

![]() Samantha Swift is back, and once again she's traveling the world in search of mysterious items, hidden object/adventure style! Welcome to the third installment in the successful hybrid series, Samantha Swift: Mystery from Atlantis!
Samantha Swift is back, and once again she's traveling the world in search of mysterious items, hidden object/adventure style! Welcome to the third installment in the successful hybrid series, Samantha Swift: Mystery from Atlantis!
 You begin in Alaska, searching for a native totem that is apparently more than it seems. As soon as you find the artifact it's taken by someone from the military, leaving you to wonder what's so special about that little thing. The answers will come as the game progresses, but the first thing Samantha and her trusty team discover at the Museum of Secrets Lost is that they need to find the pieces for a legendary item, the Harmonic Senses of Atlantis, to combat whatever threat the totem possesses. And it possesses a lot of threat...
Hidden in the totem is a meteorite, and inside the meteorite is a strange bacterium. The effects of the bacteria are two-fold: they make a person look much younger while simultaneously rotting them from the inside and making them susceptible to suggestion. An evil businessman (is there any other kind?) plans to exploit this to the fullest, creating the "Dorian Gray" skin creme (nice Oscar Wilde reference there) that will, naturally, be wildly popular in today's youth-obsessed culture. The plan is to get enough people hooked on the creme and then start the mind control via TV and the internet. Once they have enough of the bacteria, production can begin. Unless Samantha can stop them, of course.
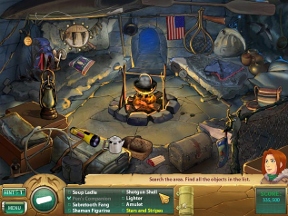
Gameplay is familiar to anyone who's played a hidden object game before. You begin each scene with a list of objects that need to be found, some of which are for your expedition, some of which go in your toolkit for later, and some of which will end up in your museum. Yellow text denotes "clues" for that object, so you might see "monkey treats" and will need to figure out that it means "bananas". Once you exhaust the first list a second one will appear, this one loaded with objects that are completely hidden from sight and can only be found by using items in your toolkit or solving puzzles in the scene.
 Of course, Samantha does have some help along the way. A limited hint system points items out, and Samantha's trusty scanner will show the outline of any object in your list. Also hanging around is your trusty PDA which carries information about each scene and enables Samantha to talk to her team back at the museum. Along with everything else there are two birds (swifts, of course) hidden in every scene. Find enough of the swifts to unlock a special bonus mode that allows you to revisit several of the hidden object scenes to compete against the clock to see how fast you can find random lists of items.
Analysis: How does Samantha Swift: Mystery from Atlantis stack up against its predecessors? Well, that's a tricky question, as the underlying structure of the gameplay has completely changed from the first and second games. Previous installments were more point-and-click adventures, wandering back and forth from scene to scene to complete an area. Mystery from Atlantis, on the other hand, has jettisoned the moving about and created a game that is much more of a classic hidden object with adventure elements. The emphasis is now on item finding, not adventuring. Is that a bad thing? Not necessarily.
In order to bolster the hidden object elements, timed and untimed gameplay modes have both been added, the former obviously providing more challenge than the relaxed timerless experience. Finding items is, naturally, more difficult as well, evidenced by the tricky yellow hints present in your list. Putting the blue "really well-hidden" items at the end of the scene was a nice touch, allowing you to fill your inventory with tools before you start the real hunt.
If you're after gorgeous hidden object gameplay with a slight adventure flavor, Samantha Swift: Mystery from Atlantis is sure to scratch that itch. Fans of the series will probably feel a pinch of sadness to see the adventure flavor so diluted in the third installment, but regardless of the shift, a superb casual game sits right below the surface.
![]() Windows:
Windows:
Download the demo
Get the full version
![]() Mac OS X:
Mac OS X:
Not available.
Try Boot Camp or Parallels or CrossOver Games.


Walkthrough Guide
(Please allow page to fully load for spoiler tags to be functional.)
Samantha Swift and the Mystery of Atlantis - Walkthrough
General
After finding the scanner in the first hidden object scene, you can decide to play in adventure mode or expert mode.
Adventure mode comes without a time limit and every object on the list will be shown as a silhouette by clicking the scanner (except objects in yellow). You will receive fewer points for each object found.
Expert mode comes with a time limit and you will only be able to click one item per scene to see its silhouette. You will get more points for each object found.
Most of the listed objects are random, except inventory items and objects in blue.
Inventory items are needed to find the objects in blue — you will need to use some of the inventory items in the same scene to solve puzzles, others will stay in your inventory for later use.
Yellow objects are little word puzzles — you get only a description of the object to find. They are random unless they are inventory items.
Blue objects can only be found by using an inventory item.
To unlock the bonus game at the main menu you will have to find two swift birds in each scene.
The bonus game contains 18 hidden object scenes with a timer — it keeps track of your best time.
Hints are obtained by finding lightning bolts. There is one in every scene.
Lightning bolts are marked in the screenshots with a yellow circle.
Swift birds are marked in the screenshots with a green circle.
Inventory items are marked in the screenshots with a blue circle.
Chapter 1: Eskimo Village, Alaska
Level 1
Find the listed objects.
Yellow objects on my list:
Fries Ingredients - potatoes
Frosty Human - snowman
Foot Garment - sock
Holds flowers fresh - vase
Open the silver box low part of the scene with the key card to find the scanner.
Use the hairdryer at the roof of the house far left to find the necklace.
Use the chain saw to cut a totem out of the log in the lower middle of the scene.
Screenshot
Level 2
Find the listed objects.
Yellow objects on my list:
Ex-Caterpillar - butterfly
Wise bird - owl
Bee Home - beehive
Foot Container - small box
Use the spear at the water low left to find the fish-pendant.
Place the beehive onto the firewood in the middle of the scene.
Watch the bear come and uncover the sled — grab first the bear, then the sled.
Drag the figurines onto their appropriate spots at the totem.
The eagle you found in the last scene goes on top.
Screenshot
Level 3
Find the 7 huskies
Now you will need the key: right top; the bone: left top; and the sausage: left middle.
Use the key to start the sledge and find a dog.
Use the sausage to lure the dog out of the doghouse in front of the house far left.
Place the bone in the feeding bowl low left and you can grab your last dog.
Screenshot
Level 4
Find the listed objects.
Yellow objects on my list:
Referee's Tool - whistle
Cold projectiles - snowballs
Criminals bracelet - handcuffs
Use the key with the snowmobile far middle to find the tank
The crank handle goes at the ple left - the weather balloon will come down.
Click the blowtorch at the target on the igloo left - a ice block falls down - defrost it with the blowtorch and grab the skull.
Screenshot
Level 5
Find the listed objects.
Yellow objects on my list:
Pen's Companion - ink and quill
Hiker's Carry All - backpack
Use the ladle to get the key out of the pot.
Use the key to open the trunk low right and get out the skull.
Place the scull onto the two holes right next to the fire place - the fire place moves and you can pick up the mask.
Screenshot
Level 6
Use the fishing rod to fish fishes out of the ice hole low left.
Watch the wale coming up - after it is gone, you can click the tooth - it will appear in the middle of the scenen.
Use ink and feather to make the engraving visible.
Screenshot
Level 7
Find the listed objects.
Yellow objects on my list:
Uncooked Steak - raw meat
Grooms Hair - comb
Girls Toy - doll
Give the steak to the wolf and he will run away - grab the mammoth teeth.
Use the starter cable with the machine low middle and pick up the gold nugget, which will fall on the ground.
Screenshot
Level 8
Find the listed objects.
Yellow objects on my list:
No sleep device - coffee machine
Click the USB stick at the screen - this will activate the printer low left corner and you can pick up a map.
Block the laser beams with the four mirrors and grab the petri dish out of the glass column.
Click the device in your inventory - a little box with a green lamp will appear low right on your screen and your cursor changes into kind of pen.
Hoover over the scene, when the green lamp blinks very fast click.
A compartment opens low left on the floor and you can get the uranium.
Screenshot
Level 9
Find the listed objects.
Each will cause a vibration.
Use the key to start the truck left side
Wait a moment and the puma pendant will glide down the snow above the truck.
Screenshot
Level 10
Your goal here is to find the matching pairs.
Click one of the object and find its matching partner.
Screenshot
Level 11
Your goal in this mini-game is, to bring the balls to their down the rings to their matching vapor color.
Line up the slots close to the posts to move the balls out of their posts.
Drag the circles around to rotate the balls so you can position them closer to their vapor color.
Drag the small ring to the matching colored vapor ring so the ball can fall into the right spot and be eliminated.
Do this with all balls and click the appearing seal plate after solving the puzzle.
Screenshot
Level 12
Find the differences.
You can find the two swift birds, but I couldn't find a lightening bolt.
Screenshot
Screenshot
Place the seal plate anywhere on the scene after finding all differences.
Place the tooth on the seal plate to finish this chapter
Chapter 2: Magnetic Island, Queensland, Australia
Level 13
Find the listed objects.
Yellow objects on my list:
Miniature World - globe
Boat Brakes - anchor
Knowledge Source - book
Pirate's Booty - gold coins
Use the knife at the shell left and grab the pearl.
Use the knife between the ship wrack and the crate right side and you will see the mermaid.
Use the key with the trunk and you will get a part of the serpent.
Screenshot
Level 14
Find the listed objects.
Yellow objects on my list:
Air under Pressure - oxygen tank
Rata-ta-ta - drum
Judge's Tool - hammer
Hot Star - sun
Place the crap at the open barrel low left corner - it will run in and come back, bringing you the shell.
Use the oxygen tank with the half empty balloon far left - it will go up and you can find the gold mask.
Place the serpent pieces one by one along the serpent silhouette by grabbing them from your inventory.
After all pieces are placed, grab the tooth.
Screenshot
Level 15
Find the listed objects.
Yellow objects on my list:
Returning Weapon - boomerang
Animal Footwear - horse shoe
Use the blossoms to lure the koala bear hidden behind the leafs top middle.
Pick up the statue, the koala will throw on the ground.
Use the chicken to feed the crocodile - grab the spear head from the crocodile's tail.
Give the tooth to the Aborigine and get a paper for trade.
Click the paper at the rock low left and click the the coal pen on it - the map will be drawn.
Screenshot
Level 16
Find the listed objects.
Use the tent pole at the tent far right - it will open and you can grab the drum.
Feed the kangaroo with the grass - get the bullroarer it will kick in your direction.
Place the coal on the fire and an Aborigine will appear behind the far left tent - click him to get him into your inventory.
Screenshot
Level 17
Find the listed objects.
Place the bullroarer in the middle.
Get the Aborigine into your inventory.
Place both Aborigines in the middle of that plate.
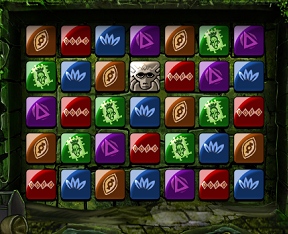
Now you will need two play a match-3 game.
Your goal is to bring the Aborigines, appearing at the top of the board, down, so that they can fall out.
Combine 4 or more tiles to get power up stones.
After finishing, place all Aborigines onto their places on the bullroarer.
You will have to wait till the wind or rain disappears before you can place the next one.
Screenshot
Click on the serpent sense of taste that appears after all the Aborigines are in their right place.
After the cut scene place the serpent of taste on the harmonic device.
Chapter 3: Geomagnatic North pole, North-West Greenland
Level 18
Find the listed objects.
Yellow objects on my list:
Shellfish Home - shell
Use the axe with the log low left to find one of the medallions.
Click the oar and the sail at the ship on the water far middle - it goes to the right and you can get a medallion from the left side of the ship.
Place the X-Stone in the according slot right side and get Thor's hammer.
Screenshot
Level 19
Find the listed objects.
Yellow objects on my list:
Second Eyes - glasses
Measuring Temperature - thermometer
Click the glasses onto the ice where you see the sunspot - it will melt and you can get the dinosaur.
Use the crowbar to move the stone low left, where you can see a red shimmer.
Use the laser cutter to break of the lower parts of all four icicles
Pick up the ancient valve, you will now find low middle.
Screenshot
Level 20
Find the listed objects.
Yellow objects on my list:
Sand Time - sand clock
Use the slingshot to shoot down all icicles.
As this you will find the pearl and the pendant.
Place both pendants right and left next to the stairs and the pear above the door.
The door opens and the main gear comes out. Pick it up low right.
Screenshot
Level 20
Find the listed objects.
Yellow objects on my list:
At rainbow's end - pot with gold
Attracts fishes - fishing hook
Don't divide by this - carabiner
Click the valves at the open pipe around the right plate.
Clean the left plate with the brush.
Click the gears onto the right plate.
Click the main gear onto the left plate
A mini-game will open.
Screenshot
Your goal is to bring all golden leaves down into the inner circle.
Drag the circles around so you can line up the gears.
Filling the gears with the leaves require you to line up a filled gear with an empty one.
The leave in the filled gear will fall into the empty slot.
The game will be completed once the center gears are all filled with leaves
Screenshot
Now click the four lava gears into your inventory.
Place them onto the little columns which appeared.
The Bear Sense of Smell will appear in the upper right side of the wall, click on it.
Screenshot
After the cut scene place the sense of smell on the harmonic device.
Chapter 4: Museum, USA
Level 22
Find the listed objects.
Yellow objects on my list:
Flat round music - CD
Click the dart at the dartboard left side - a pearl falls down for you to pick up.
Use the USB-cable with the camera left on the desk and grab the pictures appearing on the laptop screen
Get the book and place it into the empty spot on the bookshelf far middle.
The desk drawer opens and you can get the totem shard.
Screenshot
Level 23
Find the listed objects.
Yellow objects on my list:
Horse Treat - sugar cubes
Click the brush at the laptop, where you can already see finger prints.
Click again and a mini-game opens.
Your goal is to find right side the finger print matching the one on the left side.
Screenshot
Click the sugar into the coffee left side and get the cup.
Click the eyedropper at the green liquid middle left.
Get the eyedropper back into your inventory once it is filled.
Screenshot
Level 24
Find the listed objects.
Yellow objects on my list:
Girl's best Friend -diamond
9 dots - domino
Absorbs Water - sponge
Get the key and open the suitcase left on the working table and take out the device.
Use it to find 5 bugs with shiny dots on their back.
Screenshot
After finishing this task get the stone out of the inventory and place it on the microscope - click the green stones.
Screenshot
Level 25
Find the listed objects.
Yellow objects on my list:
Man's best Friend - dog
Click the UV-lamp above the painting.
Click the symbols appearing on the painting.
Get the picture roll and click it onto the empty frame far right - click the castle, the painting is showing.
Use the tape to repair the wire left side.
Get the red sphere, appearing right above the painting on the left.
Screenshot
Level 26
Find the listed objects.
Yellow objects on my list:
....and Chips - fish
Protects Hooves - horseshoes
Not gentlemen bug - ladybug
Open the crate far left with the crowbar and get out the elephant.
Use first the paint remover on the painting on the easel, far middle, then the cotton swap.
Get Van Gogh's painting.
Click the horse shoe at the statue far middle - the horse will kick the scanner update onto the floor.
Screenshot
Click the scanner and the scene will be green.
Find identical pairs.
Screenshot
After the cut scene insert the sense of hearing into the harmonic device.
Chapter 5: Rick's Cafe, Casablanca/Mermaid's Cove, Morocco
Level 27
Find the listed objects.
Yellow objects on my list:
Counts Rhythm - metronome
Beats Paper - scissors
Third Leg - walking cane
Screenshot
Level 28
Find the listed objects.
Yellow objects on my list:
Fire - Enemy - fire extinguisher
Portable Breeze - hand fan
Screenshot
Level 29
Find the listed objects.
Yellow objects on my list:
Polly wants this - cookie
Regal Hat - crown
Give the cookie to the parrot - he will fly away and you can get the dolphin statue.
Click the magnifier at the leaves - it will start burning - Place the paper above the flames till you can get the drawing.
Use the hammer to open the coco nut low middle and pick up the ring.
Use the gear at the machine far right - after the trunk is on the shore use the crank to open it.
Screenshot
Level 30
Find the listed objects.
Yellow objects on my list:
Cleans Floors - broom
Place the oxygen tank next to the air pump left beside the barrel - the barrel will lift up and you can get the key.
Use the glove to get fish out of the ice box right side.
Use the key to open the suitcase far left on the stairs.
Click the sonar and click it again to end the scene.
Screenshot
Level 30
Find the listed objects.
Yellow objects on my list:
Holds Liquids - bottle
Use the knife to cut the net left side on the statue
Use the lever at the window left side.
Give the shrimp to the fish, appearing ever and ever again low left at the niche.
Screenshot
Your goal in the following mini-game is to bring the divers to there color according excavation
There ways are not allowed to cross and they are not allowed to use the same crossing.
To bring a diver to its excavation drag him with pressed left mouse button along the way you want him to go.
A colored line will mark his way.
Several solutions are possible.
Screenshot
Click the dolphin sense of thought when it appears.
After the cut scene insert the sense of thought into the harmonic device.
Chapter 6: Liberty, Alexandria
Level 32
Find the listed objects.
Yellow objects on my list:
Battle Helmet - roman soldier helmet
King Animal - lion
The golden eye goes onto the eye drawing left side at the wall.
Place the paper onto the stone low right.
Then use the scissors to cut half of the paper.
Screenshot
Click the chess board and place the chess figures at their according places.
Screenshot
Level 33
Find the listed objects.
Yellow objects on my list:
Sharp - Eye Bird - eagle
Get the seal out of the fire bow far left.
Place the pearl into the left statue's hand - a ring will fall down
You will have to come back later.
Screenshot
Level 34
Find the listed objects.
Yellow objects on my list:
Attracts Metal - magnet
Winged Postman - pigeon
Horned Horse - unicorn
Use the magnet to the get the silver chain out of the first hole seen from down.
Use the bow to shoot down the apple on the statues head far left and pick up the scroll, that falls on the ground.
Use first the gong on the stand low right, then use the gong stick at the gong.
The gong will show now a shield you can grab.
Screenshot
Level 35
Find the listed objects.
Yellow objects on my list:
Pocket Bank - wallet
Lifts cars - car jack
Get the torch and light it at the fame right side.
Take the torch, get it out of your inventory again and light the fire in the other bowl.
Pick up, what falls on the ground.
Use the car jack to wider the door in the tunnel and grab the lion.
Click the hands under the face above the arch.
Screenshot
Level 36
Find the listed objects.
Yellow objects on my list:
Voice Amplifier - microphone
Color Picker - palette
Click on golden band at the left, the other one at the right statue - this will free your way to the bust.
Click the three golden planets at the planet ball right side - wait a moment and you can grab the golden sphere.
Click first the spyglass into the round opening low part of the scene, then the ship wheel.
Get the map.
Screenshot
In the libary are no more birds or lightening bolts.
Click first the chains and then the owl at the stone coffin right side
Screenshot
In the following puzzle move the circles till the owl is restored.
Circles in the right place will lock.
Click the owl sense of sight.
After the cut scene insert the sense of sight into the harmonic device.
Chapter 7: Remote Village, Congo
Level 37
Find the listed objects.
Yellow objects on my list:
Shiny Rock - diamond
Make a wish -wishing bone
Bull's Weapon - horns
Second Face - mask
Give the medicine man first the drum - he will give you a xylophone.
Click first the xylophone, then the stick on the stand low left.
Now give the bag to the medicine man and after this all other objects in your inventory.
Screenshot
Level 38
Find the listed objects.
Yellow objects on my list:
Mini spotlight - flash light
Upper Limp Trace - hand
Pirate Flag - crossed bones
Place the frogs on the leaves top left - he will throw down arrow and bow - the bow will open one of the plants low left.
Use the blow pipe to destroy the bottle top middle and get the diamond.
Now place the medicine bag onto the coals in the bowl - a door opens far right for you to grab the gorilla.
Screenshot
Level 39
Find the listed objects.
Yellow objects on my list:
Seal/Sound/Radio - waves
Sweep away the leaves on the ground with the broom and find the necklace.
Place the hat onto the skull - below the skull a letter appears.
Use the flute with the jar - a medallion falls on the ground.
Use this amulet and place it into the empty spot on top of the altar.
When the fire is done with "drawing" the map, place the wooden plank above it.
Screenshot
Level 40
Find the listed objects.
Yellow objects on my list:
Monkey Treat - bananas
The bananas will make the monkey right side go away and you can grab the helmet.
The tusks at the elephants, each click will give one elephant two tusks, so you will want to click three times.
After all elephants do have theirs tusks, the most back one will blow free the grave stone.
Click Sword and helmet at the grave stone and you will get the ring from the first elephant.
Screenshot
Level 41
Find the listed objects.
Click the hose at the bucket left side and wait till it is filled.
Get the key out of the bucket and use it with the keyhole low left at the stone wall.
Screenshot
In the following mini-game your goal is to find the sequences shown on the right in the grid in the center of the scene.
Click on the tiles in the order shown.
The tiles need to be connect horizontal, vertical or diagonally.
Screenshot
Click the monkey sense of touch after you finished the mini-game.
After the cut scene insert the sense of touch into the harmonic device.
Final
Place the amulet in the water and enjoy the end.
Screenshot
Posted by: Jay |
December 20, 2009 3:38 PM
|
December 20, 2009 3:38 PM