
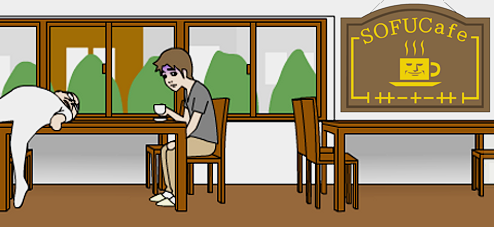
![]() Just when you think it couldn't possibly get any weirder, at least not without appearing in its own segment of Tosh.O, along comes Detarou out to prove you wrong. Yes, it's really oh so wrong. Yet, if, for some reason unbeknownst to you, you can't help smiling when you know you should be cringing, then come on inside SoFu Café for an escape-the-room experience that is clever, unique and very creative—all in the most inappropriate ways. But getting out of this place means delving quite a bit deeper than you may want to go, all for the sake of gathering needed items and solving puzzles so you can, finally, unlock the door and leave.
Just when you think it couldn't possibly get any weirder, at least not without appearing in its own segment of Tosh.O, along comes Detarou out to prove you wrong. Yes, it's really oh so wrong. Yet, if, for some reason unbeknownst to you, you can't help smiling when you know you should be cringing, then come on inside SoFu Café for an escape-the-room experience that is clever, unique and very creative—all in the most inappropriate ways. But getting out of this place means delving quite a bit deeper than you may want to go, all for the sake of gathering needed items and solving puzzles so you can, finally, unlock the door and leave.
 Although the visuals may be jarring, SoFu Café's design is very smooth with a remarkably intuitive interface, providing a truly pleasant gameplay. A simple click does most everything except decipher the codes for you. Navigate by clicking the edges of the screen wherever a grey bar appears to turn or back up, or clicking a doorway to go through it. Follow the changing cursor to find, and click on, the active areas in a scene. For inventory, click an item once, highlighting it before use, or click it a second time to bring up its detail screen. There'll be times you'll want to combine inventory so just a few clicks takes care of it all. Which brings me to something else you'll want to click on: the "SAVE" button. With three possible endings, one of which is not so happy, it's best to save frequently, especially before panda interactions.
Detarou has never shied away from strangeness and doesn't mind being inappropriate. Those who'd rather not have their sensibilities offended should give SoFu Café a wide berth, passing it by on the sidewalk with adverted eyes and a quickened pace. It's debatable whether this is the most offensive Detarou to date, but it isn't as overtly suggestive as Dream Factory. Still, SoFu Café won't likely appeal to non-fans. Fans themselves may be disappointed by its abbreviated length, a couple pixel-hunts and some vague directives. Even so, the inventive clue presentation, wacky item uses and properly challenging puzzles add up to great fun. The logic is sound but there are enough red herrings to leave you questioning each step. You might well ask: "Why in the world is there a hippo in here?" And, more bewildered: "I am supposed to do what???" Well, yes...how badly do you want to escape anyway?
Game not loading? Try this alternative link.


Walkthrough Guide
(Please allow page to fully load for spoiler tags to be functional.)
SoFu Cafe Walkthrough
Explore the Cafe Room
You start the game in the cafe and facing the area around the exit door. To the left of the door is a "SOFUCafe" sign on the wall. Click it for a close-up view.
At the bottom of the sign you'll see something curious.
There is a line of positive and negative symbols that reads: + + - + - + +. That looks important, so jot down a mental note for later.
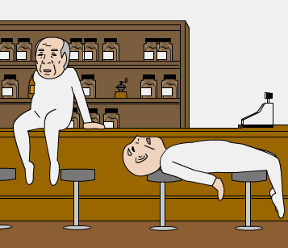
Back away from the sign, then click the man lying on the wall shelves to examine that section of the room.
On the left side of the counter under the older gentleman you'll find a box closed tight with two screws, and on the right side is an odd case with a glass front. Below the counter is a row of three cabinets. Let's take a look at the cabinets first...
The cabinet on the right is empty, but there's an odd black line going across the bottom.
The line continues into the middle cabinet where you'll also find a series of black and white circles. Take note of the pattern: Black - White - White - Black - White.
Open the left cabinet next. Move the cardboard box to the right to uncover what lies at the end of the black line: an arrow pointing to the left.
Back up from the cabinets and then examine the strange disc case with the glass cover on the right side of the counter.
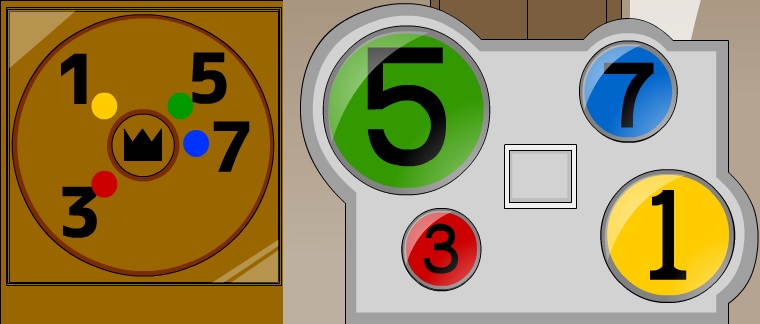
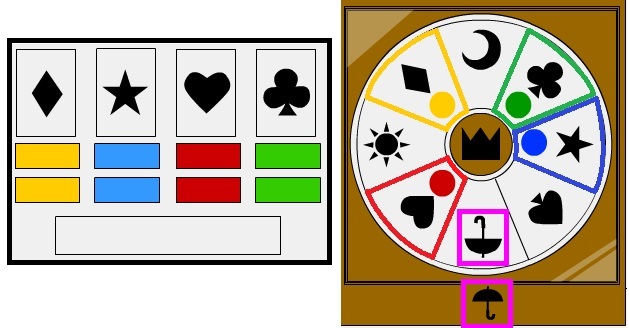
First, open the front lid and take the RED DISC inside. Now the crown symbol at the center and the four numbers (1, 3, 7, and 5) should be clearly visible.
While the lid is open, you can also see an umbrella symbol at the bottom of the case.
Re-close the lid and have another look at the numbers in the circle. You'll now see four colored dots beside each number.
Memorize the colored dot beside each number.
The number 1 is marked with a yellow dot.
The number 3 is marked with a red dot.
The number 7 is marked with a blue dot.
The number 5 is marked with a green dot.
Move back twice and then turn left to face the bar. You should see a locked door, a cash register, and three lounging old men. Click the old man lying on the bar stools to zoom in.
Click his mouth to remove the DIRTY DENTURES.
Back up and turn left again to face another door and a grey box. Open the door to look inside the bathroom.
Inspect the toilet seat lid to find a colored button puzzle. Above the puzzle is a familiar crown symbol. You're still missing some vital clues to solve this one, so you'll have to come back later!
Move back twice, then click the grey box two times to look inside. There's an old man hiding here with two curious spots on top of his head.
Now you're done looking around the room for now, it's time to get solving! Ignore the side of the room with the dining tables, you'll find nothing there but nightmares...
Solve the Polka Dot Puzzle
Look inside the grey box by the bathroom door. There's an old man hiding here, and on his head you'll see a white dot and a black dot.
You can click the dots to poke them, but you'll need to know the right order first!
HINT:
There are black and white dots just like these somewhere else in this room! Do you know where to find them and why they're important?
SOLUTION:
The dots you found earlier in the middle cabinet are the clue to solving this puzzle.
There's one small twist: don't forget the arrow in the left cabinet! It's pointing to the left, indicating that you should read the pattern of black and white dots from right to left.
With that in mind, click the man's head to zoom in then press the buttons in the following order: White, Black, White, White, Black.
If you've entered the correct solution the old man should stand up out of the box, revealing two new symbols on his body.
Looks like you've got another puzzle to solve already!
Solve the Positive(+)/Negative(-) Puzzle
When the old man stands up out of the grey box once the polka dot puzzle is solved, you'll be able to clearly see a positive sign (+) on the left side of his chest and a negative sign (-) on the right side.
Click his chest to zoom in. You can click either side to press it, but just like before, this puzzle calls for a specific order.
HINT:
Same as the last puzzle, the solution is in plain sight somewhere around the room. All you have to do is find it and recreate it on the... let's call them "buttons".
SOLUTION:
The pattern at the bottom of the SOFUCafe sign has all you need to solve this one!
Simply press the + or - buttons on the man's torso in the same order that the matching symbols appear on the cafe sign if you were to read it from left to right:
+ + - + - + +
After the puzzle is solved the man will try to climb out of the grey box and topple it over. Look inside the overturned box to find a SILVER KEY.
Back up and turn right to face the bar area. Click the door for a closer look, then use the SILVER KEY to unlock it.
Click the opened door to enter the back room.
Explore Some of the Back Room
When you first enter the room you'll be facing the back wall and an alcove. Move right to turn towards the man sitting on the cabinets, then click to walk towards him.
If you have a look at the man you can see he's holding a screwdriver in his hands. Those things are always so handy for an escape, but he doesn't look willing to give them up freely. We'll have to come back later when we have something to exchange.
Next, search inside the drawers underneath the man.
The top drawer is empty and unimportant.
The second drawer contains a box of denture cleaners and an opened packet with a DENTURE CLEANER TABLET you can take.
The bottom drawer has an interesting pattern you should take note of: a red sun with a circle of arrows pointing in a counter-clockwise direction.
Back away from the drawers, then look inside the right cabinet.
You'll find an odd set of kokeshi dolls. Each of them appear to be identical, except for the fact they're turned to face different ways.
Back up twice and then turn left twice. There it is. The hippo. Give it a click to walk closer.
You can examine two areas of the hippo, which can be a bit hard to spot at first. Click around the tail to view the rear end or click under the hippo's belly to find a hidden button panel.
Time to solve another puzzle!
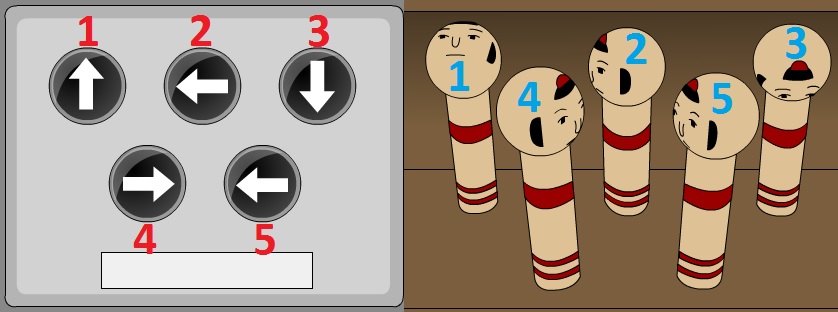
Point the Hippo's Arrows
Search underneath the hippo's stomach to find a panel with 5 arrow buttons. You can click each button to rotate the arrow 90 degrees clockwise.
HINT:
Although you won't find more arrows anywhere, it's important to note that these ones can change direction. What else in this room is seen in multiple different directions?
SOLUTION:
Use the direction each kokeshi doll found in the cabinet is looking to determine where the arrows should point.
The top three dolls correspond to the upper three buttons and the bottom two dolls do the same to the lower two buttons.
The first doll (left doll in the top row) is looking UP. The middle doll is looking LEFT. The right doll is looking DOWN. In the next row, the left doll is looking RIGHT and the right doll is looking LEFT.
Turn the arrows to duplicate the same order, then press the long button at the bottom to enter your solution.
Solution.
If you entered the right combination, a man will appear at the hippo's rear end. Click back there to take a look.
Take the EMPTY GLASS out of the man's mouth.
Back up twice, then turn left to view the area around the door where you came in. Inspect the sink in the middle of the wall.
Click the tap to turn on the water. Fill the EMPTY GLASS to make it a GLASS OF WATER.
Combine the GLASS OF WATER with the DENTURE CLEANER TABLET to create the CLEANING SOLUTION.
Add the DIRTY DENTURES to the fizzy solution, then click the glass to separate the CLEAN DENUTRES and the glass of DIRTY WATER.
Back away from the sink and move towards the bed.
Click the middle of the blanket to lift it off of the man. Pour the DIRTY WATER on the sleeping man's pants.
Try to move backwards. The man will wake and sit up from his bed.
Click the pillow to zoom in and look underneath it to find a MASK.
Go back twice and left once to face the cabinets again. Examine the man with the screwdriver again.
Click his head for a closer look, then place the MASK on his face. Click the mask to snap it on his face.
Take a look at his hands. The SCREWDRIVER on his lap is finally free for the taking!
Go back to the cafe room, then turn left to face the man lying on the shelves. Click the locked box at the left side of the counter to zoom in.
Use the SCREWDRIVER to remove the screws keeping the lid locked. Take the SOCKET WRENCH from the opened box.
Return to the back room. Turn right and examine the large cupboard to the left of the sitting man.
Open the Colorful Cupboard Lock
You'll find a misshapen button panel at the center of the cupboard. You'll see four colored buttons of different sizes and a grey square button in the center.
You can click each button to cycle through the numbers 0 through 9, but do you know the correct combination?
HINT:
The size of the buttons or their orientation on the lock are not relevant to solving this puzzle, you can completely ignore those red herrings.
All you need to find is a clue with all four colors (red, green, blue, and yellow) and four numbers that you only need to enter into the lock.
If you've been following the walktrhough, you should have already seen this clue in the cafe room. Can you guess what it is?
SOLUTION:
Simply enter the numbers seen next to the colored dots inside the disc case at the cafe room.
When you examine the case with the lid closed a yellow, red, blue, and green dot appeared next to four of the numbers inside the circle.
The green dot was next to the number 5. Enter 5 in the green button at the upper left side of the lock.
The red dot was next to 3. Enter 3 into the red button at the lower left side.
The blue dot was next to 7. Enter 7 into the blue button at the upper right side.
The yellow dot was next to 1. Enter 1 into the yellow button at the lower right side.
Press the square button at the center to enter your solution.
Solution.
The lock will disappear if you entered the correct combination. Click the cupboard doors to open them.
Remove the panel at the back to reveal a pipe half-filled with water.
Examine the bolt at the middle of the pipe. Attach the SOCKET WRENCH to the bolt, then turn the wrench to start the flow of water.
Move back twice and turn left.
Solve the White Disc Puzzle
Once you've turned on the water, the area around the back wall will change. A new wall covers the section that was the alcove and a hidden door to the right of that has opened up.
Click the new wall to zoom in for a closer look.
You'll see a series of symbols alternating between solid black shapes and two thin circles.
From left to right, the order is: Star (circles) Moon (circles) Star (circles) Diamond (circles) Umbrella (circles).
Next, back up and inspect the disc on the wall that was previously concealed behind the secret door.
HINT:
Some of the symbols on this white disc are identical to the ones you saw on the wall! Don't forget the circles, they're important too.
SOLUTION:
Line up each symbol at the top of the white disc in the order it appeared on the wall if you were to read the series from left to right. You can click the disc to rotate it clockwise.
Once a symbol is correctly positioned, press the white button at the center to enter it in.
For example, the first symbol on the wall was a star. Turn the disc so that the star is at the top and press the center button. Continue to follow this process until you've entered the full combination:
Move Star to the top and push the button.
Move Moon to the top and push the button.
Move Star to the top and push the button.
Move Diamond to the top and push the button.
Move Umbrella to the top and push the button.
If you entered the code in the correct order, the dial pops off, allowing you to remove the WHITE DISC.
Go back to the cafe room and turn left to face the shelves and cafe sign.
Open the Toilet Lock
Inspect the disc case with the glass cover on the counter. Click to open the lid.
Place the WHITE DISC inside the case. The orientation of the disc is important - can you interpret the clue at the bottom of the case?
Rotate the white disc so that the umbrella symbol on the disc is aligned with the umbrella symbol imprinted on the case at the 6 o'clock position.
Close the glass lid to add the colored dots to the picture. Memorize each marked symbol and the color of the dot it is next to:
The Club is green, the Star is blue, the Heart is red, and the Diamond is yellow
Move back twice and turn left twice to face the bathroom. Open the door and inspect the toilet seat cover.
SOLUTION:
Arrange each symbol on the lock over the bars that match the color of the dot next to that symbol on the white disc inside the case.
For example, one of the indicated symbols on the white disc is the Club. The dot next to the Club is the color green. Therefore, the symbol over the green buttons - the buttons at the far right side of the lock - must be the Club.
Plug in the rest of the marked symbols you found on the white disc to complete the combination:
On the disc, the Diamond symbol is marked with a yellow dot. Select the Diamond above the yellow buttons on the toilet lock (at the far left).
The Star symbol is marked with a blue dot. Select the Star above the blue buttons on the lock (at the inner left).
The Heart symbol is marked with a red dot. Select the Heart above the red buttons on the lock (at the inner right).
The Club symbol is marked with a green dot. Select the Club symbol above the green buttons on the lock (at the far right).
To clarify, the final order of the combination from left to right is: Diamond, Star, Heart, Club.
Push the long, grey button at the bottom to submit your answer.
Solution.
The toilet lid will open when the correct combination is entered into the lock.
Take the FLAT KEY inside the toilet bowl water.
Return to the back room.
Solve the Red Disc/Digital Board Puzzle
When you enter the room, examine the area where you first retrieved the white disc (behind the revealed secret door). If this area is closed off, go to the cupboard and click the wrench to turn the water on which will reopen the door.
Click the circular area around the middle of the wall to zoom in. Make sure the cover over the circle is lifted, then place the RED DISC inside.
Push the button at the center to start the device.
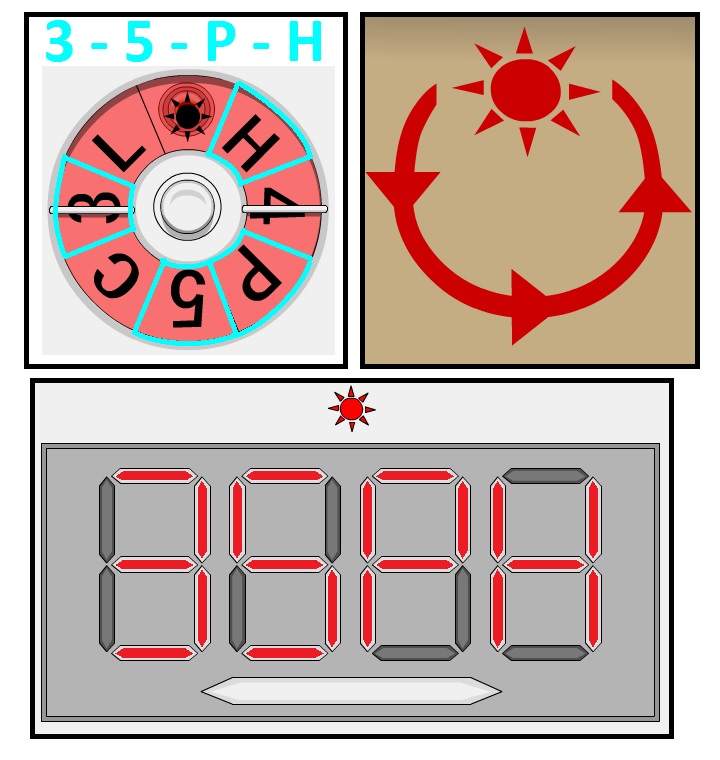
Watch the red disc as it spins around. Pay very close attention to which of the points on the disc get illuminated as they pass over the top of the circle.
By order of initial appearance, it's: 5 - P - H - 3 (this specific order is not at all important, don't worry about memorizing it. You only need to know the symbols themselves for the time being.)
Also take a mental note of the one symbol on the red disc: a Sun. This, on the other hand, is very important!
Move back twice turn to the right and look inside the large cupboard.
Remove the back panel to view the water pipe. Pull the wrench attached to the pipe to shut off the water.
The other side of the room should now have returned to how it first appeared; the secret door is closed and the alcove is open.
Back up twice and turn left, then inspect the area inside the alcove.
Click the grey, rectangular panel against the back wall to zoom in.
Place the CLEAN DENTURES inside the indentation in the panel that is shaped like an upside-down U to reveal the keyhole.
Insert the FLAT KEY into the lock. A digital board will appear with four blank digits, each made of seven segments which you can click to turn on or off.
HINT:
It shouldn't be hard to guess which characters you need to recreate on the board, since you've already seen them highlighted just a few moments ago. But do you have them in the right order?
It won't work if you try to copy the order which you first saw illuminated. No, you need think a step further!
The sun symbol on the red disc and at the top of the board is the important clue in determining the correct combination.
SOLUTION:
First, refer to the red pattern you found in the bottom drawer underneath the masked man. There you'll see a red sun at the top of a circle made up of a three arrows that pointed counter-clockwise.
Switch the water back on if you need to and watch the red disc spin. Wait for the sun to be at the top position.
Now, you already know that it's the symbols, 5 - P - H - 3 that get illuminated when they pass the top area. But combine that combination with the counter-clockwise pattern you found in the drawer and that order changes.
The new combination if you read the wheel counterclockwise with the sun as your starting position is 3 - 5 - P - H.
You'll have to switch the water back off if you turned on to re-access the digital board.
Click the line segments to create the four-digit combination on the board. Press the long button at the bottom to enter the combination.
Solution.
A cache in the back wall of the alcove is revealed once the correct combination has been submitted.
Click the compartment to zoom in and take the GOLDEN KEY.
Bad Ending (1)
Go to the back room and turn to face the masked man sitting on the cabinets. Open the door to his right to enter the panda room.
Make sure to save first if you haven't already! Approach the man in the panda costume standing in front of the camera.
A trapdoor opens up under your feet and drops you down below. Tricked again! :(
Escape Ending (2)
Play the game up to the point where you take the GOLD KEY.
Go to the cafe room and turn towards the door by the SOFUCAfe sign and the man lying on the shelves.
Click the door to zoom in on the golden doorknob, then unlock it with the GOLD KEY.
If you haven't yet earned the "Perfect Stamp Ending" be sure to save your game here!
Go through the opened door to escape. A perfectly average ending... or as average as Detarou gets.
Perfect Stamp Ending (3)
Play up to the point of the normal "Escape Ending" where you unlock the exit door with the GOLD KEY. But DO NOT EXIT THROUGH THE DOOR!.
Instead, back up and return to the back room. Something here is different, can you find what's changed since the last time you were here?
Look inside the right cabinet under the masked man.
All of the kokeshi dolls are now looking straight up! You know what to do next, right?
Turn around and look under the hippo's belly.
Rotate the arrows so that all of them are pointing upwards, then push the button at the bottom.
Click the hippo's mouth to look inside and take the RED STAMP. A winner is you!
Now you can safely return to the cafe room and go out the exit door, RED STAMP in hand, to receive the Perfect Stamp Ending!
Easter Egg
Before you escape, you may notice one item in your inventory isn't greyed out and and can still be used...
You still have the EMPTY GLASS! Go to the sink in the back room and fill it up at the tap to make a GLASS OF WATER.
Turn left and go through the door to the right of the masked man to enter the panda room. Are you thinking what I'm thinking?
Splash the giant panda on the right with the GLASS OF WATER (don't go near the left one!).
You can click the trapdoor in the floor to take a peek at your captives. Sweet vengeance!
Posted by: Trinn |
July 1, 2013 12:10 PM
|
July 1, 2013 12:10 PM