
The Book of Unwritten Tales: The Critter Chronicles
Platform: Mac, Windows, Linux

![]() Hey there, adventure gamer! Remember the good old days when your favorite genre was funnier than a car full of clowns crashing into a kazoo factory? Ok, while it doesn't take much to top that colorful feat, you've got to admit you miss the days of The Secret of Monkey Island at least a little bit. Here to soothe those old wounds is KING Art with its release of The Book of Unwritten Tales: The Critter Chronicles, a prequel to The Book of Unwritten Tales that goes all-out for some fantastic laughs, never sacrificing a solid puzzle in the process.
Hey there, adventure gamer! Remember the good old days when your favorite genre was funnier than a car full of clowns crashing into a kazoo factory? Ok, while it doesn't take much to top that colorful feat, you've got to admit you miss the days of The Secret of Monkey Island at least a little bit. Here to soothe those old wounds is KING Art with its release of The Book of Unwritten Tales: The Critter Chronicles, a prequel to The Book of Unwritten Tales that goes all-out for some fantastic laughs, never sacrificing a solid puzzle in the process.
 Meet Nate Bonnett, an airship "captain" who sounds like Bruce Campbell and doesn't know the ship's stern from the disapproving look his mother always gave him. Not that it really matters, though, because he's being chased by a bounty hunter who claims he stole the ship from a fat pirate and she's going to bring it back for the reward. That little claim of hers is pretty much the truth, but Nate's not gonna sit around and let her play winner. He's going to fight back. With confetti and cotton balls!
Before you know it, Nate wakes up bound to the ceiling in an ice cave with a totally real and legit yeti preparing to turn him into a stew. And then Critter walks by. Those of you who played the first Unwritten Tales game will recognize Critter and should be delighted to know The Critter Chronicles features quite a bit of the little guy (and his kin) wobbling about on the cold wastelands. In fact, after controlling Nate for the first chapter, most of the game switches between main characters, allowing you to see and interact with two sides of the story, not to mention Critter's own woes.
 Analysis: For the most part, The Critter Chronicles is structured like a standard adventure game, complete with inventory puzzles, clicking things to examine them, and lots of great dialogue. There are some great additions to the experience that make it a decidedly more casual affair, including a few mini-games and the always handy "press [spacebar] to see what you can click on so you don't have to pixel hunt and wear your mouse button out" feature.
Humor is definitely the most appealing aspect of The Critter Chronicles. The jokes are almost as frequent as a sitcom, but it's much more than a few one liners belted together with a crude story. Expect parodies both large and subtle, jokes that break the fourth wall, scenes ripped and contorted from Star Wars and Harry Potter, and plenty of things that will make you roll your eyes in comical exasperation. Critter Chronicles is very well-written, from the humor to the storyline, and that quickly becomes a sticking point to keep you glued to the game.
Apart from its phenomenal presentation and surprisingly awesome voice work, The Critter Chronicles is actually a solid adventure game. Imagine that! The puzzles may seem a little obtuse at times (like the confetti thing near the beginning), but once you settle in to the game's quirky rhythm, things begin to make a lot more sense. Get ready for half a day of hilarity wrapped around some great adventure gaming moments!
![]() Windows:
Windows:
Download the demo
Get the full version (via GOG)
![]() Mac OS X:
Mac OS X:
Download the demo
Get the full version (via GOG)
![]() Linux:
Linux:
Download the demo
Get the full version


Walkthrough Guide
(Please allow page to fully load for spoiler tags to be functional.)
The Book of Unwritten Tales: The Critter Chronicles Walkthrough
Chapter 1: Freedom
Deck
Look at the wine bottle at the bottom of the steam engine.
After inspecting the bottle, you can take the CORKSCREW from it.
Inspect the rubber hose at the right side of the steam engine.
Click the HOSE again to add it to your inventory.
Look inside the keg at the left side of the cannon to find the EMPTY POWDER KEG.
Open the treasure chest on the right side of the cannon.
Take the CONFETTI, HORN, and the MARDI GRAS THING from the opened chest.
Go down the hatch into the Captain's Cabin.
Captain's Cabin
Look at the wooden figure above the table to speak to Mary.
Inspect the make up table at the bottom of the vanity mirror.
Click the make up tools to pick up the POWDER, COTTON BALLS, and SULFUR POWDER.
Read the documents on the table under Mary, then take the PAPER CLIP from the papers.
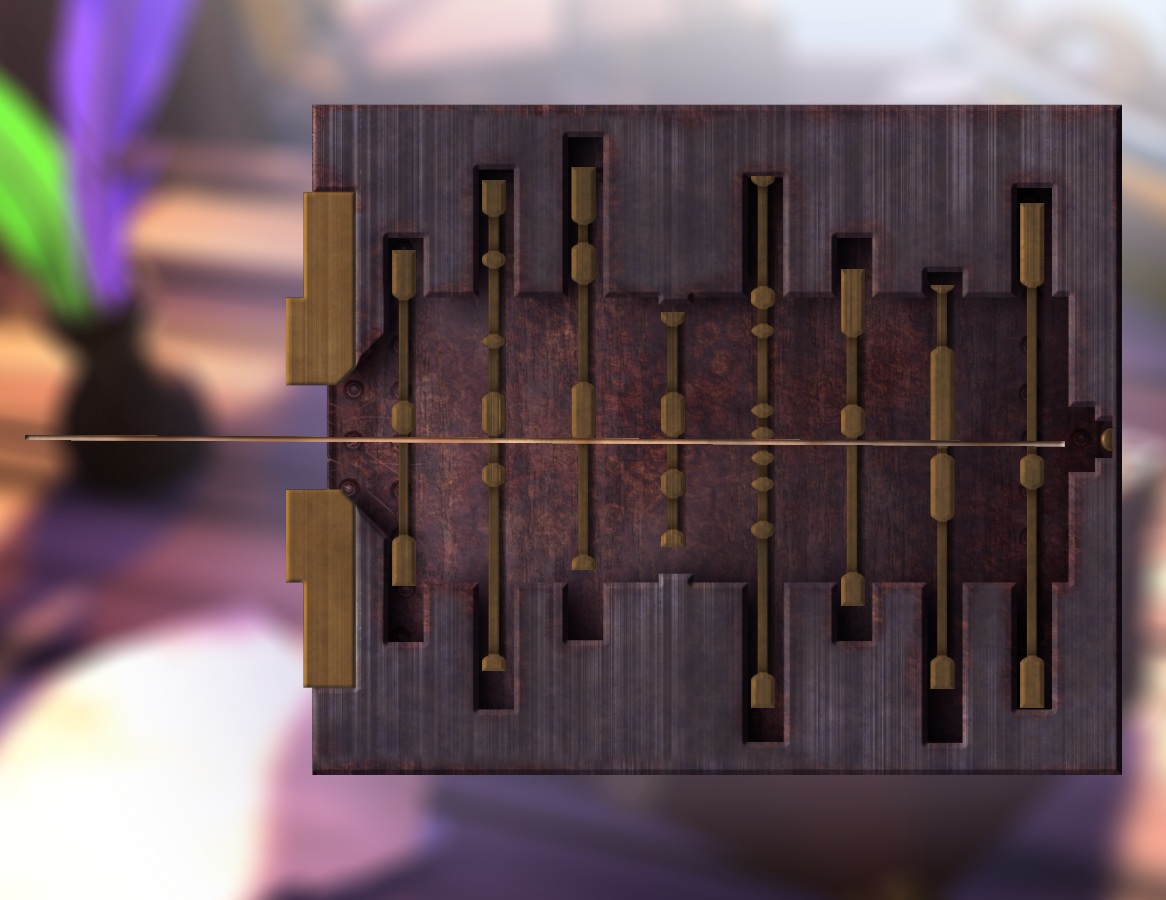
Use the PAPER CLIP on the box at the right side of the table to start the puzzle.
Angle and move the paper clip to lift the tumblers and reach the right side of the lock.
Click and drag the cursor to lift the clip up, down, left, or right.
The tumblers can be lifted up or pushed down until they hit the top or bottom sections of the lock.
Solution.
After the puzzle is solved, the CIGAR will be added to your inventory.
Search the wardrobe to find the SKELETON ARM.
Use the CORKSCREW (from the wine bottle at the Deck) to remove the cork from the bottom of the large barrel.
Pick up the saltpeter powder with the EMPTY POWDER KEG (from the large keg at the Deck) to receive the POWDER KEG WITH SALTPETER POWDER.
Add the SULFUR POWDER to the keg to make the POWDER KEG WITH SALTPETER/CHARCOAL POWDER MIXTURE.
Inspect the oven to open the door.
Use the SKELETON ARM to poke around the ashes inside the oven.
Take the piece of CHARCOAL that the skeleton arm throws on the floor.
Attach the HOSE (from the steam engine at the Deck) to the CIGAR to make the HOSE WITH CIGAR.
Use the combined HOSE WITH CIGAR on the embers in the oven to make the GLOWING CIGAR.
Go back out to the Deck.
Deck
Insert the CHARCOAL (from the oven at the Captain's Cabin) into the coffee grinder at the bottom of the mast.
Combine the CHARCOAL POWDER with the POWDER KEG WITH SALTPETER/CHARCOAL POWDER MIXTURE (from the barrel and make up table at the Captain's Cabin) to complete the POWDER KEG WITH GUNPOWDER.
Put the POWDER KEG WITH GUNPOWDER in the cannon.
Load the CONFETTI into the cannon.
Light the cannon with the GLOWING CIGAR (from the oven at the Captain's Cabin) to fire the first shot.
Prepare the cannon again with the POWDER KEG WITH GUNPOWDER, load it with the COTTON BALLS (from the make up tools at the Captain's Cabin), then fire it with the GLOWING CIGAR.
Pick up the CANNON BALL that falls onto the deck.
Load the cannon one last time with the POWDER KEG WITH GUNPOWDER, the CANNON BALL, and then fire it with the GLOWING CIGAR.
After the short cut scene, use the CORKSCREW to remove one of the rivets from the board at the top of the cage.
Tie the CORKSCREW to the HOSE to create the HOSE WITH CORKSCREW.
Talk to Ma'Zaz a few times until she gets frustrated and plugs her ears.
Now that she can't hear a thing, use the HOSE WITH CORKSCREW to pull down the chain above the cage.
Tie the chain around the grate, then throw it at the spinning flywheel.
Captain's Cabin
Click Mary to speak with her.
Push aside the purple rug on the floor to uncover a hidden hatch.
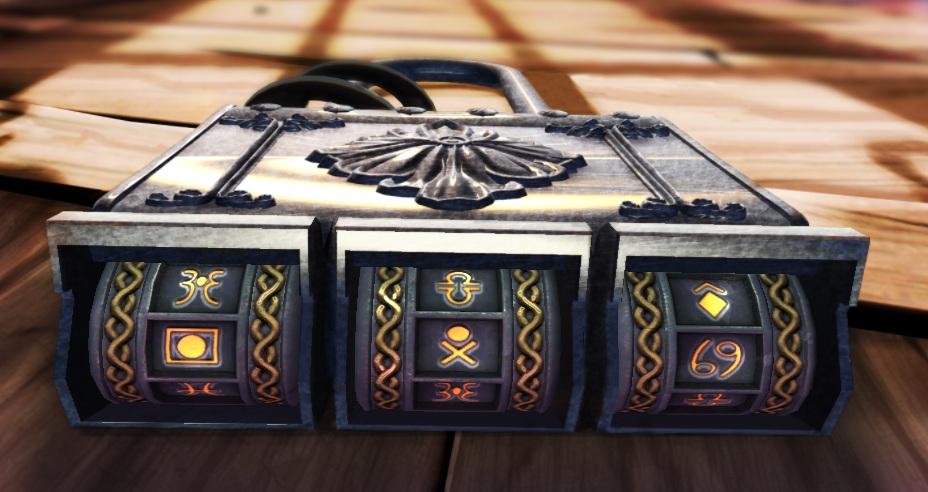
Examine the lock on the hatch to find a NOTE with the following clues to open the lock:
Under the ship.
Four smeared words, the first one could be "Symbol".
Age of the Mary.
Click Mary to talk to her again.
Ask her about a symbol on her belly, when the Captain installed the lock, and her age.
She'll tell you the lock was installed 12 years ago, but you'll have to use a little flattery to learn that Mary is 81 years old.
Subtract the 12 years from Mary's current age to find that her age when the lock was installed was 69.
Pick up the model ship in a bottle to break it, then look at the stand to find the symbol of a square with a circle inside it.
Inspect the hatch lock again to enter in the combination.
The first clue "Under the ship" refers to square containing a circle found on the stand.
Set the left lock to the matching symbol of a square and circle.
Next, set the right lock according to the third clue.
Mary's age at the time the lock was installed was 69.
Lastly, set the middle lock by finding the unknown "Symbol" indicated in the second clue.
Simply scroll through the symbols on the middle lock until the box opens.
Solution.
Once the puzzle is solved, climb out the hatch to reach the Ship Exterior.
Ship Exterior
Examine and then take the ROPE WITH GRAPPLING HOOK stuck to the railing.
Use the ROPE WITH GRAPPLING HOOK on the rope ladder hanging above the deck.
Climb the ladder to the upper platform.
Open the repair box to find the ADHESIVE TAPE.
Combine the ADHESIVE TAPE, HORN, and the MARDI GRAS THING together to create the FUNSTRUMENT.
Climb back down the ladder to return to the hull.
Stick the FUNSTRUMENT to the tank under Nate's feet to distract Ma'Zaz.
After the short cut scene, the Axe will be added to your inventory.
Go up the ladder again to return to the upper platform.
Use the AXE to chop off the FLAG.
Move down the ladder to return to the hull.
Now that you're finished with the upper platform area, take the ROPE WITH GRAPPLING HOOK hanging from the ladder.
Tie the FLAG to the ROPE WITH GRAPPLING HOOK to combine them into the ROPE WITH FLAG.
Use the ROPE WITH FLAG on Ma'Zaz.
After the cut scene, click Ma'Zaz's hand to pry off her fingers.
Yeti Cave
Examine the metal cylinder sticking out of the ice underneath Nate.
Try to reach the handle of the cylinder a couple times until the yeti comes over and "gives" you an APPLE.
Throw the APPLE at the lantern hanging from the ceiling.
Speak with Cornelius to get off the ceiling... and into the pot.
Look at the cooking pot to start the cut scene.
Chapter 2: Marooned
Sanctuary
Inspect and then take the ANTENNA sticking out of the mechanism beside Egrofal.
Go out the exit door to the Workshop.
Workshop
Pick up the ADHESIVE TAPE on the far left side of the table.
Stick the ADHESIVE TAPE to the ANTENNA to combine them into the ANTENNA WITH ADHESIVE TAPE.
Rummage through the crate to the left of the generator to find the STRAW.
Move right to go to the Ice Sheet, then continue up to the Yeti Cave.
Yeti Cave
Take the SCALES in front of the barrels between the two piles of snow.
Pick up the BALL OF YARN on the sofa.
Search the backpack in the middle of the snow pile to find the BALLOON.
Grab the KITCHEN KNIFE on the counter at the left side of the kitchen area.
Attach the KITCHEN KNIFE to the ANTENNA WITH ADHESIVE TAPE (from the table at the Workshop) to complete the KNIFE ON THE ANTENNA.
Use the KNIFE ON THE ANTENNA on the net full of apples hanging beside the kitchen cabinet to receive the APPLES.
Go back out to the Ice Sheet.
Ice Sheet
Give the APPLES (from the net in the kitchen at the Yeti Cave) to Ulus.
Your character will also pick up the BAIT LINE Ulus leaves behind.
Talk to the strange woman, then give her the BALL OF YARN (from the sofa at the Yeti Cave).
Use the BALLOON (from the backpack at the Yeti Cave) on the hole in the ice to fill the WATER BALLOON.
Return to the Workshop.
Workshop
Click Ulus to speak with him.
Select the chat option "Chesaarah-booyak!" to distract Ulus and nab the QUADROPOD.
If you use the BAIT LINE (from Ulus at the Ice Sheet) on the penguin, you'll see that he's really desperate for the fish on the line.
Go through the left door into the Sanctuary.
Sanctuary
Use the KNIFE ON THE ANTENNA (from the kitchen area of the Yeti Cave) to unscrew the alarm light on the side of the machinery in the middle of the room.
Click the unfastened ALARM LIGHT to add it to your inventory.
Exit the Sanctuary and return to the Ice Sheet.
Ice Sheet
Petra should be finished knitting by now (if she isn't, you can exit and return to the area until she is done).
Talk to her to receive the STOCKING.
Speak with Petra a second time to take the PETRA CAP (again, you may have to walk out and back in to prompt her to start rummaging through the crate).
Combine the PETRA CAP with the BAIT LINE to create the PETRA CAP WITH FISH ON THE LINE.
Move left to the Workshop.
Workshop
Put the PETRA CAP WITH FISH ON THE LINE on the penguin's head to lure him out of the Workshop.
Follow the penguin through the left door into the Sanctuary.
Sanctuary
The leader will be distracted while the penguin is running around the room.
Now you can pick up Layla's crystal ball beside the leader.
After the cut scene, you will be returned to the Workshop.
Workshop
Click Layla to speak with her.
Place the ALARM LIGHT (from the machinery at the Sanctuary) on top of the crate beside Layla.
Go right to the Ice Sheet.
Ice Sheet
Talk to Petra and she'll ask you for a stick.
Give her the antenna from the KNIFE ON THE ANTENNA.
In exchange, Petra will give you a COLANDER and the KNIFE will return to your inventory.
Go to the Yeti Cave.
Yeti Cave
Place the QUADROPOD (from Ulus's table at the Workshop) in the ray of light above the wooden logs.
Put the WATER BALLOON (from the water hole at the Ice Sheet) on top of the quadropod to focus the beam of light.
Hang the STOCKING (from Petra at the Ice Sheet) on the right hook at the top of the fireplace.
Try to walk out the door to start the cut scene.
Click the STOCKING above the fireplace to retrieve it and the PACKAGE it was containing.
Open the PACKAGE to find the HOURGLASS and the WRAPPING PAPER.
Unscrew the right HOOK from the fireplace to add it to your inventory.
Stick the HOOK into the ice wall to the right of the exit.
Next, put the WRAPPING PAPER between the logs under the quadropod to light the logs on fire.
Pick up the long section of rope hanging by the exit, then attach it to the hook on the ice wall.
Place the SCALES (that you picked up earlier in front of the barrels) on top of the sheets of ice.
Return to the Sanctuary.
Sanctuary
Pick up the POT on the floor at the left side of the room.
Look at the notes on the wall above the bottom of the ramp.
Take the NOTES from the wall, then tear them up in your inventory to make the COLORED STRIPS OF PAPER.
Connect the COLORED STRIPS OF PAPER with the STRAW (from the crate at the Workshop) to combine them into the ASSEMBLED BOUQUET.
Click the lever in the mechanism to the left of Yttocs to shut off the lights in the Workshop.
Use the HOURGLASS (from the stocking package at the Yeti Cave) on the conveyor belt to break the machinery.
Pick up the new CONVEYOR BELT leaning against the wall to the right of Yttocs.
Go out to the Workshop.
Workshop
Give the ASSEMBLED BOUQUET (from the paper notes at the Sanctuary) to Layla.
Now that you've shut off the power, you can use the KITCHEN KNIFE to cut and take the CABLE under the unlit lights.
Connect the CABLE to the alarm light on top of the crate.
Place the CONVEYOR BELT (from the wall at the Sanctuary) beside the generator.
Put the COLANDER (from Petra at the Ice Sheet) over the alarm light.
Lastly, attach the STOCKING (from Petra at the Ice Sheet) to the generator to connect it to the treadmill.
Click the treadmill to power the alarm light.
After the cut scene, return to the Yeti Cave.
Yeti Cave
Pick up the SALT SHAKER on the floor in front of the fireplace.
Place the SALT SHAKER on top of the scales on the ice shelf.
Attach the bottom of the rope to the salt shaker.
Put the POT (from the floor at the Sanctuary) on the other side of the scales.
When the apparatus on the scales is assembled, the water from the icicle will drip into the pot and ring the gong.
Before that happens, quickly use the lamp shade from the lamp on the wall under the paintings to disguise yourself as the distracted yeti heads towards the exit.
Use the KITCHEN KNIFE to cut the ties around Nate's wrists.
Chapter 3: Friend and Foe
Ice Sheet
Look at the debris in the snow to the right of the critter, then take the WOODEN PLANK.
Click Petra to speak with her.
Go through the conversation until you reach the point about the piece of leather.
Ask her to keep it as a memento, and the LEATHER RAG will be added to your inventory.
Speak with the critter, then go left to the Workshop.
Workshop
Click the critter to speak with the leader over the intercom.
Ask for help and tell the leader that you are a skilled thief.
He will request that you retrieve their antenna from Petra to prove your skills.
Pick up the SPRING beside the purple paint barrel.
Attach the SPRING to the metal plate at the bottom of the refrigerator.
Place the WOODEN PLANK (from the debris at the Ice Sheet) on top of the spring.
Go back out to the Ice Sheet, then continue up into the Yeti Cave.
Yeti Cave
Look at the scarf on the arm of the sofa chair, then take the loose THREAD from the scarf.
Search through the backpack in the pile of snow to find a PICKAXE.
Use the PICKAXE on the ice wall near the exit to smooth the surface of the wall.
Polish the smooth surface with the LEATHER RAG (from Petra at the Ice Sheet).
Pull the string next to the exit door to start the cut scene.
Take the HORSESHOE hanging above the fireplace.
Combine the THREAD and the HORSESHOE into the HORSESHOE WITH THREAD.
Click Cornelius to speak with him.
Ask Cornelius about his sandwich, then select the "Hmm" conversation option to trick him into giving you the VEGETARIAN SANDWICH.
Go back to the Workshop.
Workshop
Talk to the critter baby a few times until it gives you the SCREWDRIVER.
Attach the HORSESHOE WITH THREAD (from the parts at the Yeti Cave) to the spring board construction.
Return to the Yeti Cave.
Yeti Cave
Look inside the clay pot in the kitchen area to find the SUGAR.
Pour the SUGAR into the frying pan on the stove.
Use the SCREWDRIVER (from the baby critter at the Workshop) on the sugar in the frying pan to collect the HOMEMADE LOLLIPOP.
Go to the Workshop again.
Workshop
Place the HOMEMADE LOLLIPOP (from the stove at the Yeti Cave) on top of the spring board trap.
Talk to the critter baby to lure him onto the trap.
Pick up the HOMEMADE LOLLIPOP after it falls onto the ground.
Follow the baby out to the Ice Sheet.
Ice Sheet
Pick up the critter baby from the ground.
Quickly give the baby the HOMEMADE LOLLIPOP (from the floor at the Workshop) to add the CRITTER BABY to your inventory.
If you're too slow to feed the baby, simply go back to the Workshop and set up the trap with the HORSESHOE WITH THREAD and HOMEMADE LOLLIPOP again.
Combine the CRITTER BABY with the VEGETARIAN SANDWICH (from Cornelius at the Yeti Cave) to complete the SANDWICH.
Click Petra to speak with her.
Ask her if she's hungry to give her the SANDWICH.
Look at the protest sign Petra leaves behind to take the ANTENNA from it.
Search the open chest to find a GLASS BOTTLE.
Return to the Workshop.
Workshop
Speak with Layla to give her the ANTENNA.
After the short conversation, Critter will join your party.
Go back out to the Ice Sheet and look at the Submarine, then click the area again to travel there.
Submarine
Pick up the EMPTY CANISTER on the ground between Critter and the left guard.
Give the GLASS BOTTLE (from Petra's crate at the Ice Sheet) and the EMPTY CANISTER to Critter.
Go back to the Ice Sheet.
Ice Sheet
Talk to the technicians to find that they need a piston and machine oil.
Go up to the Yeti Cave.
Yeti Cave
Click Cornelius to speak with him.
Select the conversation option "What code word?" then ask him about the shape-shifter yeti to learn that Cornelius has created the password "Mellon" to identify the yeti.
Next, ask Cornelius for some machine oil.
Click the prison door at the right side of the room to lock yourself inside.
Talk to Cornelius and give him the wrong codeword, "Bratburger liverwurst."
Cornelius will lock himself inside the cage, allowing you to take the MACHINE OIL.
Go back out to the Ice Sheet.
Ice Sheet
Nate:
Give the MACHINE OIL (from Cornelius at the Yeti Cave) to the technician.
Click Critter's icon at the upper left corner to switch characters.
Critter:
Use the EMPTY CANISTER (from the ground outside the Submarine) on the hole in the ice to receive the LABEL and the CANISTER FULL OF WATER.
Combine the LABEL with the GLASS BOTTLE (from Petra's crate at the Ice Sheet) to create the GLASS BOTTLE WITH YELLOW LABEL.
Return to the Sanctuary.
Sanctuary
Select the GLASS BOTTLE WITH YELLOW LABEL (from the parts you combined at the Ice Sheet) in your inventory, then click the matching bottle on the table that Layla is giving her father to swap the items.
In exchange, you will receive the BOTTLE OF BRANDY.
Go to the Submarine.
Submarine
Critter:
Feed the BOTTLE OF BRANDY (from Layla's table at the Sanctuary) to the penguin standing in front of the right guard.
Click the drunk penguin to goad him into pestering the guard.
Click Nate's icon to switch characters, then walk him to the Submarine.
Nate:
Click the Black Guard to speak with him.
Tell the guard that your name is irrelevant to gain access to the submarine.
Go through the doorway to enter the submarine, then go left into Munkus's Chamber.
Munkus's Chamber
Ask Munkus about the piston you need for a steam engine two times to strike a deal with him.
After the conversation, you will be returned to the outside of the Submarine.
Go back inside, then open the right door to the Engine Room to receive a STEAM ENGINE PISTON from the engineer.
Re-enter Munkus's Chamber.
Look at and then take the NEWSPAPER on top of the machinery at the lower right corner of the room.
Go back to the Ice Sheet.
Ice Sheet
Give the STEAM ENGINE PISTON (from the engineer in the submarine Engine Room) to the technician.
Now that the technicians have all the parts, your ship will be fully repaired the next time you return to the area.
Return to the Submarine.
Submarine
Talk to the Black Guard to ask him about joining the crew.
Look at the advertisement the guard posts on the wall, then click him to speak with him again.
Ask for the advertised job a second time.
Take a SLIP OF PAPER from the number dispenser the guard placed in front of the weapons crates.
Give the SLIP OF PAPER to the guard, then wait for him to call out your number and give him the SLIP OF PAPER again.
The guard will now administer a test of your qualifications to join the evil army.
Answer all 3 questions with the most evil answers possible to pass the test.
Answer 1: "I let him kill my mother-in-law, then I shoot him."
Answer 2: "I claim I know where the gunpowder is and receive a princely sum as a reward for the information."
Answer 3: "I let the child eat the lollipop. He'll see what he gets out of it."
Click Critter's icon to switch characters, then walk him to the Sanctuary.
Sanctuary
Select the BOTTLE OF BRANDY, then click the bottle on the table beside Layla to swap the bottles again.
The exchanged GLASS BOTTLE WITH YELLOW LABEL will be returned to your inventory.
Go back to the Submarine.
Submarine
Critter:
Give the CANISTER FULL OF WATER and the GLASS BOTTLE WITH YELLOW LABEL to Nate.
Click Nate's icon to switch characters.
Nate:
Enter the submarine, then click the right door to go into the Engine Room.
Engine Room
When you enter the room, note that the guard has a questionable object he keeps hidden from you behind the pipe.
Click the dirty porthole window to examine it.
Right click the GLASS BOTTLE WITH YELLOW LABEL (that Critter gave you outside the Submarine) in your inventory to identify it as FERMENTED APPLE JUICE.
Use the FERMENTED APPLE JUICE to clean the porthole window (which will also use the NEWSPAPER).
Exit the room and go up the ladder to return outside the Submarine.
Submarine
Click Critter to speak with him.
Select the conversation option "You have to help me watch the engineer!"
Nate will re-enter the Engine Room while Critter spies on the engineer. Exit the room and climb back up the ladder to return to the Submarine exterior.
Talk to Critter again to find out the engineer is hiding something behind the pipe.
While Critter is cold, you will not be able to switch characters.
Return to the Engine Room.
Engine Room
Look behind the pipes to find the DIRTY MAGAZINES.
Stick the DIRTY MAGAZINES inside the torpedo tube.
Talk to the engineer to lure him into the torpedo tube.
Take the HOT CUP OF COFFEE from the coffee maker.
Pull the lever beside the exit door to open the hatch outside.
Go back outside the Submarine.
Submarine
Nate:
Give Critter the HOT CUP OF COFFEE (from the coffee maker at the Engine Room) to warm him up.
Click Critter's icon to switch characters.
Critter:
Click the open hatch to enter the pipeline of the submarine.
You will automatically be switched to controlling Nate inside Munkus's Chamber.
Munkus's Chamber
Choose all of the conversation options to distract Munkus while Critter steals the heart.
After Munkus throws you out, enter the Engine Room to take the CRYSTAL from Critter.
Nate will go back to the Ice Sheet where you must talk with Layla to start the cut scene.
Chapter 4: Madness
Ground Floor
Nate
Take the BELLOWS from the side of the fireplace.
Use the BELLOWS to inflate Critter and send him flying up the stairs.
Critter
Go through the right doorway to walk on the right side of the room.
Continue through the right passage to walk on the roof.
Take the FLUTE hanging on the wall to the right of the door under the pentagram.
Go right into the Gallery.
Gallery
Examine the table on the lit platform to start the puzzle.
First highlight all the pieces that make up the star in the center.
Next, rotate the discs to align a path from each highlighted piece to the circular center of the board.
Click each disc to rotate it clockwise and shift the positions of the lines.
Solution.
After the puzzle is solved, take the TARNISHED CYLINDER sticking out of the board.
Look at the strange picture on the right side of the pillar.
Search inside the painting to find a blue portal.
The blue portal will be placed on the wall, where you can go through it to come out of the orange portal in the Side Room.
Walk all the way back to the stairway, then go down to the Ground Floor.
Ground Floor
Critter
Give Nate the FLUTE (from the wall at the upside-down ceiling area of the room).
Put the TARNISHED CYLINDER into the boiling pot over the fire.
Click Nate's icon to switch characters.
Nate
Use the BELLOWS on Critter again to float him up the stairs.
Play the FLUTE in your inventory.
This will cause the enchanted rope to float out of the basket at the side of the room.
Click Critter's icon to switch characters, then walk to the Gallery and through the blue portal to enter the Side Room.
Side Room
Click the peeling section at the top of the orange portal to remove it from the wall and add the PORTABLE HOLE to your inventory.
Climb up the rope floating out of the basket to go to the roof.
Move left twice and go down the stairs to return to the Ground Floor of the tower.
Ground Floor
Critter
Place the PORTABLE HOLE (from the wall at the Side Room) on to the blank section of wall to the right of the fireplace.
Click Nate's icon to switch characters.
Nate
Now that the orange portal is nearby, you can walk Nate through to enter and explore the Gallery and upper tower levels.
Go back through the blue portal to return to the Ground Floor, and Nate will suggest that it's time to leave the tower.
Click Critter's icon to switch to his character again.
Critter
Go out the door to the Plaza.
Plaza
Pick the GRAPES from the vines wrapped around the structure on the right side of the platform.
Take the LADDER leaning against the top of the structure.
Pick up the ROPE on top of the stack of barrels.
Go down the hatch and into the Captain's Cabin.
Captain's Cabin
Take the QUILL and WINE BOTTLE on the table under Mary.
Pick up the LANDING NET on top of the pile of junk between the wardrobe and the table.
Use the LANDING NET to try to catch the skeleton arm under the wardrobe, which will chase it over to the table.
Rummage through the wardrobe to find the GLOVE.
Lure the bony hand after you've chased it to the table with the GLOVE, then click the captured SKELETON ARM to add it to your inventory.
Go back outside to the Plaza, then try to enter the mage's tower to bring Ma'Zaz back to the platform.
Click the exit to poke your head outside.
Ma'Zaz will briefly enter the cabin while Critter hides in the wardrobe.
Quickly throw the SKELETON ARM at her when she enters the room.
After she leaves, pick up the AXE she drops on the floor.
Examine the purple rug on the ground, then move it aside to uncover the hatch.
Use the AXE on the hatch lock to break it open.
Critter will cover the hatch with the rug to lay the trap.
Repeat the same process as before of re-capturing the SKELETON ARM and luring Ma'Zaz into the room.
When you throw the arm at her this time, she will fall down the hatch, and Critter will leave the LANDING NET there to keep her trapped.
Return to the Ground Floor of the mage's tower.
Ground Floor
Critter
Give the following items from your inventory to Nate:
The AXE that Ma'Zaz left behind at the Captain's Cabin.
The GRAPES from the vines at the Plaza.
The QUILL and the WINE BOTTLE from the table at the Captain's Cabin.
Click Nate's icon to switch characters.
Nate
Examine the metal object on the table.
Talk to the portrait of the Arch-Mage.
Ask about the easel, then offer to paint a picture of food and drink.
Tell the painting "I need an angular piece of metal" to make a deal with the portrait.
Exit the building and go to the Plaza.
Plaza
Use the AXE to break open the transport crate.
Nate will take the IRON NAILS out of the opened crate.
Go into the Captain's Cabin.
Captain's Cabin
Take the METAL BAR at the top of the wardrobe.
Click Mary to speak with her.
Return to the Ground Floor of the mage's tower.
Ground Floor
Inspect the rag at the side of the easel to take the THREAD.
Use the AXE on Critter to trim off some of the CRITTER HAIR.
Combine the CRITTER HAIR, THREAD, and QUILL to create the CRITTER HAIR BRUSH.
Place the GRAPES (from the vines at the Plaza) and the WINE BOTTLE (from the table at the Captain's Cabin) on top of the small table next to the easel.
Put the IRON NAILS (from the transport crate at the Plaza) into the kettle in the fireplace to receive the REFLECTING CYLINDER.
Give the AXE back to Critter.
Walk through the portal in the wall to enter the Gallery.
Gallery
Nate
Place the REFLECTING CYLINDER (from the kettle on the Ground Floor) onto the table on the platform.
Click the table to start the puzzle.
Note the pattern of the lines inside each of the five squares at the front of the cylinder.
Highlight the matching patterns on the buttons at the left and right sides of the table.
Click the rings on the table to rotate the cylinder in the center and change the line patterns inside the five squares.
Solution.
Search inside the table to find the ANGULAR PIECE OF METAL 1/2.
Click Critter's icon to switch characters, then walk Critter through the portal to the Gallery.
Critter
Place the LADDER (from the platform at the Plaza) over the gap between the pillar and the balcony above the bolted door.
Continue left until you reach the top of the stairway above the Ground Floor.
Ground Floor
Examine the painting on the wall.
Critter can't remove it with his bare hands, so use the AXE to pry off the PICTURE OF THE PLANET.
Go back to the Gallery.
Gallery
Critter
Place the PICTURE OF THE PLANET (from the wall by the top of the stairs on the Ground Floor) over the framed painting of the optical illusion on the left side of the pillar.
Click Nate's icon to switch characters.
Nate
Examine the painting of the angel to find that the angel is sticking the picture to the wall.
Next, look at the painting of the pig, then use the FLUTE (from the wall at the ceiling area of the Ground Floor) to scare the pig.
The pig will run from its painting, across the picture of the orb, and into the angel's frame to knock her out of the picture.
Now you can take the blank CANVAS from the right frame on the pillar.
Go through the portal to return to the Ground Floor.
Ground Floor
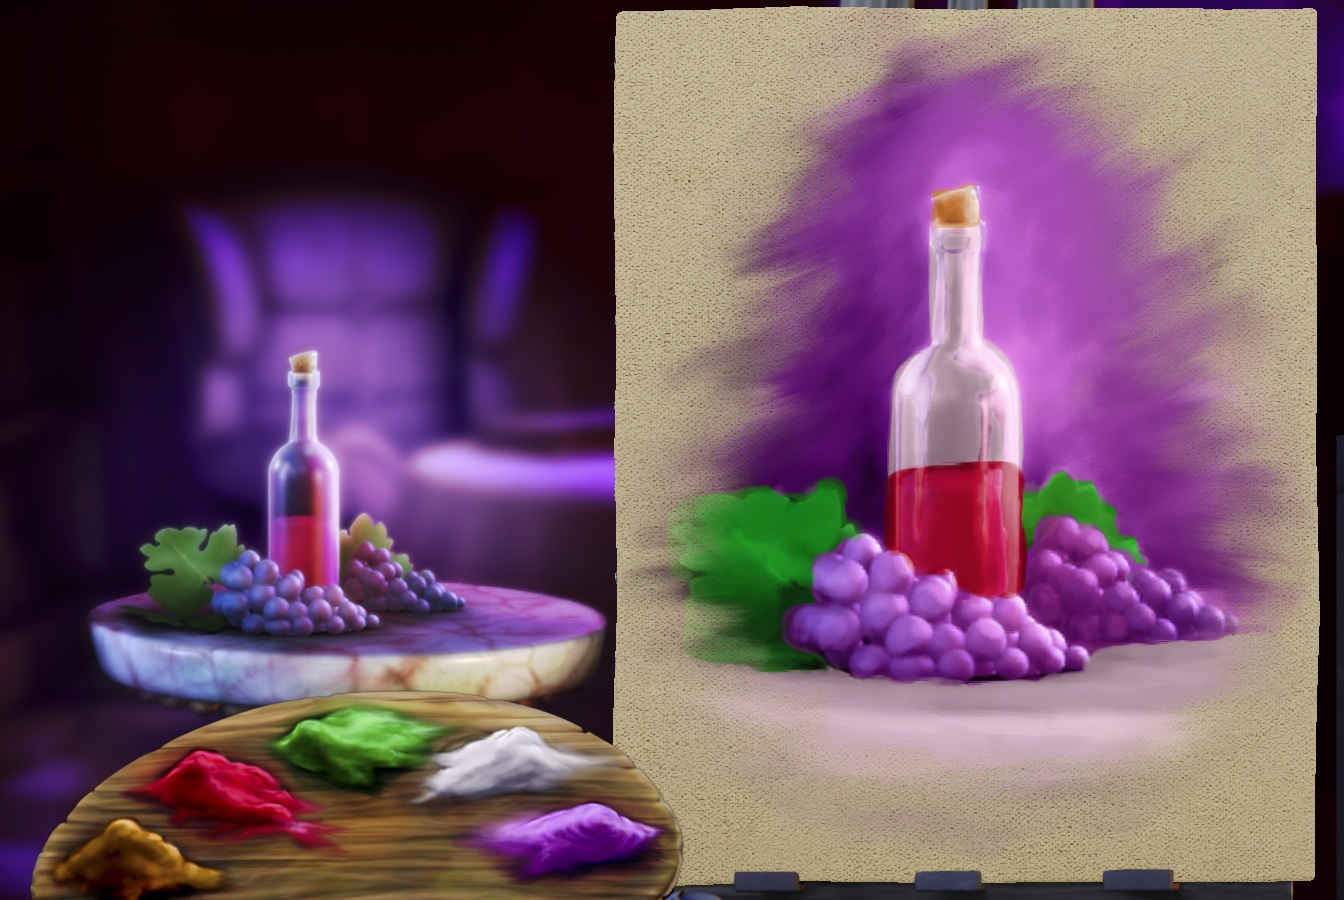
Place the CANVAS (from the angel picture in the Gallery) on the easel.
Click the canvas on the easel to start the puzzle.
Use the colors on the palette to paint the canvas.
Match the scene of the wine and grapes by selecting the colors and painting inside the charcoal lines.
Each of the objects and the background must be painted the correct color for the Arch-Mage to accept your painting.
Paint each of the pieces of the picture the following colors:
The background and the grapes are purple.
The table and the wine bottle are white.
The grape leaves are green.
The wine inside the bottle is red.
The cork at the top of the bottle is orange.
Leave the canvas to offer the painting to the Arch-Mage.
Solution.
After the puzzle is solved, the Arch-Mage will tell you the location of the last piece of angled metal.
Go through the portal to enter the Gallery.
Gallery
Click the picture of the crying clown on the right side of the pillar.
Talk to the clown to receive the ANGULAR PIECE OF METAL 2/2.
Return to the Ground Floor of the tower.
Ground Floor
Insert both of the ANGULAR PIECES OF METAL into the mechanism on the table.
ANGULAR PIECE OF METAL 1/2 is from the cylinder puzzle table at the Gallery.
ANGULAR PIECE OF METAL 2/2 is from the crying clown painting at the Gallery.
Turn the table until all of the pieces align into one uniform shape.
Take note of the pattern that the metal bars make.
Go back to the Gallery through the portal on the wall.
Gallery
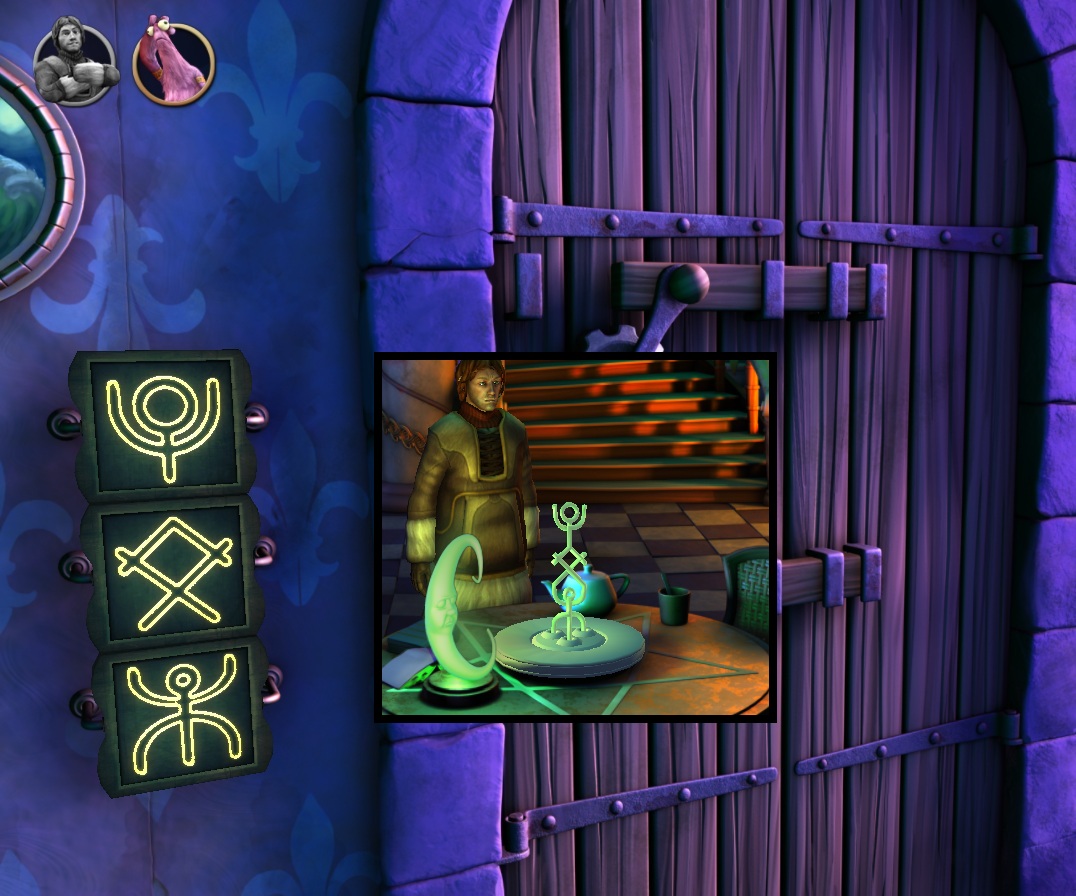
Climb onto the ladder to start the puzzle.
Select the correct symbols on the three tablets to open the door.
Click each tablet to flip through the different symbols.
Note that the tablets are arranged one over the other in top, middle, and bottom sections.
Select the symbols on the tablet that recreate the pattern seen on the angled metal bars at the Ground Floor.
Solution.
After the puzzle is solved, go through the open door into the Arch-Mage's Office.
Arch-Mage's Office
Take the STRANGE WHISTLE from the corner of the wardrobe beside the exit door.
If you test the whistle, you'll find that it can be used to lure plants.
Look at the knitting on the seat of the chair to find the BALLS OF YARN.
Combine the BALLS OF YARN with the METAL BAR (from the closet at the Captain's Cabin) to create the EARMUFFS.
Put the EARMUFFS on the guard plant.
Walk Nate back to the bottom level of the Ground Floor and then walk Critter to the top of the stairs at the upper level of the Ground Floor.
Ground Floor
Nate
Use the STRANGE WHISTLE (from the wardrobe at the Arch-Mage's Office) to lure the floating flower pot in the air closer to Nate.
Click Critter's icon to switch characters.
Critter
Quickly use the ROPE (from the barrels at the Plaza) to catch the flower pot next to the railing before it floats away again.
The flower BLOSSOMS will be added to your inventory, and Critter will return to the bottom of the Ground Floor.
Give the BLOSSOMS to Nate.
Return to the Arch-Mage's Office with both characters.
Arch-Mage's Office
Nate
Use the BLOSSOMS (from the floating flower pot at the Ground Floor) on the chemistry set on the table to create the perfume OBSESSION NO. 1
Spray the perfume bottle OBSESSION NO. 1 on Critter.
Click the magic scepter on the cushion behind the guard plant to start the cut scene.
Chapter 5: End and Beginning
Ice Sheet
Click the rope ladder twice to talk to Mary.
Search through the wardrobe she drops down to find a WIG and CLOWN NOSE.
Give both of the items to Critter.
Examine the green bathing suit on the side of the wardrobe to take the METAL HANGAR.
Use the SCEPTER OF TIME to dispose of the guard blocking your path.
Walk both characters left to the Workshop.
Workshop
Look inside the cardboard box in front of the refrigerator to find the BLACK DISHES.
Pick up the WOOL on the work table by the guard.
Give the WOOL and the BLACK DISHES to Critter.
Try to enter the Sanctuary to start the cut scene.
Go back to the Ice Sheet, then continue up into the Yeti Cave.
Yeti Cave
Use the SCEPTER OF TIME twice on the lamp above the ice chair.
Remove the LAMPSHADE from the futuristic lamp.
Take the CURTAIN hanging from the rod in the ceiling.
Return to the Workshop.
Workshop
Nate
Put the CURTAIN (from the bar at the Yeti Cave) into the barrel of purple paint to dye it into the PURPLE CURTAIN.
Connect the METAL HANGAR (from the piece of clothing on the wardrobe at the Ice Sheet) to the side of the treadmill.
After the wire heats up, use the LAMPSHADE (from the lamp at the Yeti Cave) on the wire to cut it into GREEN DISHES.
Give the PURPLE CURTAIN and the GREEN DISHES to Critter.
Click Critter's icon to switch characters.
Critter
Combine the PURPLE CURTAIN and the GREEN DISHES to create the HOMEMADE DISGUISE, then click the disguise to wear it.
Now that the costume is complete, click the door to enter the Sanctuary.
Sanctuary
Pick up the FLAT PIPE beside the red wires at the left side of the room.
Take the PIPE WRENCH leaning against the side of the machine.
Go back out to the Workshop.
Workshop
Critter
Give the FLAT PIPE (from the floor at the Sanctuary) to Nate.
Click Nate's icon to switch characters.
Nate
Use the SCEPTER OF TIME on the FLAT PIPE to revert it to a fixed PIPE.
Give the PIPE back to Critter.
Click Critter's icon to switch characters again, then re-enter the Sanctuary.
Sanctuary
Critter
Use the PIPE WRENCH on the intercom above the exit door.
Insert the PIPE (that Nate created at the Workshop) into the gap in the intercom.
Click Layla to speak with her three times to receive the BABY CRITTER.
Show the BABY CRITTER to Munkus so that the baby can memorize his words.
Use the BABY CRITTER again on the intercom to speak with the guard outside.
Click Nate's icon to switch to his character in the Workshop, then click the door to enter the Sanctuary.
Nate
Click the buttons at the sides of the prison to start the cut scene.
Workshop
Nate
Pick up the APPLE CORE the guard threw to the ground.
Use the SCEPTER OF TIME on the chair beside the treadmill to turn it into dirt.
Place the APPLE CORE in the pile of dirt.
Use the SCEPTER OF TIME again on the apple in the dirt to make it into an apple tree.
Click the tree pick a few APPLES from it.
Place the APPLES in front of the fan at the left side of the Sanctuary door.
Age the apples by using the SCEPTER OF TIME a third time to start the cut scene.
Critter
Remove the wires from the generator attached to the treadmill, then use them to shock Munkus.
Posted by: Trinn |
December 16, 2012 10:47 PM
|
December 16, 2012 10:47 PM