
 Hi! Let me introduce the first Weekday Escape Retro Edition! Once upon a time, in The Golden Ages Of Escape Games (about 4 years ago) were so many games released that not all good ones did it to JIG. Nowadays, when the ages are not so golden, is right time to go back for a while and appreciate them.
The first game, a true little gem from Amanita design, is more about looking for friends than escaping, followed by Sanpoman´s game, where you escape an island and finally, the longest one, is a full lenght escape from Kuroneko.
Have a good time and enjoy!
The shortest game in this Weekday Escape is a little pill of hapiness with instant effect and replay value. Today, Amanita Design is well established independent game development studio producing full games. This one from their beginnings is made for music group The Polyphonic Spree. There are just three screens for playing, but sooo charming and full of magic, perfectly fitting the music!
The cursor is changing, no save button, one ending.
At the beginning, click the left button for a start. You find yourself on a beautiful and peaceful Toaran Island. You know how to escape, there is a balloon behind some trees, but how to get to it? Well, by solving some puzzles, of course. There are some signs in japanese, but you don´t need to understand them to get through. For navigation, use side bars and also arrows, and if you get stucked, try to search for a new location, some can be easily overlooked as navigation is a bit clumsy. On the other side, wandering around the island surrounded by pastel colors and omnipresent cutness is a pleasure!
The cursor is changing, save button, one ending.
Escaping from Study Room is not easy (you definitely need a piece of paper or two for notes). It´s also one of the best escape games with style reminding of Robamimi or Neutral. There are many clever puzzles to solve and some items difficult to find. You need good observation and logical thinking to get through! Changing cursor at hotspots can be helpful, also, check the collected items carefully!
The cursor is changing, save button, two endings.
We love escape games, and our readers love talking about them and sharing hints! How about you? Let us know what you think, ask for clues, or help out other players in the comments below.


can't wait for the walkthrough :)
Yes we know Paul :)
This isn't so much an escape as it is a regular point-and-click, but sure.
The Quest For The Rest
Yes, the game may be short, but feel free to just sit on a screen and enjoy the music. (The volume control doesn't work for me, but the mute button and song position scrubber do.)
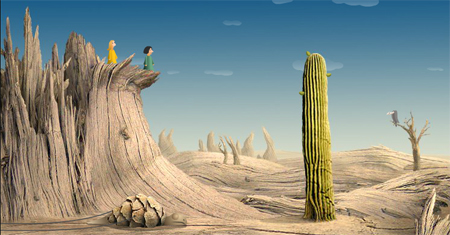
Desert
Yellow- and green-clothed people (let's call them wanderers) are watching from a cliff at a desert scene with a tortoise which looks like an acorn, a cactus ready to grow fruit, and a rather unhelpful lizard. Wait, didn't the about message mention three lost members?
Puzzle
Each of the three protruding buds on the cactus grows into a fruit when clicked. The fruit drops on the ground.
If a fruit drops to the left of the cactus, a rat comes out from the cactus and takes it, and then munches on it for a while until the cactus grows another bud.
You'll need to wake the tortoise up so he can pull something into view, but he'll go back to sleep unless there's fruit he can reach.
Solution
Grow each bud of the cactus thrice, so that the fruit are ready to drop.
Drop both fruit on the left and wake the tortoise. Also drop the fruit on the right.
The tortoise will crawl over and munch on both fruits, pulling a cart into view.
Rescue
The pink wanderer is sleeping on the cart. Wake him up by clicking on him, then click again.
He inflates a sack on the cart by blowing into it, and it somehow rises into the air, lifting him on a platform which the other two wanderers hop on and sail off into the next scene.
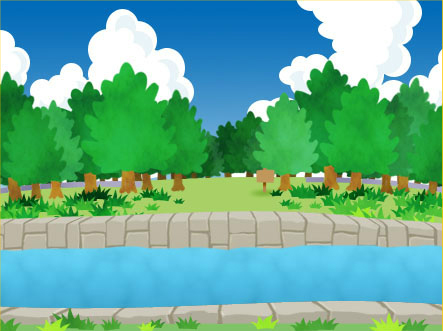
Forest
With their makeshift airship wrecked on a tree branch, the wanderers now have to deal with a fox and a river, with the help of some fungi, puffballs, ferns (or mimosas?), dragonflies and frogs, flowers and cattails.
Click on the two fungi to get the green wanderer to climb on them. Then click on the branch, and then on the puffball below it.
The fox can't stand the respiratory irritation, and leaves to the left. Click on the fronds to shrink them, then click on the hole at the base of the tree that was hidden behind them.
The green wanderer walks into the hole (followed by her friends), and emerges out of an upper tree hole overlooking the river.
Click the left flower (at the same height) to get the green wanderer to hop on it. Click the frog to chase the dragonfly away, and quickly click the flower it was sitting on.
Click the left cattail, and the green wanderer jumps onto it, bending it down into the treehole and forming a bridge.
Ocean
Oh great. Now they're trapped on a tiny piece of wood floating on the surface of the ocean.
Get them to the submarine, but first you'll need to drive the octopus away. Do the seahorses, fish and whales have any significance? Who knows.
The coral(?) to the left of the submarine releases bubbles from four vents. Scare the green seahorse back into the right one, and then click it again to release a large green bubble.
If this is timed correctly, a fish will ingest the bubble, then get eaten by the octopus, who will then get uncomfortable enough to leave the submarine.
Click the hatch on top of the submarine to get the wanderers to dive in. Once they're inside, click the front window to zoom in on the green wanderer and the controls.
Pull the middle lever to start the propellers, the left lever to get it off the seafloor, and then the right lever to advance.
Finale
The submarine surfaces next to a line of people waiting for them. Enjoy the ending screen and song.
can't wait for the other 2.
Some hints for Toaran Escape
Navigation is a bit awkward. Move around using the right, left, back arrows on the sides and bottom, and also using arrows in the middle of the screen that show up when the cursor is over them.
On every scene, make sure you check for arrows to the right and left.
Getting into the pink house
Use the hint from the two circles with three numbers each.
136 and 245.
Hit the left button for clicks 1 3 and 6 and the right button for clicks 2 4 and 5.
L R L R R L
What to do with the white key?
It goes into the hole in the back of the train.
The sign to the right of the door with the nn:nn puzzle
Click the stone above the top right of the sign.
Where are the boxes?
Yellow box
Go left from the yellow house. It is on the shore.
Pink box
Go right from the yellow house. Then go forward. And forward again (see the yellow gates close up). Then left (see the curved grey thing (railroad track)). Click on the right part of the curved grey thing.
Blue box
Go right from the yellow house. Then go forward. Then go right (see the back of the red house on the right). Take the curved arrow left (see the balloons from the back). And take the next curved arrow left.
Green box
After going into the building with the nn:nn puzzle, go up the ladder on the left.
Orange box
Inside the yellow house.
Where is the sixth letter?
On the scene with the two round signs with three numbers each, go left.
Use the stick
from beneath the yellow fence
to get the letter from the tree.
Toaran Island
This game is both very long (use the save button) and very difficult to navigate (but there's something you get that will help you).
Exploration 1: An Eastern Plain
You start off facing a pool. It's a nice pool, but it's time to escape this island. Toaran Island? Where even is this Toaran?
Turn right to see a pink house and a sandy area to the right. Zoom in on the sand. There's nothing there. Back up and zoom in on the pink house. It's locked and the door has two identical buttons on it.
You could turn left from the pink house and walk around the pool, but let's not do that yet. Instead, turn right to see the side of a stone tower.
Click on the grass to walk forward, then click on the grass again. Now you're facing the front of the observation deck. The door's locked and takes a four-digit code, which looks like a time. Anyone here got a watch?
Back up from the door and turn around to see two signs with 136 and 245 on them. Walk towards them, and then turn left to see two trees. There's something stuck in the leaves of the left one, but you can't reach it yet.
Go back, right, back, back, and face the observation deck door again. Turn left this time and walk backwards! Now there's a yellow spot on the ground to the right. Walk to it to see it's a yellow chest.
Go back, turn right, and now the pool is in sight again. There's a yellow house and another sandy patch. The sandy patch has a suspicious mound too large to dig with bare hands. The yellow house is locked from the inside, but you can take an orange key from beside the door. You could walk around the pool from here, but we have other priorities.
Turn right to face the pool again (starting screen), then turn right and go to the pink house.
Pink house
The door
The pink house door unlocks with the code from the two signs behind the observation deck.
The digits 1 to 6 appear in 136 245 on the left, right, left, right, right, left sides.
Click the LRLRRL buttons to open the door.
The house
There's a table and two chairs here. Click on them to zoom in, then click on the book on the table to take it.
Also click on the right chair to look at it. There's a blue key behind it.
Back up and turn right. There's a clock on the wall. Zoom in and click on it to read the time: 13:28.
Turn left twice. There's a trapdoor in the floor with a white ladder descending to a tunnel that ends in a door with a porthole. Looking through the porthole, and you'll see why the door can't open - it's a door to the bottom of the pool.
(Leave the pink house.)
Reading
Examine the book in your inventory (using the question mark button). Open it up and take the map from the right side.
There are instructions on these pages to turn a valve to drain the water.
Flip the page by clicking on its right edge. These pages tell you to search the observation deck sign for a key.
Now that you have the map, you can examine it at any time to see your current location.
Exploration 2: Lost in the Forest
Turn left from the pink house door (or right from the yellow house door) to enter the forest. According to the sign, this is the "Forest of Rest". There's something giant and colorful poking out above the treeline.
You can head either left or right from the screen with the sign to walk around the forest, but let's go straight for now. There's a yellow gate in front with six empty rectangular frames. Perhaps you could find something to fill them with.
Turn left to see some a short stretch of empty railway tracks, and click beyond it to see a pink chest.
Go back to the yellow gate, turn right, and click on the fence in the distance. Zoom in on the blue chest to find that it can't be reached from here, so back up. Take the long stick from under the fence, then click the fence again to look beyond it. There's your escape route: a giant hot-air balloon. But rules are rules, you can't just climb over the fence to freedom without unlocking the gate.
Back out until you reach the screen with a glimpse of train tracks on the right. Turn right to look at that stretch of tracks, which has a train carriage on it. Click on the carriage to find a hole at the back.
Exploration 2.5: Lost around the Forest
Go back to the screen with the forest sign, and turn left. Click the grass to walk forward. Ignore the pink chest (which can't be reached from here), and click the grass to walk forward again. Take the shovel resting against the tree to the left.
Go back to the screen with the forest sign again, and now turn right. Click the grass to walk forward. Ignore the ballon (which can't be reached from here), and click the grass to walk forward again. Zoom in on the chest and use your blue key to open it. Inside, there's a metal plate with N printed on it. Take the N plate.
Excavation
Go back to the sand patch left of the yellow house, and use the shovel thrice to dig up the mound. There's a large winding key here.
Bring it back to the (northern) train tracks, and use it on the hole in the train. The train moves to the other end of the track, uncovering some symbols: Spade, Heart, Club, Diamond.
Observation deck
A hidden item
Make your way back to the observation deck, and zoom in on the sign. Click on the wall to the right of it, and you will now be looking at the back of the sign, with a pink key hanging on a hook.
Four digit door
Unlock the observation room door with the time on the clock in the pink house.
Enter 13:28, and open the door.
Valve
Turn the valve on the floor. It does something.
Going up
There's a green chest here which we don't have the key for. Turn right, and take the yellow key off the railing.
Go back all the way to the pink house.
Down and up
Go back through the trapdoor and tunnel, and open the door. Make your way across the bottom of the semicircular pool, open the other door, go through the tunnel and up a ladder.
Now you're in the yellow house. Unlock the door, which puts you outside the house, so go back in again.
Yellow house
Open up the orange chest with the orange key to get an A plate.
Turn left and unlock the desk with the code from the train tracks.
Spade, Heart, Club, Diamond (3, 1, 2, 0 clicks.)
Open the drawer and take the green key.
Collect them all
You'll need six plates to open the gate, and you have the keys and the stick to get them.
Green
Green key: In yellow house desk drawer
Green chest: Observation deck roof
Gives: T Plate
Stick
Stick: Under fence, north of forest gate
Plate: In trees behind (east of) observation deck
Gives: O Plate
Pink
Pink key: Behind observation deck sign
Pink chest: Forest South, inside
Gives: A Plate 1
Yellow
Yellow key: On observation deck railing (right side)
Yellow chest: Southeast of observation deck
Gives: R Plate
Orange (done)
Orange key: Outside yellow house
Orange chest: Inside yellow house
Gives: A Plate 2
Blue (done)
Blue key: Chair in pink house
Blue chest: Forest North, outside
Gives: N Plate
Escape
Place the six plates on the gate, then go through, click on the rope to loosen the ballon, and click the balloon to get on.
Plot twist: the island was Toaran all along.
Congratulations!
(Alright, time to challenge the last escape.)
For the apartment 102 study room, if you want to experience both endings,
you need to try wrong 6-color codes and then walk out of the room to trigger a event. Being too clever and solve the code by oneself will miss that.
Many games with 2 endings trigger right before exiting but this one don't. Makes me search the web quite a while to find that.
To be honest, I did lookup another walkthrough (gave up after just 3 minutes in due to that first puzzle!) and noticed that part, so I'm aiming for the second ending on the replay.
Even with that, I did spend several hours working through every puzzle, having to slog my way through
a few unusual pixel hunts
unclear hints about waiting times
forgetting how to use a calculator
holding the clue upside down
updating my image editor
reading the other clue upside down (took me 3 whole hours to figure that out)
so hopefully when I'm done writing this up nobody else has to do any of that.
This is truly a nightmare of an escape, with
multiple pixel hunts and gimmicks at the very start
forced viewing of some clues (but not others)
red herrings
a puzzle that requires a calculator, and a significant amount of math
puzzles whose clues you can't bring with you
a puzzle that pretty much requires a physical piece of paper
a puzzle whose rules are very ambiguous
a cat which basically gives you things on its own whims
a decision point which isn't marked as such, and occurs before half of the game
If this has a "four-star" difficulty, I'm not sure I want to see five!
Apartment #102 - Study Room
You thought you were getting a nice cosy place to study, but Kuroneko's got an entire IQ test worth of puzzles planned out for you!
Part 1: The Study Room
Exploration
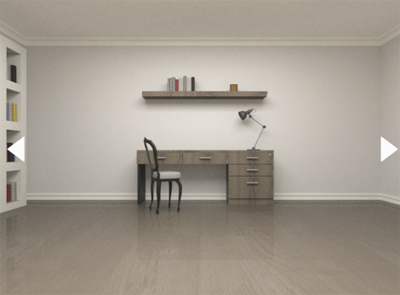
Screen with desk
You start off facing a desk, which alludes the amount of time in this game you spend working with pen and paper.
Let's get right to it. The desk has five drawers, and a book and a box on top of it. The book is locked and the box only has two buttons: club and heart.
The left drawer of the desk has a drawing of a square with extended top and right sides intersecting, and a 57 in it.
The next drawer is empty. Huh? Kuroneko would never leave a drawer empty. Look deeper in the drawer by clicking its rear, and get a red bookmark.
The top right drawer is locked, and the one below that has a helpful book with a picture of a maze, in thick gray and white lines.
The bottom drawer has a box with four digits and buttons to increment the digits. Why's there only up buttons when there's ample space for down buttons? Let's keep that in mind.
You can check under the table. Okay, this space really is blank. Check the right side of the table. Blank too. Check the left side of the table to find another square drawing, with bottom and left sides extended, and 83 written inside.
Look at the shelf up top, which only has a locked cylindrical case.
(Back up and turn right.)
Screen with sofa
I'm sure this screen is exaggerating, that chair isn't as far away from everything else as it appears.
Look under the black sofa cushion. Nothing there. Check the left side to see another square drawing, with bottom and right sides extended and 61 written inside. (What's up with all this graffiti?)
Check the right side, which is blank. Click the upper-right corner to look around the back. There's a bronze square key taped to the back.
Check the side table, which only has a box with four buttons on it. Er... let's see. We only found three squares, so we'll have to come back. No, really. Stop trying to outsmart the game.
There's an abstract picture hung on the wall, a tessellation of white triangles pointing up and black triangles pointing down, and it's signed Kuroneko in the corner. Except that last o seems to be a hole.
(Turn right.)
Screen with doors
Two doors on this screen, and a white panel in the middle.
The left door is locked, and takes a three-letter code.
The right door is locked and takes a five-digit code, and the cat door on it has two black buttons pointing up and down.
The white panel has an outline of four shapes protruding from it: a square, a triangle, a circle, and a square with a rectangular notch. Clicking on it raises a shutter, revealing a different white panel with the same four shapes, but now as holes. There's also what appears to be a rectangular button on this panel, but it doesn't work.
(Turn right.)
Screen with books
The entire wall is a bookshelf, four rows by eleven columns full of questionably engaging literature. Well, almost the entire wall, since you can click on the left and right corners of the bookshelf to find nothing and a blue cylinder, respectively.
Zoom in on the (center portion of the) bookshelf. One particular cat-egory of books stands out with their black covers. Also, there's a folded note in the upper left, which (unfolded) just has five arrows drawn on it from top to bottom, but some of the arrows are diagonal, which must mean something. Let's leave that clue there and come back later.
Tabletop
Use the square key to unlock the diary on the table, which is completely blank for a bunch of digits. Some of them are tilted, but no particular pattern is clear.
Use the bookmark on the diary, covering up the left side, leaving just 3s and backwards c's (?). Those shapes do remind you of something else...
Club and heart shapes on the box. If you cover up everything except the very top, the heart shows a sideways 3 and the club a turned c.
3633522353 = 3c33ccc3c3 = HCHHCCCHCH = RLRRLLLRLR
Enter the code and the box opens.
In the box
There's a bunch of pencils, arranged pointing up and down: DUUDUDDDU. There's also an eraser, which slides aside to reveal a triangle pointing right. But there's nothing on the right.
How about up? Click the top of the screen, and the view shifts to the top of the box, which has a round key taped to it.
Cat door
Use the pencil code to unlock the cat door.
Press the DUUDUDDDU triangular buttons. There's a black cat here, and its tail's covering something. You can poke the cat, but you don't get anything other than a meow every eight pokes.
Jewelry box
Use the round key to unlock the cylindrical box on top of the shelf, and take a pin.
Put a pin on it
Abstract art, that is. Place the pin in the hole in "Kuroneko" on the art above the sofa. It slides into the wall, revealing a much more complicated panel showing a folding net of a cube with certain small squares protruding from it. You can't do anything with that yet though.
Cat door, round 2
(You need to have both used the pin and viewed the cat door once for this step.)
Go back to the cat door, and the cat's tail has shifted. Now there's a square drawing on the floor, with top and left sides extended, and the number 492.
Corner buttons
Assemble the square drawings to form the corner code for the box on the side table next to the sofa. (Remember, the crossings on the squares all coincide in the center.)
Upper left (sofa): 61
Upper right (table): 83
Lower left (desk drawer): 57
Lower right (cat door): 429
Put together:
61 83
57 429
Click the ⌜⌟⌝⌟ ⌞⌜⌞⌝⌟ buttons on the box, and it opens. Take the silver key.
Back to the drawers
Use the key to open the top-right drawer. There's a bunch of flip cards in here, with a thick horizontal bar on the front and thin lines on each of the four other pages.
Mentally fill in the horizontal bar on the four pages, getting a digit for each, then use that four-digit code to unlock the box in the bottom drawer.
Enter 2853.
The box opens. Take a yellow pyramid.
But wait, remember when I said the up-only buttons were weird?
Open the drawer again, and then click on the handle, pulling the entire drawer off. Look in the space where the drawer was to get a green card, and click on the card to punch three rectangular holes in it.
This green card goes over a certain other clue to give a code...
Place the green card over the book in the second drawer. The letters HFT appear in the holes.
Enter HFT on the left door, which opens up to the bedroom.
Part 2: Bedroom
Exploration
More abstract art. On the left wall, a 4x4 grid of black and white squares, once again signed by Kuroneko in the corner. There's also a chair that's just for show.
On the wall straight ahead, there's the bedside table which has a coffee cup and saucer next to a lamp. Pick up the cup. This side table also has two doors which don't open but each budge a little bit when pulled before returning back.
The bed has not one, but two pillows, under which is a cryptic note with a drawing in gray and red on white. Or is it white and red on gray? Either way, there's a single red spot which looks particularly important.
On the right wall, six pieces of art with shaded areas delineated by circular arcs and straight lines. Each piece is monochrome in a different color.
Turn around. Next to the door, there's a coin-operated machine with a lever and space for a printout. Probably out of place in this bedroom, but people have weird interests.
Treasure spot
The cryptic note is a map of the study room. But instead of your usual escape game map which shows the top-down view, this map only shows where the furniture touches the floor.
Either way, the map points you to the back leg of the sofa. So zoom in on it again, and click the left side twice this time.
There's a panel in the wall which opens up to reveal a not-so-big red button. Press it, and you hear a muffled thud.
At this particular point in the game, it's possible to lock yourself out of either of the two endings. Please save your game, but also remember not to overwrite your save afterwards.
The fall of abstract art
The large artpiece in the bedroom has fallen to the ground. In its place, there's a panel with six red buttons which cycle through the colors of the artpieces on the opposite wall. (There's also a white button.)
The whole thing is surrounded on the top and bottom by a bunch of leftward pointing arrows:
<<<<<<<<<<<<<<
<<<<<<<<<<<<<<
Wait, those are less-than signs. The game is literally asking you to make a quantitative comparison of art.
Or at least, the shaded areas in each piece of art.
Shaded proportions of each square, and how to calculate them:
Blue: 1/2 ≈ 0.500
Mentally flip it over, and the blue parts become white and the white blue. So their areas are the same.
Red: π/4 ≈ 0.785
Quarter of a circle of radius 1.
Yellow: 2-π/2 ≈ 0.429
Eight copies of the white area in Red, each scaled down to 1/4 the area.
It's also two unit squares minus two inscribed circles or four semicircles, if you can visualize that.
Purple: π/8 ≈ 0.393
The large circle is π/4 (or four copies of Red scaled to 1/4 the area), and the small circles are each 1/4 the area of the large one because they have half the diameter.
Green: 1-π/8 ≈ 0.607
Same figure as Purple but rotated and inverted.
Pink: 5/4-3π/16 ≈ 0.661
Outer pointy pink parts: 1-π/4
Inner pointy pink triangles: 1/4 (Draw in the two diagonals of the square, which (together with the diagonals of the smaller squares) divides it into 16 congruent small isosceles right triangles, of which 4 are pink.)
Inner pink circle: π/16 (Exactly half the diameter of the large circle, so 1/4 the area.)
So Purple < Yellow < Blue < Green < Pink < Red.
But hold up just a moment...
You can get another ending if you fail this puzzle eight times.
If you choose to do so (just click the white button eight times), the black cat will come to the study room and drop a hint book for you.
It's not much help, since you'll probably still need to know that 2/π ≈ 0.637 ≈ 7.64/12.
Anyway, now that you have your answer, enter it into the bedroom button panel (3, 4, 2, 5, 1, 0 clicks).
The panel opens up, and there's a Rubik's cube in there. Well, not quite. All its faces are painted an identical shade of silver, and there's a small pinhole on the bottom.
Cat door, round 3
Go back to the cat door. The cat has left (and that has nothing to do with your appallingly bad math skills), leaving a coin on the floor next to the drawing.
Okay, not a real coin. More like a cat token.
The slots
Use the coin on the machine facing the bed, and pull the lever. It spits out a printout with paw prints on it.
Bedside table
Pull the doors of the bedside table according to the paw order on the printout.
From bottom up: RRLRLLLRL.
The table opens up. Take the red object, which turns out to be a notched pyramid when you inspect it.
Solids (not liquids)
Go back to the white panel in the study room between the two doors.
You need to fit your four objects into the four holes... somehow.
Examine the coffee cup, and click its handle to pull it off. Now it's perfectly round.
Examine the blue cylinder, and click on it to rotate it. Now it looks square.
Examine the yellow pyramid, and click on it to rotate it. Now it looks triangular.
Examine the red object, and click on it to rotate it. Now it fits the last hole.
Place the four objects in the panel, which spits out a square part with a small round handle.
Squares (or cubes)
Place the square part on the cube in the bedroom. Its faces light up and it... beeps? No wait, that was the artwork in the study room beeping.
Each of the buttons on the net of the cube lights up in red, and changes color when clicked, except for two of them.
Oh great, time for more Mensa-level problem solving. Get out your pen and paper, in case you somehow managed to solve all the previous problems without using it.
I've put a few screenshots here if it helps: http://imgur.com/a/vc9WP
But in case that fails, here's a textual description.
There are a total of three views of the cube, allowing you to see all six faces. Using what you see, you have to orient the cube to its folding net and read off the colors of all the buttons.
First up, the three views. The second is rotated from the first by 180 degrees (not 90, as the previous animation might have you expect), and the third is rotated from the second vertically by a smaller angle.
The only buttons which don't change color occur next to each other along an edge, at the center position on one face and the corner position on the next. By comparing the two, you can find that they must be the red square on the left face on the first view and the red square on the top right of the right face of the second view.
Label the faces on the net 1(top) 2345(middle) 6(bottom), and give each face an upward-pointing mark. With this labeling, the views are:
First:
Top is 2, mark points lower left
Left is 1, mark points right
Right is 5, mark points left
Second:
Top is 2, mark points upper right
Left is 6, mark points right
Right is 3, mark points up
Third
Left is 6, mark points right
Right is 3, mark points up
Bottom is 4, mark points lower-right
Now you can read off the colored squares:
B__ ___ r__ __B ___ _W_

___ W__ ___ _W_ R_W __B

_r_ ___ ___ ___ ___ ___

(1) (2) (3) (4) (5) (6)
So make the squares blue (and red), white, (red), blue and white, red and white, white and blue, and then click the lower-right button.
This gives you access to a switch which turns all the lights off, drowning everything in an eerie green.
But at least it gives you the code 28594 on the bookshelf.
Flip the switch again to turn the lights back on.
Read it again
Use the arrows on the note to shuffle the digits in 28594, giving you the code for the right door.
Write 28594 on the tails of the arrows, and trace them to get 84529 on the heads.
So unlock the right door with 84529. The right door leads to a dark corridor.
Part 3: Corridor
Exploration
There's not much you can explore. The door has closed behind you, leaving you trapped in the darkness without even a black cat to save your life.
Okay, keep calm. Front door, no. Grid of 15 buttons, no. Back door, no.
Aha! A "Panyasonic" home control system that's here to save the- how do you work this thing again?
Enlightened
The green and pink buttons on this device each light up two squares on the screen, one containing a linear figure and one containing a colored square.
For instance, the first (top-left green) button shows a "horizontal line" tile in the seventh place and a "lower right pink square" tile in the second place.
Some of those lines form corners, some of them are straight, but they all...
They all connect to form an arrow, passing through the squares like so:
2387

1456
But the arrow's not what we're after. Can we display something else in its place?
We can consider what colored square tiles appear on which position of the screen:
GLR PLR GUL GUR

PUL GLL PUR GLL
(Remember, this has nothing to do with the button positions yet.)
Trace the arrow through that grid to determine the order of buttons to press.
PUL GLR PLR GLL PUR GLL GUR GUL, which is
8715
6243
Press the buttons in that order, and the lights turn on. Now we can do whatever that other puzzle in here was.
Abstract art strikes again
Turn around to face the grid of white buttons. The lower-right button is black and resets the grid, and there's a signature in the upper-left: Kuroneko.
Which isnt surprising. But it's surprising that the signature runs upward instead of rightward, and also seems mirrored.
Copy the black-and white grid from the bedroom, but mirrored across the lower-left/upper-right diagonal axis so that its lower-right corner is now the upper-left.
wBwB

wwBB

Bwww

BBwb
Press the seven buttons indicated, and then the lower-right black button. This device opens up and gives you the apartment key.
Use the key to open the apartment door and leave.
Escape - Good math ending
You get a Congratulations screen showing the front door of the apartment with the shapes on it.
Escape - Bad math ending
You get a Congratulations screen with three solids, flash cards, pencils, eraser, apartment key and diary on it. (Perhaps this is the game telling you to study more math.)
Don't forget to check out the Apartment For Rent screen, which shows a listing of the apartment complete with 3D model and pictures that show when you hover over the rooms.
(Condensed walkthrough)
In case you're stuck with the prospect of running the whole game again to get the other ending, here's a version of the above with only the necessary steps.
Room changes between study/bedroom/corridor are marked.
Look behind sofa for a key
Look deeply in second drawer for a bookmark
Unlock diary on desk, use bookmark
Unlock box on desk: RLRRLLLRLR
Click top of box, take key
Unlock box on shelf, take pin
Place pin on art
Unlock cat door: DUUDUDDDU
Review cat door
Unlock short table box:
16 38
57 249
Unlock top drawer (no need to open)
Unlock box in bottom drawer: 2853, take pyramid, rotate
Pull out bottom drawer, take card, punch
Use card on book in middle drawer
Open bedroom door: HFT
[B] Unfold note on bed
[S] Open panel behind sofa, press button, SAVE
[B] Unlock bedroom panel: 342510
[S] Take coin from cat door
[B] Use coin in bedroom, (take printout)
Unlock bedside table: RRLRLLLRL
Take notched pyramid, rotate, take coffee cup, remove handle
[S] Take cylinder, rotate
Fill shapes, take cube part
[B] Place part on cube
[S] Make the center row WWRW and the buttons below that WB and the other buttons B.
Flip switch twice, unlock right door (84529)
[C] On right device, press buttons in this order:
8715
6243
Turn around, press the following:
_1_2
__43
5___
67_8
Take key, leave.
Sorry for triple-posting, but before I forget: the "weekday escape" tag doesn't work. It should be "weekday-escape".
Retro Edition is a great idea!
Rather than keep track of things in my head (as if!) or using pencil and paper, I keep two Paint sessions open, one for pasting screen shots, and the other for pasting interesting things from the screen shots, plus notes. Here's what I had at the end of this game, a bit more than usual (I hardly ever delete anything in case I have to restart): http://i.imgur.com/sbmEHyv.png
@barbara Just to contrast with your approach, I usually go into these escapes with only the same text editor I use to write the walkthroughs, and don't copy down anything unless it's too complicated to memorize or too tedious to re-solve.
In other words, I don't mind backtracking a bit if an average player would do that, but I take down detailed notes when puzzles are hard enough that most players would have to.
By the end of Study Room, I had
written down the exact formulas for the colored areas, but calculated pink to be exactly 0.25 units less than it should have been,
made and edited the screenshots for the cube puzzle, since I knew it was necessary and it's honestly next to impossible to solve in a text editor, and
listed down what every button on the corridor panel displayed: the numerical order of path segments, the position of the colored tile and the corner indicated on the colored tile, but I misinterpreted each corner tile as indicating its opposite corner.
Every other code was in my head.
That's how it usually is for the first playthrough, and then I do a second playthrough (sometimes two second playthroughs simultaneously) to get the order of steps for the walkthrough.
If anyone is curious, my first playthrough
got me the bad math ending, but I never left the bedroom and so never noticed the cat.
Also, I still have no idea
what that triangle mark under the eraser actually means.
I like that. I usually just use notepad (if anything is needed), but if the room is harder I change to Excel.
This was somewhat harder and I needed to use pen and paper.
I think the triangle was just a hint that the pen hint is used for those black triangle shaped buttons.
Update