
 It's a time for looking back again - time for the Retro Weekday Escape! Tateita puts you into prison of some kind; and you are innocent! That's not fair! You can shout as loud as you can, but no answer...well, seems that you have to help yourself somehow...and the absence of guards definitely helps.
Hottategoya's escape terrace is a bit jail like too with all the bars around, but the sky is mediterranean blue, sunny and cloudless, so you may feel almost holiday-ish. Yeahm shows you surprizing approach to the genre and Minoto very surprizing approach to well known fairy tale
Have a good time and enjoy!

This Tateita's escape is short and simple, and all puzzles featured here you've probably met in other games and not just once. But it's also very atmospheric and with strong spirit of "golden age of escape games". You need to escape from some fortress, maybe a prison, probably located nearby the sea, as the sound suggests. The basement you are locked in is clean and well lit; however, you're behind bars...can you get out?
The cursor is not changing, no save button, one ending.
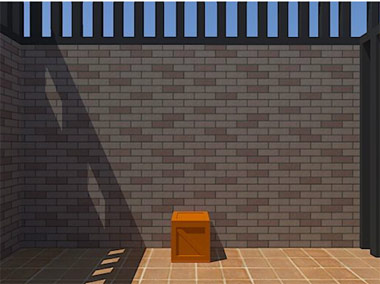
With Hottategoya you get to a strange place, which could be easily upper floor of fortress from previous game (with a bit of imagination). The large terrace with revolving gate in its middle is divided by bar fences into quaters. You can see the exit door between bars, but that quater isn't accessible yet as the gate is stuck in one position and you have to figure out how to operate it - and the only way is to solve few codes and open all these safes, of course!
The cursor is not changing, no save button, one ending.
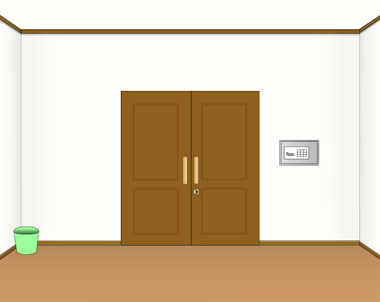
Yeahm's game starts like any other standard escape - you found yourself in a simple room with few pieces of furniture, some safe and a locked chest - so usual scenarios come to your mind. But one of the found items makes quite a difference and gives an interesting twist to the whole game - and it's very refreshing and pleasing the heart of all true escapists! Just start as usual; what you need is a good observation.
The cursor is not changing, no save button, one ending.
Minoto adapted for us classic fairy tale - and it's a brisk adaptation with UFO and a corrida! Don't forget to read descriptions of found items, they may explain something important...
The cursor is not changing, no save button, two endings.
We love escape games, and our readers love talking about them and sharing hints! How about you? Let us know what you think, ask for clues, or help out other players in the comments below.


The clues inside the safes on "Revolving Gate" made my head hurt!
Had to break out a text editor and grid out the colors to get the number patterns.
Didn't catch the significance of the red and blue squares on the wall in the third area until after it no longer mattered. Observing something else got me the answer I needed.
Quite liked the chest item in "Past Escape". Reminded me of
the spooky moment in "The Legend Of Zelda: Twilight Princess" where Link (in wolf form) discovers the unseen ghosts in Hyrule Castle, all gathered around pointing at a secret passage in a suspicious dead end. Creepy the first time you stumble upon that!
This week, all four walkthroughs are in one comment.
Basement Escape
As the text below the game helpfully tells you, there is no item examination, no item combining, and no save feature. Yes, the basement is easier than it looks.
(For this walkthrough, I will start the solutions to puzzles from their first spoiler rather than second as I usually do.)
Exploration
You start off facing a locked gate with a rod stuck behind it… it's not really stuck since you easily pick it up!
Turn left to find a dark corridor with a blue locked wall box.
Turn left to find two rocks, one much bigger than the other.
Turn left- wait, this room only has three screens. That's it.
Rock
Use the rod on the rocks. It fits over the small rock and under the large one, and one more click uses the power of class 1 levers to move the large rock!
Pick up the blue key (key1) that was hidden under it.
Unlock / Exploration 2
Use the key to open the wall box, and push the switch inside it to turn the lights on in the corridor and next room.
The corridor ends in a fork splitting into two dark corridors, and the door in the middle has no handle, but a suspicious hole next to it.
Turn left to find a wall with a green four-digit safe, then left again to find the way back, then left again to find another locked wall box as well as a clue on the right side.
Four digits
In the "equation" at the top of the wall clue, the boxes on the right correspond to those on the left in a very particular way: they show precisely the segments that need to be added to the left side to complete a seven-segment display.
So remove the segments at the bottom from a complete seven-segment display (8888) to get the code (6891).
Enter 6891 in the safe to open it, then push the switch inside to light up the left corridor.
Exploration 3
Since the corridor is oriented diagonally, it ends facing a corner with an eight-button safe.
Turn around (left or right) to face the way back. A clue is written on the wall next to the doorway.
Eight buttons
As the picture on the wall clue indicates, 0 is up and 1 is down, so you need to press the second button in the top row and the first and third in the bottom row.
Do so, and the safe opens up. Take the orange key (key2) from it.
Unlock 2 / Exploration 4
Go back to the second room, and use the key to open the wall box, then press the switch in it. Now the right corridor is lit.
It leads to another room with a green four-digit box in it, very similar to the wall safe you saw earlier.
Turn around to find a clue next to the door.
Four digits again
The wall clue is a maze that's really easy to solve (keep going straight and only turn when reaching a wall), especially because the path through it is already brighter than its background!
If you divide the maze into four equal parts from left to right, the path through it forms the digits 2520.
So enter that into the box to open it, and take the handle from inside.
Twist / Exploration 5
Place the handle next to the middle door of the second room, and turn it to raise the door up, opening the already-lit passageway.
It leads straight to a pedestal with a black key (key3) on it, but picking up the key releases the handle, causing the door to shut behind you!
Turn left to find yet another four-digit safe in the corner.
Turn left and click the door to take a closer look. Four digits are written on it in white.
Four digits again again
How convenient that the code for the safe is right there on the door!
Enter 7435 in the safe to open it and find a white key. As you pick it up, the description tells you that it's a fake key.
Trickery
Place the fake key on the pedestal where you found key 3. This causes the door to open back up.
Unlock 3
It's now a straight path back to the first screen, where you can use the key to unlock the gate and leave!
Escape from the Room with a Revolving Gate
Have you ever had the phobia that you'd walk through a revolving gate and get trapped in it? (Now you do.) This game is pretty much the same but less claustrophobic.
Exploration
The revolving gate is on your left, but let's deal with that later. For now, examine the safe with three buttons that glow red when pressed.
Turn right to face a wall. Of course it has a locked wall box on it! Underneath, there's an empty crate.
Click the left and right sides of the crate to find numbered white triangle markings. (You can also see another crate from here, but we'll get to it.)
Turn right to find a similar crate with a folded note in it. Unfolding the note, you find a string of red capital letters.
As you've seen earlier, the sides of this crate also have numbered triangle markings.
Turn right to face metal bars. Thankfully, you can just walk across the revolving gate to the other side, where you find another locked wall box over another crate which contains another note with another string of capital letters, this time in blue.
Check the sides of this crate too.
Turn right to face metal bars. This time, the revolving gate blocks your way.
Turn right to face the way back. On this side of the bars, three of them have white and red squares painted on.
Turn right to face a safe with four triangular buttons.
Black and White
Use the clue from the crates to unlock the safe with triangle buttons.
The triangles labeled 1, 2, 3, 4, 5, 6 are on the UR LL UR UL LR UR corners of their sides.
So push the ◥ ◣◥ ◤◢ ◥ buttons, then open the safe to find a green key in front of a grid of colored squares.
White and Red
Use the clue from the bars to unlock the safe on the first screen.
In order to make the buttons match each row of squares from top down, you need to push the center, right, left, left, center, right ones in that order.
So click the CRLLCR buttons, then open the safe to find a red key in front of another grid of colored squares.
Unlock (red and green)
Use the red and green keys to unlock the wall boxes in the first and second quadrants.
Flip the power switch in the first box and then push the rotate button in the second (it won't do anything otherwise), and you hear the gate rotate behind you.
Exploration 2
Walking over to the new area, you find a clue with a row of alternating red and blue squares.
Turn right to face a safe with six colored buttons.
Turn right to face the way back. There's no other clue here.
Turn right to face yet another locked wall box.
Red and Blue
Use the red and blue square clue to unlock the six-button safe.
The clue suggests that you interleave the red and blue letters from the two notes you have.
Doing so, you find that they spell out
GREENREDGREENBLUE.The green, red, green, blue buttons are at the upper-right, upper-middle, upper-right, lower-left positions of the safe. So push them in that order and then open the safe to find a blue key in front of a grid of colored squares.
Unlock (blue)
Use the blue key to unlock the wall box over here too. It has a rotate button identical to the one you just pressed, with the same effect of spinning the revolving gate.
Exploration 3
Walking through the gate, you face a three-digit wall safe with colored digits.
Turn left to find the exit door, then turn left to find the way back, then turn left to face bars separating you from the first area. There are no other clues here.
Yellow and Cyan and Magenta
Use the clues from the colored grids in each safe you opened to unlock the three-digit safe.
(You can press the rotate buttons again to spin the gate back if you need to backtrack.)
Each colored grid can be divided into its left, center, right parts, and the non-black squares in each part are either all yellow, all cyan or all magenta.
For instance, the yellow parts occur at in the left column of the grid in the first area, the middle column of that in the second and the right column of that in the third, which means…
…you can combine them in that order to form the digit 9!
Similarly, the cyan parts combine (from left to right) to form 4, and the magenta parts 8.
Enter 948 in the safe to unlock it. Take the plain golden key from inside, and use the key on the door to escape!
Past Escape
Oh no, someone's messed up the clues in this room. You might need superpowers to get out of this one!
Exploration
The locked double doors on the first screen have a numeric keypad on their right. Beside the bin on the left, you find a pen.
Turn right. The huge cassette player on the table doesn't seem to have an eject button. On the left, a hair dryer lies next to a screwed-down wall panel, and a bowl hanging from the ceiling has a fake bird next to an egg that you can pick up. Examining the egg, you find that it has a four-digit lock! On the right side of the screen, a toy car on the floor is missing one of its batteries, and a wall panel opens up into a platform with three small square holes in front of larger shaded shapes.
Turn right. A can of black paint is spilled on the floor, and a picture on the wall appears to have its top section missing. The chest in the middle is locked, and the fish tank on the right has a notebook submerged in it. How horrible! At least you can pick up the box cutter from the right of it.
Turn right. The only new thing here is the table in the middle, which has a locked drawer as well as a blank notepad with its pen missing and a box with all five of its buttons painted black.
Replace
Place the pen in the holder attached to the notepad. Did that do anything?
Now you can open the desk drawer to find a red heart piece and a golden key.
Unlock
Use the key to unlock the chest, which contains an large magnifying glass with a note telling you that it allows you to see the past. Let's try it out!
Portal
If you select the magnifier, you can now move it around the screen and look through it. And indeed, you see in the chest the exact same magnifying glass that was there a moment ago!
Using it around the room, you find that:
The paint can wasn't originally there.
The picture's top half was just the reflection of the bottom half.
The notebook and cutter used to be in the desk drawer along with the heart and key.
The five-button box had brightly-colored buttons in different colors.
The pen was indeed originally by the notepad, but it has something extra on the back.
The keypad had a code for it written on the wall above the door.
The hair dryer was plugged into a power socket beside it.
The car wasn't originally on the floor.
The black shape markings on the wall panel were different.
With a little more thorough searching, you find that
there was a hole in the wall at eye height between the desk and bin.
Using it on the items you hold, you find that
The pen (pick it up again) had an attachment on the end opposite the nib.
The heart used to have water dripping off it, revealing a pink underlayer.
The car used to have two batteries.
The notebook was originally dry.
Deep down inside
Place the heart in the tank, and it turns pink and shows four digits.
So enter those four digits (3537) in the egg to open it, and take the battery inside.
Hidden path
Use the cutter to reopen the hole in the wall above the bin. Inside, there's a start line with racing stripes.
If you use the magnifier on it, you see the toy car there.
Charged
Place the battery in the car, and place it at the start line.
A short while later, you hear a crash as it returns to its original position on the floor. This time, there's a square piece next to it.
Rewind
Use the clue from the picture to unlock the cassette player.
The symbols on the picture are (from left to right) fast-forward, play, stop, rewind, play, play, stop.
So push the 4th, 3rd, 2nd, 1st, 3rd, 3rd, 2nd buttons, and the player ejects a circle piece.
Keycode
Use the clue you found above the keypad to unlock it.
The magnifying glass reveals the clue 19476, so enter that in the keypad, which unlocks the safe so you can take a screwdriver tip from inside.
(If you use the magnifying glass on the safe, you find that it was originally empty.)
Unscrew
Click the back of the pen to remove the end, and replace it with the screwdriver tip.
Now you can use it to unscrew the panel, and you automatically plug the dryer in.
Restore
Use the notebook on the dryer, than examine it. Ugh, the page is smudged beyond recognition!
Wave the magnifying glass over it to view its original contents.
Five buttons
Use the clue from the restored notebook to unlock the five-button box.
The arrow on the page passes through red, yellow, blue, pink, green, yellow, black circles.
So push the 3rd, 5th, 1st, 2nd, 4th, 5th buttons, and then the black button on top. The box opens so you can take a triangle piece.
Trio
Place all three pieces in the wall panel with the shape markings.
You need to follow the order shown through the magnifying glass: square on the left, then triangle, then circle.
Do so, and the panel opens up so you can take a silver key. Use the key on the door to escape!
Snow White
It's time to leave your common sense at the door once again, as we tell the tale of Snow White and her seven dwarfs and a dog and three chicks and…
Exploration
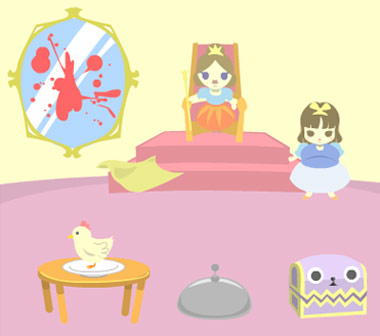
The game starts in the throne room with a plump Snow White and a not-so-plump Queen. The mirror on the left is splattered in blood (?), and there's a fine polishing cloth on the ground next to it. In front, there's a chicken sitting on a plate, a dome-shaped cap (cloche) with mysterious effects, and an empty treasure chest that seems quite hungry.
Cleaning
Use the cloth to clean off the mirror. Look like Snow White is the fairest of them all!
The queen has her huntsman throw Snow White out of the castle and onto a field, where six dwarfs struggle and fail to pick her up.
Your cloth is now stained red with the tomato sauce!
Exploration 2
The field doesn't look too unusual, except for the bullfighter wearing a gas mask.
Go right to the house guarded by a dog, where the last dwarf stands outside in front of smoke plumes billowing out of the ground around a round object.
Stained
Give the red cloth to the bullfighter, who easily defeats the bull. In return, you get his box respirator (gas mask).
Smoke-free
Give the gas mask to the seventh dwarf, who walks into the smoke and retrieves the UFO.
You can also pick up the blue dwarf.
Vandalism
Set the UFO free in the field beside the bullfighter, and it cuts up a tiny circle of crops to reveal a Frisbee in the middle.
Fetch
Give the frisbee to the dog. Mysteriously, it never lands and the dog keeps chasing it.
Carry
Place the seventh dwarf among the others, and they carry Snow White towards and into the house before tossing her onto a bed.
Exploration 3
The house has six bird nests with two chicks in them which switch nests when clicked. You can open the window to find an elephant painter who gives you his paints and brush.
Meanwhile, in the castle
Go back all the way to the left and remove the mirror from the wall, then pick up the declining poster showing three ghosts.
Also cover the chicken with the dome and then remove it. Now there's a chick on the plate!
Three chicks
Place the chick in the lower-right nest in the house. Now you can click it too to move it.
So use the clue from the poster to solve the chick puzzle.
To match the colored eyes on the poster, you need to color the chicks blue, green, red from top to bottom (click them 1, 3, 2 times with the palette equipped) and then move them to the left, right, left positions (click each one once without using the palette).
Once all of that is done, the top nest flips over and a diamond rolls onto the ground.
Treasure
Give the diamond to the treasure chest, which spits out an eaten apple. What a horrible trade!
Reversed
Place the apple core on the plate and cover it with the dome again. When you uncover it, you find a delicious uneaten apple.
The fate of the kingdom is in your hands! What will you do?
Ending 1
Give the apple to the queen, who puts on a hood, rushes over to the house, and feeds Snow White the apple.
Snow White instantly withers away before your eyes- oh wait, she's just slimming down to a more manageable size. Dieting end!
Ending 2
Give the apple to the elephant in the house window, who runs over to the castle and feeds the queen the apple.
The overwhelming nutritional goodness of the apple causes the queen to plump up, so she too can be like Snow White. Rejuvenation end!
Once again, thanks for text walkthroughs, kktkkr!
Update