
 It's time for a break - Retro Weekday Escape brings four games for your fun!
You get lost (twice) in Esklavos' lovely small world connected with ours by magical gate, locked by four locks at the moment unfortunately. After you escape it (twice), you find yourself in Ichima's room without any visible exit and with several secrets which make game more entertaining than expected. Suzunari's room is absolute classic with many clever puzzles.
Have a good time and enjoy!
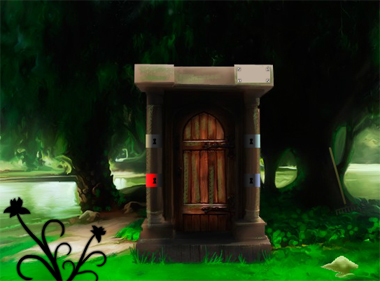
The swamp in one of the first Esklavos' escapes seems like beautiful English landscape garden and not very cursed. But it's enchanted for sure, as the only way how to escape it is magical portal and you need to find four colored keys to open it. Just solve few puzzles and the keys emerge by themselves (fall from above). The game is quite short and to fully enjoy dreamy atmosphere and art style of Esklavos, another escape from swamp follows - and this one definitely feels cursed.
The cursor is changing, no save button, one ending.
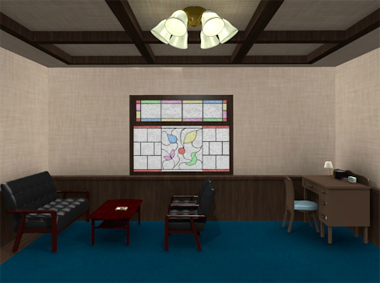
Ichima left you in a living room, a bit dark, with old almost antique furniture and not very intersting. On the second sight, the room isn't as common as you thought - there aren't any doors, and the stained glass window is without handles, probably unopenable, so how did you get here? Or better, how are you supposed to get out? The situations isn't hopeless though, there are some items you can find, and also clues where and how to use them - will you escape?
The cursor is not changing, no save button, one ending.
On the starting screen of Suzunari's (very classic) escape are two movie flappers with 'start' inscription. Both are active and depends whether you want to know the story behind the game and also can read Japanese (click on the flapper in the middle of the game screen then) or just play (click on the one in lower right corner). Intro in Japanese is short and skippable and gives you some information about brown briefcase which is in your inventory right from the beginning. Remember, your goal is to find how to open the briefcase and when you open it, you're free!
The cursor is not changing, save button, one ending.
We love escape games, and our readers love talking about them and sharing hints! How about you? Let us know what you think, ask for clues, or help out other players in the comments below.


since KK will be gone for a couple of weeks, i hope someone can get some walkthroughs done for the games.
Cursed Swamp
Get stuff
Rake
To the right of the house, leaning against the tree
Spade
In the scene two to the right of the door, leaning against the tree
Hammer
Use the rake on the leaves under where the spade was
Screwdriver
Use the spade on the dirt to the right of the door
Plant
Click on the branches of the plant to the left of the door until they match the branches in the scene to the right.
Fish
Click on the blue box hanging from the tree to get the clue.
The clue at the bottom of the screen reads "Transform six fish in one and the key will be yours."
Then click on each fish until they all line up on top of each other.
Halfway up the water, above the middle of the patch of leaves in the water.
Numbers (the six sticks in the scene to the right of the door)
Get the first two numbers from the tree
55...
Get the last four numbers from above the door
Use the screwdriver on the panel on the top right of the door
3218
Rock (at the bottom of the tree three scenes to the right of the door)
Break it with the hammer
Indigo Blue Hint for the clown puzzle
The hint is on the second page of the book.
For each word, get the number of each letter to the right of the word. For example, for "Pearl", the letters are 'e' and 'a', so the numbers are 2 and 3 (pEArl).
Pearl 23
Sapphire 6
Ruby 14
Emerald 5
Take the first letter of each word in the order given by the numbers. For example, the first lette is R, because the number '1' is with "Ruby".
R P P R E S
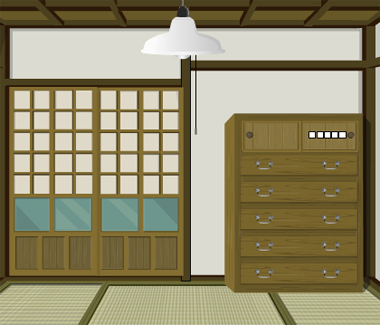
Suzunari Escape 27: Backfire
Looking around
We start with a chest already in our inventory.
There's a cabinet in the first room. Clicking on the top drawer reveals a 5-digit number puzzle. There's nothing in the other drawers.
There's a panel to the left. Clicking on the door reveals another room. Go in. Get some corn and a hat.
Click on the hat to reveal a 6-colour clue
6 flowers: white-green-green-yellow-white-yellow
Go back to the main room. Go right.
There's a chest of drawers with a "7" drawer sticking out. Clicking on all the drawers reveals a 5-digit clue:
7-3-5-8-1
There's a panel to the right. Clicking on the door reveals the kitchen. Go in. There's a sink and a pump that doesn't work.
Clicking under the counter reveals a a big yellow pot that you can move aside, a panel that needs a screwdriver, and a row of 5 coloured pots.
white-purple-green-blue-orange
Clicking on the big yellow pot reveals a wire rack.
Go back to the main room. Go right.
Top left of the cabinet: There's a doll with three coloured flowers.
white-yellow-green
Top right of the cabinet: a puzzle with three vertical buttons.
Middle left of the cabinet: a diamond puzzle.
Middle right of the cabinet: The door has a 3 x 5 pattern of blue or white squares, maybe a clue. Clicking on the door reveals a chest that needs a key.
Bottom left of the cabinet reveals a 4-digit number puzzle.
Bottom right of the cabinet is an empty drawer.
Go right.
There's a big green thing with a swirling pattern. In the middle, there's a section that's a bit different.
The swirls are in a more regular pattern.
L R R L R L R
There's a 5-flower puzzle. Clicking on the right-hand-side of the panel reveals a 3 x 5 flower clue.
To the right of the flower puzzle, there's a 4-number clue.
26-5-3-14
5-flower puzzle
Use the clue with the 3 x 5 blue or white squares and the 3 x 5 flower clue.
Yellow face, Green 4-leaf clover, Pink tulip, Pink tulip, 3 little white flowers
Get a big whitish pot.
3-vertical-button puzzle
Use the 5-flower and 3-flower clues.
The 5-flower clue tells what colours to use, and the 3-flower clue tells what colour the buttons are.
top-bottom-bottom-middle-top-middle
Get pliers and a grey triangle.
Pump in kitchen and locked chest in the doll room
Use the pliers to fix the pump. Use the pump to draw some water. Get a silver key from the sink.
Use the key to open the locked chest. Get a blue thing that looks like the top of something else.
Inside the chest is a 5-testtube clue. Left-to-right in ascending order of height:
green-orange-purple-white-blue
5-number puzzle in the first room
Use the 5 coloured pots clue, the 5-testtube clue, and the 5-digit clue from the drawers in the second room.
The pots tell what colour to choose, the testtubes tell what order to choose the numbers in (lowest testtube=lowest drawer).
white=3, purple=5, green=1, blue=7, orange=8
Get the screwdriver. Use the screwdriver to open the panel under the counter in the kitchen. Get a step stool.
Clock
Place the step stool under the clock. Use the blue thing on the clock to reveal a left-right puzzle.
Use the clue from the big green thing with a swirling pattern.
L R R L R L R
Get some matches.
Diamond puzzle
Use the grey triangle to complete the puzzle. Now, look at the door to the kitchen. It has a row of 4 blue squares with a white triangle.
The white triangles point 1=down-left, 2=up-right, 3=up-left, 4=down-right.
Now look at the 4-number clue. It tells what order to click the triangles in the diamond puzzle.
2-6-5-3-1-4
Click the triangles pointing down-right, down-left, up-left, down-right, up-right, down-left
Get some charcoal.
Cook the corn
Place the charcoal on the big whitish pot (it must be a hibachi).
Light the charcoal with the matches.
Place the wire rack on the hibachi and place the corn on the rack.
Get the clue to the 4-digit number puzzle.
6 3 2 8
Get a gold key.
Use the key to unlock the chest at the bottom right of the inventory.
And out!
I really enjoyed the Suzunari Escape. Colourful, no pixel hunting, and while the puzzles were a bit complex, they were all logical.
Cursed Swamp Escape 2
It's been ages (kind of) since you last escaped the swamp, and now it's more cursed! More swamp! More escape!
Exploration
(You should pick up items with an empty hand; make sure Handle is selected.)
A hooded figure (statue?) holds a bowl between two trees, and you notice some colored fish swimming at the bottom of the screen. On the left tree, you also see a clue with digits, a skull that actually becomes a five-skull puzzle when clicked, and a wiggling earthworm. On the right tree, you see an empty nest and an empty pot near the bottom-right corner.
Go left. This screen has a familiar-looking locked magic doorway surrounded by four colored keyholes, and it too has a clue with digits on top. Pick up the stick next to it, and notice the stream leading down into the lake where more colored fish swim around. The left tree has a black bird on it, as well as an earthworm and a forked branch you can take. The right trees have a net wrapped around one of its branches, as well as another earthworm and a clue with a partially-colored pentagram in a red circle. You'll also notice a darker-colored branch extending from the right edge of the screen, as well as three leaves along the bottom edge that move when you click them.
Tilt
You might notice that on the second (left) screen, the branch sometimes moves when you click the leaves along the bottom of the screen. How exactly does this work?
The branch lowers when you click the leaves from right to left (3 to 2, 2 to 1, 1 to 3), but resets if you click any leaf out of order.
So simply click the leaves from right to left repeatedly until the branch reaches its lowest position and a blue key rolls out.
Halves
Use the digit clues to solve the puzzle with the skulls.
The digit clues combine to form the code 52531141, so use the stick to hit the skulls in that order (5 being rightmost and 1 being leftmost).
Once you've done it correctly, a red key appears at the bottom of the screen.
Lure
Give all three earthworms (one by one) to the bird, who flies to the right screen and eventually lands next to the nest, dislodging a white key.
Catch
Combine the net and branch to form a fishing net, and use it to get all five fish: blue, white and green from the left screen, and yellow and red from the right screen.
Fill
Use the pot in the stream to fill it, then use it on the bowl held by the statue to fill that.
You'll notice that you can use the fish on the bowl (while not zoomed in on it) to place them there. Now what?
After placing each fish in the bowl, you have to rotate them into the correct position according to the pentagram clue.
The easiest way to do this is to rotate all the non-yellow fish into position, clicking the white, green, red, blue fish until they are in the top-right, top, top-left, bottom-left positions, and then move the yellow one over the red fish. (Even easier if you don't put the yellow fish in first!)
Once done, a gold key drops from the bowl.
Unlocks
Place all four keys in their matching locks to escape!
room7 Indigo Blue
It's fun to play in rooms without a visible exit.
Exploration
You find yourself in a cozy room with a large stained glass window. Cushioned chairs surround a table with a tray of gems, from which you can take a tiny green case. The desk in the corner has an alarm clock you can adjust, as well as a large drawer with a notebook in it and smaller locked drawers with a four-digit lock, a keyhole and a four-button lock. (You'll need to close each drawer before you can open the others.)
Examining the notebook, you find a clue about gold prices on the first page and a clue about gems and numbers on the second.
Turn right to face a tall blue machine between two lights.
Turn right to face a painting with a panel beneath, missing just one of its buttons. On the left, a bookcase holds various uninteresting books and wineglasses, as well as a golden mask. Its bottom drawer has a photo that looks like it's from this room. Looking up at the top of the bookcase, you see some blue shapes that you can't grab, as well as a hole in the ceiling above.
Turn right to face a fireplace (shuttered off) with a lever slot. The clock on the mantle is missing its hands. On the left, a rack on the wall has a hat and trousers hanging on two of its three hooks, and you can look in the hat to find a clown card with four letters on its corners.
Hooked
Place the mask on the empty hook, and a silver key pops up.
Once you get the key, you can retrieve the mask from the hook.
Unlock
Use the silver key to unlock the middle desk drawer, then open it and take the paper knife.
Poke
Use the knife to open the green case, and open it to find a folded note with a time written on it.
Adjust
Set the clock on the table to the time shown on the note (6:20), and push the red button on top. A pair of clock hands fall out!
Attach the hands to the clock, which opens up a small drawer to the right with a teardrop-shaped button inside.
(If it wasn't clear where the button goes, you can click it to find the peg on the back.)
Shapes
Place the button in the empty spot under the painting. Now you can click the buttons to change their colors. (The game helpfully reads the colors out for you in Japanese, which is rather pointless.)
Where have you seen those shapes and colors?
The shapes of the buttons match those on the stained glass window, where they are yellow, pink, blue, green.
So click the buttons 2, 3, 1, 4 times to open up the painting. In the compartment behind, there's a stack of books with a keyhole on the top one.
Clown
Obviously the clown card will help you unlock the bottom drawer, but you need more clues for it.
So look in the notebook to find the rest of the puzzle.
The second page of the notebook has four "equations", where the gemstone name on the left sides of the equations begin with the letters P, S, R, E. You might also notice that each of the letters on the right of the equations occurs exactly one in the words on the left.
The numbers tell you to count the positions where the letters occur:
e,aare the 2nd and 3rd letters of Pearl.iis the 6th letter of Sapphire.R,yare the 1st, 4th letters of Ruby.ais the 5th letter of Emerald.This suggests that the 1st to 6th buttons in the code are those marked by the letters RPPRES, so push the ⌟ ⌜⌜⌟ ⌞⌝ buttons on the lock to open the drawer, then take the small key from inside.
Unlock 2
Use the small key on the books behind the painting (if the painting drops back down, click the button panel to reopen it).
Inside, you find a hammer-shaped piece which is actually a lever handle!
Pull
Insert the handle into the lever slot on the fireplace, and then pull it down to open the shutter.
It looks like a dead end here, but one wall is missing: near the left side, you find that the stone passage continues into a staircase that leads up to the attic!
Exploration 2
Light shines upwards from a hole in the floor. As you take a closer look, you find that it leads to the room you came from, and clicking it again gives you a direct view of the blue shapes on top of the bookcase, which spell out four digits.
Turn left to find something that looks like a cannon, as well as a trapdoor in the corner behind. Looking through the trapdoor reveals that it's placed directly above the black couch on the first screen.
If you get cold feet and try to backtrack down the stairs, your efforts get thwarted when you find that the fireplace entrance has closed behind you.
So the only way out is indeed to drop down through the trapdoor. Once you land, click the middle of the screen to return to a normal position.
Top down
Enter the code you saw in the attic (5427) in the top desk drawer. The drawer opens you find a strip of film negatives.
Light the dark
Make your way back up to the attic (by pulling the lever and climbing the stairs).
The thing that looks like a cannon is actually a projector, so place the film in it to view a clue with the mask, knife and a hand pointing to the corner of the screen.
Once the hand appears, you can click that corner to find another tightly-shut trapdoor.
Use the knife to pry this compartment open, and you find a golden key inside.
Unlock 3
Leave the attic the same way as before (by jumping), and use the golden key on the tall blue machine.
It asks you for a value in yen which you have to enter by a keypad. What about the tray that opened on the bottom?
You can place golden objects on the tray to weigh them. Following the clue you saw upstairs, you weigh the mask (580 g) and the knife (180 g), and also pull the key back out of the lock and weigh it (140 g).
The total of those three weights is 900 grams, and following the conversion rate in the notebook tells you that they're worth a total of 720000 yen.
Entering the correct value in the lock makes the exit open up… beneath you!
Thankfully, you've already trained your landing skills twice, and the fall onto hard pavement doesn't stop you from immediately walking away. Congratulations on escaping!
Update