
 A short trip to the past is here, it's Retro Weekday Escape time!
You start in Tototo Room's room with simple task - find eleven blobs and turn them into orange smiley faces. In Esklavos' poetic world you need to find four eyeballs instead, which don't turn into anything, they are your pass to the freedom, and after you leave it, Suzunari locks you in very classical escape room, obviously traditional Japanese one. Usawanhouse's room is a classic too, though well known fairy tale it plays with has an unexpected twist.
Have a good time and enjoy!
This escape isn't very old, but Tototo Room's games haven't changed much during these many years they've been creating them - you hear the same fanfare when you 'activate' some blob, the room is almost the same too, refurbished a bit, and you often meet special creatures here, like playful melon or gingerbread man - and it's always fun. So, explore the room, click every grey spot and the signboard above exit door shows you how many buttons you've already found; when you see eleven smiling faces on it, you can push the 'open' sign and get out.
The cursor is not changing, no save button, one ending.
P.S. For comparsion, here are some of their oldest works: Button Escape 3, Button Escape 4, Button Escape 5 etc.
Esklavos takes you to their bluish and atmospheric world, to the seaside at dawn (or dusk), familiar tune sounds, and small dragon needs your help. No wonder, it's missing front legs...and it won't grow them later like tadpoles does (probably), as judged by the big dragon which you meet later and doesn't have any too...and it also wants your assistance. So, look around for useful items to overcome magic fires blocking North West way first, do what the dragons want, and finally, collect four eyeballs. Only fully completed and therefore satisfied skulls open the portal for you!
The cursor is changing, no save button, one ending.
Suzunari's blog has been closed from December, but this game is surprisingly still accessible - and as their other ones (sadly not playable now) has logic and intuitive puzzles, clean and neat graphic, and very high playability. At the beginning is a skippable intro (in Japanese only), and then you find yourself in a room with locked door and unusual decorations, which are clearly hints, as every escapist can see at the first sight. Can you get the key from exit door and leave?
The cursor is changing, no save button, one ending.
Usawanhouse's game also starts with skippable intro in Japanese, I'm sorry. Then, suddenly, you stand in the middle of someone's living room and no need to say that all doors are locked. But you know what to do, just look for hints, puzzles and keys - everything we're used to. Now, the only question stands, why are the three pigs involved? or maybe more important one, can you escape?
The cursor is changing, save button, one ending.
P.S Good news for players with bad memory - two years old The Basement Escape has been ported to Unity. Others can replay it too.
We love escape games, and our readers love talking about them and sharing hints! How about you? Let us know what you think, ask for clues, or help out other players in the comments below.


Button Escape 37
The game page has a second copy that doesn't require Flash. While it may have visual/audio bugs, they should have no impact on gameplay.
Exploration
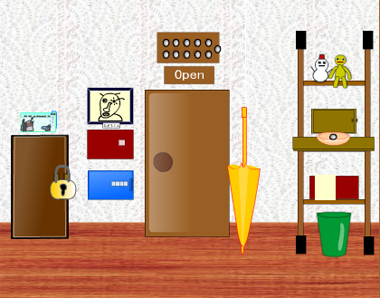
There's only one screen to explore this time, but it's decked out with all the furniture you've gotten used to seeing. And as usual, the door is locked and you'll need to turn on the eleven (silver) lights above it by finding some buttons.
On the left side, you find a picture of a "Surprised Man", and you can do some things to it by clicking its nose and dark eye. Under that, there's a red safe with eight blue buttons arranged in a circle and connected in pairs, and also a blue safe with a four-digit lock. On top of the locker with the giant padlock, there's a fish tank (with a button visible near its air pump), and you can click it to get a closer look at some tiny lilypads, a zigzagging arrow, and another button at the top right corner.
On the right side, there's a yellow umbrella with a digit that appears when you open it, and then there's some shelves with a variety of objects. The top shelf holds a snowman and gingerbread man. Clicking them reveals that they're friends, and you'll find another digit clue, a button behind the gingerbread man, and a button under the shelf. The second shelf has a bowl with a button, but it's guarded by a melon with a long tongue. Nonetheless, you can still click the button on the left side of that shelf. The next shelf has a red box whose lock has four buttons with decorative lines on them. And on the floor, there's a bin that compresses and then pops up just long enough to push the button hidden beneath.
Eight-pointed
Use the clue from the fish tank to unlock the red wall safe.
Each blue button is colored white on a different side, mimicking the concave shape of the lilypads. So the leftmost pad, which appears to point down, actually represents the topmost button.
Observing the gaps, the clue (read from left to right just like the arrow) tells you to push the top, bottom, right, left, upper-right, lower-left, upper-left, lower-right buttons.
So push the buttons (with white) on the ↑↓→←↗↙↖↘ sides. Once you're done, the game helpfully zooms out, and you can open the safe to find a gold key, a monkey with some letters on its face, and a white outline of something.
Golden
The white outline tells you to click the nose in the picture to make his nose/snout appear. Since the gold key appeared together with the outline, that's a hint that the key fits in the nostrils!
There's nothing to open up, but this "unlock" lets you flip the picture over to find a clue with some weather symbols. The pin that holds it up is actually a button!
Forecast
Use the clue from the weather symbols to unlock the blue wall safe.
(You have to view each of the matching clues for the game to count it.)
You've already seen the digits on the umbrella and behind the snowman. Another digit appears on the eye of the picture, which is shaped like the sun. And if you're considering similar shapes, then the cloud symbol actually looks like the monkey's face, on which the letters from left to right spell
seven.Putting them in order, the digits on the monkey, eye, umbrella, snowman form the code 7328. Enter that into the safe and open it to find a silver key.
Silver
Use the silver key to unlock the padlock. Looking in the locker, you find a rather large button, a pencil you can pick up, and a yellow line that starts a larger clue when you click on it.
Linear
Use the line clue from the locker to unlock the red box on the lowest shelf.
In order to reproduce the clue from the locker, you need to click the buttons 5, 6, 2, 1 times.
Do so, and then open the box to find a drawing of a stick figure with a button on his forehead.
The stick man points to his own mouth, so click the mouth to open it and find another button inside.
Bar
The remaining button is in the bowl, and you have to stop the melon using only a pencil.
Thankfully, you can just use the pencil to hold the compartment shut, and then push the button!
Complete
The Complete message confirms that you've found all eleven buttons:
Numbered according to this walkthrough, the
09 10 07 11 08 01

05 06 02 03 04
lights on the door are controlled by the following buttons:
On corner of fish tank
On screen with lilypads
Behind gingerbread man
Under gingerbread man's shelf
To left of bowl
Under bin
Back of picture frame
In locker
On stick figure forehead (in red box)
In stick figure's mouth
On bowl
Click the OPEN button above the door to open it and escape!
Dragon Nest Escape
These dragons look soft, but do you think they breathe fire, or eat travelers for breakfast? Let's not stick around to find out.
Exploration
(Reminder: you can only pick up items with an empty hand ("handle").)
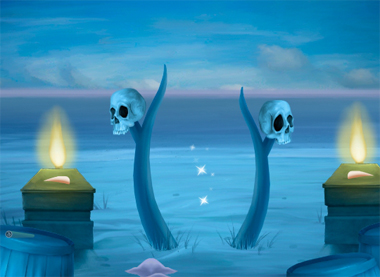
The starting screen has a small dragon whose speech doesn't make much sense. Its stone platform is surrounded by five eggs, and a similar platform on the left has a fire lit.
Go right to find a "magic door" formed by skulls on sticks. There are two more similar stone platforms here, each having a fire and a pink horn attached. Also, there's a torch at the right that doesn't do anything. On top of the barrels, you find a small telescope and some arrows, and there's a pile of dust on the ground that's slightly grayer than the sand around it.
Go left twice. The arrow at the corner of the screen indicates a path onward, but it's currently blocked by two magic fires in the middle of the screen. While you're trapped here, take a look at the locked chest and crossbow next to it, the sign with a guide to Draconian (and a horn stuck in it), and another horn stuck to the low platform on the right.
Range
You may have noticed more hotspots on the starting and left screens.
Specifically, you can look out on the shoreline with the help of the telescope. What do you see?
Some glass bottles hang on strings to the left and right of each distant peak. There are two on each screen, for a total of four.
How do you reach them?
Combine the crossbow and arrows. While still looking through the telescope, switch to them and use them to shoot down all four bottles.
Then back out, and pick up the bottles on the beach to get 2 elven cards, an uncharged wand, another 2 elven cards and an eye.
Magic
You'll need to charge up the wand with a source of magic. Other than the fires, where can you find something magical?
Use the wand on the magic door to charge it, and then you can use it to put out the magic fires.
Exploration 2
Now that the path is clear, make your way up to the- Whoa! That's a big dragon!
He asks you to find some claws, but for now you can just grab the shovel part from the left side of the screen and the crowbar from the right.
Force
Use the crowbar to pry the horns off the sign and the platform to its right, as well as those on the screen near the magic door.
This gives you a total of 4 horns, which is the correct amount.
Also use the crowbar to open the second barrel from the right, then reach your hand in and pull out 2 elven cards and the other shovel part.
Dig
Combine the shovel parts and use that shovel to dig up the dirt pile, revealing a bone inside.
Translator
Surprisingly, the only thing that activates the ring of eggs is whacking them with the bone.
Use the clue from the sign to figure out the correct clue for this.
(The clue from the small dragon is randomized but that from the sign isn't.)
Each letter in the dragon's clue appears on the sign next to a digit, and each digit represents one egg. So for instance, "g" is the 4th egg from the left.
This gives you a sequence of eight eggs to hit with the bone, and when you've done it correctly an eye falls out of the sky.
Repeat
Give the elven cards to the dragon, who plays a memory game with you.
After he shows and hides his yellowish cards, click the white ones in that order to match. If it's wrong, the puzzle resets.
Obviously this is randomized too, but it helps if you give each of the cards a name, like Claw or Harp or Vee or whatever, and it helps even more to just cheat by taking a screenshot.
Whatever method you use, once you win you can back out to find an eye beneath the dragon.
Return
Also give the four claws to the large dragon, who honors his word by giving you the black key.
Unlock
Use the black key to unlock the chest, which contains the last eye.
Exit
Place all four eyes into the skulls, and then click the magic door to leave!
Under the Sakura Tree
Suzunari tends to write rather long and powerful stories, and I just can't do this one justice with a proper translation. I'm going to omit most of the details, but it starts with
a memory of your (the narrator's) physically strong grandfather telling you to eat more.
Over the years, he developed Alzheimer's and began to forget Grandma who was kind to him throughout, so you lived with them.
One day, he called you to the house, but then the door locked behind you and he was missing!
Exploration
Clicking on the door reminds you that Mom must have hidden a key somewhere in the room. On the right is a photo of Grandpa and Grandma when you were young, but the frame seems to be loose and tilts when you click its corners.
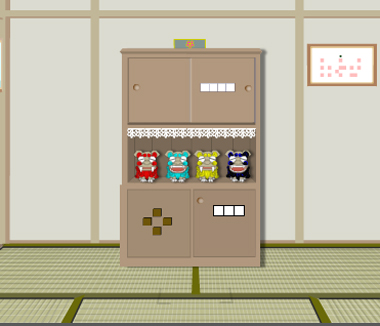
Turn right to find a tall cupboard and another picture frame with a perplexing clue. Looking at the cupboard from top to bottom, there's a box on top too high to reach, an empty compartment with a clue printed on its wall and a locked door with colorful buttons, a row of colorful figurines (let's call them lions) that can be lifted to find a teacup hidden behind, and more locked doors with four-button and three-digit locks.
You also faintly see a pair of L-shaped markings drawn on the tatami mat flooring. Wonder what goes there?
Turn right. This side of the room is split in half, but you immediately notice that the hanging scroll is showing some dancers. Under it, there's a pair of statues for marital happiness. (The descriptions identify these as eisa and shisa, indicating that they're from Okinawa.) On the left, there's a tall standing lantern which you can open to find an empty plate at its base. Opening the drawers beneath, you find a bag of shincha tea whose description tells you that it's an Okinawan souvenir and Grandpa's favorite. As for the right side of the room, the top compartments are out of reach and the sliding closet doors are stuck. A closer look reveals that they're blocked by a screw.
There's also a pair of markings on the floor here.
Turn right. Even though there are shoji windows, you can't open them at all. The drawer of the table has its handle partially removed. And the game has nothing to say about the power sockets on the left.
Four colors
Looking at the cupboard, you realize that you need to enter colors of the lion figures into the top-right door.
Those colors are red, aqua, yellow, blue, so click the buttons 4, 3, 6, 1 times and open the door to find a screwdriver.
(The screwdriver's description says it's bought from "Suezou Store", which I can only assume is a Cogito Ergo Sum reference.)
Unscrew
Use that screwdriver to remove the screw holding the closet shut.
Now you can open the left side to find a box with four symbol buttons (that you need to view a hint before attempting) and a stepladder, and you can open the right side to find an electric kettle full of water.
But that's not all! Look around for another screw you can remove.
The side of the stepladder has a piece secured with screws. Thankfully, removing it is perfectly safe and reveals a clue with some symbols and math.
Screw
Place the screw into the drawer of the table, and use the screwdriver to fix the handle.
Then open it to find a matchbox.
Climb
Use the stepladder (on the floor markings) to reach the box on top of the cupboard. It has a pattern of sakura flowers on top as well as some color-changing buttons arranged in the shape of a flower on the front.
Reclaim the stepladder and use it to reach the upper doors above the closet. The left door doesn't move but the right door does, and you find an unlit candle behind it.
Light
Place the candle inside the lantern and light it with the matchbox, then close the lantern. A clue appears!
Dance
Use the clues from the lit lantern and scroll to unlock the bottom-left cupboard door.
The pose of each dancer is the same (or a mirror image) except for the position of the drum.
The numbers on the lantern indicate the order to look at the dancers, and in that order the drum points LRRUD.
Click those buttons to unlock the door and find a folded transparent sheet.
Squares
Place the transparent sheet onto the picture frame. Now there are red squares all over, but where do you get a clue?
While still looking at the frame, drag the sheet around to make the black dots align. What do you see, and where can you use it?
Among the jumble of red squares, suddenly none of them overlap and most of them assemble into three large digits.
Enter that code (268) into the bottom-right cupboard door, then open it to find a teapot.
Tea
Connect the kettle to the power socket to boil some water.
Use the tea leaves on the teapot, then use the teapot on the kettle.
Finally, pour the tea out into the teacup. The design on it changes color!
Five colors
Use the clue from the filled teacup to unlock the box in your inventory.
The pink petal at the top isn't actually a button. The other four petals (left to right, or counter-clockwise) need to be blue, lime-green, gray, yellow, so click them 2, 5, 9, 6 times, then open the box to find a watch.
Interestingly, the watch has just one button which seems to magically change the numbers displayed into shapes.
(The description of the watch says it was Grandma's present to Grandpa.)
Corners
The steam from the kettle reveals a clue on the windows behind: four symbols arranged at the corners of a pane. What clue and puzzle does this match?
You've seen those same symbols in the top-left compartment of the cupboard. Translating those to corners of the pane, you get the sequence UL LL LR UL LR UR.
So touch the ⌜⌞⌟ ⌜⌟⌝ corners of the photo frame, which drops down to reveal a tiny sanshin (Okinawan shamisen) which seems designed for a doll.
Side
You seem to be running out of clues, so it's time to check your items again. Specifically, that matchbox which hasn't gone away after you used it.
Click the right side of the matchbox to find a clue with colored letters printed on the inside.
Those colors match those of the lions under the scroll, and you'll also notice that the four-button safe in the closet is now usable.
The puzzle just requires you to copy the eye shapes of the lions onto the buttons on the box, but the catch is that their right eyes are on our left and vice versa, so that you should be looking at the 3rd, 2nd, 4th, 1st eyes from the left of the display.
Click the buttons 3, 0, 2, 1 times, then open the safe to find a doll on a box, with its hands apparently ready to hold something.
Player
Place the musical instrument on the doll, which activates the four-digit lock at its base.
Use the clues on your remaining items to figure out the code!
The star, diamond, square, double circle which appear on the stepladder replace the numbers 45, 6, 8, 10 on the watch when you push its button.
So the equation on the stepladder works out to 45×6×8+10=2170. Enter that into the doll box, then open it to find a fancy gold key.
(Feel free to save your game before the ending.)
Ending
Use the key to unlock the door and end the game!
As you step out into the courtyard, Grandpa and Grandma sit together watching the sakura flowers. He makes an embarrassed proposal, and she accepts. For a moment, you wonder if they locked you in to spend some time alone.
The next year, he passed away. As Grandma tells you, he wasn't sad or fearful in death, even as he was very timid in life.
It's been 10 sakura seasons since, and you've become more like Grandpa, both in the strong appearance and the things you tell your children. Will your wife turn out just like Grandma? Maybe you'll propose too in 50 years, under this sakura tree.
Invitation
After receiving an invitation from your girlfriend, you arrive at her house… but she's not there and the door locks on you!
Exploration
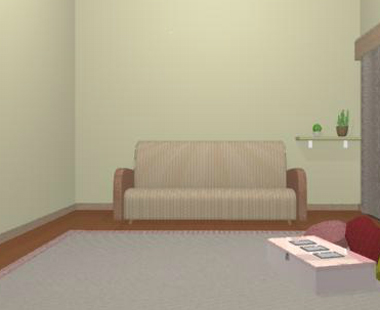
You start off facing a couch and a wall shelf with some potted plants. Ignore the pink box for now, and click around to find
a detailed drawing under the couch, and a similar but less detailed drawing under the shelf.
Turn right. Here you can see that the pink box has a three-digit lock with tulips drawn on one side and three arrows on the other, and beside it on the carpet are some colorful cushions. Opening the curtains, you find that you have a rather limited view of a vehicle, some flowerbeds, and a bit of the other room visible through bars. There's also a diagram on the left, and clicking it reveals that it's a simplified floor plan with some clues added.
Turn right. In between two locked doors, there's a picture frame showing a car under 9 numbered circles which are actually buttons. You can also see that the false ceiling isn't sealed off, and two metallic things hang from the top.
Turn right. Beneath the wall clock, there's a four-digit safe in the wall.
Trimerous
Use the clues near the pink box to unlock it.
Since the arrows on the box cross over each other and point to the cushions, the correct order of colors is yellow, red, pink.
Counting the tulips of those colors outside the window, you get the code 147. Enter that in the box and open it to find a note showing colored dots in a circle, as well as a pink key.
Unlock (pink) / Exploration 2
The floor plan tells you that the pink key unlocks the door to the left of the car picture.
Entering the new room, you find that it's noticeably narrower than the first. The wall directly ahead has three photographs above three pig figures that change color when clicked. The only thing you can look at on the right wall is the cute animal figure that doesn't look at all like a big bad wolf.
You can click the bed and look out the window to get another view of the yellow car, but while looking at the bed you can also remove the blanket and lift the pillow to find some sort of remote control with buttons that just light up with letters.
Once you're done looking in this room, just turn around to find the doorway back.
Triple threat
As the drawing under the shelf indicates, you need use the remote control on the pigs when they're in a particular state. How should they be set?
Each pig sits under a photograph of a different material.
Checking your drawing again, you find that the pigs near the wood, straw, brick huts wear red, green, blue.
Click the leftmost pig thrice to make it so, then examine your remote control and push it. (That's the OK button for this puzzle, even though it's two buttons.)
With the power of eye lasers, the wolf is defeated, and you can grab the green key from its tongue.
Three digits
Use the clue from the car to unlock the car picture.
Enter the number on its plate (372) by clicking those buttons on the picture. A yellow key falls out into the compartment below!
Encircled
Use clues from the note and wall clock to unlock the wall safe.
The dots on the clock which are green, pink, yellow, blue are in the 7, 2, 5, 8 o'clock positions.
So enter 7258 in the safe and open it to find a red button and a drawing of a ladder.
Pushing that button, you find that a ladder drops down between the doors.
Climb it to find a locked red box and a blue key.
Unlock (yellow)
Use the yellow key to unlock the red box. Inside, you find a red, hollow, cylindrical object. It's not a spicy fishcake, it's a grip handle!
Unlock (blue)
Use the blue key to unlock the other door to the room, and you're out… into a boring corridor with iron bars at its end. On the left, there's another door but it's padlocked.
Unlock (green) / Exploration 3
Use the green key to unlock the padlock, and you're in. But this is a Japanese room!
You get a wide view of the room, and the table in front has a dark red box next to a lock with three picture buttons. Along the back wall, you see a butterfly plate hiding some numbers, a flower scroll hiding some other numbers, a bamboo dish (?) hiding another number, and a pink dome fastened with a screw. It may look weird, but the dome is actually semitransparent and hides a lever on the wall inside.
When you're done, you can leave the room by backing out.
Pattern
Use the number clues around the room to unlock the box on the table.
The digits from 1 to 5 are hidden behind the items decorated with the flower, butterfly, flower, butterfly, bamboo.
Click the CLCLR buttons to open the box. Inside, you find a flat piece of metal that looks like a flathead screwdriver tip.
Unscrew
Assemble the screwdriver using the tip and handle, then use it to remove the pink dome.
Now you can flip the lever to release the iron bars.
Ending
Back out, leave through the end of the corridor, and enjoy the ending sequence!
Update