
 Hi escapers, it's retro time!
Colorful Primera prepared simple task for you, just crack a few codes and out, right into the No1game's house where are hidden little green men. They won't stay hidden for long, being exposed to your searching skills! Escape from Jan's Room's cafe probably makes you a bit hungry, be prepared, their hamburgers seem tasty indeed, and the last comes exciting adventure in space by Dassyutu.
Have a good time and enjoy!
Primera wants you to collect five eggs which mysteriously dissapperead from a nest. Luckily, they didn't get cold yet, no matter how long you look for them, and so if you solve all the puzzles and get the eggs, and also help to hatch them out successfully, you'll reunite a family! Happy end!
The cursor isn't changing, no save button, one ending.
P.S. Talking about hatching eggs, let me remind you of enjoyable game How to Raise a Dragon by Gregory Weir with many endings depending on your decisions during playing. Much fun!
No1game trapped you in a small dark house, and the door is - not surprisingly - locked. You need to find ten green men and get out, of course. This game is several years old and back then green men weren't so cunning and inventive as today so it doesn't take long to catch them, and while searching for them you can admire the graphics and minimalistic design of the game.
The cursor isn't changing, no save button, one ending.

You find yourself locked up in Jan's Room's cafe and to escape, you need to figure out a code from the exit door. This game is overall nice with clever puzzles, but some pixelhunt is involved so don't give up too early - explore all items you find really carefully and the items which you can take a look at only, too. Also notice, that to get to the back part of the cafe (the corridor) you need to click white double arrow on the left side of the bar visible if you stand in front of it.
The cursor isn't changing, no save button, one ending.
In this old Dassyutu's game you're an astronaut and your spaceship had a collision with a huge asteroid. Surprisingly, nothing much happens, your collegues are calmly sitting by a control panel, passengers are also fine...seems that you're the only one who worries - someone must do something about that massive hole! And the computers, they are all down! It's lethal situation! Well, the someone is you. Can you repair the spaceship? It's much easier than one would said - I'm wondering whether they still connect colorful dots in spaceships nowadays in order to restart computers.
The cursor isn't changing, save button, one good ending and several bad (found three so far).
Bonus game: The last game by Dassyutu was posted in WE N°225, one year ago. The devs haven't retired though, their new games are in 3D with a bit akward navigation. Here is the latest one from June: Escape from House on the Hill.
We love escape games, and our readers love talking about them and sharing hints! How about you? Let us know what you think, ask for clues, or help out other players in the comments below.


looking forward to these.
Find the 5 Eggs
Did the rooster just lay an egg?
I found the five eggs, but I was stuck on the EGG safe for a while.
I rescued the spaceship, and though I tried, I only found one bad ending.
I needed a walkthrough for the hamburger shop. I couldn't get the door with the red numbers.
I had the hint and was looking in the right place, but I still couldn't get it.
Now I'm stuck with 7 escape men, and don't know what to do with the objects I have.
This was a good batch of games!
hope walkthroughs are coming soon.
?
Find the 5 Egg's
Exploration
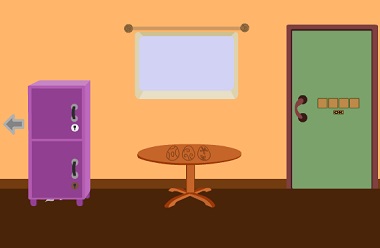
The door here has a combination lock you can't even access! To the left under the open window, a table has some eggs carved into it. There's a purple cabinet with keyholes on its locked doors.
And there seems to be something under that cabinet.
Turn around (left or right). The locked door has a three-digit lock. Under a picture of eggs, there's a box with one lock having color/egg buttons and the other lock having colored letter buttons. The green cabinet on the right has a lock with three patterned egg buttons and another having a circle divided into three color/plant buttons.
Top green cabinet
The clue on the table is for the top of the green cabinet:
4, 1, 3 clicks
which contains a red cloth and an egg.
Use the red cloth on
the window
to get a clue.
Door / Exploration 2
Use the clues from
the curtains you just put up, and the table again
to unlock the door:
Count the eggs of each design on the curtain. In the order specified on the table, there are:
3 2 5
The backyard has a tall fence and two chickens. The tree has an egg in its trunk, as well as a box with a nest in it. Take a key from the nest.
Unlock 1
Use the key to unlock the bottom purple cabinet, and open it to get a bag of chicken feed.
Turn the bag over to find a clue.
Bottom green cabinet
Use the clue from the back of the bag to unlock the bottom green cabinet.
Top left: 2 click
Top right: 3 clicks
Bottom: 1 click
Inside, there's a vacuum cleaner and a blue sheet with some egg shapes.
Chicks
You'll need clues from the
blue sheet and picture frame
to unlock the left side of the box:
(Place the blue sheet on the frame.)
Together, the colors and shapes are:
Yellow bottom, Red Middle, Blue Top
(2, 1, 4 clicks)
Take the smartphone and turn it on to find a clue.
Messy
Use the vacuum under the purple cabinet to find an egg. The vacuum now contains paper scraps with letters on them.
Use that clue to unlock the right side of the box:
The scraps are the same length, so they show different parts of the code. Read them from bottom to top!
The buttons you need to press are
RLCLR
Take a small spade.
Outside / Unlock 2
Use the feed on the chickens outside, then go back in and out again.
One of the chickens has moved, and you can pick up an egg.
Also use the spade on the ground in front of the tree to find an unusual egg. This one opens up into an egg key!
Use that key to unlock the top purple cabinet. Inside, you find a basket and can take an egg from it.
Collection
(You can now access the green door lock.)
Place all 5 eggs in the nest outside.
Go back in and out again, and a chicken now sits on them.
Go back in and out again, and the eggs have hatched! Use that clue to unlock the door.
2, 1, 6, 4 clicks.
And you've escaped!
Find the Escape-Men 16: the Solar Power
Click "English" to change the language before you start. Also, you might want to raise your screen brightness for this.
Exploration
The whole room is dark except for some sunlight coming from your left. It would be nice to have at least the door lit up, but you have no power here.
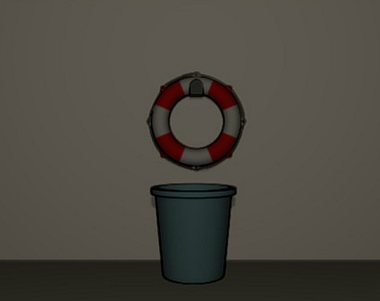
Turn right to find a bin (trash box) under a float that hides an Escape-Man. The power socket has been opened up and its wire cut, but thankfully just clicking the wire fixes it.
Turn right to find two switches on the wall. They both start in the off position, and you can only turn on one at a time. The right switch hides an Escape-Man. The cardboard box contains a hair dryer, a black garbage bag and an Escape-Man.
Back out. Instead of opening the box, click the top-right side (between the box and wall) when you're looking down on it.
There's an Escape-Man and screwdriver there!
Turn right to face a window. You can close the curtains to find a number 8, whatever that means. You can also look down to find a + mark on the floor, and look up to find a screwed ceiling panel.
Keep closing and opening the curtains. After about 4 times, an Escape-Man falls out.
Examine your items. There's an Escape-Man on the hair dryer, and another Escape-Man in the trash bin.
Dark
Find a light switch.
The left switch turns on the spotlight above the door.
Closing the curtain allows you to see that light better, as well as the Escape-Man directly under it.
Tall
To reach the ceiling panel, you have to
place the trash bin on the middle of the floor.
Now when you look up at the ceiling, you find an Escape-Man and can unscrew the panel to find another Escape-Man.
Collector
The chime tells you that you've got all 10 Escape-Man:
In order of this walkthrough:
On wall behind float
Behind right switch
In cardboard box
Behind cardboard box
In curtains
On hair dryer
In bin
Under spotlight
Beside ceiling panel
Behind ceiling panel
They combine into a big Escape-Man, but you're not done yet!
Big
The power socket in the room works after you repaired it.
But you'll need to turn on the right switch first.
Attach the hair dryer to the socket, and then the garbage bag.
Finally, you'll need to combine
the garbage bag to the float to form a balloon
and then
place the balloon on the floor (removing the trash bin first), and the big Escape-Man on the balloon.
Enjoy the ending!
Escape from a Hamburger Shop
An experience you won't get at the drive-through!
Exploration
There are five shelves on the wall but you can only examine the left three. Among the cups, you find a note with a three-letter clue.
At the bottom left, a white ball sits on the wooden divider. When you take it, you find that it's actually a drawer handle.
Turn left to face a window with colored stripes. The right table has a note with a number clue.
Turn left to face a wall clock with a burger logo above a shelf with jars of coffee. You can also check the exit on the right to find a four-digit lock there.
Turn left to face the counter and the menu above. At the left edge of the counter is a row of four drink cups with colored burger designs.
Click to the left of those cups to find a switch that makes numbers appear on the cups.
While looking at the counter, click the glowing white arrows at the left of the screen. In this corridor, there's a burger on a pedestal with three dials, a locked toilet door requiring a key, a locked door with a red four-digit lock beside, and a wall box with a tiny hole where the handle should be.
Corridor
You'll need
the white handle, as well as clues from the notes, the clock and the window.
For the wall box:
attach the handle to the box, and open it to find four familiar items.
For the burger pedestal:
The minute, second, hour hands of the clock point
Up, Left, Down-right
(0, 2, 3 clicks)
Take a blue key from the pedestal.
For the right door:
Each column has 10 stripes, and the note tells you that they represent the digits 0 (bottom) to 9 (top).
Each column has a red stripe, and they appear in vertical positions representing the code
7537
Exploration 2
Now you've unlocked two new rooms. Let's start with the toilet.
You can't sit down, but you can check out the four-digit box on the floor beside the toilet bowl.
Above the arrow on the wall, you can check the shelf to find COFFEE printed underneath.
Turn right. The mirror above the sink is covered in some nasty pink foam.
Leave and make your way to the kitchen, where you see some bottles of ketchup and a grill in the back. You can also click the door, which has a burger label and a five-digit lock next to it.
After picking up one bottle of ketchup, click under it to find a digit on the bottom.
On the left of the counter, you can take a towel from the handle.
Turn right to find a metal container with a combination lock that you don't have a hint for. The fridge on the right has its doors tied together with wire.
Bathroom
Use the towel to clean up the mirror, revealing a clue.
Also, use clues related to coffee
from the shelves and wall box
to unlock the box in the bathroom:
Count the items shown in the wall box. (But don't actually count those ones, just the ones on the shelves.)
That gets you the code
7354
Take the pliers.
Kitchen
Use the clue from the mirror and from
the lit-up drink cups
to unlock the compartment beside the fridge:
The numbers on the cups indicate a sequence of colors:
Blue Yellow Red Green
(1 3 2 4 clicks)
You can take a burger bun from inside.
Also, use the pliers to open the fridge. You can take a burger patty and examine a cabbage to find another number clue.
Place the patty on the grill, and yet another number clue immediately appears.
It should not surprise you that the bun you picked up has a number clue
on each half (click just above and below the bun to view those numbers)
Now you can use the number clues to unlock the kitchen door:
The ingredients of the burger shown on the door are all numbered. From top to bottom:
Top bun: 5
Sauce: 3
Meat: 6
Cabbage: 7
Bottom bun: 9
Enter 53679.
Escape
You're now behind the counter! A single note in a cup asks you to do some math.
Flip the note over to find another clue.
Use clues from
the front and back of the note, and the menu boards
to unlock the shop entrance:
The words on the front of the note tell you which menu to look at, and the rectangles on the back tell you which item on that menu.
For example, the top item on the front/back is a Hamburger that's half small and half big (i.e. half small letters and half capital), so it represents a fishBURGER that costs 320 yen.
Similarly, the hot drink is an ESPRESSO (400), and the sides are the CHICKEN (340) and SALAD (420).
Adding all those up with 3006 gets you the code
4486
And you've escaped!
Spaceship Rescue
This is possibly the least harmful asteroid strike ever, unless you're the one tasked with fixing this ship.
(A little warning that this game contains randomized color puzzles. I can't give much color-blind help on them.)
Exploration
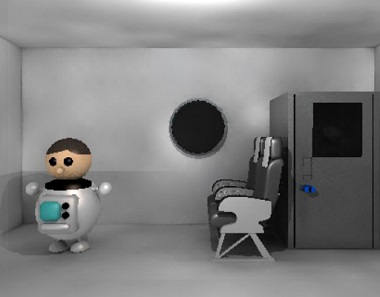
You start off facing a window looking out on a green planet. A locker on the right has a blue keyhole. There's also an astronaut standing on the left, but you can't interact with him because that's you!
To the right of the locker, you can take a telescope.
Go left to the cockpit, full of equipment that has been disabled by the crash. In the windows ahead, you see a red planet. Pick up a flashlight on the floor, and a blue key in front of the pilots. The computer on the right is working, and it shows you a clue with colored circles.
Go back (click the bottom of the screen) and then out (click the bottom again) to a corridor. The door here leads back where you just were.
Go right to find a door with a blue light and a four-digit lock.
Go right to find a door with a green light.
Go right once more to find a door with a red light. That door is broken.
Go left and enter the door with the green light. You see a white planet out the window. Searching around in the lockers, you find a crowbar and screwdriver. You can also open the cardboard box on the trolley to find a rope.
There's something to the left of the locker that you can't reach. Pick up an electric cord under the trolley.
Save your game, and let's make a bad decision!
The red door is broken, so let's fix it with our heavy tools! Just take the crowbar and whack-
It turns out that all the air is leaving the ship, which is bad for you! Game Over.
Thankfully, you can just hit Replay and Load from the title.
Let's make a better decision!
Use the blue key to open the locker on the starting screen. Take the helmet from inside, then examine and click it to put it on.
Now you can use the crowbar to open the red door without consequences… but it's completely dark in here!
Fixing the lights
First you need to identify the problem:
Use the flashlight to get a better view of the room.
Click the broken lightbulb, and the game tells you it needs replacement.
The solution is easy to find:
The storeroom has two light bulbs, and the game now tells you to use a screwdriver.
So use the screwdriver to remove a lightbulb, and then use that bulb to replace the broken one.
And now to make sure it works:
Click the red switch on the right to turn on the lights.
Exploration 2, but save your game again
First, the bad ending. If you click the left side of the screen you'll find a red toolbox floating outside the hole in the ship. Try to grab it and you'll just float out into space, Game Over!
So let's avoid that for now. There's a control panel in the middle secured shut with bolts. Behind the pile of debris on the floor, you find a note with four colored stars.
The shelf behind you has part of a note with colored circles. At the right, you can look out the window at a blue planet.
Under that window is the other part of the note, and when you take it the game automatically combines both parts for you.
Spacewalk
While still in the broken room, use the rope on yourself.
Now you can leave the spaceship and grab the floating toolbox. You'll notice that it has a four-digit lock with a star marking.
Planetary
Use the
telescope on each of the four planets
to get digit clues (randomized, so make sure you write them down!)
Use these clues together with
the one on the monitor in the cockpit
to unlock the blue door:
The circles on the monitor are red, blue, white, green.
Copy those numbers from the cockpit, broken room, storage room, starting room.
Exploration 3
Ah, a relaxing break with your fellow passengers who might be a bit too calm about this whole incident. Looking out the middle window, you find a really weird pattern of colored stars.
Check behind the left seat to find a stick, and behind the right seat to find an electric cord among the trash.
Stars
Use the clues from the
starry window and star note
to unlock the toolbox:
Count the (randomized) number of blue, white, green, red stars on the window.
Take a spanner.
Stripes
Go back to the storeroom and use the stick to retrieve an electric cord beside the left locker.
Now that you have the required items, save your game!
Go back to the broken room and use the spanner to open up the control panel.
There are several colored hexagons here for you to use the cords on. But do it wrongly and it's an instant Game Over!
So check your clue carefully.
The clue is the colorful note that you assembled from two halves.
To connect each cord, select it and then click both colored endpoints. Based on the note, you'll need to connect:
White to Green (top right to bottom left)
Black to Yellow (top middle to bottom right)
Red to Blue (top left to bottom middle)
(You can do this in any order, as long as the pairs are correct.)
The room glows green.
Rescue
Make your way back to the cockpit, where the top monitor glows green and shows you a clue. Looking around again, you find two new things:
Next to the green monitor, there's a password panel.
Next to the left pilot, there's a note with a grid of letters.
Use the clues from the monitor and grid clue note (randomized) to unlock the password panel:
As indicated by the screen, read the second letter of the top row, the first of the middle row, and the third of the bottom row.
Enter that password as three lowercase letters.
You win! Enjoy the ending animation!
kktkkr, thank you for your always excellent walkthroughs!
Update