
 How about a short excursion back in time? Are you ready? Good, four games from past are waiting for you this Wednesday on JIG!
With Hottategoya, we are escaping from a functionalist architect's dream, concrete tower with complicated system of staircases and corridors. Kiteretsu takes us into simply furnished cute rooms (two!), and with Gatamari we continue the journey we've already started three weeks ago.
Have a good time and enjoy!
 Escape from the Concrete Tower
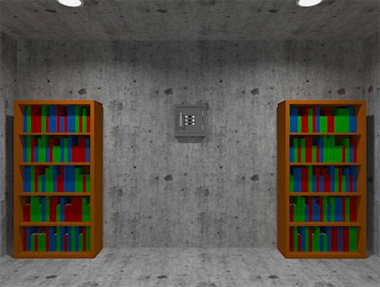
Hottategoya's concrete tower may seem like rough construction only, but sliding doors are working already and bookcases, books included, are in their right places. You find yourself closed on the highest floor, but luckily someone has left few hints here and there, so you can figure out how to operate the doors and find your way out.
The cursor is changing, no save button, one ending.
Two short and sweet games from Kiteretsu remind us escapers about early Neutral's games. Having their own specific charm they are not their clones though. Clean and simple graphics, pleasant sounds and intuitive puzzles is a receipt for enjoyable playing afterall. And retro atmosphere is strong in these!
The cursor is not changing, save button, one ending.
 Gatamari Escape 7 - Gate Escape 2
Recently, in Gate Escape 1 ( WE Retro Edition N°3 ) we conjured a cutter at the end of the game and escaped...to another locked room. In this room Gatamari kindly let us keep the cutter, but alas, it doesn't help us out. It is useful, but a reacher (aka a pointer) is what we need the most to get out. No doubts how to get it, the pentagram for conjuring reachers is silently waiting in the room's corner. But before the pentagram activates, how to get all these devices standing around work? By solving some good puzzles, of course!
The cursor is not changing, save button.
We love escape games, and our readers love talking about them and sharing hints! How about you? Let us know what you think, ask for clues, or help out other players in the comments below.


Escape from the concrete tower
I had to use Excel to work out the number code; so for those who don't want to go that far, the code is:
5896
looking forward to the walkthroughs hehe
Escape from the Concrete Tower
It's not much of a tower, considering the game only brings you through the inside of the four rooms on the title screen.
Exploration 1
You start off facing two bookshelves and a three-letter safe, the letters arranged vertically. Poking around in the bookshelves, all you find is a triangle symbol next to an arrow (left bookshelf, bottom shelf) and a star symbol with another arrow around it (right bookshelf, middle shelf right).
Books are boring, so turn right. This screen is also boring, so turn right again. There's a door with a sun symbol drawn on it. (All the doors have no handles, so good luck with them!) Turn right yet again, and there's a red arrow floating above the left windowsill. Zoom in there to find a clue: a diagram of the first screen, with a red arrow across the middle shelf of the right bookshelf pointing towards the left.
Lateral
What's so special about that middle shelf, and how do you get three letters from it?
Turn your head sideways, and the space above the books resolves into three letters: FEL.
Enter that into the safe, and open the safe. Inside, there are two lights labeled with sun and moon symbols, and a button labeled I.
Push the button, and the moon light turns off and the sun light turns on. You also hear some stone shifting, so turn around twice. The sun door has opened, so go through it.
Exploration 2
Second room! You're facing an unlabeled door and a safe with three symbols and a dial.
Turn right. This screen is boring. Turn right again. In between the corridor back and a door marked with a moon symbol, a red arrow on the wall points to a hexagon symbol with another curved arrow.
Turn right. It's another boring screen with windows. Time to solve a puzzle.
Dial
The safe dial has eight positions. Use the arrow clues to work out the code for the safe.
Star: Turn clockwise to SW
Triangle: Turn counterclockwise to S
Hexagon: Turn clockwise to NW
So click the right side 5 times, left once, right thrice, then open the safe to find an identical control panel to the previous safe.
Not completely identical though: the light is now on the sun symbol, and the button is labeled II.
Press the button, switching the light and moving some stone. Turn around, and the corridor (sun) door has shut and the moon door has opened. Go through it and then down the stairs.
Exploration 3
This feels oddly familiar. You're facing a door marked with a vertical sequence of roman numerals, and a control panel with the light on Moon and a III button. Turn right, and a red arrow points to a clue with a green circle over a green-and-black grid.
Turn right again, and you can see the corridor back on the left and a closed sun door on the right. Turn right. Nothing.
Routine
Press the III button, and turn around. There's a red arrow pointing to a clue with a green plus over another green-and-black grid.
Now you can go through the corridor on the right.
Exploration 4
This feels oddly familiar. By which I mean you're looking at an unlabeled door, a four-digit safe with a green symbol over each digit, and control panel IV (sun-lit). Turn right, and a levitating red arrow points towards yet another clue with a green square over a green-and-black grid.
There's nothing else interesting in this room, even if you turn right twice to look around.
But if you start walking back to the previous room, you'll notice a red arrow on the corridor entrance, pointing to a clue with a green cross over a grid.
Green
Combine the green parts of the grid clues to get four digits to unlock the safe.
The clues are:
Circle: line and J-tetromino

Plus: turned S-shape

Square: two lines

Cross: 4 shape.
So the combinations are
Square + Plus: 5

Circle + Cross: 8

Square + Cross: 9

Circle + Plus: 6
Enter 5896, and the door on the left slides open, revealing a ladder up to the second room.
Path
Press the control panel buttons in the sequence indicated by the roman numerals in the third room.
(Easier said than done!)
The paths between rooms are:
1 to 2: Sun
2 to 3: Moon
3 to 4: Sun
4 to 2: (no door)
and the sequence required is 343211.
In other words, the sun doors must be open after the II button press. Working backwards, the sun doors must be open before the first III button press, so you have to start in room 3 with the sun doors open (lights on sun side).
Go back through the corridor to room 3. Click the III button to turn the light to Moon.
Go back up the stairs to room 2, then immediately down the ladder to room 4. Click the IV button (Sun).
Go back through the corridor to room 3, and click the III button again (Moon).
Go back up the stairs to room 2, but click the II button this time (Sun).
Go back through the corridor to room 1, and click the I button twice.
The roman numeral door should open to the outside.
Escape
Make your way to the roman numeral door (go back to room 2, down the ladder to room 4, back through the corridor to room 3), and leave through it.
The Escuest adventure continues...
Escuest 3: http://frame.escapegames24.com/escuest-escape-3.html
Escuest 4: http://kiteretsu-world.info/escape/escuest-4.shtml
I know. They are good. I thought I would introduce them in the next WE...
Thanks kk. can't wait for the others.
Hey Jay, nice short reviews gotta say that, one thing i noticed playing a few games (and being a developer myself) is that the fun factor is
PD: Nice site.
If we get 3 and 4 in the next WE (Retro), then it too will have a total of four games!
ESCUEST 1
As the description says: "This game is so easy, a beginner may be able to beat it without help." But here's a walkthrough anyway.
Exploration
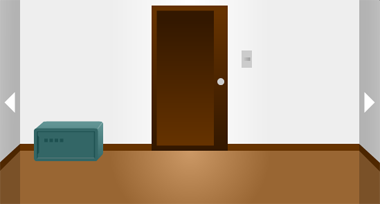
You start off facing a locked door with a light switch next to it, and a blue box on the floor that's locked and takes a four-digit code.
Turn right, and a laptop on the table is running "Widnows 2". You need SAWADA's password to unlock it. (Actually, the password box only takes numeric input.)
Turn right, and there's a red vending machine selling only one item, a Power Drink. The wall next to it is cracked.
Turn right, and a panel on the wall has forty light blue squares on a darker background.
Lights out
Press the light switch to turn the lights off, then turn left to look at the square grid.
Some of the squares glow in the dark. (Turn the lights back on.)
Three digits
Use the pattern of lights on the square grid to unlock the blue box.
The four rows of the grid have 4, 7, 2, 8 squares lit up.
So enter 4728 into the box, and open it to find a single coin and a clue for a numeric PASSWORD.
Password
Use the clue from the blue box to unlock the laptop.
Since PASSWORD is 12664753, the letters in SAWADA correspond to 624232.
Type 624232 in the box, then click the blue arrow to log in.
It turns out Widnows 2 isn't very fun, and the laptop only has a single file on it with a grid of eighteen colored circles.
Powerup
Use the coin on the vending machine, then click the black button (with a red dot) to dispense the power drink.
Take the drink and examine it, then remove its tab and click to gulp it all down.
Powerful
Now that you're all powered up, click on the cracked wall to punch a hole in it. Inside, there's a white box with four colored buttons. You'll need another four-digit code.
Colors
Use the clue from the laptop to unlock the white box.
The grid of colored circles had five pink/purple circles, eight yellow, four green and one blue.
So enter 5841 in the box, then open it (click the dark area under the lid) to get a key.
Escape
Use the key on the door handle to unlock the door, then click the handle again to escape.
(You get an end screen with unlimited Power Drinks.)
ESCUEST 2
What's more Japanese than an escape room with a vending machine? An escape room with tatami mats, of course.
(Don't expect this game to be as easy as the first. The four ESCUEST games in the series ramp up in difficulty, according to the star rating.)
Exploration
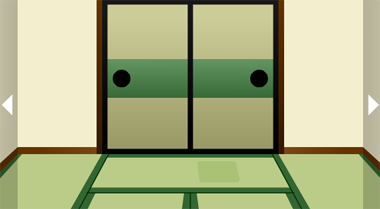
This time, you start off facing some sliding doors that are stuck. There's a dark patch on the tatami mats in front of them.
Turn right. There's a calligraphic scroll that's just decorative, and an wooden box below it which takes a three-digit code, arranged vertically, with a green object behind it on the right, which turns out to be a screwdriver. There's also a vase which hides a red-and-white device which looks like a calculator. The device has four buttons, one for each card suit, and you can turn it over to find a screwed-down panel on the back. Next to the vase, there's a crumpled paper ball that turns out to be blank when you unfold it.
Turn right, and you're facing a door to the previous room/game. To the left of it, a poster tells you to push a red button so that a lady can pass through the door. There's also a table with a bowl with a cookie hiding a clue with a red diamond with a 5. Under the table, there's a power cable you can pick up.
Turn right, and that lady wants a cookie. There seems to be something behind her on the wall. Also on the wall, there's a five-digit safe. Also on the floor, there's a heater without power.
Cookie
Use the cookie on the lady, and it's gone. So turn left (or right) and then turn back again. She's moved to the side next to the heater.
Hot
Plug in the heater, then turn it on.
Use the paper on the heater. Examine the paper, and you'll notice that it now has three rows of numeric clues and a spade mark with a 1 in it.
Numeric
Use the clues from the paper to unlock the wooden box.
Each row of digits contains the last digits of consecutive multiples of 1, 4 and 7.
So the sixth digits in the patterns are 6, 4 and 2.
Enter 642 in the box and open it (click the handle) to get a Cutter, I mean penknife, and a clue with a club suit numbered 4.
Slash
Examine the penknife and click on the handle to extend the blade, then use it on the dark patch in front of the exit door.
Use it again. And again. You should now be able to get a coin battery from the hidden compartment, as well as a clue with a heart suit numbered 9.
Calculator
Use the screwdriver on the back of the device, then insert the battery and flip it back over. The device is now on, and clicking the buttons increments the digits beneath them and changes the number on the larger display beneath.
Now use the card suit clues to get the correct numbers on the device.
Spade (Paper): 1
Heart (Floor): 9
Diamond (Bowl): 5
Club (Box): 4
Click the buttons 1, 9, 5, 4 times. Nothing happens.
Five digits
Enter the number from the calculator into the five-digit safe.
The number is 47135, so enter that code.
Nothing opens up. Instead, a red button drops down.
Escape
Push the button to "open" the doors, and click on the doorway to leave.
cool on the escuest walkthroughs. I think i'll like the getamari walkthrough as those games are awesome. :)
Gate Escape 2
You won't believe what's down in these ruins! (That screenshot says it all.)
Previously on Gate Escape...
Your quest for the Holy Grail has brought you to these ruins, with seven trials to clear and seven treasures to gather. You've cleared the first trial and obtained a treasure in the form of a box cutter, but you're going to need something more substantial than that to reach this elevator button.
Exploration
Your inventory is empty except for the box cutter from the previous game.
You start off facing some green double sliding doors, with red arrows leading up from them to a single open button on the unusually high ceiling. On its left, a deep hole in the wall has two small protrusions at the back end. On the right, a stone tablet with a grid of symbols has four shaded circles on top and a gem in the middle.
Turn left. There's an empty glass tank and a stone head ("Kappa?") on the wall with an orange button. On the right wall, four symbols are painted in a row.
Turn/move left. There's a seal on the floor marked REACH, with ER in smaller text beside it. Next to it, an empty gourd rests on a platform that looks like it could move downwards. A blue rectangular door above the platform is locked.
Turn left. The doors to the previous room are here, and there's an eye on the wall on each side of the doors. The one on the right has a white pupil, so click on it to remove a marble.
Turn left. Two large metal boxes sit next to each other. The right one has four dials above a locked green door, and the left one has a grid of twelve holes (which don't fit the marble you have) above another locked green door with a clue: a white-and-gray grid where the gray parts look like the digits 71.
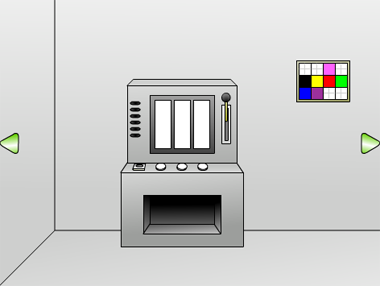
Turn left. There's a slot machine with a lever, three buttons that you can't press (yet) and a round hole instead of a coin slot. Beside it, a picture on the wall has seven colored squares that move around when you click on them. Click on it to take it, and there's a toy pig behind it with nostrils and a hole where its tail should be.
Search
Locate the four symbols from the wall in the grid of symbols on the stone tablet, then use that clue to unlock the right machine with the four dials.
Inverted T: Middle bottom
Hourglass: Top left
Star: Middle left
Crescent: Bottom right
So turn the dials until they point down, up-left, left, down-right (4, 7, 6, 3 clicks), then open the door to get a scroll.
Slice
The scroll is bound tightly together, so use the cutter on it, making a satisfying sound.
Unroll the scroll to find a payout table for the slot machine. How is this a clue?
Jackpot
Use the marble on the slot machine, then use the clue from the scroll to rig your chances.
(If you mess up, the machine will eventually return your marble after you pull the lever.)
An arrow runs to the right across the top of the scroll, then down the side and left across the bottom, passing by some snail symbols.
Similar symbols occur on the slot machine: the one with the shell on the left is on the left column and so on.
In the order of the arrow, the snail symbols have shells on the RRCLR LCCRL sides.
So put the marble in the left slot and press those buttons. The left light should turn red. Now pull the lever.
The snail symbols line up and seven colored marbles fall out of the machine.
Seven
Use the clue from the picture with colored squares to place the marbles in the grid of holes on the left machine.
Label the grid (of holes/squares)
ABCD

EFGH

IJKL
and notice that the squares cycle through the following paths:
Red: GHGF

Blue: IJFE

Green: HD

Yellow: FEABCG

Pink: CGKLHD

Purple: JIEI

Black: EA
The marbles need to be in the positions (from left to right) ABFJDHL. The only square that reaches B is yellow, so yellow must go in that spot. Then the only remaining square that reaches A is black, and so on:
B = Yellow, L = Pink,

A = Black, D = Green, F = Blue,

H = Red, J = Purple
ABFJ DHL = Black Yellow Blue Purple Green Red Pink
Place the marbles in those slots, then open the door to get a winding key.
Then take the marbles back.
Oink
Turn the toy pig around and attach the winding key to it, then use it on the hole next to the exit door.
After a few twists, the pig walks all the way in and you hear a click. What did that do?
Wet
The eyes on the stone head now glow red, so push the orange button on top, dispensing water into the tank.
Fill the gourd in the tank. (Click the top of the tank, above the surface of the water.)
Use each colored marble on the tank. Four of them float in the water, and the other three sink.
Dense
Use the filled gourd on the platform it came from, weighing it down and revealing the panel above, with seven switches and a diagram of seven overlapping squares.
Then use the clues from the floating marbles and the picture with squares to flip the correct switches.
With a bit of experimentation, you can get some of the squares on the picture to overlap.
In the center: Yellow > Pink > Red > Blue > Purple, with yellow on top.
On the left: Yellow > Blue > Black > Purple
On the right: Pink > Green > Red.
So the seven switches correspond to the Yellow Pink Green Red Blue Black Purple squares.
The pink, blue, purple and green marbles are floating.
So click the 2nd, 3rd, 5th and 7th switches to flip them up.
A chime sounds and the Reacher seal glows green.
Summoning
Click on the seal, and a mysterious character holding a long stick appears. They call him Reacher, or Reach for short.
Use him on the elevator button, and his staff extends all the way to push the button.
Then he does some weird replicating stunt, gives you the staff and disappears into thin air. Wait, it's just a pointer!
(The character referenced here is Monkey King Sun Wukong and his staff, Ruyi Jingu Bang, or whatever they're called in Japanese.)
Get into the elevator to leave and view a teaser for the next game.
In Escuest 2, I couldn't figure out how to turn on the heater. I thought I had clicked everywhere on it, but I finally hit on the right place.
There's a button on the bottom section towards the right. Now that I know it's there, I can see it. Slightly less black than the heater.
I had no problem finding those hotspots mainly because I tend to click everywhere and click a lot, but the pixel hunting gets way out of hand if you go on to play ESCUEST 4. The worst part is there's no changing cursor for that series.
If you finish Escuest 1, you're rewarded with https://youtu.be/e_DqV1xdf-Y
I like Escuest. Addictive and intuitive puzzles, simple graphics, and pleasant sounds.
json formatter
Update