
 It's time to slow down and look back - it's Retro Editon Weekday Escape time!
This week you visit for the last time two Maroya's kittens making their new home homely. From cosy house you fall deep down into Tateita's jail cell like room; you are not imprisoned though, only locked to prove your escaping skills. Finally comes another Gatamari's game and prepare for the long ride and many, many puzzles! Corridors, mazes (they'll give you a map, don't worry), lift, ancient statues, chasms and magic pentagram!
Have a good time and enjoy!
This is the last room of Marshmellow's New Home series by Maroya. The 3rd Room (WE N°45) and the 4th Room (WE°51) was explored few years ago; recently, a month ago, it was the 5th Room (WE-RE N°7). You (the kittens) start in enclosed balcony and this part is a prelude only, after you find out how to open the French window the main game with original and fresh puzzles starts. And after you solve all of them the whole house is accesible and then the kittens lived happily ever after!
The cursor is changing, no save button, one ending.

If there was a competition for the best loading screen, Tateita should get some medal for sure and it should be the gold one, as I see it. It's beautiful!
You find yourself in bare empty room which seems like a jail cell (Loom Custody by Place of Light, anyone remembers? Or recent unReal: Birth by Factory. 112). There is broken chair lying there, few locked safes, barred windows and something what could be lower part of ladder, but sadly, out of reach. Floor and walls are concrete grey, but someone painted windows' borders in bright colors, maybe to give the room more cheerful look...?
The cursor is not changing, no save button, one ending. Description of items is in Japanese only (not a barrier in playing).
Your journey to the Holy Grail with Gatamari continues (previous games can be found in WE - Retro Editions N°3, 4, 5, 6, 7) and there are many places to explore and many puzzles waiting for you! The game has also the run-for-your-life part - you have to deal with giant rolling boulder threatening to crush you! "Treasures" obtained earlier are in you inventory at the beginning - a Cutter, Reacher, Driver, Decoder and Flashlight - and they are all useful, but for that huge nail in the middle of the exit door you need to conjure a hammer. Clues for puzzles are precise, but good observation is also very important and brief survey may not be sufficient...sometimes you have to combine more clues to get the right solution and remember, they may include twists!
The cursor is not changing, save button.
We love escape games, and our readers love talking about them and sharing hints! How about you? Let us know what you think, ask for clues, or help out other players in the comments below.


Both links for Marshmellow go to the previous room. Change 5 to 6 for the new room.
I got out even though I don't think I ever saw one of the clues (white word).
Can't wait for the walkthroughs :)
Anyone?
Chair walkthrough. (Yeah, I'm going out of order. I'm stuck on Marshmellow.)
Exploration
There's a green window and a chair. You can zoom in on the window and turn the chair around. The legs are odd, and there's a key taped to the bottom.
Turn right. Here we have a yellow window, a green box with four buttons, and a stick.
Turn right. A blue window and a red box that wants a color-coded number clue.
Right again. A red window and a blue box. Also something poking down from the ceiling.
Blue box
Use the key from the chair to unlock it. Get a handle.
Red box
Look closely at all the windows. Count the bars for the code. Color-blind help: The order is red, blue, yellow, green, so the code is
6435.
Inside is a blade and a series of boxes with numbers on the sides.
Green box
Use the clue from the red box:
top, bottom, bottom, right, left, top.
Push the red button and the sides of a ladder descend from the ceiling.
Ladder
Add the blade to the handle to get a saw and saw off the legs of the chair to add to the one you already picked up. They're all different shapes and have letters on the bottom. Put them in the holes to make the rungs of the ladder, and go up.
Keypad
Here we need letters and shapes. Use the ones from the ladder.
Top to bottom: square E, circle G, triangle A, pentagon U. Then hit enter.
...And we're out!
Ok, I can't promise it'll be very good, but here's my try at Marshmellow's New Home 6 walkthrough:
First be aware that there's some weird navigation in this one, and some areas you can only access if you're facing the right way, which is a little counterintuitive. Also, after unlocking things you need to back out to the original view to open them; there's a loud *thunk* noise when you unlock something correctly.
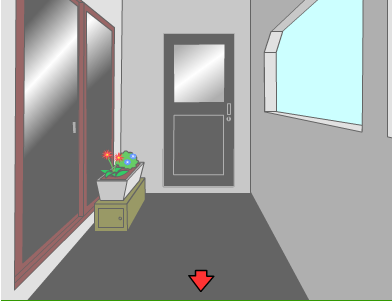
Balcony
We start out facing a box that needs a 4 digit code. Zoom in and click to the bottom right side of the box to look behind and get a battery. Look in the window to the right and see inside, where there's a framed picture of 4 flowers: blue, pink, yellow, and red.
On the other end of the balcony is what I'm guessing in the door we come out on, a sliding glass door (locked, of course), and a box of flowers on top of a long locked box. If you click on the sliding door it zooms in on a lock with a pink X. Zooming in on the flowers there are two plants: one with 2 red flowers and one with 4 blue flowers. You can look off the balcony on the right side, and see more flowers growing below: 3 yellow flowers and 7 pink flowers.
Use the number of each colour of flowers to unlock the 4 digit box
4 7 3 2
and get a key. Use the key on the locked box under the flowers and get a remote. The remote has a pink X button and a blue O button, but if you use it on the door with the pink X lock it doesn't work.
Look at the remote again, click on the red arrow to look at the back. Of course, it's missing a battery, but luckily you found one earlier, so replace it.
Use the remote on the door's pink X lock, and now you can get into the bedroom inside!
Bedroom part 1
You start, oddly enough, facing the sliding glass door you just came in. In front of you in a table with a paper on it. Zooming in on the paper reveals it to be a bit off an odd crossword.
Turning left, we face the door we'll eventually be wanting to exit through. There's a brown cabinet on the right with a locked door that needs a key, and two drawers: the right drawer contains a screwdriver, the left drawer is locked and needs a 4 digit code, with a red and blue rectangle on it. Above the cabinet is a poster of a tree with a red arrow pointing up. On the left side you can see the side of a pink and white dresser.
Between the top and second drawers on the side of the dresser is a little dot; clicking on it zooms in to reveal a screw. Use the screwdriver to unscrew it.
Go left again; we can now see the front of the dresser and a TV. You can only open each drawer from this perspective. The top left drawer has a blue card with 4 numbers cut out. The top right drawer needs a 4 digit code, with a clockwise spiral as a clue. The second drawer, which is now openable since you removed the screw on the side, has a shirt that says BANANA in yellow letters. The third drawer has shirts; click on the middle on to move it aside and get a green key. The 4th drawer has a shirt with APPLE written on it in red letters. The bottom drawer has 4 buttons with green arrows.
Left one more time. We face a bed behind a curtain and a desk area to the left. Click on the yellow curtain to pull it back and look into the bed area. Above the pillow is a paper with CHERRY written on it in red.
Click on the bottom edge of the bed to look between the mattress and the side and get a ladder side.
There are doors above the bed you can't get to yet.
In the desk area, there's another ladder side off to the left. On the right part of the desk are 3 drawers. The top needs a key
Use the green key to open it. Inside is a ladder rung and a picture showing the pink and white dresser, with the left side of the bottom 4 drawers boxed in red and a down arrow.
The middle drawer has a picture of a tree branch and two buttons.
Use the clue from the poster of the tree over the brown cabinet.
right, left, left, right, left
Inside is a grey key
The bottom drawer needs a 4 colour code, which we don't know yet.
Back in desk view, move the chair to open get to the top left drawer. Inside is a red card with 4 numbers written in a variety of colours, and a card with the word SUGAR written in white. On top of the desk is a set of books; you can take out the white one which it titled "color," and shows the results of mixing different colours
blue+red=purple, blue+yellow=green, yellow+red=orange, and white+red=pink
That's all we can do in this view, so now let's revisit some other puzzles
The brown cabinet
Back to the brown cabinet! The locked door can be opened with the grey key from the desk. Inside is a second ladder rung, a paper that says OCEAN in blue, and a picture of a maze.
The bottom drawer needs a 4 digit code. Fortunately, we have a couple pieces of paper with 4 digit codes on them.
Unfortunately, neither the number cut out of the blue paper nor the number written on the red paper work.
Look at the rectangle above the 4 digit code: blue over red
Put the blue paper on top of the red paper, and read the number that's left (ie ignoring the blue parts): 2534
Inside the drawer is a remote.
The TV and pink dresser.
Go use the remote on the TV. We get a show of a star followed by spinning numbers on a light yellow background.
Where have we seen that shade of yellow before? The buttons of the of the top right dresser drawer, which had a clockwise spiral on it.
Note which numbers are rotating clockwise: 5138
Go back to the dresser and use that code on the top right drawer, and get a third ladder rung.
We also now have the info to open the bottom dresser drawer. Where have we seen something with directions and green arrows before?
Recall the maze from the brown cabinet. Enter the directions you'd need to go to get from start to finish
down, right, up, left, up, right, down
Inside are some shirts and the final ladder rung.
While we're at the dresser, recall the clue from the top desk drawer with the left side of the drawers in a box. Take a look a what colour each shirt on that side of the dresser is.
The desk and going up
Use the colour clues from the shirts to open the bottom desk drawer:
The shirts on the left side of the bottom 4 dresser drawers are, from top to bottom: yellow, red, blue, and green.
Inside the drawer is a hammer. We now have everything we need to make a ladder! Use the rungs on the ladder sides, then hammer everything into place. Use the ladder on the bed to get to the doors above it. Inside is a box with a colour wheel on the top, and 4 coloured buttons on the front that need letters.
Colours and crosswords
The buttons on the colour box are purple, green, pink, and orange, the same as the colours we were told how to make in the book on the desk. What have we seen that has letters in various colours?
Recall that around the room we've seen CHERRY and APPLE in red, OCEAN in blue, BANANA in yellow, and SUGAR in white. But how to combine them?
Back to the crossword on the table in the sliding glass door view! It has spaces for 5 words of the same length as the words we've found. They even marked one in blue to show you where OCEAN must go. Fill in the rest of the words, and note where they overlap
_____S
_____U
_____G
_O___A
_CHERRY
_E
BANANA
_N___P
_____P
_____L
_____E
White SUGAR and red CHERRY overlap at R; red CHERRY and blue OCEAN overlap at C; blue OCEAN and yellow BANANA overlap at A; and yellow BANANA and red APPLE overlap at A as well.
So the purple, green, pink, and orange letters on the box are C A R A respectively
Open the box to get a gold and blue key. Use the key on the doors next to the brown cabinet. We've now conquered the 2nd floor of our new home: onward to the ground floor in future games!
So I don't have the energy to do a full walkthrough of Gate Escape 6, but here's some hint/solutions to some of the trickier puzzles if you get stuck
Rolling boulder:
Note the sign before the boulder door/pressure pad that says the boulder cage will only open if the pit earlier in the hall is up.
Outrun the boulder to just after the pit, then turn and push the button for the pit to go down; the boulder will fill the pit so you can still go across, but a new one won't be let loose when you go in
Lady statues
The paper with LOVE and the blue line on it is used here.
Note there's a footnote on the paper about E, and that one of the statues' hands can't be changed
The statue holding the green ball is the E, make the hands of the others spell out LOV in a clockwise order (L is forefinger and thumb, O is a circle with fingers and thumb, V is first two fingers up)
Pushpins
The red, blue, and grey dots on the map show where the pushpins of those colours are at
The weird clanging grey thing in the main room can be zoomed in on the right side in the correct view and cut.
Sometimes things that are high up can only be reached by climbing on stuff
Use the two red boxes to get to the blue pushpin high on the wall
The gaping grey hole in the wall you entered through can be looked up and down (into a boarded over skylight and a dark pit, respectively) by clicking on the top and bottom of the screen. You'll need to combine some items to get the pin here.
The final pushpin puzzle
So you have to fill 25 squares with grey, blue, and red colours. No matter which order you put the pins in, grey is on top, then blue, then red, so you can colour a space with a red pin in it blue, or a blue pin in it grey.
So there's obviously other solutions (just counting rotating or flipping this one, if nothing else) but here's one version of pin placement that works
Counting the bottom left corner as (1,1) and using a cartesian coordinate system:
Blue pins at (1,5), (4,4), and (5,4)
Red pins at (1,2), (2,4), and (3,1)
Grey pin at (5,2)
Black and white mazes
The statues on either side give a clue on this one: right hand and left hand rules. Remember to count symbols twice if you backtrack into them after going down a dead end.
Solutions for the mazes, with T for triangle and D for diamond;
black on white (left hand rule)
XTDTXOODD
white on black (right hand rule)
OTTOXXXXDTODXX
i hope the Getamari walkthrough will be here soon. And I appreciate ceecee and Vinca for the first 2 walkthroughs.
Here's a Gatamari walkthrough that I wrote up earlier!
Gate Escape 6
The games are getting longer and longer. So put your Do Not Disturb sign up (you still have it from last time, right?) and make sure to use that save button.
Last time on Gate Escape...
With five trials and treasures covered, the quest for the Holy Grail is moving along smoothly. But this sixth room takes the challenge to a whole new level (yes, you did just fall a long distance onto a cushion in this room). Will you find the necessary tools in these twisty passages to bust through the next obstacle?
Exploration
As you'd expect, your inventory has only a box cutter, pointer, pair of screwdrivers, codebook and flashlight in it.
The door ahead isn't a door, it's just a rock with a single giant nail driven into it. The rock looks like it's on the verge of cracking, if you could only find something to smash it with.
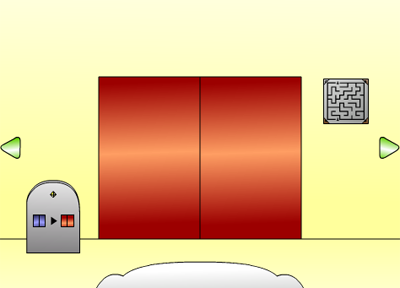
Turn/move right to a screen with golden doors and a panel of elevator buttons that don't seem to work. So turn right again to find silver doors and another panel of elevator buttons, this time in four colors with a hint handwritten on the wall next to it.
Turn right again to find bright red doors with no obvious way to open them. There's a stone tablet showing an arrow between blue and red doors, as well as a maze picture on the wall with three brown corners and one white one. There's also the cushion that saved your life. It's surprisingly springy (and fun). There's also something else hidden here, but I'm saving that for later.
Turn right to find a huge hole in the wall. You can click the top of it to look up and see planks balanced precariously over a gap in a now-lit room, or look down to see... nothing but a bottomless pit of doom. (Despite what the text says, you can actually see the bottom if you squint, and there are absolutely no cushions there.)
Turn/move right to find three confusing mazes on the wall, each with an arrow on the top and bottom, a button beside each row and a pink button in the lower-right corner that flashes some of the squares pink. Below the mazes is a three-letter safe with a horizontal slot. On the floor, there's a Hammer seal with an ox head on a maze background.
Serpentine
Solve the triplet of mazes on the wall by connecting the top arrow to the bottom.
Hint 1: Some squares cannot be part of any path, because all but one of their exits is always a dead end.
Hint 2: For the last maze, solve the middle three rows first.
The paths through each of the mazes should be as follows:
V<-- R2 | --V< L3 | V--- R2

V--- L1 | V<<- R3 | >V-- L1

>>V- R1 | >>V- L3 | -V-- R2

V<<- L2 | V<<- R2 | ->>V L3

>V-- R1 | >V-- L1 | --V< R2
(The numbers indicate how many times each button needs to be pressed: 2, 1, 1, 2, 1 for the first, 3, 3, 3, 2, 1 for the second and 2, 1, 2, 3, 2 for the third. If you're too lazy to press those buttons, you can just skip ahead to the next clue.)
After solving each maze, click its pink button for a clue that unlocks the three-letter safe.
The pink squares that appear on the mazes spell UDJ.
So enter that in the safe, and it spits out a transparent sheet with colored dots through its slot. The sheet has its top-left corner colored white.
Convoluted
Place the transparency on the maze beside the red door, and the dots land within the passages of the maze.
So use that clue to unlock the silver doors.
The path through the maze passes through cyan, green, pink and yellow dots in the order CGPYYPGCC.
So click the ⌞⌟⌝ ⌜⌜⌝⌟ ⌞⌞ buttons, and the doors open into a long and dim passage.
Exploration 2
Once in the passage, you get four red buttons on screen to control your movement around, so use those instead of clicking on the walls.
Check out the left wall which has a live map you can pick up. It has a bunch of squares and dots, but it seems there are only two ways to proceed: forward and right. Best to keep checking it though.
So walk forward along the passage, abruptly interrupted by a giant hole in the floor. The panel on the wall next to it has a three-digit lock with two more buttons below it. With no way forward, it's time to backtrack.
Go back and through the other side passage, which leads through open blue doors... which slam shut as you walk through. The walls here have red rectangular buttons. You quickly learn not to push them, as they send sharp spears flying down from the ceiling or up from the floor. Pick up the sturdy treasure chest containing a red pin, and leave through the red doors which also slam shut behind you.
(If you wish to go back through the trapped passage, just repeat the steps, entering the silver and then blue doors.)
Vertical
As suggested by the tablet, use the clues from the blue-red passage to unlock the yellow doors.
In the direction of the passage, the 2nd, 3rd and 5th buttons are higher than the other five, and their traps are aimed upward while the others are aimed downward.
So click the DUUDUDDD buttons, and open the door into another set of dim passages.
Exploration 3
The tunnel turns a corner, where you pick up another treasure chest. Inside, there's another red pin attached to a note. No, the ruins are not trying to flirt. This is a different kind of hint.
Turn left and continue down the tunnel to a junction where one path branches into three. The left path has a blue panel locked by a device with four black squares around an octagon. The wall to the side of it has a rectangular panel that's screwed down. T
The right path has three dark holes in the wall, and a blue pin high up on another wall.
The forward path leads into a tiny room which has a device with 25 tiny holes and an unusual clue with colored squares on the right of it. Turning around, you find a button next to the doorway with a display that indicates that it's LOCKed. But the button doesn't work yet.
(If you've been watching your map, you might notice that there are fewer dots than before.)
Unscrew
Use the screwdriver to unscrew the panel on the left path from the junction.
Inside, there's a single red pin.
Light
Switch on the flashlight and use it to light up each of the holes on the right path.
At the back of the holes are... axes? Some of them are crossed, some parallel, some both. If only there was some way to put them in order.
Reach
You can easily reach the blue pin at the top of the wall, but can you remove it?
Yes. If you pile both (empty) chests up under it, the blue pin is at eye level when you climb up, and you can just pull it out of the wall.
Numeral
Use the clue from the axes to unlock the three-digit panel in the other passage.
Notice that the digits are surrounded by black on three sides, and the same is true of the axes, which form the roman numerals III, V and IX when arranged with the non-black side up.
In fact, the excess yellow portions indicate that the views through the holes are overlapping.
The lower-left corner of the code is on 3 and the lower-right corner is on 5, so the code is 395.
Enter that in the panel, and the red light on top turns blue. Now you can use the other two buttons.
The down button currently does nothing, so press the up button which causes a loud rumble.
Turn left to find the hole filled in, with a platform in its place. So walk over it down the tunnel, which slopes upward to end in locked doors with footprints marked in front and a cryptic sign on the wall. Maybe you should read a little closer.
Weight
Click the footprints to step on the pressure plate, and the door opens.
And then the bars open and a boulder rolls straight toward your face!
It absolutely bulldozes you and you wake up next to the giant hole in the wall, where the boulder must clearly have landed in the pit below.
Glad at having a second chance, you run back up to the double doors and step on the pressure plate again. Nope, that boulder's still there, and it rolls toward your face again!
This time, you're alert enough to click the back arrow and run down the passage all the way to safety (there are two safe spots for this). Almost a minute later, the boulder rolls right past you and makes a distant but deafening crash.
Third time's the charm, right?
Fall
That boulder's still there, so you need a better plan for getting rid of it.
If you haven't figured out the sign yet, it says that the boulder doesn't roll when the platform is down.
Step on the pressure plate to trigger the trap, then turn around and run 7 screens to the wall panel.
Push the down button on the panel before the timer reaches 10 seconds.
The platform drops back into the pit, and the boulder drops in after it.
Now you can walk over the boulder back to the top of the slope and step on the pressure plates yet again.
Of course, there's another boulder up there, but it's held behind the bars because the platform is now down.
As you walk forward off the pressure plate, the door slams shut.
Exploration 4
As you approach the corner, you notice something hidden behind the bars: a blue pin just out of reach.
Around the corner, there's a doorway, but a blue marking on the floor forms a cross pointing to a star.
Enter the doorway to another room which is not as dimly lit. The door on the left is outlined completely in black and opens into a room with a female statue holding up a hand. On her wrist is a button that lets you change her hand gesture. The door on the right has a checkered outline and leads into a similar room, but the statue grips a green-and-white capsule. (Her wrist button doesn't work.)
Turn right twice to face the way back. The door on the left is outlined in white on top of black, and leads to a room where the female statue holds up two fingers. The right door, outlined with black diagonally over white, leads to a room where the statue holds up a fist.
Extend
Use your (extended) Reacher to pick up the blue pin beside the boulder.
Rock Paper Scissors
Use the clues you have to get the right gestures on the statues.
Hint: First, you need a sense of direction.
The blue cross on the floor is a compass rose, and the star it points to translates (in your codebook) to N.
Thus the black door is on the north side and the checkered door is on the east side.
The fingers should spell out LOVE in clockwise order, ending on the East door.
So enter the white-over-black door and click the wrist button 3 times to form L.
Then enter the black-over-white door and click the wrist button 5 times to form O.
Then enter the black door and click the wrist button 2 times to form V.
You hear something roll to the floor with a thud, so go to the checkered door and pick up the capsule, which contains a spool of red thread, which looks thick and strong.
(The statue now holds up an open palm with the letter E. Wave goodbye!)
Mini map
Use the clues from the central statue room to unlock the panel on the left path of the junction.
You'll notice that the upper-right square is stuck on black.
Since this represents the black door, the other squares clockwise from it must checkered, horizontal split and diagonal split.
However, to match the geometry of the room, the bottoms of the doors should align with the sides of the octagon, and thus the inside edges of the squares.
(The order of patterns on each button also hints at this fact.)
Click the buttons
8 -

4 5
times (from black). When correct, you get a different text and the sound of the lower panel opening up to let you take a horseshoe magnet.
Missing
Based on the sign in the small room, you should be missing a gray pin and a blue pin. And you have just the right tool to find them.
Your high-tech map will tell you that the gray pin is in the huge pit off the main room.
So examine the magnet and tie the thread to it, and dip it in the pit to pull out the gray pin.
It will also tell you that the blue pin is in the main room itself, on the south(-west) end of the room. So hunt around a bit more carefully.
The hidden spot is the right corner of the cushion, where the blue pin is sticking out and you can remove it using the Cutter. That would have been really dangerous!
Tricolor
Now that you have all seven pins, you can go back to the small room and solve the puzzle there.
Note that you cannot remove pins while you're holding pins: you must switch to a different item.
The pins work as follows:
When inserted in the board, each pin colors its own square, but the red pins also color the four adjacent squares red, the blue pins also color the four diagonally touching squares blue and the gray pins also color all eight surrounding squares gray. (These numbers are smaller for pins placed next to the edges of the board.)
However, white take precedence over blue which takes precedence over red, so that a red pin can sit on a blue square but not vice versa.
With these rules in mind, the puzzle asks you to place all seven pins so that six squares are gray, eight are blue and eleven are red.
(Hints in next spoiler.)
Hint 1: There is more than one known solution, so don't try too hard to pin down the possibilities with logic.
Hint 2: Red pins can only cover a theoretical maximum of 15 squares, so they have to be spread apart to cover the correct area.
Hint 2A: In fact, it's not a good idea to force a red pin to cover 5 squares. Why?
Hint 3: Blue pins generate irregular outlines, but you can try placing them next to each other and inside the gray areas to produce straighter edges.
Place the gray, blue and red pins in either of the following arrangements:
-G-B- | --G-B

--BB- | -B---

----- | -B--R

R---R | -----

--R-- | -R-R-
A beep informs you that the puzzle is solved, so turn around to the button panel which now reads UNLOCK, and push the button. A purple door slides down, and the whole room moves and shakes!
Exploration 5
The elevator spits you out into a room with bright white walls. Two four-button safes on the far wall are marked with left and right semicircles. The only other thing of interest in this room is a device on the wall next to the doorway back which shows a maze with symbols. The device has a blue button that flips the maze over to the other side with white symbols on a black background instead.
There are also two doorways out of this room, to the left and right (check your map). The left doorway (on the map) leads to an even tinier room than before, where a swordsman has his left hand on the dark-colored wall. The right doorway is similar, but this swordsman has his right hand on the wall instead, and the walls are white while the floor is black.
Touchy
Use the clues from this room to unlock the white and black safes.
Hint: The black symbols are on the white safe and white maze with black walls.
The statue in the black-walled room keeps his left hand on the wall, so he...
...follows the left wall.
Solving the maze by following the left wall, you get a path with a few detours near the end, and it passes through the circle, triangle, diamond and cross symbols (some twice) in the XTDTXCCDD order.
So click the 423241133 buttons on the white safe, and its semicircle blinks green.
Similarly, following the right wall on the black maze gives a path that passes through the CTTCXXXXDTCDXX symbols.
So press all fourteen of the 12214444321344 buttons on the black safe, and its semicircle also blinks green.
Solving (both halves of) that puzzle must have done something. But what?
Green
Take the elevator back to the first room, where the Hammer seal is now glowing.
So click it to summon a menacing humanoid with a bovine face who can and will pulverize anything with his massive maul.
It's probably best to ask Hammer politely.
So use the minotaur on the exit rock, and he gives the nail a sharp tap.
The rock develops a labyrinth of cracks, which pulse red a few times before the rock completely shatters.
After that spectacular display, Hammer hesitantly hands you a hammer, which is well weathered and worn.
And then he vanishes, leaving you to bring the treasure through the door and up the stairs to the final room. Stay tuned for the grand finale!
Thanks kk. Missed your walkthroughs :)
Update