![]() Three free escape games. Three very different atmospheres. Take your pick: whimsical, thinky, or dark. Then settle in for five minutes to revel in the mood. Since those still might not be enough to get your fix, you can follow the "Like that? Try this!" links for continued mood indulgences.
Three free escape games. Three very different atmospheres. Take your pick: whimsical, thinky, or dark. Then settle in for five minutes to revel in the mood. Since those still might not be enough to get your fix, you can follow the "Like that? Try this!" links for continued mood indulgences.
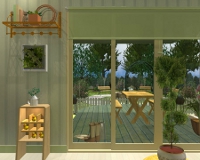
 Candy Rooms No.10: Lettuce Green Natural - Imagine a phone call that goes like this: "Yeah, FunkyLand? Let us have more candy but make it feel healthy, environmentally sensitive, something that Kermit would approve." And here you have it: refreshing visuals in everyone's favorite color and a lovely view out the window of a summery verdant backyard. It's both cleverly presented yet consistently simple; find the five candies and the door key is ceremoniously presented to you. If only... could just... reach... there! Out in a jiffy! Relaxing amusement more than cranial strain is the goal.
Want to go on kicking back in summer time bliss? Chill for a bit in Escape from the Big Windows Room before traveling on to PonPon House 2 for ocean views and neverending whimsy.
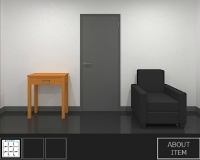
 Maze of Similar Rooms - You already know from the title if you're going to love or hate this newest Hottategoya escape. Either mazes remind you of that awesome day at The Wooz with all your friends—or they leave you teeth-gritted and shaking, not at all relishing the rat-in-a-box scenario. Most the challenge here is poured into orientating yourself through a series of very alike rooms as you seek out clues and solve a couple puzzles on your way out. The polished aesthetics and quality production values help mitigate any disappointment of its brevity while its design and concept add an extra escapeyness to round out the experience.
What, that wasn't amazing? Then there's Escape from the Strange Forest for a truer hedge maze challenge or Mugein for a unique (and superior) take on the same-room-but-different concept.
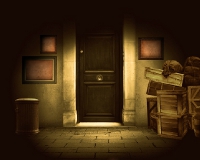
 Dark Alley Escape - If Hottategoya's maze got you thinking about scarier things, such as rounding a hedge and being startled by Jack Nicholson's frozen grin of madness, then this little horror adventure by Esklavos is right up your alley. It'll satisfy those who are in the mood for something darker than all the sweet candy goodness of FunkyLand, but it's going to disappoint true horror fans with its rather thin storyline. The atmospheric visuals are fun to poke around in although it tends to feel static overall. Once you get past some clunky navigation and controls, the puzzles—although rather abstruse—are enjoyable enough to please escape fans of all ilks.
Looking for something even darker? Go for more gore in Killer Escape or feed your nightmares with Deep Sleep.
We love escape games, and our readers love talking about them and sharing hints! How about you? Let us know what you think, ask for clues, or help out other players in the comments below.


Walkthrough Guide
(Please allow page to fully load for spoiler tags to be functional.)
Maze of Similar Rooms Walkthrough
1. Where are we?
Quickly look around the room. There are three doors. You have a map. Examine it and you will see that you must be in one the the middle column of rooms. The locked cabinet is to the left of the door that has the blank wall on the left. From the map, this lines up with the question mark in the bottom middle room on the map.
2. Let's open that cabinet.
On the top of the map are four symbols that match the four on the cabinet. The first is in the room straight ahead, let's go there.
The map says it should be left of the door to the right. Hey look! A drawer! And inside is the symbol and a number.
Next symbol is two rooms to the right of here... go to that room (bottom right of the map)
The map says the symbol should be to the left of the door you just came through. The cabinets are there, and if you check them you see the symbol and another number. Note it and let's move to the central room. (third symbol)
On the eastern wall, in the picture frame! It's our next symbol and number. Next, the north east room.
On the couch this time.
Right, let's go back to the cabinet.
Enter the number sequence (5267) and open the cabinet.
Take the wrench
3. Where to now?
Look at the map. There's another "?" at the mid row western and eastern rooms. Let's Check out the western one.
The drawer is bolted shut.
But we have a wrench
Open the drawer
Get the black plate
4. No, really. Where to now?
OK, we have one more ? to check from the map. Go to the mid western room.
Hey, the picture frame is different.
The picture looks like the black plate would fit there.
A number code! (4875)
5. Let's blow this joint!
Go to the north western room, enter the 4 numbers into the door and escape
Posted by: Jonathan Kok |
May 28, 2014 6:03 AM
Dark Alley Escape Walkthrough:
This is a step-by-step walkthrough (written for certain fellow escape gamers) with what just may be too many steps and spoiler tags. Ah, but at least I tried. ;)
1.
Observe the scene in front of you. Click on the frames to the left and right of the closed door. Notice that three different objects (mirror, watch, and mask) are described but they are not pictured. Also notice that the cursor changes over the trash can to the left, but nothing can be done with it as of yet.
2.
Move left.
3.
Pick up the piece of garbage (1/8) in the lower left hand corner of the visible scene.
4.
Note the design on the wall above the bed.
5.
Move left.
6.
Pick up the piece of garbage (2/8) on the couch
7.
Notice that the cursor changes over the "x" on the wall. You cannot do anything with it as of yet.
8.
Read the sign over the open trash can.
9.
Move right twice.
7.
Once you are in front of the closed door, move down.
8.
Pick up the piece of garbage (3/8) in front of the green door.
9.
Notice the boarded up window to the right.
10.
Move left.
11.
Pick up the piece of garbage (4/8) in front of the telephone.
12.
Click on the blank page on the wall (the one above the "Delivery" poster).
13.
Use the design you found above the bed at step 4 to solve this puzzle.
14.
Pick up the hammer that has fallen to the ground.
15.
Move right, up, left, then left.
16.
Use the hammer on the "x" on the wall.
17.
Take note of the now revealed number. Be sure to write it down or memorize it. The number changes with each playthrough.
18.
Move right, right, then down.
19.
Use the hammer on the boarded window.
20.
Enter the now open window.
21.
Pick up the piece of garbage (5/8) near the left of the visible scene.
22.
Pick up the crowbar to the right of the machine.
23.
Click on the machine. Notice that it cannot be used without its missing wheel.
24.
Move down then left.
25.
Click on the telephone.
Pick up the piece of garbage (6/8) to the right of the dial.
26.
Dial the number you got from behind the "x" on the wall
27.
Observe the "Delivery" poster.
28.
Take the watch.
29.
Move right then up.
30.
Place the watch in the lower frame to the left of the closed door.
31.
Use the crowbar on the trash can. You will receive the trash can lid.
32.
Click on the trash can to receive a note.
33.
Move down then right through the window.
34.
Use the lid on the machine.
35.
Click on the now working machine and collect the final two pieces of garbage (7/8 and 8/8).
36.
Use the note as a guide for the correct sequence of using each horn
Hint: the numbers represent which horn to press. For example, three would be the third horn, four the fourth, and so on. Again, the order found on the note changes with each playthrough.
37.
Notice that something on the machine has changed.
Get the mask from the machine.
38.
Move down then up.
39.
Place the mask in the frame to the right of the closed door.
40.
Move right twice.
41.
Remember what the sign above the trash can says about a tidy house?
Put the garbage into the trash can then click on the trash can to receive the mirror.
42.
Move right twice.
43.
Place the mirror in the top left frame to the right of the closed door.
44.
Click on the sparkling closed door. Congrats, you made it out!...oh, haha, I mean in! Good job! ;)
Posted by: shjack180 |
May 28, 2014 7:41 PM