
 Hello again! It´s Wednesday and a new Weekday Escape is here! Three escape games for you to relax, all from Japanese developers this week. Thank you very much, Japan, for week dose of puzzles and fun.
Flatsan's game is a small room escape game with logic puzzles, not so easy as it seems.
In surreal Chokochai´s game is inspired by Indiana Jones´adventures and includes a whip, a hat (three hats for three cats) and a mine cart!
Cute game from Nekonote is an escape game with adorable creatures´ bonus.
Have a good time and enjoy!
 From there?
The room you are escaping from is not big and only basically furnished, but puzzles are clever and sometimes you have to combine clues to break a code. There is a hint button, a little bulb, to help you with some puzzles if you get stucked - not with each puzzle though. With or without hints, if you concentrate, you can escape!
From there?
The room you are escaping from is not big and only basically furnished, but puzzles are clever and sometimes you have to combine clues to break a code. There is a hint button, a little bulb, to help you with some puzzles if you get stucked - not with each puzzle though. With or without hints, if you concentrate, you can escape!
The cursor is changing, no save button, one ending.
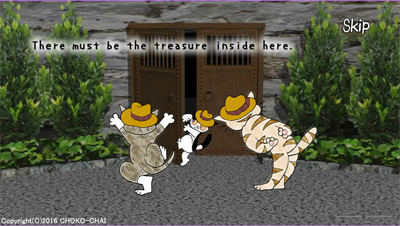 3cats and the Temple of Doom
Three cats found a treasure map and what else to do with such a map, than go and collect the treasure, right? In front of the Temple of Doom they had a bad feeling, never mind, they said, let´s go! Well, bad feelings can be right, sometimes. Now the cats are trapped inside the Temple and they have to escape, with or without the treasure. Solve some puzzles with cats´ help and at the end escape like Indie, in a mine cart!
3cats and the Temple of Doom
Three cats found a treasure map and what else to do with such a map, than go and collect the treasure, right? In front of the Temple of Doom they had a bad feeling, never mind, they said, let´s go! Well, bad feelings can be right, sometimes. Now the cats are trapped inside the Temple and they have to escape, with or without the treasure. Solve some puzzles with cats´ help and at the end escape like Indie, in a mine cart!
Before you start, choose a language option (Japanese or English).
The cursor is changing, save button, two endings.
 Find Dwarfs
The game says find dwarfs, but in fact first you have to help to a chicken, then to cows, solve some puzzles, help to another chicken, and you may escape without finding all ten dwarfs. But they are so cute they worth finding, they sound like a rubber duck when you catch them and you keep them in a little cage. Look everywhere, some of them are very sneaky, little bastards.
Find Dwarfs
The game says find dwarfs, but in fact first you have to help to a chicken, then to cows, solve some puzzles, help to another chicken, and you may escape without finding all ten dwarfs. But they are so cute they worth finding, they sound like a rubber duck when you catch them and you keep them in a little cage. Look everywhere, some of them are very sneaky, little bastards.
The cursor is not changing, no save button, one ending.
We love escape games, and our readers love talking about them and sharing hints! How about you? Let us know what you think, ask for clues, or help out other players in the comments below.


I have the feeling you put the toughest one first this time. (Please fix the screenshot/image.)
From there?
For most puzzles, you need to have viewed the necessary clues before the solution is accepted by the game.
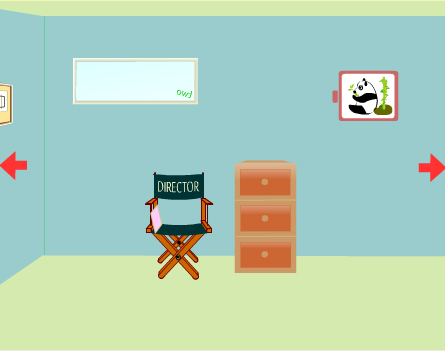
Exploration
Starting screen
In the top-left corner, we have what appears to be a mirror, and the word "two" is written mirrored in green on one of its corners.
There's a director's chair labeled DIRECTOR, and a sign on it has a red square and then the word RED in red. Kind of red-undant.
There's a chest of drawers next to the chair, and it has three drawers. The top drawer is locked. It needs a four-digit code, and its hint is an arrow pointing to a green circle labeled END.
The second drawer is unlocked but empty. It has "eight" prominently written on the back, with the first four letters in yellow and the last in green.
The bottom drawer is also locked. It has three star buttons arranged vertically (and an OK button to confirm the code).
There's also a safe on the wall with a picture of a panda. Its corners are clickable.
(Turn left.)
Left screen
There's a potted plant on the left, which hides some writing on the wall: 9 in red over "nine" in red except for "e" in "nine" which is in yellow.
Next to the potted plant, there is a wardrobe. The left door is locked, and the lock is marked with a red square and eight buttons that turn red when clicked, arranged in a row. This lock also has a hint which we won't read yet.
The right door of the wardrobe is unlocked, and opening it reveals two objects: a book, which you can't take, and a jug, which you can. Other than shaking the jug and noting that its contents are heavy, you can't do anything else with it yet.
The book has a clue in it:
Alphabet

12345678 (8 is crossed out)
There's also a noticeboard on the wall. A note is pinned to it, with an arrow passing through squares of a grid. Flipping over the corner of the note reveals another color-number clue: a blue 7 over a blue "seven" where the "n" is red.
(Turn right twice.)
Right screen
There's a safe on the wall which doesn't seem to be working yet. It has 12 white buttons in a 2x6 grid, a large blue button underneath, and a flower-shaped hole over it.
The air conditioning is currently off, but there seems to be an object stuck between the slats.
There's a table with a laptop on it. When turn on, it shows a clue involving a stair-stepped line and a prompt to enter a pass-number with five digits.
Under the table, there's another safe which needs a key, and six letters underneath it:
HQDRKNFinally, there's a door on the right edge of the screen. Only the left half of it is on screen.
Puzzles
The red square
We need to open the left door of the wardrobe.
Hint: Director's chair
Eight letters in DIRECTOR, eight buttons on the lock.
(But there's also eight letters in Alphabet, and eight digits in 12345678.)
There was also that card on the chair. So much red. It's everywhere, especially in...
The word DIRECTOR!
Spell RED with the letters in DIRECTOR, but you can't use the eighth letter (8 is crossed out).
Press the 3rd, 4th and 1st button and then OK/CL.
The door opens, revealing two items. On the top shelf, there's a toy capsule which you can open up to get a battery. On the second shelf, there's a cookie jar labeled BANANA COOKIE. Slide it aside to get a cookie. Then put the jar back before you leave.
(Some fun for those who can read Japanese: The name on the battery is "Flat" (after the developer), inadvertently making a "flat battery" pun.)
Colored numbers
Which colored number words have we seen?
two: green
seve/n: blue/red
eigh/t: yellow/green
nin/e: red/yellow
There's some overlap between the colors. For instance, the n in seven is the same color as the start of nine.
(It's also an overlap of letters.)
We could arrange overlapping colors, putting blue to the left of red, which is to the left of yellow, and so on.
We could also arrange overlapping letters...
Colors: blue/red/yellow/green
Letters: seve/nin/eigh/two
We have four digits! Also, four colors! And the last color is green.
In the top drawer, put in the code 7982.
Take the remote from the drawer.
Cooling off
Examine the remote. Turn it over and put in the battery. Use the remote on the air-conditioning, which turns on, opens up, and drops a slip of paper.
The paper reads ESCAPE, but the last letter is faded. On the back, PASS No. is written, followed by PEACE.
Pass Number
Go back to the laptop. Five digits in the pass number.
Five letters in PEACE, all of which occur in ESCAPE. Or ESCAP.
P is the 5th letter, E is the 1st, and so on.
Enter 51431 as the pass number.
Several red circles show up at corners among the jagged line.
Corners in red
The corners matter. The order of the corners matters.
Focus on what corners are circled and not where they are circled. For instance, the first corner is a lower-right ⌟ corner.
Go to the safe with the panda picture. Click the LR UL UR UL LR LL corners (which is ⌟ ⌜⌝ ⌜⌟ ⌞), and then OK.
The picture slides down to reveal a star clue (middle bottom top middle bottom) and a hole in the wall.
Three stars
Enter the star code in the bottom drawer and press OK. Open the drawer and take a hammer.
Smash the jug in your inventory and take the rocks.
Banana cookie
Use the cookie from your inventory on the indentation in the inactive safe. The word ONE appears in the bottom-right corner, and the buttons now work.
2 rows of 6 buttons. Each of BANANA and COOKIE is six letters.
And what about ONE?
Press all the buttons corresponding to O, N, and E.
Press these five buttons:
__N_N_

_OO__E
then the big blue one. The safe opens up. It's completely empty except for a hole in the wall.
Hole in the wall
Fill the empty capsule with the rocks, close it again, and send it down the hole from the panda safe.
It rolls down, dislodging a metal capsule which you can pick up from the cookie safe, and open to get a key.
This key opens up the locked safe under the table, revealing two extra lines of letters and a four-color lock.
Not your usual word search
The previously visible line under the locked safe lines up with the two new lines to make a 3x6 grid of letters:
MLSWYP

BUEGAI

HQDRKN
The other 3x6 grid was on the noticeboard. Following the arrow on the grid through the grid of letters gives BLUEGRAYPINKRED.
Turn the buttons blue, gray, pink and red by clicking them 2, 4, 6 and 3 times.
The wardrobe opens up a different way to reveal the exit!
hey kk, thanks for the walkthrough to "from there" and you were right on the screenshot. it makes it look like a "find The Escape Men" game but it isn't" I hope when you find time you can do the remaining 2 games. :)
You're right: I uploaded the correct screenshot.
Welcome to the island of treasure! *hums dramatic music*
3 Cats and the Temple Of Doom
Don't forget, there's two endings here. As with other Chokochai games, you can click the cat on the lower-left of the screen to call the three cats into action, but only after you've identified what they should act on.
Since I have trouble remembering their names (Shokora, Chai, Chibi) I'm just going to refer to them as large, middle and small cats.
(Item list)
There's a lot of screens in this game. Refer here if you're missing any item.
Tools
Torch: First room
Whip: First room
Spear: Third room
Hammer: Fourth room, in ceiling
Swords
Orange: Second room, stuck to the wall
Purple: First room, back of large stone
Red: Fourth room, discolored area between torches
Green: Third room, on floor
Yellow: Third room, behind coffin lid
Pink: First room, behind chest
Stones
1: Fourth room, wall with slots
2: First room chest
3: Second room, small door
Keys
Silver: Third room, in burst balloon
Gold: Fourth room, wall fragment
C Major: Inside handle of hammer
First room
A round boulder blocks the way. We could struggle to move it, but let's look around first.
Turn right. There's two torches here and a locked chest. Take the torch on the left and look behind the chest (click its lower-right corner) for a pink toy sword.
Turn right. Looks like we're not getting out through this locked door. There's a whip on the wall on the right edge of the screen.
Turn right. In between the two torches here there are four pictures of leaves. Each stalk has a different number of leaves:
1+3, 4
6, 2+5
Turn right. We're back at the boulder again. Click on it. It doesn't move.
Maybe our cats are strong enough to push it? Click them, then click the large one and then the boulder.
One's not enough? Click the middle-sized one and then the boulder.
No? Click the small-sized one and then the boulder.
The boulder slides aside. Take the purple toy sword from the moved boulder. Now we can move on to- oh no, the next room is full of spikes!
Some holes have opened up on the left side of the screen. There are four of them, and each has a loop of rope that can be pulled.
Pull them in order according to the leaf pictures: ⌜⌟ ⌜⌝⌟ ⌞
The spikes retract. Time to move on.
Second room
There's a large block of stone, with five square buttons around an
OK button. The top button has a star marked on it. The square buttons stay down when pressed and reset when OK is pressed.
Turn right. There's a small door between two torches, but it's locked.
Turn right. There seems to be a sword attached to the right side of the wall. Click it, click the lower-left cat, click the middle cat, then click the sword again. It's an orange toy sword.
Turn right. There are two torches here, one of them unlit. Light it with the torch from the first room. A clue appears, a arrow in the shape of a five pointed star, starting and ending at a black circle sign and passing through a black star:
.24.

5..1

.3..
1=● , 3=★
Turn right. We're back at the block, and we have the code for it.
Rotate the clue so the star is on top:
..3..

1...5

.4.2.
In other words, hit the left, lower-right, top, lower-left, right buttons, and then OK.
The block separates into two chunks which slide to the side, leaving the door open. Onward to the next room!
Third room
In front, the path is blocked by a huge green balloon. Oddly enough, none of the cats even want to put their claws near that thing.
On the floor, there's a sort of compass: the circle is divided into N, E, S and W. Each quadrant is divided into sectors labeled I, II and III. Each small sector has a dot marked on either the outermost ring or the second-outermost ring.
The dots on the outer ring are from sectors N.II, E.I, S.II, W.II and W.III.
Turn right. There's a grid of levers, labeled across the top with n, e, s, w and down the left side with I, II, III.
Flip those five levers:
.X..

X.XX

...X
It sounds like something opened up.
Turn right. There's a patch on the floor which is differently colored. This time the small cat takes care of it, and digs up a green toy sword.
Turn right. There's two torches, one unlit, and an coffin which was opened by the lever puzzle. Light the left torch, take the spear from the coffin, and flip the coffin lid over to get a yellow toy sword.
Turn right. Now we have something sharp to pierce the balloon with! Use the spear on the balloon, popping it. Take the silver key from its remains before moving on.
Fourth room
There seems to be a metallic cat statue straight ahead, but that path is blocked by metal bars labeled CDEFGABC from lower-left to upper-right.
Turn right. There's two torches on the wall, one unlit. Lighting the left torch reveals a discolored splat on the wall. Large cat gives the wall a good kick, shattering it into pieces and revealing a hidden space with a red toy sword.
There's something glimmering on the leftmost wall fragment. It's a gold key.
Turn right. There's nothing interesting on this screen, so turn right again. The wall here is blank, but something wooden is hanging from the ceiling. Use the whip to retrieve it. It's a wooden hammer.
Examine the wooden hammer. The handle opens up and there's a piece of paper inside. There's some sheet music on the paper, a sequence of seven notes, and a handy guide to the notation on the back.
That's exactly what we need to open up the bars.
The notes are E,F,G,C,D,E,F where the C note is high.
Hit the corresponding bars with the hammer in order.
The bars open up. Another room!
Fifth room
There's a giant cat statue in front.
This time, turn left. There's two torches, one unlit and a clue. Light the left torch and read the clue:
Melon Peach Banana

Strawberry Grape Orange (arrow z)
Turn right. Now that all the torches are lit, the cat statue has beaming eyes and its base has opened up. There are three holes in the base.
Turn right. There's six colored slots in the wall. The toy swords fit in the matching-colored slots, but nothing happens unless they're inserted in the right order.
Read the fruits left-to-right across the top and then the bottom (Hence the "z" clue.) Each fruit represents a color of sword: green, pink, yellow, red, purple, orange.
Slot/Inventory

.2. / . 6

5.3 / 5 4

6.1 / 1 3

.4. / 2 .
A hole appears. Pick up a stone.
Turn right. It's time to backtrack.
Gold and silver
Go back to the first room and open the chest with the gold key. Take a stone.
Go back to the second room and open the small door in the wall with the silver key. Take a stone. There's a discolored portion of the wall.
Go back to the fifth room and insert all three stones in the cat base. They shimmer three times, and then the entire cat statue slides to the side, revealing some tracks and a minecart.
That's the exit right there, but surely you want to take some treasure before you leave, right? Save the game.
Normal End
Click on the exit doorway. The three cats ride off into the distance. It was a good escape!
Happy End
Go back to the second room and open the small door in the wall. There's a golden cat figure there! Take the treasure and leave through the exit door.
The four cats ride off into the distance. The cat treasure is a lucky charm.
Don't forget to check out the cat photos after the credits, you've earned it for completing the game.
I was also wondering about a familiar clue from Temple of Doom, and it just struck me:
The music you play to solve one of the puzzles is the Indiana Jones theme.
kk, again thanks for the "3 cats" walkthrough. Looking forward to find dwarfs :)
Please could someone explain how you get the answer for the 3 circles puzzle for the cupboard in the barn in Find Dwarfs?
Had to look it up, but still can't see how or why that is the answer.
Thanks :)
@BlueBird: I had to brute-force that one the first time through because it was so unintuitive.
You need to figure out that the clue is
the writing on the wall: a reflected 319
and on the lock,
the three circles represent clocks.
Those two together mean that
The code is 3 o'clock, 1 o'clock, 9 o'clock.
Find Dwarfs 2016 winter
You need to find ten dwarfs before escaping. Click on the cage at any time to see the current count. Also, there's no save button for this game, but it auto-saves your progress so that you can load it from the title screen.
(Dwarf list)
Inside box next to door
On wire, after plugged in
On round window of house
Under right snowman's hat
In grass beside safe
Second cushion on sofa (after viewing bench screen)
On ladder in barn
Outside igloo (after lighting fire and coming back)
Back of lost chick
In snowglobe
Exploration 1
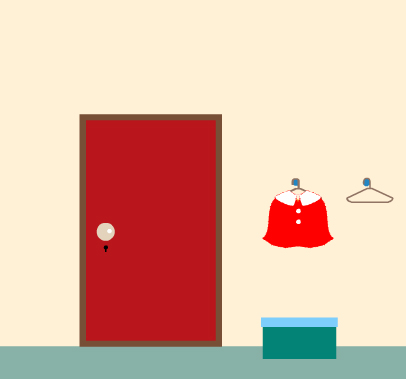
Door
There's a red door on the first screen, locked of course. A coat is hanging by the door. Click on it to check behind it. There's a scarf there.
Look at the box on the floor: it has two round buttons and a rectangular button, taking a sequence of lefts and rights.
(Turn right.)
Sofa
There's a chick...chicken? sitting on the sofa. (It's a hen.) Click on her, and she tells you to look for a hat, scarf, and boots. There's a cushion on the sofa, but nothing hidden there.
To the left of the sofa, there's a snowglobe on the table. The snowman seems rather unhappy with the dwarf, but we can't open up the snowglobe to get him out.
To the right of the sofa, there's a lamp. Trying to turn it on doesn't do what you expect: the light shines on only the right side, then the left, then right, right, left, and then it turns off.
(Turn right.)
Fireplace
There's a rectangular box above the fireplace, but its wire is too short to plug in.
(Turn right.)
Window
The window blinds are drawn. Raise them and look through the window. There are four flags: red, blue, white and green. Green is tallest, followed by blue, white and red. Take the extension cord from the windowsill.
There's also a blue chest of drawers here. The top drawer is locked and needs a key, and the bottom drawer is locked and needs a sequence of four colors. (The colors available are the same as those on the flags.)
Puzzles 1
Left and right
Enter the code from the lamp into the box next to the door: RLRRL.
The box opens up. Take the dwarf(#1) and pair of boots.
Four colors
Go back to the box over the fireplace. Click on its wire, and use the extension cord on it. A dwarf(#2) slides down the cord.
The box lights up. Click it and four triangles appear, first in order from left to right, then all together. They are large, tiny, small, big (4,1,2,3).
Match that to the height of the flag(post)s.
The color code is Green Red White Blue.
Enter that into the lower drawer (3,1,0,2 clicks) and back up. The drawer opens and there's a hat inside.
Give the hen the hat, scarf and boots (in any order), and then click on her.
She gives you a capsule which contains a red key which opens the door.
Exploration 2
House
You're outside the house now. Click on the window to find a dwarf(#3), and then back up.
Snowmen
Click a snowman hiding behind the trees. There's actually three snowmen. The left one has a silver button which doesn't match his other plain blue button.
Check under the hats. There's a dwarf(#4) under the right snowman's hat.
All the snowman arms can be set to high, middle or low.
(Turn right.)
Cows
The left cow is larger (or maybe closer) than the right one, and his face is a little grayish? Maybe they shouldn't be outside in the cold...
Click on the cows. The cows want the barn to not be boarded up, so that they can enter.
(Turn right.)
Outside Barn
There's a sketchbook lying in the snow. Flip through its pages:
Empty except for a scribble
Drawing of Dad, Me and Mom
Cow grazing/drooling on grass
Hen and two chicks
Firestarting with Fire, (Crumpled) Paper, Oil and Wood
Blank Page
Tear out the blank page and crumple it into a paper ball.
(Click on the barn.)
Barn
Just as the cows said, the barn entrance is boarded up. To the right of the doorway is a capsule machine, but we don't have anything for it.
To the left of the doorway is a safe with nine buttons. Each button turns blue when pressed and only changes back when all of them have been pressed.
On the wall beside the safe is a clue which has three circles and three symbols. A comb? A line? A comb with hair? We'll deal with it later.
There's also a dwarf(#5) in the grass beside the safe.
(Go back to the field outside the barn, and turn right.)
Bench
The bench is empty the first time you look at it, but you can change the screen and come back.
The hen is now sitting here with one of her chicks. She says her other chick has gone missing.
There's also an EXIT sign, which you can click to end the game. If you do this without 100% completion, you'll get a failure screen, but you can still go back to the game from that screen or load your autosave from the menu.
High, Middle, Low
The three snowmen match the three people in the drawing.
Follow the arm positions in the drawing to arrange the snowman arms: low, middle, middle, middle, middle, high.
The silver button falls out into the snow. It's a coin.
Shiny pieces of metal
Use the coin in the capsule machine to get another capsule which contains a blue key.
Go back into the house and use the blue key to open the top drawer. Take the crowbar.
On the way out of the house, take a closer look at the sofa. Now that the hen has left, you can click on the second cushion on the sofa, revealing a dwarf(#6).
Go back to the barn and use the crowbar to remove the plank from the entrance.
In the barn
There's some grass on the left, a locker in the middle, and a ladder on the right.
The lock on the locker has three circles which fill clockwise from the top, turning from gray to red in 6 steps and then back to gray.
Click on the ladder to zoom in. There's a dwarf(#7) on one of the steps. There's also a clue, a spiral that stars in the center, goes down and then circles around counter-clockwise to the lower-left.
Safe
Hit the buttons in a spiral pattern:
765

814

923
and back up. The safe opens.
Take the oil from inside the safe.
Locker
The circles on the lock don't fill up in equally spaced steps. The relevant angles are 0, 30, 90, 180, 225, 270 and 360 degrees!
Maybe there's some other meaning involved. What if we ignore the coloring and focus on the dividing lines?
The code on the wall is a three-digit number, together with its reflection about its top edge. So cover up the top half of those symbols.
Those digits are 3, 1, 9. Do we have choices that are 3, 1 and 9 of something?
There are circles that correspond to 3, 1 and 9 o'clock, or 90, 30 and 270 degrees.
Click the buttons 2, 1 and 5 times, then back up. The locker opens up. Take the saw inside.
Looking for cows
Go back to where the cows were. The cows have left and it's just an empty field now. (But not completely empty, we'll come back later.) Go back to the barn. The cows are there.
Click on the smaller cow, who chews up the grass. There seems to be something under it. Do it again. There's a candle under the chewed grass.
Starting a fire
Go back to the field where the cows were, and click on the round bulge on the horizon. It's an igloo with a fire ring in front of it. Clicking on the igloo only produces a "..." response.
Time to start a fire! Place the paper ball in the fire ring. Pour some oil on top.
Add some wood! But not that giant plank you have. Saw it into sticks, then stack them around the paper.
Fetch some fire! Go back to the house, and light the candle in the fireplace. Bring it back to the campfire and light it.
(You don't have to do the steps in this order. The game will let you place either paper or sticks first, and it will let you pour oil even if only one of paper or wood is in the fire ring.)
Leave and come back to the igloo. The lost chick has come out, and dropped a dwarf(#8) on the ground.
Lost chick
This chick seems a little worried about something, and the hen will point that out if you try returning it.
Examine the chick and turn it around. There's a dwarf(#9) hanging off its back.
Now that that's sorted out, return the chick and click the hen, who gives you a screwdriver.
Snowglobe
Go back to the snowglobe in the house, and open it with the screwdriver. Take the dwarf(#10) from inside.
Go back to the exit sign. The game asks "Do you really leave?" to which you answer Yes.
Congratulations! (If you click the hen in the ending screen, she waves.)
From There is indeed a tough one. I needed to use the walkthrough (thanks kktkkr, nice once) for almost everything. I was glad to be able to solve the last couple of puzzles myself; I guess I finally caught on to the patterns.
Thanks for answering kktkkr, I completely missed that! :)
Update