
 Time for short break and fun is here, the new Weekday Escape has just arrived!
Joyful and colorful game by Vitamin Hana wants you to repair your moped and ride it away. To school, perhaps, as in AppGoya's game you have to escape a classroom, which they call mysterious but seems quite ordinary (except for all those riddles). The last comes Riddle Escape and their escape from strange, but beautiful place built for unknown purpose on the sea.
Have a good time and enjoy!
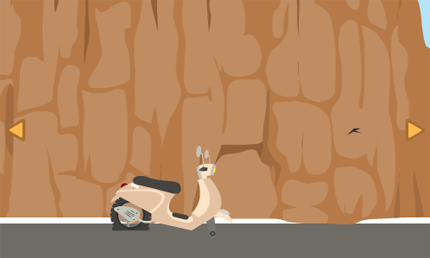
Seems that you had a moped accident in Vitamin Hana last game, but a very, very small one, fortunately. Nobody was hurt, even no bruises, only your moped is missing a wheel. You can see it nearby, unapproachable though. You shouldn't stay there in the middle of the road, it's dangerous, a car may rush out of the tunnels any minute and game designers didn't give you a phone to call some help - but hey, there are lying some crates (coded) and red backpack (also coded), maybe you can find some clue around and open them. Hopefuly they are hiding some useful items...
The cursor is not changing, no save button, one ending.
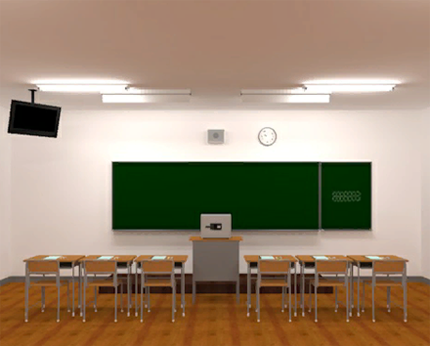
This game by AppGoya (earlier Hottategoya) is out from August, but it was available only for Android. Now they've relased the PC version too and we can see they still have it, puzzles are stylish and clever. The classroom you are locked in doesn't seem mysterious at all, only the music you hear around is a bit suprising for classrom. But something about the room doesn't feel right, go and look around again - yes, a door is missing! Can you get out? After a quick search you find some clues and also items, and I'm sure you find your way out soon!
The cursor is not changing, autosave, one ending.
The game is available for Android too.
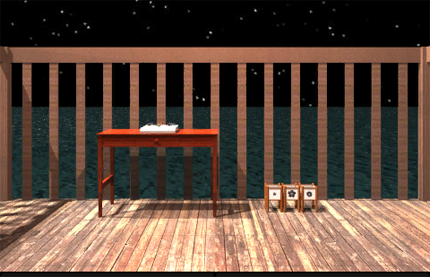
Creative and productive Riddle Escape brings us another atmospheric game. The game enviroment is georgeous, and starry night and sea certainly increases attractiveness and makes playing more pleasant. Gameplay is quite linear, not very difficult, but not too simple. Intentionally, seems, we know they can make longer and more difficult game (Clock Escape in WE 147). This one is a perfect coffee break game!
The cursor is not changing, autosave (not 100% reliable), one ending.
The game is available for Android too.
We love escape games, and our readers love talking about them and sharing hints! How about you? Let us know what you think, ask for clues, or help out other players in the comments below.


Mountain Side
M for mountain, M for motorbike, M for mechanic, that's you.
Exploration
You start off facing a tunnel into the mountain marked with a clue. Along the roadside, your red backpack sits dangerously close to the cliff edge, and it's locked with a three-symbol padlock.
Check inside the tunnel to find two safes in the wall, one with a three-digit lock and another with two buttons labeled L and X.
Back out and turn left to find a vertical cliff face with a small crack on the right side. Your motorbike is there, with one flat tyre and one missing tyre, and what looks like a lock on the back that you can't access yet.
Turn left, and the windy mountain road with birds flying overhead leads to another tunnel marked with a dark triangle. Along the road, there's a locked crate which needs a code with three beveled line segments, and there's a green locked box which needs a code with four directional arrows. A single motorcycle tyre rests on the cliff to the left, way out of reach.
Geometric
Use the clue from the (nearby) mountain tunnel to unlock your backpack.
Enter
O+△(3, 1, 5 clicks), then click the padlock to remove it.Inside the bag, there's a pair of binoculars and another green locked box which takes a three-symbol code.
Far
Use the binoculars on the distant tunnel, and then use the clue from that to unlock the crate.
The dark triangle has the digits 1 to 3 on its sides, so the code for the crate is
\/_(2, 1, 3 clicks).Open the crate to get a tyre pump and a clue with four hearts in different orientations.
Inflate
Use the pump on the flat rear tyre to inflate it and find a clue with an up arrow in a heart shape.
Pointed
Use the clues from the hearts (and rear tyre) to unlock the green arrow box.
The hearts are oriented down, left, up right and down right.
So point the arrows in those directions by clicking the buttons 4, 6, 1, 3 times.
Then click the lid of the box to open it and get a mallet.
Vandal
Use your mallet on the hole in the cliff face (next to the motorcycle), releasing water onto the road.
Turn right, then turn left again, and the water has soaked into the rock under the hole, revealing a three-digit clue.
Three
You'd think the code from the cliffside would go in the left tunnel safe, but it doesn't work.
So you need another clue (or two).
The digits from the triangle clue are, from left to right, 2 3 1.
So following the Circle Plus Triangle Clue, add 254 to 231 to get 485, and then enter that in the safe.
Then open it to get a bucket of white paint (with a brush/roller in it) and a clue about numeric values of X and L.
Paint
Use the white paint on the road to paint the center line. This only works if you click right in front of the nearby tunnel entrance, and it reveals five symbols in the unpainted space.
So use those symbols to unlock the other green box next to the backpack.
Click the bear, star, lampshade, star, bear symbols (RLCLR) on the box, then open it by clicking its lid to get a spanner and your driver's license, which has an unusual registration date printed on it.
Roman
Use the clue from your license to unlock the right tunnel safe.
10, 50, 30 and 50 are X, L, XXX and L in roman numerals.
So click the XLXXXL buttons, then open the safe to get a rope and piton.
Descend
Zoom in on the cliff above the loose tyre and attach the rope to it. But wait! It's not safe to climb down yet.
Use the mallet on the piton to secure it.
Now that the rope is secure, it's easy to get the tyre.
Repair
Use the tyre on the bike, and attach it with the spanner.
Now that the bike is upright, you can push it aside to find another clue with symbols in the cliff face.
Numerous
Use the symbol clue to get a three-digit code to unlock the bike.
(Hint: the buttons on the locks don't count.)
There are 7 birds, 5 hearts and 2 stars, so enter 752 in the lock. Open the compartment up to find a key.
Close the compartment, and use the key on the bike to start it and end the game.
Mystery Classroom Escape
Perhaps you were ready to be mysteriously trapped in another mysterious room with mysterious puzzles to solve. But just when you get used to AppGoya's style, they change up the interface and add… background music!
Interface help
You can switch the language (and toggle music and sounds) on the title screen or the options menu after you start the game. Also note that there's no longer a hint button in the menus, since hint buttons are provided for individual safes and locks.
Exploration
At the front of this mostly normal classroom, six desks are arranged in a row. Each desk has identical stationery except for the pencils which have different colors and lengths. At the front of the room, the teacher's desk has a three-digit safe on it, except that the digits are arranged vertically and represented by roman numerals. On the right side of the blackboard, what appears to be a seven-segment display of (overlapping?) digits is shown in chalk, with all the segments present. There's also a TV screen in the top-left of this screen.
Turn left. A filing cabinet with a down arrow painted on its side has six drawers, all of which are unlocked except for the top one, which has three comparison operator buttons under a row of six lights and the word SIZE. There are also three pairs of tables and chairs, with a red four-digit box on the left.
Turn left. At the back of the room, there's a bunch of empty pigeonholes under a noticeboard with a poster of a pigeon with the number 29184. There's also a small locked safe on the right of the room and a locked locker on the left which needs a four-digit code after a black 6 and orange 9.
Turn left. There's another three pairs of tables and chairs, and the middle table has a torn notebook page with a picture of a corgi over the number 4157.
That's all the furnitue accounted for, but you still feel like you're missing something important, and it's not just the lack of exits.
Check under the right deck on this screen to find a remote control.
Zoologic
Use the remote on the TV, which flashes six pairs of animal pictures.
So use that clue to unlock the top drawer of the cabinet.
Only the 4th pair has the left animal smaller than the right. The 3rd and 5th pairs have identical pictures.
So click the
>>=<=>buttons, and open the drawer to find a green box with a hexagonal nut sticking out.Colorful
Use the clue from the pencils to unlock the locker.
The red, green, white and blue pencils have lengths of 5, 8, 6 and 9 centimeters.
So enter 5869 in the locker, and open it.
Inside, there's a blackboard eraser at the top, a list of animals in the middle, and a blue box with three top-hat shaped buttons of different sizes under a row of six lights.
Wiped
Use the eraser on the right chalkboard, leaving only the digits 6352 in chalk.
Then enter that code in the red safe and open it to get a hexagonal screwdriver, which I'll call a hex key.
Unscrew
Use the hex key to unlock the green box in your inventory to find a can opener and a clue which equates A to 1 and Z to 26.
Depths
Use the clue from the drawers in the cabinet to unlock the blue safe in the locker.
(Hint: you can use the floor as a guide.)
The 2nd and 3rd drawers from the top are shortest and the 1st and 5th are longest.
So click the RLLCRC buttons, and open the safe to get a sealed tin can.
Content
Use your can opener on the can to find a key.
Unlock
Use the key on the safe to find another four-digit lock under a picture of a cat.
Cipher
Study the picture clues to deduce the code for the cat lock, using other clues to help you.
As indicated by the green box, A=1 and Z=26 mean that B=2, C=3 and so on.
(So we have B I R D = 2 9 18 4 and D O G = 4 15 7.)
This means that C A T = 3 1 20, so enter 3120 in the lock to open it.
The pigeonholes slide down to reveal a secret passage. So go downstairs, where there's only a locked door and two barrels. The left barrel has a warning of sorts, but it's also a clue.
Unsafe
Use the clue from the explosive barrel to unlock the safe on the teacher's desk.
The digits on the sign should refer to roman numerals I, V and X. But in which order?
X, I and V are the 2nd, 7th and 8th letters of EXPLOSIVE.
So 87=VI, 77=II and 72=IX.
Enter that in the safe, then open it to get another key.
Use this key on the last door to leave. Conglaturations!
Thanks as always, KK Can't wait for Escape From The Sea.
KK? Anyone? is the walkthrough for Escaoe From The Sea ready?
Here you go.
Escape From the Sea
M is for the sea mist that sprays onto the pier.
Exploration
Thankfully, you don't start underwater, but on the middle of a floating wood platform. In front, there's a desk with a small white box on it which has six crystal flowers and two knobs in the lower right. Next to it, three lanterns have silhouettes of plants on their fronts.
Turn left to find a door to the next "room", locked with a three-digit code and having a clue with red and white shell pictures and a plus symbol.
Turn left again to find a small round table with another white box, this one locked with a code involving different numbers of horizontal stripes. Above the table, a locked cupboard has its handles tied together with wire.
Turn left again to find a shelf on the "wall" with three compartments. In the left compartment, a tray holds a total of eight red shells. In the middle compartment, a safe is locked and needs a code involving the sizes of plants. In the right compartment, there's a single green paper crane. To the right of the shelf, two columns in the wall are connected by thin horizontal bars.
Horizontal
Use the clue from the wall beside the shelves to unlock the white safe.
The horizontal bars occur in groups of 1, 4 and 2, so click the buttons 0, 3, 1 times.
Inside the safe, there's a pair of pliers.
Snip
Use the pliers on the wire tying the cupboard shut, and open it to find a clue with three marked stone discs and a round box with buttons that (almost all) change color when clicked.
Botanics
Use the clue from the lanterns to unlock the plant safe.
The plants are, from left to right, small, large and medium-sized, so click the buttons 2, 0, 1 times.
Inside, there's a plain white knob.
Tuning
Place the knob on the flower box, then use the clue from the stone discs to set the knob positions.
The white lines on the discs point to the right, lower-left and upper-left.
So click the knobs 2, 5, 7 times, and the flowers light up in three different colors.
Rose
Use the clue from the now-lit flower box to unlock the round box in the cupboard.
In clockwise order, the flowers after red are yellow, blue, yellow, yellow, blue.
So click the top, lower-right and bottom buttons twice each.
Inside the box, there's a round drawer handle.
Use the handle on the desk drawer and open it to find a tray with a total of eleven white shells.
Seashells
Use the clue from the red and white shells to unlock the door.
The tray with red shells has 4, 1, 3 shells in each section.
The tray with white shells has 5, 3, 3 shells in each section.
So add 413 to 533 to get 946, which is the code for the door.
Exploration 2
Next room! You can see six red lanterns with white stripes ahead, but they're on the other side of a locked door which has three small metal wheels on its base.
Turn left to find a box on the wall with a black flowery symbol on it, and a gap in the wall on the left which opens into the sea, with a rope tied to a pillar.
Turn left. There's nothing on this screen other than the door back, so leave it alone for now.
Turn left. There's yet another locked door here and you can see the corner of a boat behind it. To the left, there's a trapdoor which you can't lift. To the right, there's another wall shelf with four compartments. The upper-left one is locked, the upper-middle one shows a photo with an arrow pointing to a hidden spot, and the lower-right one has a blue paper crane.
Hidden
Follow the hint on the photo to find the hidden spot.
Go back to the first room and open the desk drawer, then click on its right side to find a key.
Unlock
Use the key to unlock the locked compartment of the shelf in the second room to get a crowbar.
Leverage
Then use the crowbar to lift the trapdoor and find an empty bucket with the same black flowery symbol from earlier.
Dropper
Tie the bucket to the end of the rope and dip it in the sea, then pick up the full bucket.
Then splash the water onto the box with the flowery symbol to get a clue with white corners.
Steer
Use the corner clue to unlock the door forward.
Make the L-shapes on the wheels match that on the box by clicking the wheels 6, 1, 4 times.
The door unlocks and you can move on.
Exploration 3
Finally, we're at the lanterns. They're hanging over a box with four candle buttons.
Turn left. There's another gap in the wall which opens up to show you a key floating on a platform just out of reach. There's also a very long locked chest.
Turn left. Next to the door back, there's another set of wall shelves with doors on their compartments. (More like cupboards, really.) The left one hides four white candles, the top one hides a yellow crane, the right one hides a box with six buttons (marked with one line), and the middle one is locked and has a picture of a moon on it.
Turn left to find a telescope stand, but no telescope.
Binary
Use the clue from the lanterns to unlock the box in the right compartment of the moon shelves.
The white stripes are on the top, bottom, top, top, top, bottom sides of the lanterns.
So click the 1st, 3rd, 4th and 5th buttons.
The box opens to let you take a matchbox.
Inflammable
Use the matches to light the candles in the left compartment of the moon shelves.
Time passes before your eyes and the candles burn down to different lengths, so use this clue to unlock the box under the lanterns.
The 3rd candle is the tallest, followed by the 1st, 4th and 2nd.
So click the buttons 2, 0, 3, 1 times to find a magnet.
Length
The magnet isn't strong enough to let you force-grab the key, so you need to find some way to extend its reach.
Hint: What's the other item you still have?
Use the matchbox on the rope in the second room to burn it free.
Then use the magnet on it and use the tied magnet to get the gold key.
Unlock 2
Use this key to unlock (the lid of) the long box and get the telescope inside.
Gaze
Place the telescope on its stand, and look through it.
The moon is pretty, but three stars around it are blinking in a rather unnatural manner.
So use that clue to unlock the last compartment of the moon shelves.
The left star blinks first, then the top, right, top, left, right.
So click the LURULR doors of the moon shelves.
The right door slams shut and the moon door slams open, so take another golden key from inside.
Unlock 3
Use the key to unlock the last door in the second room, which opens out onto a pier with a boat floating beside it.
There's also a flat long box on the pier with a white crane next to three polyomino buttons which have to be made the correct colors.
Orizuru
Use the clue from the paper cranes to unlock the box on the pier.
The long, zigzag and T-shaped shelves (in the 1st, 2nd and 3rd rooms) hold green, blue and yellow cranes.
So enter that in the box by clicking the buttons 3, 1, 2 times.
The box opens and you can get a long oar.
So use the oar on the boat and row into the distance.
Thanks for the walkthrough for Escape From the Sea, kktkkr. I got stuck with a crowbar and nowhere to use it.
I hadn't noticed the trapdoor.
I also needed the hint for the floating key.
I noticed that I still had the matches
but I didn't notice that it still let me click on the gap in the wall where I could get to the rope.
Update