
 It seems that the weeks are getting shorter and shorter...believe it or not, it's Wednesday again and the new Weekday Escape is here!
With MayMay you visit three one-scene rooms and all the codes you break and the puzzles you solve lead to ownership of five candies. Really. Riddle Escape locks you in traditional Japanese room (again) with your four lollipops (five minus the green one given to the snail) and before you get out of there they are licked away! Good, after escaping from Funkyland's rooms you'll need some space in your stomach to pack down edible reward.
Have a good time and enjoy!
Coffee break expert MayMay doesn't want you to do some work this time, you have to find five lollipops. They are so well hidden that one wonders what is inside of them. Gold nuggets? Gems? Probably not. What you find are just colorful and flavourful candies and the only purpose of collecting them is final puzzle. I am not sure whether you get them at the end, but I hope so, otherwise the snail would be very disappointed.
The cursor is not changing, no save button, one ending.
 Escape from Traditional Japanese Room 2
This is not a repost of Riddle Escape's game from September (WE N°154). The room may seem identical at first sight, and busy developers may have borrowed some furniture from the first one, but puzzles are different and items too. It's an excellent game again; and there is the "ooh!" moment of pleasant surprise later, appreciated by ecapers. No language barrier, clear instructions, logical puzzles. Can you solve all of them?
The cursor is not changing, autosave (not 100% reliable), one ending.
The game is available for Android too.
It seems that Funkyland stopped travelling and returned to the concept "find five objects" (Alice House, Girls Rooms and Candy Room series). Or, being thorough, seven objects (Fruit Kitchens). The game is bigger than it seems, you have to explore more rooms and open more doors than you would expect to find five tea tins and get rewarded afterwards with a treat. Joyful jazzy music, polished design, puzzles clever but not too hard and a frog as a trademark - Funkyland does hold their high standard! They are even getting better and better in design.
The cursor is not changing, save button, one ending.
The game is available for Android too.
P.S. There was one game from Fruit Kitchen series missing in JiG archives, it's Fruit Kitchens No.2: Green Apple. We are complete now!
We love escape games, and our readers love talking about them and sharing hints! How about you? Let us know what you think, ask for clues, or help out other players in the comments below.


The link in the text is wrong (and the image link is correct).
Find 5 Lollipops
MayMay has a craving for sugar, and you can satisfy it with some handy-dandy fancy candy.
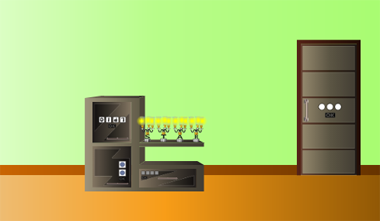
Exploration 1
You start off facing an oddly-shaped cupboard with three locked safes and a shelf that has four candle-holders with letter-shaped stems. The upper-left safe has four buttons with weird symbols on them, the lower-left safe has two identical round blue circle buttons, and the lower-right safe is just a four-letter safe. The door to this room has three buttons that show different cogwheel-shaped blobs when you click them.
Brightness
Use the clue from the candelabra to unlock the lower-right safe.
Enter STAR in the safe, then open it to get a screwdriver with symbols on its handle.
Shapes
Use the clue from the screwdriver to unlock the door.
The screw drive types shown are (as listed on Wikipedia) double-square, tri-wing, Bristol.
So click the buttons 1, 5, 2 times to unlock the door.
Exploration 2
This time, there's a four-digit safe and a four-color-safe on the floor, and the second (right) one is attached to a low table that also has a panel with four screws at the front. On the wall above, four different-colored flowers sit in pots marked with different numbers of dots. The door to this room seems to have a digital lock with a red light.
Unscrew
Use your screwdriver to remove the screwed panel and get a yellow lollipop from inside.
Potted
Use the clues from the flower pots to unlock the left safe on the floor.
From left, the pots have 2, 4, 1, 3 dots on their front.
So enter 2413 in the lock and open the safe to get a keycard and a green lollipop. Turning the keycard over, you find an arrow clue on the back.
Bloom
Use the clues from the flowers to unlock the right safe on the floor.
The pots with 1, 2, 3, 4 dots hold red, purple white, blue flowers.
So click the buttons 2, 3, 0, 5 times to unlock the drawer and get one knife, bent into two knifes! It's a cake cutter!
Clearance
Use the keycard on the door of this room to unlock it and advance to the next.
Exploration 3
Five framed pictures on the upper-left of the wall show different numbers of candies, except for the center one which only shows a black X. There's a three-digit safe below that on the floor. A beautiful chocolate cake sits on a table in the middle of the room, and to the right of the table are two colorful safes: a small box on the floor with four colored buttons, and a set of five colored boxes on the wall next to the locked door.
Slice
Use the cake cutter on the cake to find a blue lollipop inside.
Numeric
Use the clue from the keycard and the pictures on the wall to unlock the three-digit safe below them.
In the order shown by the arrow on the back of the keycard, the wall pictures show the numbers/symbols
5, 4, X, 1, 2.54×12 = 648, so enter that in the safe to unlock it.
Inside, there's a clipboard, and the paper attached to it reads LOLLIPOP in flowery letters with a five-digit code written beneath.
Counted
Use a clue from the clipboard to unlock the small box on the floor.
The wall pictures with 5, 1, 4, 2, 5 items show blue, green, red, orange, blue candy.
So click the 2nd, 3rd, 1st, 4th, 2nd buttons on the box and open it to find a remote control.
Spelling
Use the other clue from the clipboard to unlock the upper-left safe in the first room.
When turned upside-down, the LOLLIPOP code reads d0d17707 instead.
So click those buttons on the safe, and open it to get an orange lollipop.
Beep
Find something that the remote control can be used on.
(While looking at the object, examine the remote and press its button.)
That something is the candles in the first room.
Using the remote caused the candles to turn off, and now you can see darkened dots on the candelabra.
Dotty
Use the clue from the candelabra to unlock the lower-left safe.
From left to right, the dots occur on the UUDUDDU sides of the candle holders.
So click those buttons, and open the safe to get a red lollipop.
Collection
You should now have five lollipops, so place them in the matching colored boxes beside the last door.
This unlocks the door so you can open it and escape.
You get a sweeeetttt!!! ending screen with 16 lollipops.
KK, what is the correct link to the game?
The correct link for Find 5 Lollipops is http://minigames.squares.net/maymay/ra035.cgi?MAGT=P .
Thanks kk. can't wait for the other 2.
Riddle Japanese Room 2
You might think Riddle Escape just rearranged a room, but almost everything is different here.
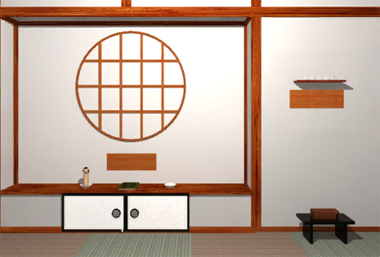
Exploration
You start off facing two double doors (?) with white diamonds on them, four lanterns on the floor in front of them and a sakura flower on the right wall. On the wall next to it, there's a panel of three light switches, none of which seem to work.
Turn right. The double doors on the right side of this screen are locked, so look at the left side which has a watercolor painted scroll on the wall next to a sakura missing a petal. Clicking on the scroll, you find a safe with a daruma doll picture and eight black/white buttons. Under the scroll, there are two safes hidden on the floor, one with three square slots and another with a red dot and a grid of nine black/white buttons.
Turn right. Under the round window is a wooden panel and two saucers on either side of a book, one of which has a kokeshi doll on it. The book itself has symbols printed on half of its numbered pages. There's a locked cupboard below that. Backing out, you find a shelf of lit candles on the right side of the screen, each on its own candle holder, but one holder is empty. There's also a low table on the floor with a three-color box on it (colors arranged vertically).
Turn right to a screen with wall shelves on the wall, holding a box with comma-shaped slots, a two-button box and a bowl with dice respectively. At the lower-left, there's a single sakura petal. At the lower-right, there's a set of three square cabinets holding paper fans marked with the 灯 kanji in various stages of writing.
Double-sided
Use the clues from the book to unlock the two-button box on a wall shelf.
In each pair of pages, the symbol appears on the left, right, left, right, right, left sides.
So click the LRLRRL buttons, and the box opens up to let you take a kokeshi doll.
Place the doll in the empty saucer on the other side of the book, and the panel nearby opens up to show you a box of delicious three-colored dango.
Tasty
Use the clue from the dango skewers to unlock the three-color box below the candle shelf.
The balls change from pink to blue to green across the skewers from left to right, and those changes occur on the middle, top, middle, bottom, top, bottom balls.
So click those buttons to unlock the box, and it opens up to let you take a comma-shaped piece (magatama).
Snake eyes
Use the clue from the bowl of dice to unlock the red dot box under the painting.
The dice showing the red pip on top are in the upper-left, upper-right, right and bottom positions on the grid.
So click those four buttons on the box, and it opens up so you can take a matchbox from inside.
Open up the matchbox to find another magatama piece.
Curve
Place both magatama pieces in the box on the wall shelf, and it opens up to let you take a golden key.
Unlock
Use the key on the large sliding doors on the screen with the painted scroll, and then look inside.
In the upper-right corner, there's a box with four color buttons and a large button with two white diamond shapes. Above the box, two sakura petals are painted on the back wall.
In the lower-right corner, three pink cakes (buns?) sit on stacks of plates, each topped with a symbol drawn in icing sugar.
In the upper-left corner, three more square cabinets hold more paper fans with more partially-written 灯 kanji. (The lower-left 灯 is complete.)
In the lower-left corner, a three-button box sits on a red cushion. The buttons cycle through different numbers of white stripes when clicked.
Lights out
Use the clue from the paper fans to turn the lights off.
Press the buttons on the light switch panel according to the stroke order of the 灯 kanji.
The symbols with 1, 2, 3, 4, 5, 6 strokes occur on the ULRURL fans.
So click those buttons, and the whole panel slides up to reveal a simpler light switch.
So flip it, and the room goes dark.
Sunlight filters in from the outside through the white diamonds on the doors, but there's more light in this room coming from the lanterns on the floor, which glow in four different colors.
As you back out of the view, the lights turn back on.
Four corners
Use the clue from the lanterns to unlock the box in the upper-right behind the sliding doors.
The lanterns are red, yellow, blue, green in clockwise order, but the diamond button is on the bottom rather than the top, so the code has to be turned upside-down.
So make the buttons
Blue(1) Green(2)

Yellow(3) Red(0)
by clicking the buttons that many times, then click the diamond button to open the box and get a metal key.
Unlock 2
Use the key to unlock the cupboards below the book.
Inside, there are three stacks of red cushions.
Crimson
Use the clue from the stacks of red cushions to unlock the box resting on a red cushion behind the sliding doors.
The stacks have 1, 5, 3 cushions, so click the buttons 0, 4, 2 times to open it.
Inside, there's an unlit candle and a clue with three sakura petals.
Linear
Place the candle in the empty candle holder to complete the row of candles on the shelf, then light it with the matchbox.
The panel below the shelf pops open, and now you have another shelf with four daruma dolls and a white safe with five petal-shaped buttons.
Pentamerous
Use the petal clues to unlock the sakura safe.
Placing the clues in order from one petal to five, the new petals appear in the top, bottom-left, right, left, bottom-right spots. (Or in other words, every second position counter-clockwise from the top.)
So click the buttons accordingly, and the safe opens up to reveal a stone panel.
Four pairs
Use the clue from the daruma dolls to unlock the safe behind the painted scroll.
The 1st, 3rd, 4th, 5th eyes from the left are white (unpainted).
So click those buttons on the safe, and it opens up to reveal another stone panel and a three-button safe where the buttons show symbols (and are arranged vertically).
Symbolic
Use the clues from the pink cakes to unlock the three-button safe-in-the-safe behind the painting.
The cakes are placed on stacks of 3, 1, 2 plates, which makes them all different heights.
So from top to bottom, the symbols should be snowflake, sunflower, clover.
Click the buttons 0, 1, 2 times accordingly, and the box opens up so you can take another stone panel.
Fit
Place all three stone panels in the remaining safe below the painting, and open it up to find a maroon scroll.
Unwrapping it, you find a clue with four colored 田 (or ⊞) shapes, with an X between the blue and yellow ones.
The spot
Recall that the blue and yellow lanterns are on the right side.
So zoom in on the floor between them and push the pressure plate on the floor to open up a hidden passage which leads down some stairs and (you guessed it!) into another room.
Exploration 2
There's a really small canal and red bridge across it, with some posts in the middle of the canal. On the left side of the screen is a safe with a red line running under some hourglass shapes. Each hourglass has its top half lit, but clicking on the unlit half will "flip" it.
Across the bridge on the left is a locked panel with a clue under it with tall and short rectangles connected by an arrow between. To the right of it, there's a shrine with an unusual safe inside which has a red circular button which changes color when clicked and two square buttons which flash white when clicked.
To the right of the shrine, there's a display in the wall with five hourglasses, each having a red top or bottom. To the right of that, there's a hamburger-shaped painting on the wall with a red top and white bottom, and six rectangular white buttons that turn red when clicked.
Gravity
Flip the 1st, 3rd, 5th hourglasses in the display to place the red side on the bottom.
Then use that clue to unlock the hourglass safe on the left side.
Only the leftmost hourglass has the sand stuck on top. So flip the right four hourglasses of the safe by clicking their lower halves.
The safe opens up so you can get a key.
Unlock 3
Use this new key to unlock the panel to the left of the shrine. Inside, there are five unlit candles.
You can use the matchbox to light them up, but then they all mysteriously go out.
Burn out
Use the clue from the candles in the first room to light the candles in the second.
The candles on the shelf have gone out, and the tallest candle is now the 2nd from the left, followed by the 4th, 1st, 3rd and 5th.
So light the 2nd, 4th, 1st, 3rd, 5th candles in the second room.
The circular window in the first room lights up in different colors.
Red and white
Use the color clues from the circular window to unlock the safe on the right of the canal.
Once again, you have to invert the pattern to put the red on top.
Then the 1st and 2nd rectangles in the top row and 1st and 3rd in the bottom should be red.
Click those four buttons on the wall, and you hear a click, and the lamps in the room start to flash.
Simon
Use the clue from the flashing lights to unlock the safe in the shrine.
The order of flashing lights is: Red Left Right Blue Right Yellow Right Left.
So click the left, right, circle, right, circle, right, left buttons.
The safe opens up so you can get another golden key.
Unlock 4
Use this key on the diamond double doors to unlock them.
Then click them again to escape and view a familiar end screen.
Thanks again KK. can't wait for the last one/
Fixed!
the final walkthrough coming soon?
Here it is!
Escape the Tea Salon
It's a large house, a lot of tea, and a long game, so remember to use the save button if you need to take a break.
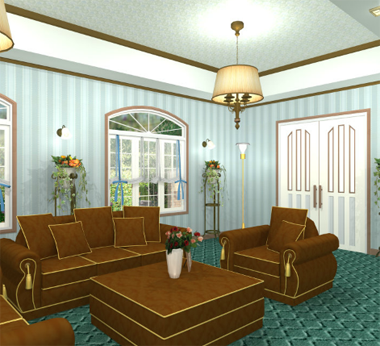
Exploration
You start off facing a very long dining table, set with twelve teacups on twelve placemats. Some of the placemats have solid colors (blue, red, yellow) instead of a floral pattern. At the end of the table is a locked cupboard with three colored dots, each in the middle of a grid of four square buttons.
Turn right. Along the wall, there's a Candy Frog glass cabinet that's locked, with nothing but an empty green platform in front of it. Next to that, there's another locked cabinet with an OK button beneath two golden hooks. (Everything on it is just decoration.)
Turn right. In the middle of a group of sofas, a "hint" card has a clue with three grids of eight brown squares, with one square missing in each grid. On the back couch, the left cushion hides an hourglass with blue sand. Beyond the sofas is a pair of locked double doors (with no keyhole), and you can zoom in on the handles for some reason.
Turn right. On this last screen, there's more locked double doors, but this pair does have a keyhole.
Primary
Use the clue from the dining table to unlock the twelve-button cupboard.
The blue colored placemats are in the UL and LR positions on their table, the red ones at the UL and UR, the yellow ones at the UR, LR and LL positions.
So click the 1st, 3rd, 4th, 6th buttons on the top row and the 2nd, 5th, 6th on the bottom.
Then open the cupboard and take an invitation card from the top and a tin of Earl Grey on the bottom.
Pass
Use your invitation card on the door behind the sofas.
More specifically, zoom in on the handles, insert it in the gap, then raise it up. You hear a clinking sound, and then the door is open!
Exploration: Hallway
As you enter, pick up the blue device with white buttons from the floor.
There are some grand double doors on the left next to (a decorative vase and) a cupboard with nine doors. The middle one is locked, and the others are empty except for the top-right one, which contains a tin of Darjeeling.
The door on the right has an odd lock next to it, with a cylindrical slot over a row of six lights ending in a sun symbol between two leaf buttons. Those look like elements from the picture on the right wall, which shows a plant growing toward the sun.
Phototropic
Place the hourglass in the cylindrical hole, and then use the clue from the plant picture to unlock the device.
The leaves along the stem of the plant (from bottom to top, towards the sun) are on its left, right, left, right, right, left sides.
So click the LRLRRL buttons, and now the door to the right is unlocked.
Exploration: Dressing Room
There's not much interesting in this room. The only thing you can examine is the green box on the table, which holds a crown key.
However, you can go through each of the doors into different bathrooms. The only thing you can examine in each of them is the sink, filled with teal water in the left bathroom and teal water in the right.
Unlock 1
Use the crown key to unlock the central locker. Inside, there's a wrapped package, marked for air mail.
Litmus
Dip the invitation in both the pink and teal water, and a four-digit clue appears in both colors on the card.
Digital
Use the blue device you picked up on the cupboard with two hooks next to the Candy Frog safe.
Then use the clue from the invitation card to unlock the device and the cupboard.
Enter 6372, then open the cupboard. The only thing of interest is a blue key in a bowl on the left.
Unlock 2
Use the blue key to unlock the double doors on the left of the dining table.
Exploration: Kitchen
On the left side of the kitchen, there's a counter with an interesting tray on it. One of the two saucers on the tray holds a teacup, and there are three icons in gray at the top of the tray. There's also a cabinet with eight teacups on eight saucers, and you can lift up each teacup to find a diffferent flag printed on the saucer.
The middle island of the kitchen holds an empty teapot on the tray and an empty stove.
The right side of the kitchen has a tray of sandwiches next to the (working) sink, as well as a fridge locked with a seven letter code.
At the back of the kitchen, there's a door locked with a keycard lock, and a safe next to it with three crowns over flag buttons.
Sovereign
Use the clue from the Hint card on the ottoman to unlock the flag safe.
The squares missing in each grid on the card are at the bottom left, second row right column, and third row left column.
The corresponding saucers in the kitchen cabinet have the flags of Sri Lanka, China and India printed on them.
So click the buttons 6, 3, 4 times, and push the OK button which opens up so you can take a pair of scissors.
Snip
Use the scissors to unwrap the package and get a card key from inside.
Then use it to unlock the door in the back of the kitchen.
Exploration: Tea Room
A table on the left of the room has a plate of scones, so take one.
In the far corner of the room, there is a kettle on a desk. On the wall above, a simple picture reminds you to enjoy teatime.
The low shelf under the right window has a safe with three sliders, each having a picture of food.
Nom
Use the clue from the sandwiches next to the kitchen sink to unlock the slider safe in the tea room.
There are a total of 5 cucumber sandwiches, 2 tomato sandwiches, and 3 egg sandwiches.
So click the sliders 4, 1, 2 times, and open the safe to get the tin of Keemun.
Afternoons
Use the clue from the tea room to unlock the fridge.
The seven-letter code for the fridge is TEATIME.
So enter that and open the fridge, then take the cream from the middle shelf and the tin of Assam from the bottom shelf.
Meal
Place the scone and cream in the tray, and their icons light up.
Brew
Turn on the sink and fill the kettle in it.
Then place the kettle in the stove and turn on the flame, which boils the water quickly.
So pick up the kettle and pour the boiling water into the teapot nearby.
Then bring the full teapot to the tray and pour the tea into the teacup.
Now that the tea is complete, the clamps on the tray open up.
Served
Bring the tray to the Candy Frog safe and place it in front of the frog.
The display opens up so you can take the tin of Uva.
The five tins of tea combine to give you a door key.
Escape
Use the door key to unlock the double doors in the hallway, and leave through them to enjoy a lovely teatime.
Update