
 New Weekday Escape is here and it's very healthy indeed! A piece of physical work, some art and tasty French food at the end! Yum!
As usual, MayMay lets you leave their room after you do something, and this time it's a bit of carpentry. Therefore playing their game is definitely not time-wasting, don't blame yourself, it's work! And after that is time for music in Amajeto's game - and music is very good for mental health, you know. With Funkyland you get opportunity to visit a French Restaurant. No need to talk about importance of quality and well prepared food, right?
Have a good time and enjoy!
It's a pure coincidence that MayMay delivers a game about a chair only two weeks ago after you dismantled one (chair in WE - RE N°8), but MayMay is more demanding than Tateita. You are supposed to do some carpenter work here and assemble a chair with an upholstered seat from parts. Notice, that the order in which you do it is very important; if the game doesn't let you combine one item with another, try it the other way around. Completed chair is not the goal of the game though, you need it to step on it - and that's why you should work carefully! You don't want to end up on floor with twisted ankle, right?
The cursor is not changing, no save button, one ending.
Amajeto has significantly changed looks of their games few months ago and this game is the first one in new style introduced. The room you have to escape is another living room with a balcony, but simplier and a bit childish maybe (nothing wrong with games for kids, long live Monkey Go Happy!). Nevertheless, puzzles are solid and creative and you have to use your brain to escape. Musical education is not required, instruction enclosed.
The cursor is changing (its color), no save button, one ending.
P.S. Thinking about music, Vintage card, the last game from Amajeto's predecessor Tomatea, is music themed too.
Funkyland wants you to find five pots this time. Various sizes and colors (their greyish shapes are on the top of game screen) and they are real! To my great surprise, pink flower-shaped pots are produced and sold! Others too, probably, I didn't checked...but apart from extraordinary cookware there is much more. Puzzles and codes with well balanced difficulty, not too easy, not too difficult, several rooms to explore and Mr. Frog at the end would give you the key from exit door if you give him something he likes...
The cursor is not changing, save button, one ending.
The game is available for Android too.
We love escape games, and our readers love talking about them and sharing hints! How about you? Let us know what you think, ask for clues, or help out other players in the comments below.


Tripped at the finish. Can't figure out
how to open fifth cabinet in foyer. Have satisfied Mr. Frog, and found all pots except middle one. Possibly a sequence of opening other four cabinets? Or a key?
Thanks for any assist!
You guessed right:
You're missing a key.
What was the last thing you needed to clear the frog machine? Go back there and look.
Can't wait for the walkthroughs
anyone?
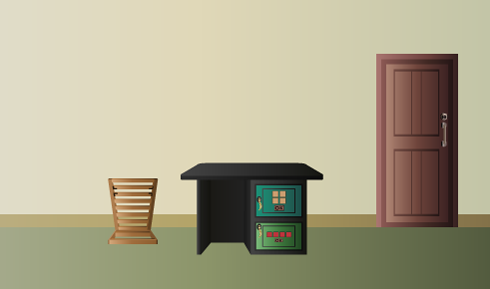
Calm down and take a seat. Or make a seat and escape.
The Chair
Don't worry, this isn't some 25-piece DIY furniture that will summon nightmarish horrors if you mess up. All you have to do is fix up a chair.
Exploration 1
The game gives you most of the chair right away, all you have to do is pick up the chair back next to the table with two different four-symbol locks. The door here needs a key, so it probably helps to examine your items more closely.
Marked
Use the clue from the chair back to unlock the top table safe.
Clicking on the dark markings, you find that they form the
⌞(5) ⌟(4)

⌜(2) ⌝(1)
symbols, so click the buttons that many times to open the door and find a key.
So use that key on the keyhole of the door to unlock it and move on.
Exploration 2
A curtain at the top left has seafood symbols around a dotted bent arrow, and there's something at its corner that you can't reach. A cupboard at the right has an unlocked door that hides a pair of pliers and a door with a four-color lock. The door to this room has a four-circle lock, where the buttons cycle through different semicircles when clicked.
Oceanic
Use the clue from the curtain to unlock the bottom table safe in the first room.
In the order of the dotted arrow, the symbols on the curtain are Lobster Claw, Crab, Starfish, Fish (right).
So click the buttons 3, 2, 1, 5 times, and open the door to find a pair of scissors.
Linear
Use the scissors to cut along the dotted lines and get a piece of fabric that you can turn over to hide those hideous stripes. (Just kidding, they're stylish.)
Through the hole you just made, you can see a polka-dot pattern in blue shades and gradients.
Bubble
Use the clue from the curtain hole to unlock the door.
The semicircle halves at the corners of the hole are the
D(4) L(1)

R(2) U(3)
so click the buttons that many times to unlock the door.
Exploration 3
There's a cupboard with three matching green doors here. The top one has a three-letter lock, and the left one has a three-digit lock with rectangular digits, and the right one is unlocked and holds a cushion that you can turn over to find another clue. The door of this room has a four-digit lock.
Ludo
Use the circle clues to unlock the four-color safe in the second room.
Each semicircle in the curtain clue indicates a color on the cushion bottom:
Blue(4) Yellow(2)

Red(5) Green(1)
So click the buttons that many times to unlock the cupboard door and find a staple gun, which seems particularly water-sensitive.
Tumble
Use the clue from the staple gun warning to unlock the three-digit safe in the third room.
Turning the staple gun over, you find that the red letters are actually the digits 457.
So enter that in the safe to open it, and take four chair legs from inside. Being a seasoned escaper, you keep them in your inventory exactly as you found them.
Fill in
Use the clue from the chair legs to unlock the three-letter safe in the third room.
The markings on the legs combine to form the letters HLF.
So enter that in the safe to open it and get a bottle of "extreme" glue.
Repair
You don't need to be an expert for this one. You just need to know that the cushion needs a cover.
Coat the chair legs in glue, and attach them to the chair back.
Place the inverted cushion on the flipped fabric, and attach it with the stapler.
Then flip the wrapped cushion back over and place it on the chair.
Hung
Use the chair under the curtain, then climb up and use the pliers to retrieve and untie the colored plastic bricks, and then click them on the examine screen to face their tops towards you.
Tipped
Use the clue from the bricks to unlock the last door.
The bricks, from left to right, have 6, 8, 4, 5 rounded protrusions.
So enter 6845 in the door to unlock it and escape.
Thanks KK for the walkthrough. Looking forward to the other 2 soon :)
anyone?
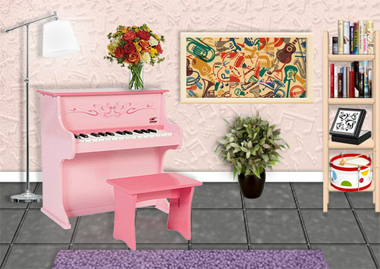
Amajeto Music Room
As the title says, Amajeto has filled a room with enough music instruments to upset the neighbors. Maybe just play a few notes before you go.
Exploration
The first thing that catches your eye is a pink piano with a few large keys, well suited for a casual player who only needs one tune. The only other thing of interest is a painting on the wall with its middle section all scrambled up.
Turn right to a screen with a drum set and toy carousel (neither of which work). There's a locked balcony door and a lock with four colored bars.
Turn right to find a television screen surrounded by lots of fake and unusable things. The only things you need to concern yourself with are the purple numbered grid, the square tile on the floor and the locked exit door.
Turn right to find many cabinets and safes. The musical picture in the middle of the wall has tilty corners, and the picture to the right of it shows a few notes on a stave. The top cupboard doors are all unlocked and empty except for the middle one. On the floor, there's a two-button safe with tilde symbols, a four-digit safe reminding you how useful a Fade can be, a four-letter safe with no particular relation to the previous one, and a four-color safe where you need to color different musical notes.
Spin
Unscramble the (randomized) musical instrument picture and it opens up so you can take a square tile.
Tilt
Use the clue from the purple grid to unlock the tilty corner picture.
Click the ⌜⌝ ⌞⌞⌟⌟ corners (which were marked with the 1, 2, 3, 4, 5, 6 digits).
The middle cupboard on top opens up so you can get a square tile.
Tails
Use the clue from the right picture to unlock the leftmost safe on the floor.
The notes on the picture have 1, 2, 2, 2, 1 tails.
So click the LRRRL buttons, and open the safe to get a remote control.
Telly
Use the remote on the TV to get a clue with colored notes on a stave.
Then use it on the (zoomed-in) TV again to get a diagram of the white keys on a piano and their corresponding letters.
Four columns
Use the first clue from the TV to unlock the side table next to the balcony door.
The red, yellow, blue, green notes are on the 4th, 1st, 2nd, 3rd spaces from the bottom.
So click the respective columns of the lock 3, 0, 1, 2 times, and open it up to get a square tile.
Four digits
Use the other clue from the TV to unlock the second-left safe.
The F, A, D, E keys are the 4th, 6th, 2nd, 3rd keys from the left.
So enter 4623 in the safe, and unlock it to get a square tile.
Four letters
Use the piano clues to unlock the second-right safe.
The keys pressed on the piano are the D, E, A, F keys.
So enter that code into the safe to open it and get a key.
The key unlocks the door to the balcony, where you find a toy xylophone marked with musical notes and two flowerpots, the left one of which hides a square tile.
Held
Use the clue from the xylophone to unlock the rightmost safe.
The 𝅗𝅥𝅘𝅥𝅯𝅘𝅥𝅘𝅥𝅮-marked bars of the xylophone are yellow, blue, green, orange.
So enter that code in the safe by clicking the buttons 0, 2, 3, 1 times, and open it to get a square tile.
Compose
You should now have all 7 square tiles, so use them on the purple grid to get another image you have to unscramble, this time by swapping the pieces.
The solution is randomized, but here's a hint: the treble clef goes on the right half of the picture.
When you've got the picture arranged correctly, a compartment beneath the grid opens up so you can take a golden key.
So use that key on the door to escape!
Thanks again KK
looking forward to the last one.
hope it'll be ready soon :)
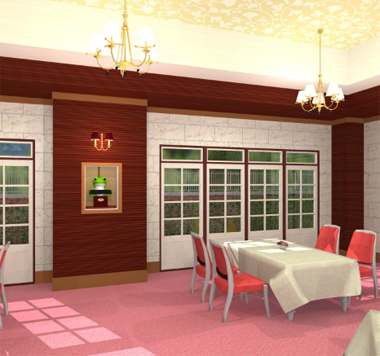
Escape a French Restaurant
You don't need to learn any French or cooking to become a top pot spotter.
Exploration 1
You start off among a bunch of neat tables facing a Candy Frog in the wall holds a tray with four square holes.
Turn right to find another table where you can remove a plastic sheet from a holder.
Turn right to find another table, on which rests a locked box with seven round buttons. Behind it, there's a wine cabinet whose lock has three knobs and a round protrusion, and you can faintly see a pot in there. There's also a pair of locked double doors.
Turn right to find another table with four plates, but they have different colors and rolled napkins placed in different directions. Behind it, a door has a lock with four food symbols and a slot at the top, but you can't do anything with it yet.
Turn right to find another table with a listing of different foods, their matching cutlery, and French names for each. As a reward for reading to the end, you find a smart card marked ouvrir (open).
Blades
Place the card in the top of the food-symbol lock, and use the clues from the cutlery list to unlock it.
Click the buttons
4 3

5 2
times, and click the OK button, which changes its text to OPEN.
So open the door next to it.
Exploration 2
It's a rather large kitchen, and a good place to start is with the pink flower-shaped pot at the lower right (below the island). On the left side of the screen is a notice board, and the pinned notes show various animals and weights. Next to it is a pink framed picture with four letters in colored outlines and a dial in the middle that comes right off. Beneath the noticeboard, one of the cutlery trays holds a pink token. Beneath the picture frame, a decanter holds a key, but you can't reach it and the decanter is held to the table by small bars.
Examine the island further to find a bottle opener between the kitchen scales and the sink. At the wall, there's some different-flavored jam jars on (a familiar-looking tray on) the oven. Along the same wall is a cupboard which has a four-digit lock with square and circle symbols, and you can faintly see another pot inside. Beside the cupboard, there's a pink outline on the floor and a sign with a chair above it. Also beside the cupboard (but on the right wall), a device holds four different-colored macarons and has four coin slots.
Dials
Use the dial to complete the lock of the wine cabinet.
Then use the clues you've found to unlock the wine cabinet.
The WINE letters on the framed picture appear on the LL LR UL UR outlines on the picture frame..
The colored plates (which have the same colors) hold napkins whose red markings point in the ↖↓→↙ directions, so click the dials 7, 4, 2, 5 times.
Then open the cabinet, pick up the yellow oval pot and a wine bottle.
Empty
Use the bottle opener to open up the wine bottle.
Then pour all the wine into the decanter in the kitchen, which puts the heart-marked key within reach.
Use the key to unlock the double doors into the corridor.
Exploration 3
The corridor ends in double doors with six lights and no handles. A pink mat on the floor leads you to the right window where you can see several ponds with lilypads (and things in their centers). Opposite it on the left, an unlocked door leads to the bathrooms.
The bathroom has two sinks, the left of which has an orange token covering its hole, as well as a safe beside the right sink covered in hearts. It also has two doors, and the toilets behind them have clues hanging on their walls.
Sums
Use the animal clues to unlock the four-digit kitchen cupboard.
The square clue (boar − pigeon) indicates the weight 41 kg, and the circle clue (deer + hare) indicates 29 kg.
So enter 4129 and unlock the cupboard to get the green pot with handle on the right side and two door handles from the box on the left side.
Six
Look through the window again, and use the plastic piece on it. Some digits appear over the middle of each pond.
Two
Place the door handles on the double doors that are missing them, then use the clue from the window to unlock it.
The lilypads in the ponds numbered 1, 2, 3, 4, 5, 6 appear on the LLRLRR sides of those ponds.
So click those handles, and the door unlocks.
Exploration 4
Finally, you reach the entrance hall, but of course the doors are locked. The display case on the left holds a purple token. Click the counter on the right to find a cupboard with five doors. The second door from the left hides an arrow clue, and the rightmost door is locked and needs a key. Beside the cupboard on the right, a door has its handle held shut by a bar secured with screws.
Seven
Use the arrow clue to unlock the seven-button safe.
Click the buttons in the order indicated:
_5_4_

6_3_2

_7_1_
The safe opens up so you can take a screwdriver.
So unscrew the bar restraining the door at the restaurant entrance, and open it to find another room!
It's a small storage room with a stepladder inside.
Peak
While examining the ladder, click it again to unfold it.
Then use it on the pink outline beside the kitchen cupboard.
Back out and click the top of the cupboard, and pick up the jewelry box which contains a tiny heart-shaped winding key.
Use it on the heart safe in the bathroom, and turn it.
The safe opens up so you can take a green token.
Exchange
You now have all four tokens, so place each one in the slot under their matching macarons in the kitchen, and then pick up the pink, yellow, purple and green macarons.
If you hadn't noticed it before, it should be now clear that the rightmost box of the device is different. Take the key from it.
Preserves
Use the clue from the jam jars to satisfy Mr. Frog's appetite.
From left to right, the jars (and jam) are purple, orange, red and green.
However, the markings on the sides of the jar tray are reversed from those on Candy Frog's tray. So the order that you want to use the macarons is green, red (pink), orange, purple.
Place them accordingly, and the platform holding Candy Frog spins around so you can take a red heart-shaped pot.
Finale
Use your key to unlock the right cupboard door at the entrance, and take the blue circular pot from inside.
Since that completes your collection, the five pots combine to form a door key which has a miniature plate, cutlery and one of each of the pots on it.
Use the key on the main door to escape, and you enjoy a fancy lunch with a view of the gardens outside.
Thanks again kk for the walkthrough.
Update