
 Stop thinking about Christmas, now! Take a break, the new Weekday Escape is here!
Playful game by Tototo Room is short, but sweet (literally) and clever. Riddle Escape takes you to beatiful temple at night, nobody's there, only you and puzzles and they give you a katana to play with! Who would resist? Sadly, you have to leave your katana behind...you would find use for it in Selfdefiant's asylum...well, you have to get something else for dealing with evil spirits there...
Have a good time and enjoy!
Eleven grey dots above exit door in Tototo Room's room stand for eleven blobs to be found. Some of them are visible at the first sight, some only partially, some are well hidden in unexpected places and can be small or big; all change to smiley orange face after you click them and so does one dot above the door. Few texts in Japanese may be discouraging, but you can simply ignore them. Mostly. One clue consisting of four signs is crucial for one code; solution can be deduced by similarity of signs though.
Can you make the upset gingerbread man happy? Make his life sweeter? Can you help the yellow ghost outside? Can you...get out?
The cursor is not changing, no save button, one ending.
New game from Riddle Escape is awesome (again), atmospheric and with strong magical feeling; also bigger than it seems. First you find yourself locked in not very temple like hall, just a big room with few cupboards and some shelves around, reminding a lot of Yomino Kagura's rooms. It is backstage area of a temple only, but before you get further, there is something to be done...puzzles and riddles, of course! Can you escape?
There is one puzzle at the end of the game in Japanese, but quite simple (four Kanji signs found during playing and four pictures to be matched) and can be done with a little help of Google Translate.
The cursor is not changing, autosave, one ending.
The game is avalable for Android too.
You are locked in abandoned and haunted Selfdefiant's asylum, atmosphere is heavy and dark, glowing purple orbs are flowing in the air everywhere around you, but you can't touch them...what now? First you have to find a sacred jar (bright green bottle), it's in one of accessible rooms, just waiting to be picked up. With the bottle in your inventory you can collect the orbs and change them in special "shop" for something useful, like a map or some items (the crystal ball on the right isn't necessary item, transfers you to any unlocked room on the map and makes playing more comfortable only). There are seven blood-red gems to be found in the asylum; after you find the seventh one, seven spots for placing them miraculously appear on walls in seven rooms - and after you place all gems, golden skull gives you skeleton key and you can leave then, because you did it - the evil spirits are gone! Thanks to you!
The cursor is changing, autosave, one ending.
We love escape games, and our readers love talking about them and sharing hints! How about you? Let us know what you think, ask for clues, or help out other players in the comments below.


Can't wait for the walkthroughs :)
I couldn't find the credits on the asylum game. Anyone know what the music is?
I really like the sound of "Tototo Room's room", which is just about as repetitive as seeing the same room repeatedly in the Button Escape series.
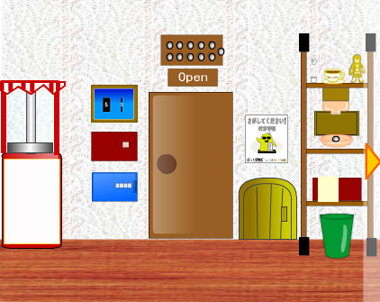
Button Escape 44
It's a room with some sweets hidden away! Unfortunately, there's nothing that suggests you get to enjoy them when escaping.
Exploration
Eleven lights above a door are turned off (silver), and you need to activate them to make the Open button work. To the left of the door, there's a picture frame showing two numbered black rectangles, and you can turn it over to find an arrow. Below that, there's a safe with eight buttons in two rows (as if on skewers), and then there's a four-digit safe below that. To the left of all those, there's a cotton candy machine with some interesting stripes at the top and a four-color lock over its Start button. To the right of the door, there's a poster telling you to look for a haniwa (buried terracotta figure), with a number for the Button Museum beneath. Below the poster, there's a pet door too small to crawl through.
The shelf next to those objects has a variety of items. On the top shelf, there's a gingerbread man who wants to see some sugar rain, and is too scared of the cup of black coffee to let you push him aside. There's also some sort of stand with a button. On the next shelf, there's a button sitting in a bowl, but it gets sucked upwards towards a bottle when you try to click it. On the next shelf, there's a box with a four-kanji lock. Below that on the floor there's an empty green bin, but you can remove its base to find a button beneath.
Turn right to find a window with a helpful warning about the clear glass pane in it. You can open the doors and look through the glass to find the haniwa enjoying the sun next to an orange tree, but since that's out of reach, all you can get here is the button on the inside of the right door. On the wall to the left of the window, there's a clue with 12 above an A. To the right of it, there's a locked box whose door is clear enough to see several things through it, and you can push the button at its corner.
Turn right to find a picture frame covered by orange balloons. In a clear case tied tightly with rope, there's a red balloon with spikes. (Google Translate tells me the knot is "rattling", whatever that means). Push the button at the base of the case.
There it is
Flip the picture frame over again, and follow the arrow to find a secret.
Click (and hold) the empty space at the tip of an arrow, and another arrow appears!
So click the empty space at the end of that arrow, and you find a button.
Additive
Use the clue from the cotton candy machine and rectangle picture to unlock the eight-button safe.
The stripes at the top of the machine occur in eight groups. Counting the thick stripes as 5 and the thin stripes as 1, the groups have total values of
2 5 6 3

4 7 1 8
So click the buttons in that order, and open the safe to find a knife.
Gordian
Use the knife to cut the knot. The red balloon floats up, all the orange ones pop, and you can now see the clue behind.
Blue
So use the clue from the huge picture frame to unlock the blue four-digit safe.
The shapes on the picture come from the digits 6412.
So enter that in the safe and open it to find a key and a glass with chopsticks in it. The glass has a circle of twelve colored squares with a rotated A in the middle, and while you're on this screen, push the button at the top left.
Unlock
Use the key on the keyhole of the locked box, and it opens to let you take a packet of granulated sugar that's sitting in front of a phone.
Hotline
You've got a phone and you have a phone number. What is it?
Pick up the receiver and dial the museum's phone number (
*32*-74##) from the poster.A museum guy promptly arrives and carries away the haniwa, leaving a weird clue that you can read through the window.
Minute
Use the clue that you just saw out the window and the clues from the glass in the blue safe to unlock the cotton candy machine.
(Hint: That red's not red. The other red is red.)
If the squares on the safe were a clock with the apex of A pointing at 12 o'clock, then at 00:20:35 the hour, minute and second hands would point at the blue, orange and green squares.
Since the letter A is red, this means that the color code you need is blue, orange, green, red.
Click the buttons 2, 5, 4, 1 times to unlock the machine. Now it just needs one more thing before it can start.
Float
Place the sugar in the cotton candy machine, and start it up.
Then gather the airborne sugar with the chopsticks. Now you have fluffy cotton candy on a stick!
Make it rain!
Place the cotton candy on the stand, and it melts into the coffee. The gingerbread man moves over and is overwhelmed by the sweetness, so push the button he was sitting on.
Then look at the wall behind to find a clue that reads ㅗㅛ人中.
Grapheme
Use the clue you just found on the top shelf to unlock the box on the bottom shelf.
The symbols on the clue can be found in the 土皿火虫 characters.
So click the buttons 0, 2, 1, 4 times to open the box. Take the cork from it, then click the 2 buttons inside the box and under it on the left.
Plug
Go back to the second shelf and use the cork on the bottle. The button bounces back into the bowl where you can click it and get a congratulatory message.
Complete
The Complete message confirms that you have all the buttons. If you're missing any, here's a list:
The buttons, in the order that you press them in these walkthrough, are:
On the top shelf (stand)
In the bin
On right window door
Corner of locked box
Base of balloon case
Back of picture frame
Corner of glass cup screen
Beneath gingerbread man
Inside kanji box
Under kanji box
In bowl on second shelf
and they turn on the
09 10 06 11 03 04

07 02 05 08 01
lights on the panel.
Click the Open button to open the door and escape.
I'm so close! In Upside-Down Asylum, I've unlocked all the doors (except the last one) and have 6 of the 7 gems. There are two puzzles I haven't solved, that I know of -- can anyone give a hint?
I have not yet figured out
how to unlock the safe in the "TXL" room and how to get the stinky rag in the clothes dryer.
Never mind! Finally got out. :-)
For Escape from Old Temple, how is it possible that I have a sword, and yet...
it cannot cut through a thin wire of twine?
I escaped the Upside Down Asylum, but...
Does anyone know what the stinky rag in room D is used for? It doesn't seem to be used for anything...
Thanks for the walkthrough KK. can't wait for the others.
Upside Down Asylum: Escaped! Took a while but was very fun. Love games where you don't get stuck, but also aren't TOO easy. Click the map to transport to rooms you have been to! And the NOTES on the right are excellent and handy, no more screenshots! And no, the rag wasn't used, probably a red herring..
Speaking of rooms, this game shows Riddle Escape's other name (Room's Room) on its title screen. I guess that makes it one of Room's Room's rooms.
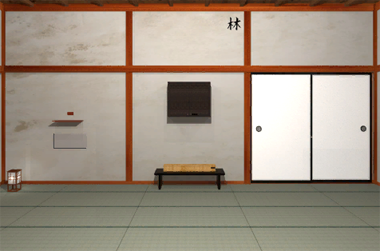
Escape from an Old Temple
You can expect a Riddle Escape game to be unexpectedly long. Even if that doesn't make sense to you, you should probably get comfortable with a cup of tea for this.
Exploration
Wait, where's the aged temple? The game throws you right into a traditional room facing identical sliding doors. On the left are two weird sockets, but you recognize from previous games that they fit two magatama (comma-shaped crystal jewelry). At the top right is a long window that you can't possibly reach or fit in, and you can examine the lantern on the right but do nothing with it.
Turn left to find a painting of a moon and katana. On the right is a cupboard with four doors, the top pair locked and the bottom pair tied shut. The right corner is brightly lit with three lanterns, and the left corner less brightly with two. The round paper window there has a round hole next to it, and the table beneath has seven paper cranes in three different colors, as well as an odd safe with corner buttons decorated by a miniature lantern.
Turn left to find a cupboard with white doors, but as you zoom in you find holes where the handles are supposed to attach. The shelf in the middle has three kokeshi dolls, each with a red stripe along the bottom and a red eye. Next to them is a safe with a daruma-marked indentation and what appears to be two buttons that don't work. On the left, another shelf holds three subtly different spinning tops which are not actually spinning, as you can tell by their white markings. There's also a picture of an old temple (finally?) with four white semicircles on its edges.
Turn left to find a pair of locked white double doors, and a three-digit locked cupboard over a long box on a table which is also locked with three buttons that act like dials. On the left, there's also a shelf with four candle holders and one unlit candle, and a panel below that fastened by screws. Above all of these, there's a single 林 kanji on the wall next to the ceiling.
Flight
Use the clue from the paper cranes to unlock the three-digit cupboard.
There's exactly one red, five green and two yellow cranes on the table.
So enter 152 in the cupboard and open it to find six daruma dolls facing different directions, a box of matches and a three-button safe with the buttons showing different numbers of diamonds.
Gyro
Use the clue from the tops to unlock the long box.
The tops with circular, triangular, square stems have lines pointing towards the ↓←↗ directions.
So click the buttons 4, 6, 1 times to open it and find a sword. Unfortunately, it's stuck in its sheath so you can't unleash your violent tendencies. The grip of the sword has a pattern of diamonds.
Argyle
Use the clue from the sword grip to unlock the diamond box in the wall cupboard.
The sword grip shows groups of 4, 1, 3 diamonds.
So replicate the pattern in the safe by clicking the buttons 3, 0, 2 times. It opens up and you can take an unlit candle.
Model
Use the clue from the lanterns around the room to unlock the box with the miniature lantern.
The lantern box has three working corner buttons and one that doesn't. The room has three corners with lanterns and one without.
Clockwise from the empty corner, the corners of the room have 2, 3, 1 lanterns. So the corners on the safe should have
3 1

2 0
lights, which means you should click them
2 0

1 -
The safe opens up and you can take the daruma doll with a rounded bottom.
Faces
Place the daruma doll in the safe that matches it (beside the kokeshi dolls on the shelf), and use the clue from the ones in the cupboard to unlock the safe.
The dolls in the cupboard face the LRRLRR directions, so click those buttons to open the safe and get a key.
Unlock 1
Use the key to unlock the top cupboard doors. Inside, there's a map of the room with screws on the back. There's also a safe with six buttons over a red line, and each button can be clicked to turn it red.
Beneath
Follow the map to find something useful.
Directly under the kokeshi shelf, you find a trapdoor in the floor with an unlit candle inside.
Sisters
Use the clue from the kokeshi dolls to unlock the safe with six buttons.
The eyes on the dolls are black, red, black, red, red, black.
So click the 2nd, 4th and 5th buttons from the left, and the safe opens to let you take an unlit candle.
Brighter
Place all three unlit candles on the shelf beside the other one, and light all four with the matches.
The panel above them opens up so you can take a shiny key.
Unlock 2
Use this key to unlock the double doors.
On the left, there's a screwdriver hanging by a chain and a stack of cushions with misaligned flower symbols.
On the right, there's five plates of pink rice balls marked with decorative symbols (on the plates), and a four-color safe marked with a 和.
Unscrew 1
Use the map on the screwdriver to unscrew the compartment at its back. Inside, you find two handles.
So use the handles on the doors that are missing them, and open them to find a storeroom with a ladder and a safe with a clue that shows an arrow from a red flower to a blue one.
Soft
Use the clue from the cushions to unlock the flower box in the storeroom.
From blue to red (bottom to top), the cushions have flowers on their RDLDRU sides.
So click those buttons to find a single button labeled 和.
Orient
Place the character button in the round hole next to the paper window, and it fits sideways. As you push the button, colored dots appear on the window.
So use that clue to unlock the box with the matching character behind the double doors.
The dots are (in clockwise order) red, yellow, green,blue, with yellow and green next to the button.
So the colors on the box should be
Blue(1) Red(0)

Green(2) Yellow(3)
Click the buttons that many times, then unlock the safe and get a magatama bead.
Tall
Use the ladder to climb up to the window on the first screen, which perfectly frames the moon and has 火 written on its right wall.
Following the clue from the painting, you place the sword on the windowsill and wait.
The painting rises up to reveal four more unlit candles. You could light all of them, but they go out instantly.
Lights
Go back to the four candles you lit before, which have now burnt out. At the bottom of their candle holders, you find 四 一 二 三 kanji.
So use that clue to light the four paintings behind the candle in the correct order.
Your fantastic language skills let you recognize 一二三 as kanji for 123, which means that the other one is 4. So the correct order to light the candles is 4123.
So light the 2nd, 3rd, 4th, 1st candles from the left, and a panel opens up so you can see a safe with three flowery buttons.
Three patterns
Use the clue from the plates to unlock this three-button safe.
The plates with 1, 2, 3, 4, 5 rice balls on them have patterns matching the LCRCR buttons on the safe.
So press those buttons to open the safe and get a magatama crystal.
Pair
Place both the magatama in the panel on the first screen to open the doors out into the old temple. As you click the doorway, the screen fades to white…
Exploration 2
…and then the screen fades back in, this time with music!
In typical Riddle Escape fashion, the way out is blocked by a canal, and the mechanism to lower the bridge is missing three square pieces. You can lean over the left bank to see flowers flow past the bridge.
On the left, there's a rock with a small circular pool of water. The pool has a single leaf floating in it and eight light and dark pebbles around the outside. There's a wooden frame with two bells hanging from it, which looks like it has space for a third (and a locked compartment beneath them). There's also a shelf with decorated balls on several of its spots.
On the right, there's a cabinet whose lock has three striped buttons. Next to that, there's a safe with buttons that light up in flowers, and another safe that has animal patterns on its buttons. Above all of these, three of the lanterns have white stripes on them.
Striped
Use the clue from the striped lanterns to unlock the cabinet beneath.
The lanterns have 5, 3, 2 stripes, so click the buttons 4, 2, 1 times to open the cabinet.
Inside, there are three lanterns with animal symbols, a safe with buttons that show the decorated balls, and a single character 風 on the back.
Flora
Use the clue from the bridge to unlock the flower safe.
The flowers flow past in the order top, bottom, top, center, bottom, center (with top being the farthest away), so click the corresponding buttons on the safe to open it and get a bell.
Fauna
Use the clue from the lanterns in the cabinet to unlock the animal safe.
The stripes on the legs of the bird, cat, fish lanterns are at the bottom, top, middle.
So make the buttons on the safe (from top to bottom) display cat, fish, bird by clicking them 1, 0, 2 times.
The safe opens so you can get a pair of pliers.
Marble
Use the clue from the shelf of balls to unlock the matching safe in the cabinet.
From top to bottom, the compartments which change between rows are the LRLCL boxes.
So click those buttons to open the safe and find a red X! Actually, it's a transparent plastic sheet with the X marked on it. The sheet also has semicircular cutouts in its sides.
Snip
Go back in and use the pliers on the lower cupboard doors.
Then open them to find three dice in notched plates and a framed clue telling you to unfold a red paper crane.
Also use the pliers to free the screwdriver from its chains behind the white double doors.
Unscrew 2
Use the screwdriver to unscrew the panel beneath the burnt out candles (to the left of the long box).
Behind, there's a framed clue with several yin-yang symbols, and a safe with dotty buttons in notched chrome frames.
Points
Use the clue from the dice plates to unlock the dotty safe.
The frames (from left to right) correspond to the RCL plates which have dice showing 2, 6, 3 dots.
So click the buttons 1, 5, 2 times, and the safe opens so you can get a flowery square panel.
Flat
Pick up the red origami crane from the table, and unfold it to a note with several yin-yang symbols.
Overlay
Use the sheet on the temple picture (on the shelf with tops), pointing out a secret spot.
Dig
Go back outside, and use the clue from the temple picture to find the hidden item.
Click the lower-left corner of the pathway, and open up a trapdoor there to find a square panel and the character 山.
Sonorous
Place the bell you have on the frame beside the other two, and use the yin-yang clues to ring the bells in order.
The groups of 1, 2, 3, 4, 5, 6 yin-yang symbols occur in the LRLCRC columns of their clues.
So ring the bells in that order and the compartment opens up to let you take a square panel.
Cross
Place all three square panels in the bridge mechanism, which lowers the bridge.
Now you can walk across to the locked double doors, but the combination lock is missing its button. On the left is a three-button safe with buttons that flash a grid pattern, and on the right are three red lamps, the middle one having a white button, a black button and a clue with a leaf.
Binary
Use the clue from the pebble pool to unlock the lanterns.
In counterclockwise order from the leaf, the pebbles are WBWBBWBW in color.
So click the LRLRRLRL buttons, and the lamps light up to show you a code.
Ternary
Use the clue from the lamps to unlock the box to the left of the door.
The lanterns light up in the LLLRRRC order, so click those buttons on the box to open it and find the missing button.
Arts
Place the button on the door, and the four buttons light up with abstract symbols.
So use the remaining clues from the game to unlock the door.
The 風林火山 kanji mean Wind, Forest, Fire, Mountain, and they occur in the cabinet, the ceiling, the window and the trapdoor. So from top to bottom, the kanji occur in the 林 火 風 山 order.
Make the buttons on the cabinet show Forest, Fire, Wind, Mountain by clicking them 1, 2, 0, 3 times.
Then push the button to unlock the door and escape! (With a new and splendid Congratulation screen.)
anyone?
KK, a couple of glitches in this game
where you said the canfdkes will burn out if lit the 2nd time, I accidentally lit them and they stayed lit and lost the matches, however what happened afterward where I was supposed to light the candles in a certain order was not necessary and I still got the item. one or 2 other things happened similar. But now,. the part where i'm supposed to pic up the red origami, I cannot pick it up. and the bells I can ring after hanging all 3 but even after I ring them in the ciorrect order, nothing opens up underneath. I'm confused.
never mind. I figured it out. nice games so far, Can't wait until the last one.
last walkthrough ready?
Upside Down Asylum
Evil has set upon the asylum and you have no time to read the lengthy description! Grow your magic power and defeat the evil before you go mad trying to find that one hidden spot!
Interface help
You can mute the music in the menu (and only a few sound effects are left). The Pause button saves and quits.
There is no interface to examine items; you can combine two items by clicking on them in order. If you pick up too many items, you can scroll the inventory to reach the other 10 slots, and you can click an item and then an empty spot to move it there.
You will eventually get the ability to fast-travel. Don't forget to use it.
Exploration
You find yourself in a broken-down entrance hall. Glowing purple dots on the screen can't be picked up. So keep travelling (RRRUR) until you reach a darkened library, where a sacred jar rests on a shelf along the right wall. This gives you a purple bar on the display which you can click to check on your orbs.
Spiral stairs map:
_Be___

_C3_Xb

_S2_Li
<S1>__
Pick up 4 orbs from the library, then go left to the stairs and pick up 4 orbs there. (Note the four-button panel on the left wall.) Go up to a corridor with 3 orbs and a flashlight on one of the windowsills. Note that the right door there is locked and needs a blue key. From the corridor, go straight to a large empty room with beds, a green evil spirit and 2 orbs. Then go back to the bottom of the stairwell, pick up 4 orbs including the one along the bottom stair, and notice the screwed panel along the stairs.
Go right to the east wing. Here's another mini map:
______Ce

______Al

Hw_Co_Ch

↓↓
You enter the hallway on the left with 4 orbs and a green eye of darkness. Move right into a small corner with 4 orbs, then move right again into the chapel and collect 3 orbs. Move forward to the altar and collect 4 orbs, then talk to the specter that pops up and click the left item to buy the map. Check the small piano on the left for a clue (which you can record down with the handy Notes box on your map). As you look up towards the ceiling, you find a purple eye that emanates darkness (and no orbs).
You don't need to collect every single orb, but if you did you should now have 22 orbs.
Go back to the stairs marked G on the map, and pick up 3 orbs. The escape path is south of here but the skull doors require a key.
There's a hotspot under the stairs. Click the hidden door three times to open it and find an unlit candle.
Go upstairs, picking up 3 orbs, and make a note of the colored clue on the pillar. Then go forward/upward to a corridor with four orbs and a chair with a note on a clipboard which you can tilt to read. The path forward is blocked by a door requiring a gold key.
Now that you have 33 orbs, walk all the way back to the altar (orb shop) and buy the last item, a crystal ball. Now you can click on the map to fast travel! (No need to select the ball first.)
Use it immediately to teleport to W, a sunlit piano room with four orbs (two on the curtains and two on the floor) and then to H, a corridor with 4 orbs, a red bell out of reach and a button panel.
The last area you can access is through the entrance on the first screen (F, 4 orbs). As you walk out into the cloudy sky (E, 4 orbs), you notice a ladder leaning on the right greenhouse. Move forward (N, 3 orbs) to a path blocked in front by a futuristic door requiring a purple key. To the left (M, 4 orbs) is a tree next to a greenhouse that has a screwdriver on a ledge (left side of screen), and to the right (O, no orbs) is a warning sign with a clearly fake phone number at the bottom.
(Orb count: 26, I think.)
Purple
Use the ladder on the bell (room H), and pick up the purple key from it.
Then use it to unlock the door at the greenhouses (up from room N).
You end up in a greenhouse (U, 4 orbs) with a pot of dirt on the left. Moving forward (AA, 3 orbs), you find a room with rattling pipes, a four-digit safe and a bottle of lighter fluid at the lower left corner.
Number
Use the clue from the warning sign (O) to unlock the four-digit safe (AA).
The last four digits of the sign are 3839, so enter that in the safe and open it to find a pair of batteries.
Green
Go to the base of the spiral stairs (room I), and use the screwdriver on the wall panel to find a green key.
Then move right (room J) and down, and use the green key to unlock the door.
Exploration 2
You're in some sort of clinic (room C) where there are five orbs. The wreath on the wall has four roses, and you can remove the bottom one to find a blue key beneath.
Move right to a laundry area (D, 4 orbs) where a stinking rag sits in a washing machine. Then move left twice (B, 4 orbs) where a silver spoon sits next to some pill tubes. Notice the button panel on the wall.
Move left again to a room (A) overcome with darkness in which four orbs shine brightly.
Gold
Place the batteries in the flashlight, then use it to light up room A and find a gold key on the floor.
Use that key to unlock the door (north of V) to get to a room (AB, 2 orbs) with a button panel and a locked chest with a nine-button grid and three lights.
Silver
Use the spoon to dig up the dirt (U) and get a silver key.
Then use it to unlock its door (right of P) and find a bathroom (Q, 4 orbs) with an interesting skull on the wall and a lighter on the sink.
Lit
Use the lighter on the candle (G), and a red gem shows up.
Blue
Go to X and use the blue key to unlock the door on the right. It opens into a room (Y, 3 orbs) with heavy equipment and a safe in the far corner. The right door has glowing blue letters on it.
Turns
Use the clue from the corridor chair (V) to unlock the combination safe (Y).
The chair clue reads 11-21-7.
So turn the dial left (counterclockwise, repeatedly) to 11, then right to 21, then left to 7. (If you mess up, back out and try again.)
Open the safe and take the red gem inside.
Buyout
Now that you've visited every room (from A to AC), you should have 59 orbs left over, so spend 40 of them at the Orb Shop for a sacred dagger and a light bow and arrow.
Grid
Use the clue from the blue letters (Y) to unlock the chest (AB).
Spell T, X, L in the grid (just like on the door) in order, clicking the bottom button after each letter.
The chest opens and you can take a red gem.
Tune
Go back to the piano room (W) and use the other piano clue from (T) to unlock it.
The digits 1-9 on the smaller piano appear on the AFCDFBFGE keys.
So press those keys on the large piano, and a red gem appears on its keys.
Four corners
Use the clue from the colored panel at P to set the four-button panels.
Each of the H, B, R, AB panels only has one working button: the UL, UR, LL, LR button.
So make them red, green, blue, yellow by clicking them 4, 2, 1, 3 times.
Then return back to P to take the purple magic wand.
Clear out
You now have three magic weapons, so use them to defeat evil.
Firstly, use the dagger on the spirit at AC, and he drops a red gem.
Then, use the bow and arrow on the eye at Z, and it drops a red gem (at T).
Then use the magic wand on the eye at J, and it drops a red gem.
Of course, this blows up the eyes so that the darkness clears.
Seal
You now have all seven gems, so place them in the sockets at A, F, K, S, T, V, AA.
Then go back to the skull at Q, and pull a skull key out of its mouth.
Use it on the exit door (at G) to escape!
(Item list)
If you have the map (and jar) but are missing something, here's where to find them.
Flashlight: X
Orb Shop (dagger, bow and arrow, crystal ball): T
Ladder: E
Screwdriver: M
Purple key: H
Lighter fluid (optional): AA
Batteries: AA
Green key: I
Blue key: C
Spoon: B
Gold key:
Silver key: U
Lighter: Q
Magic Wand: P
Red gems: G, J, T, W, Y, AB, AC
Sockets: A, F, K, S, T, V, AA
kk, a couple of problems with the walkthrough on Upside Down Asylum
you mentioned a W and M room I could visit on the map. no rooms show up as W or M
Think you can help on this?
Oh, whoops.
The map only shows rooms you've been, so to reach W you have to teleport to V and move right.
Similarly, M is to the left of N, so you can teleport to N first if you've never been to M.
thanks again for your hard work on the walkthroughs as usual kk. you are an awesome person.
Update