
 Welcome back after a week, welcome to another summer Weekday Escape!
This week we have two games by Amajeto, solid and reliable developer with great talent for constructing puzzles, and both meet the expectations, again. Dassyutu's room is full of seemingly empty pieces of furniture, coins and polite warnings, that without finding a clue you can't even try to solve a puzzle - no guessing or even brute forcing here. Promising newcomer, Rinnogogo, created cute escape game with a story - you are a hero helping others with dangerous obstacles in their lives, armed with your wits only!
Have a good time and enjoy!
Camping in Amajeto's game isn't real adventure in wilderness; it's more play at camping in your yard, as the name indicates. Why not...only how to get there? The door is locked, so your first task is to get the key - and the final as well, as the key from garden gate leads to freedom. Lets not jump ahead though, before you can leave, there are some puzzles to solve, and joy of camping amplified by atmosphere of summer night.
The cursor is changing (its color), no save button, one ending.
Although the second game by Amajeto has one scene only, there are enough puzzles to cover regular escape (todays measure). You need to go to bed after all that camping, but your bedroom is haunted, so you must get rid of all the pesky red-eyed ghosts (as in WE N°170). The board with sixteen squares marks your score; the goal is to get lit all the squares, solve the jigsaw puzzle then and good night!
The cursor is changing (its color), no save button, one ending.

Dassyutu locks you in a typical escape room, and you need to click everywhere, better twice (even thrice, sometimes), to find all the items and ten coins scattered around. The shelves around walls seem empty at the first sight, but definitely deserve closer inspection, and the same can be said about corners, drawers and horizontal surfaces. And vertical too. So, can you get out of here?
The cursor is not changing, save button, one ending.
Welcome in Rinnogogo's family hotel! You are politely invited by its owner, Mr. Rabbit, but there is something weird about his smile...when the door closes and Mr. Rabbit leaves, you can take a look around ...and under the bed you find frightened small animal! He begs you to find his wife! Something suspicious is happening here, would you help to the poor creature? The help doesn't involve confrontation, just solving some puzzles... that wouldn't be difficult for any escaper (you can do it without knowledge of Japanese language), if it were not for some pixel hunting and a bit vague hints to one puzzle...still, the game is cute, and its art and story lovely!
The cursor is not changing, no save button, one ending.
P.S. Talking about creepy rabbits, Alice is Dead serie definitely worth a visit!
We love escape games, and our readers love talking about them and sharing hints! How about you? Let us know what you think, ask for clues, or help out other players in the comments below.


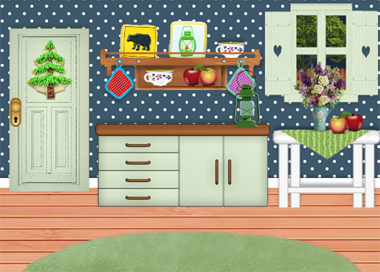
Camping in the Yard
You have all night to figure out how.
Exploration
The device over the couch catches your attention: only three of its pieces are missing! And all you have to do is shift the left couch cushion to find a missing tile. On the left of the screen, you can click the books on the shelf to find a clue with colored ghosts under faint letter outlines, and also look through the drawer locks, one with green and red buttons, one with four letters, one with four color buttons in a grid and one with four color buttons in a row. The lamp in the middle turns out the lights, and when you do so the eyes on the owls light up. Turn the lights back on.
Turn around (left or right) to face the locked door. Take the lantern on top of the cupboards, where the top "drawer" is unlocked and holds a clue with five circles. The other drawers don't work at all. The cupboard doors are separately locked, with the left one requiring a four-letter code and the right one requiring a four-bar code.
Turn off the lights and turn around to open the top drawer again. The circles now glow green and red.
In the dark
(Turn the lights back on, and) use the clues you saw in the dark to unlock two of the drawers on the shelf on the first screen.
The colors of the owls' eyes were red and green on top and blue and yellow on the bottom.
So click the buttons on the third drawer
1 3

2 0
times, then open it and find a key.
The colors of the glowing circles were red, green, green, green, red.
So click the right, left, left, left, right buttons on the top drawer of the shelf, then open it to find a lighter.
Ghostly
Use a clue from the book to unlock the bottom shelf drawer.
From left to right, the ghosts are red, blue, yellow, green.
So click the buttons 1, 0, 2, 3 times, then open the drawer to find another tile.
Unlock / Exploration 2
Use the key to open the door to the yard.
Now you face a gate which is also locked. A campfire is already set up on the left side, and all you have to do is light it. On the right, there's a tent which you can't enter.
Fired up
Examine the lighter and open it up, then use it on the campfire to light it.
Also examine the lantern and use the lit lighter to light it.
In the light
Place the lantern in the tent, which makes some figure silhouettes appear.
Then use that clue to unlock the right cupboard door.
The tallest silhouette is the second one, followed by the third, first, fourth.
So click the bars 1, 3, 2, 0 times, then open the door to find… some sausages!
Toasty
Place the sausages over the fire, then leave the yard and come back.
Now the sausages are cooked, and each one has a different pattern of lines where its skin splits.
So use that clue to unlock the left cupboard door.
From left to right, the sausages have 8, 4, 6, 5 split lines.
So enter 8465 in the door and open it to find a bottle of water.
Quench
Dump the water onto the campfire to put it out.
Only one glowing stick remains in the firepit.
Shaded
The burnt stick is essentially charcoal, so use it on the book. Some of the outlines completely disappear when shaded in, leaving only four letters uncovered.
So use that clue to unlock the second drawer.
Enter ACME in the drawer, then open it to find the last tile.
Scrambled
Now that you have all three tiles, place them in the device on the first screen, and then solve the (randomized) scrambled image puzzle to get the last golden key.
Use that key on the yard gate to escape and end the game!
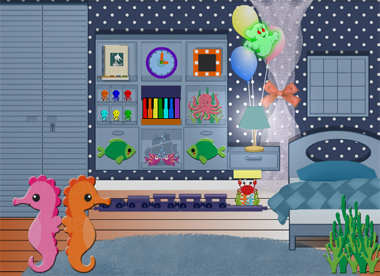
Nightmare Escape 18
It's another haunted room with sixteen not-so-scary ghosts, each with their own challenge!
Exploration
The green ghost floating in front of the balloons is the first to be removed this time. Doing so updates the grid device on the right, and if you zoom in there you'll find a ghost blocking its coin slot. Four of the squares on the grid are outlined in orange. Under the grid, look at the bed currently occupied by another ghost. After driving it off, you can move the pillow aside to find a colored drawing.
Looking under the bed, you find another ghost that's moving back and forth too vividly to capture.
The balloons are tied to a drawer where you have to turn some buttons in a grid orange after shifting its ghost aside. Below that, a train set (also haunted) is missing its engine.
The shelves/cupboards in the center are the main attraction in this room. From left to right and top down: there's a picture that has to be colored in, a clock showing the current time (nothing interesting there), a photo frame(?) with eight symbol buttons arranged around its outside, a set of six colored octopuses/octopi which can be shuffled around, a piano with colored keys, a puzzle with a jumbled image, a grid of buttons which show different images, a four-letter lock with different-colored letters, and a grid of letter buttons which turn black when pressed. Other than the clock, each one has a ghost that requires its puzzle to be solved.
On the left side, there's a locked wardrobe with a keyhole (and ghost covering it), and the two seahorses in front have a puzzle involving a grid of colored stars.
Unscramble
Start with the randomized image puzzle (to the right of the colored piano).
Click the pieces to rotate them until they fit. Once done, the ghost leaves and the grateful octopus gives you a coin.
Paired
Play the randomized memory game in the lower-left shelf, matching pairs of tiles to remove them.
When all the tiles are removed, the ghost leaves and you can take the train engine.
Driven
Place the train engine to complete the train set and remove another ghost.
The letters on the sign change color, and you can pick up a folded note with a list of words from the rear car.
Lexicon
Use the list of words to solve the word search in the lower-right shelf, coloring each word you find black as you find it.
(As the compass rose on the note reminds you, words can appear diagonally, from right to left or even from bottom to top.)
The following are the locations of each word, where (m,n) is the square in the mth row from the top and nth column from the left:
RAY: (4,2) ↑ (2,2)
COD: (1,5) ↓ (3,5)
SEA: (6,5) ↑ (4,5)
CRAB: (2,3) ↘ (5,6)
FISH: (4,6) ↑ (1,6)
SAND: (3,3) ↓ (6,3)
CORAL: (6,1) ↑ (2,1)
TURTLE: (1,4) ↓ (6,4)
OYSTER: (1,1) ↘ (6,6)
After you color them in, only four letters should remain white:
-LE---

------

------

------

-K----

-P----
So press the button to remove the ghost. Now you can pick up a dart gun, and look (click and hold) at the letter grid again to find that those four letters are now colored differently.
Precision
Use the dart gun to hit the ghost under the bed.
Four letters
Use a clue from the completed letter grid to unlock the bottom-middle shelf.
The yellow, green, red, blue letters on the grid spell out KELP, so enter that in the lock.
The ghost vanishes and you can pick up the drawing it leaves behind.
Tune
Use the remaining clue from the train set to play the piano.
The letters of TRAIN are purple, aqua, blue, green, purple.
So push the 7th, 5th, 6th, 4th, 7th piano keys from the left to vanquish the ghost. The last key also disappears and a grid shows up above.
Six colors
Use the clue from the piano to put the colored octopuses on the left shelf in order.
Colorblind help:
The starting order is:
orange blue red
aqua yellow green
and the remaining piano keys are (from left to right) red orange yellow green aqua blue.
The six squares correspond to the six remaining keys, telling you the correct location of each octopus:
red orange yellow
green aqua blue
Make those five swaps to remove the ghost.
Seahorses
Solve the sudoku puzzle on the seahorses, filling in the missing stars so that each row and column has all four colors.
The unique solution to this puzzle requires you to click on the empty squares
-1-2

-2--

14-3

--1-
times. Push the button to vanquish the ghost and get another drawing.
Light squares
Only four ghosts remain. Check the light grid for the clue to the drawer.
Each of the corner squares are highlighted. So click the corner squares on the drawer grid to turn them orange.
Then open the drawer (removing the ghost) to find a key.
Unlock
Use the key to unlock the wardrobe (and clear out another ghost).
Some of the shelves inside are empty, some have towels, and the middle one has a drawing.
Frame
Use the clue from the towels to unlock the pattern frame in the top-right shelf.
Since the towels are on the left, top-left, top and right compartments, click those buttons on the frame to unlock it. (Another ghost defeated.)
Paint
Use the clues from all four drawings to color in the picture on the top-left shelf.
Examine each sketch to find the colored parts:
Beige sand and anchor
Green eye patch, belly and kelp
Red coral and conch
Blue body, bubbles and clamshell
Once you've colored the picture in, the last ghost is gone too.
Bingo
All sixteen ghosts have now been removed:
In the order of the grid squares, 1 being top left:
Floating in front of balloons
On bed
From sudoku
From octopus puzzle
From scrambled image puzzle
Under bed
From drawer
From four-letter shelf
From train set
From coloring picture
From pattern frame
From piano
From memory game
From word search
On wardrobe keyhole
Blocking coin slot
So place the coin in the coin slot to reveal the final puzzle.
Solve the randomized jigsaw to end the nightmare!
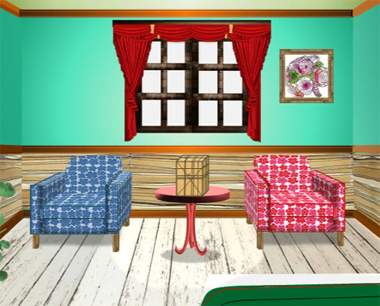
Room Escape 26
This room escape takes the search for coins… to another level.
Exploration
The bookshelf catches your eye with the colored books placed on the wrong shelves. There's nothing special about the books themselves, but you find a coin (lower left) and a screwdriver (upper right) by looking around them. On the left, a filing cabinet has three locked drawers which require (from top to bottom) four arrows, four colors and four shapes. On the right, a ladder leans against the wall but you can't climb up there, so pick it up.
Pick up the coin on top of the cabinet and another coin between the bookshelf and ladder.
Turn right. Here, there's a yellow cushion which you can click to look under and find a coin, and a projector on a small table which you can also click to look under and find a dustcloth. To actually see what's being projected (nothing at the moment), you need to click on the bright spot on the wall. Further to the right, there's also a black cupboard/shelf combination in the corner. Opening the doors, you find a coin and a doorknob. You also find a pair of sunglasses and a coin on the shelves.
Turn right. There are no hotspots in the bottom half of this screen, so click around the windows, where you can zoom in on the darkened panel and also on one of the panes to the right which is smudged. The red button in the top left alerts you to the presence of a box on a suspended platform next to it.
Turn right. The office chair blocks most of the desk, but it's hard to see anything even if you look over it. Three of the desk drawers contain a coin, a paintbrush and a transparent slide, and the last drawer is locked and has a blue keyhole. As you change the view to the left, you find that this part of the top floor is missing a railing.
While looking down on the desk, zoom in on the chair to find a coin on it.
Place the ladder in the space to the left of the table, and climb up to the top floor.
The seemingly empty bookcase actually holds a light bulb (top left), bow (third from top on left, labeled "arrow"), hammer (second from top on right) and coin (bottom right). The walkway continues past a small safe with a four-digit lock and ends at a door missing its doorknob.
Take the coin to the left of the safe.
That's all 10 coins, so you can start on the puzzles.
Illumination
Attach the lightbulb to the desk lamp, which lights up a tiny insignificant area of the desk.
Click the lamp to swivel it over and light up the floor.
Then zoom in on the lit area of floor to find a four-digit code.
Enter that four-digit code (4312) into the upstairs safe to open it and find an arrow (labeled "bow").
Shot
Combine the bow and arrow, and use it to hit the red button, lowering the box.
The box needs a password input, and it has some red dots on its right side.
Four dots
While examining the box, select the sunglasses to automatically use them and reveal its password.
Type BANK into the box to unlock it and get a piggy bank.
Shatter
Use the hammer to smash the piggy bank. There's no money inside, only a blue key.
Unlock
Use the blue key to unlock the lower-right desk drawer. Inside, there's a spray can of glass cleaner.
Wipe
Use the glass cleaner on the smudged window pane, and then use the cloth to wipe it clean.
Well, almost clean, as a clue with four shapes remains on the pane.
Push those four shape buttons (triangle circle square star) on the bottom cabinet drawer to open it. Take the lens.
Filter
Examine the darkened window pane, and select the lens to use it, revealing a strip of four colored squares.
So push the corresponding color buttons (green red blue yellow / 2314) on the middle cabinet drawer to open it and find a vial of mysterious liquid.
Stain
While looking at the projector's output (on the wall), you can select the slide to use it and view a pattern of arrows. However, the game will not recognize that as the correct code.
Instead, combine the paintbrush and liquid, then use it to paint the slide red.
Now when you use it on the projector, the arrow clue is different.
Enter the correct arrow code (left up right down) on the top drawer to open it and find a door key.
Exit
Place the doorknob on the door upstairs, and you automatically use the screwdriver to secure it.
Now you can use the key to escape!
Coin list
Here's where to find all 10 coins in the order they appear in this walkthrough:
On bookshelf
On cabinet
On floor right of bookshelf
Under yellow chair
In black cupboard
On black shelf
In upper-left desk drawer
On office chair
In upstairs bookcase
Left of upstairs safe
Walkthrough for the last one.
Hotel R
Literal translation: "Hospitality of Hotel R". Also, "rin no gogo" is "Rin's afternoon", but the logo on the page is an apple = ringo, just like on the site's favicon.
Intro
(Click the Next button to advance text.)
A neatly dressed rabbit greets you.
"Welcome to Hotel R! You must be tired. Please come on in. Make yourself at home in our rooms."
"Let me introduce the rooms. We have rooms for rest and relaxation."
"Here's your room. Please rest in it. Take care now!"
"Well then, let me excuse myself. Uhuhu…"
Exploration
Everything in the room is nicely furnished, but the only thing of interest on this screen is the wrapped package on the table.
Turn left. This table has two chairs and a mirror, and in the middle, a calendar has one of the weekday names blacked out. Looking under the table, you find a pair of scissors next to two locked drawers, the top one having black and white buttons and the bottom one having a keyhole. The potted plant on the right has six flowers with several of their petals missing.
Turn left. Several R flags hang over the bed, and you can take a pebble from the plant pot beside it. The sign on the door has a sad mouse (bear?): "Don't leave! Please listen to me." There's also a bright red locked door to the left of it and bright red wardrobe doors to the right with four colored buttons on their lock.
Turn left. There's an unusual set of shelves with figurines on them, and a much higher one on the left with a round blob sitting on it. And what's that under the bed? It's the sad mouse!
"M- My wife hasn't returned. Won't you find her?"
Unwrap
Now we've got a mission, and the first quest item is… (use the scissors on the box)
A stuffed bunny! After looking at the five buttons on the front, you can click it to turn it over.
Colors
Use the clue from the bunny to unlock the wardrobe doors.
The buttons with 1, 2, 3, 4, 5, 6 holes are green, orange, red, black, orange, black.
So click the 2nd, 3rd, 1st, 4th, 3rd, 4th buttons from the top to open the right door.
There are windchimes you can't play with your bare hands, hanging over a stone six-button safe with a vine running over it. If you open the left door, there's just a scroll hanging there telling you not to forget to take your stuff.
Botany
Use the clue from the potted plant beside the table to unlock the safe in the wardrobe.
The flowers on the plant have
2 4

6 1

3 5
petals remaining, so click the safe buttons in that order to open it.
What's this, a lollipop? No, it's a small mallet!
You can now look behind the safe to find a Y-shaped slingshot frame.
Percussion
Use the clue from the shelves over the bed to play music on the wind chimes hanging in the wardrobe.
The shelves with 1, 2, 3, 4, 5 figures are the 2nd, 1st, 5th, 4th, 3rd longest ones.
So use the mallet to strike the 2nd, 1st, 5th, 4th, 3rd bells from the left, and a key appears suspended by a thread.
Unlock 1
Use the key to unlock the bottom table drawer and find a pair of pajama trousers.
Ranged
Use the scissors to cut out the elastic from the trousers.
Then attach it to the slingshot frame, add the pebble, and use it to shoot down the blob on the high shelf.
Turn left to look at where it fell. Aw it's a cute little bunny!
Fluff
Use the scissors to cut open the right side of the small bunny, and take the golden key among the stuffing.
Unlock 2
Use the golden key to unlock the bathroom door.
The bathroom looks perfectly normal except for the Wanted poster on the wall ("Please find my adorable wife") and the safe in the lower left corner that requires a password.
Deleted
Since the calendar appears on the poster, use its clue to unlock the safe.
The missing weekday label on the poster would be Wed.
So remove "Wed" from "Wanted" to get "ant". Enter that into the safe (all lowercase) to open it.
Oh no, the missing wife is all locked up! You can pick up the clue strip tied to the bars.
Vertex
Use the clue from the strip to unlock the top drawer.
The V and W letters match the shapes of the black and white flags.
Which means that the clue VVWVWW indicates the BBWBWW (RRLRLL) buttons.
Push those buttons to open the drawer and find a heart key with rabbit ears.
Unlock 3
Use this key to unlock the cage in the bathroom and reunite the couple!
You get a congratulations screen which thanks you for sticking around to the end.
Update