
 Hi! The new Weekday Escape is here to brighten up Wednesday (in case the Sun is a little weak)!
You start in tomoLaSiDo's room where is cheerful piano music encouraging you to find six key parts and many electronic components. Bathroom door in Neat Escape's apartment is locked, but you are lucky - just look around - yes, there is fantastic view at a lake but that's not what I mean - look again - yes! There are hints and also a place where to input some numbers. You will get out after all, relaxed and refreshed, and prepared for long journey out of 4399's cellar jail cell (new Chinese developer after a long time)!
Have a good time and enjoy!
There are 24 electrolytic capacitors in tomoLaSiDo's tiled room, but you don't have to find all of them - this is completely voluntary quest, for escape is only the key required (its parts are completing themselves in lower right corner). You don't need to know what such an electrolytic capacitor is - you are just looking for small black cylinders with two wires poking out of it. Some puzzles may stay unsolved, because the key for escape is in one piece quite early in this game - but it would be a pity, puzzles are fun!
The cursor is changing, no save button, one ending.
The name of Neat Escape's game suggests that you are supposed to escape from the bathroom - yes you are, but in fact it's return through the house to your room and three locked doors are in your way. The place you are staying is a beautiful villa or big apartment, new, polished and very clean as all interiors from Neat escape - no surprise you aren't escaping it, you just don't want to spend a night in a bathtub.
The cursor is not changing, save button, one ending.
The game is avalable for Android too.
On your way out from the 4399's prison cell you need to open eighteen doors, solve many puzzles, and destroy many priceless artworks (hopefully copies only).The place where you are trapped seems like old castle and medieval fantasy atmosphere is strong here - alchemy, astrology, swords and magic! Puzzles are mostly straighforward and not complicated, but few are missing clear clue, so some random clicking is involved. Items can be combined in your inventory. When in doubt, try to smash or cut something. No regards.
The cursor is not changing, no save button, one ending.
We love escape games, and our readers love talking about them and sharing hints! How about you? Let us know what you think, ask for clues, or help out other players in the comments below.


Just a quick note for the chinese game: I had to use the refresh green arrow in order to have the message for Adobe Flash.
Not every Chinese game is like that
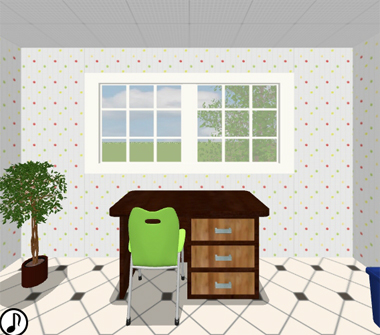
Escape Challenge 62: Room with Electrolytic Capacitors
As you may have noticed, Escape Challenge is up to the 60s, and that means a different, livelier piano piece to accompany your escape.
Exploration
As usual, you start off at a desk, but it's facing a rectangular window. The only thing you can do to the desk is check its drawers. The top one is empty and holds a (capsule with a) key piece, the middle one has a three-color lock, and the bottom one has a five-digit lock. On the left, the potted plant holds another key piece as well as a capacitor on the rim of the pot.
Turn left. The triangular windows draw your attention to the desk in the middle, which has a box of capacitors from which you can only take one (but it's a usable item), and a paper note beside it with a grid of digits.
Look under the table to find a key piece.
Then look at the actual underside of the table to find a screw.
Turn left to face the door. An unusual device holds a capsule, and it has a rectangular display and voltage control slider and a light bar and a button that all don't work until you find the missing part on the left. The wall clock above has rapidly flashing green lights and four buttons around the outside.
Turn left. The couch holds a capacitor cushion which puffs air when you squeeze it. A box on the wall has a lock with two buttons, and the bin under it is empty. While looking at the bin, pick up the capacitor from the couch armrest.
Walk into the corridor and enter the toilet. After you sit down, you can look right, up and then left to find a drawing of a boy enjoying "condenser milk".
Two buttons
Use the clue from the cushion to unlock the wall box.
The puffs of air emerge in two different positions, alternating between right and left.
So click the RLRLRL buttons and open the box to find a key piece.
Three colors
Use another clue from the cushion to unlock the middle door drawer.
The colored rectangles on the cushion are yellow, cyan, yellow, so click the drawer buttons 2, 1, 2 times, then open it to find a key piece.
Timing
The lights on the clock flash too fast to see, but pushing in the top button slows it down.
Now that you can see the clue, use it to push the buttons correctly.
The lights flash in the RLRDRDL order, so push those buttons, and a capacitor rises from the top of the clock.
The weird device
Place the capacitor item in it, making three balloons and a bow appear on screen.
Holding down the big yellow button fills the bar, and the bow fires when it's full. You can also raise the bow using the slider.
But the highest voltage outright destroys the capacitor, and you'll have to get a new one from the box. You'll need to find another way to get to that balloon.
The triangles along the top of the device alternate between up and down, except for the first ones directly above the balloons which all point down.
Indeed, after you shoot down the two lower balloons, you can click those triangles to pry loose that panel and move it down. Now you can shoot an arrow from the middle position to hit the last balloon!
The plastic panel opens up and you automatically get the key piece.
Bonus
Back out and look at the device again, which shows the word CLEAR.
So use that clue to unlock the bottom desk drawer.
Refer to the grid of numbers beside the box. Each letter indicates a digit in each column, and those digits combine to form the code 11311.
So enter that in the drawer, then open it to find a screwdriver and capacitor.
Remove the screw on the bottom of the table, and pick up the whole box of capacitors.
You now have the whole key and all the collectibles, so leave through the door to end the game.
Item List:
6 key pieces:
Top left: in middle drawer
Top middle: in top drawer
Top right: in wall box
Bottom left: in potted plant
Bottom middle: from device
Bottom right: under capacitor table
24 capacitors:
1 on plant pot
1 from clock
1 in bottom drawer
1 on couch armrest
20 in box of capacitors (if you're holding 1, it will give you the other 19)
1 other item:
Screwdriver in bottom drawer
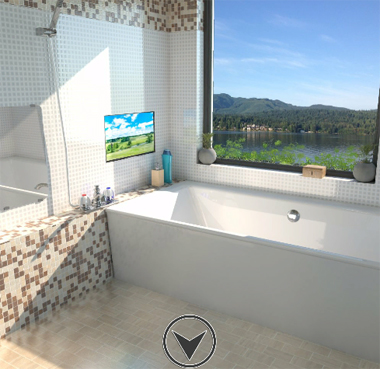
Escape From the Bathroom
Don't you just hate when you get trapped in a bathroom with a scenic lake view?
Exploration
Let's start with the windowsill, on which rests a box with four roman numeral buttons arranged vertically. The first time you click to zoom in, a small yellow handle is visible in the upper-right corner that lowers the blinds, on which there are four squares arranged in a column with IV written in the third one. Beneath the window is the bathtub, which is empty except for a smaller bright green tub inside.
On the left wall, there's a TV screen showing a landscape photo, and you can click the soap bottle beneath to rotate it and find another square clue. Further to the left, there's a tap connected to the shower, but it releases water onto the floor. There's also a mirror which you can shift by clicking its sides. You find nothing when you move it to the left, but moving it to the right reveals a square clue on the wall behind!
Turn around to face the locked glass door, which has a white smear next to it. There's a panel in the wall with two small holes.
Wash
Turn on the tap and fill the green tub in the stream.
Then splash that water on the wall beside the door to reveal a fourth square clue.
Roman
Use the square clues to unlock the box on the windowsill.
Each clue has a different square marked with a roman numeral: (from top to bottom) VI III IV VIII.
Click the buttons 5, 2, 3, 7 times accordingly, and open the box to find a handle.
Hole
Place the handle on the wall panel and open the compartment to find a red key hanging off a weird pipe.
You can also click to turn the valve, then click to look closer at the pipe. The valve handle has some interesting features, and it's now pointing in the Close direction.
Unlock 1 / Exploration 2
Use the red key to unlock the glass door, and proceed out to the next room.
You now face another locked door. On the right wall, there's a maze with red and blue colors on its exits. On the left wall, there's two boxes connected by a thin rod passing through a red light. You can't open the top box, but you can open the bottom one to find some tubes connected to its top and bottom, ending in hexagonal sockets.
Turn around to face the glass door where you entered. On the left, there's some laundry and washing machines, but you can only look at the chest of drawers in the corner, the lower one of them containing a screwdriver. Look at the sink area on the right, where there's a three-digit safe to the left of the sink and a safe on the right with four square buttons that cycle through paths, starting at a blue rectangle and ending at a red one.
Look down at the mat in front of the glass door, and shift it aside to find a single screw.
Path
Use the clue from the maze to unlock the box to the right of the sink.
The thicker walls of the maze separate it into four squares, one for each button. Since the red marking on the maze is on the left, you need to invert its solution on the box.
So for instance, the leftmost button on the box corresponds to the rightmost square in the maze, and since the solution in the maze follows the top wall and then the bottom before reaching the blue marker, the path on the box should follow the top wall and then the bottom after leaving the blue marker.
Click the buttons 4, 6, 3, 9 times to open the safe and find a spray can of cleaner.
Unscrew
In the first room, you can now unscrew the valve handle, first taking the screw.
Then attach the handle inside the lower wall box in the second room, place both screws, and secure them with the screwdriver.
The beep you hear indicates that the top box is now open, and you can take a handheld wiper from it.
Cleaner
Spray the cleaner onto the mirror above the sink, and clear it out with the wiper. You still can't see your reflection, but you can see the reflection of everything else.
Click the top half of the mirror to take a closer look, and you find that the reflection of the shelves forms the digits 384.
So enter that code in the box on the left of the sink, and open it to find a yellow key.
Unlock 2 / Exploration 3
Use the yellow key to unlock the wooden door. You're finally out of the bathroom!
Now you're in a corridor with large glass windows on the left. On the right side, two locked doors lead to a "Bed room" and "Rest room". Two columns of lockers flank the middle portion of the corridor. In the left column, the top locker only has a round circle on its bottom, the middle locker has a smaller circle, and the bottom locker is locked and has two red squares. In the right column, the top locker is empty, the middle locker is bolted shut, and the bottom locker holds a wireframe bowl of oranges in front of a red N.
Click the Bed room sign to slide it down and reveal a yellow W.
Continue forward along the corridor past "Dad's room", "Living room", until you reach "My room". The panel on the left is locked and requires a key.
Rounds
Place the tub in the top locker on the left, and the spray can in the locker below that.
Now that both of the lights on the bottom locker are on, you can open it to find a spanner.
Wrench
Use the spanner to open the middle locker on the right. Inside, there's a box with two buttons under a clue which reads A→Z.
Left and Right
Use the clue from the corridor to unlock the two-button box.
Hint: You need to find objects, each of which gives one letter. Some of the objects are "left" and some are "right".
The round shiny buttons on the box look like the doorknobs along the corridor, some of which are on the left side of the door and some on the right.
Each of the signs on the doors has only its first letter capitalized, and the clue in the locker tells you to consider the rooms in alphabetical order:
Bed room: doorknob on left
Dad's room: doorknob on right
Living room: doorknob on right
My room: doorknob on left
Rest room: doorknob on right
Push the LRRLR buttons to open the box, which contains a blue key.
Unlock 3
Use the blue key to unlock the box beside "My room".
Inside, there's a lock with three letter buttons in red, blue and yellow squares. Click the blue spot on the left to find that it's a letter O painted on the door.
Three letters
Use the letter clues you've found to solve the last puzzle.
The red, blue, yellow letters spell out NOW.
So enter that in the panel, then push the button, and you hear the click of the door unlocking.
Click on the door to end the game.
You're finally back in your room, enjoying a juicy fruit smoothie!
Whew! If this game had just two more stages this would be my longest walkthrough.
Room Escape Mission 1
This is a long game, but each of the 18 levels is self-contained, so feel free to take some breaks. Rest assured that none of them involve flaming gears, bullets, or creepy eyes staring at you from the darkness.
Interface help
The in-game menu is really simple: the left button returns you to the title screen, and the right button mutes (the music — there are no sound effects.)
But the really useful buttons are outside the game: the blue zoom buttons beneath it on the left (zoom in, zoom out, optimal zoom, fullscreen). "Fullscreen" removes most of the clutter and zooms the game to fit your browser window, and you can also achieve a similar effect after enlarging the game by clicking the lightbulb in the top right of the page.
The latter method also hides the green button that restarts the game, which is really helpful for messy clickers like me.
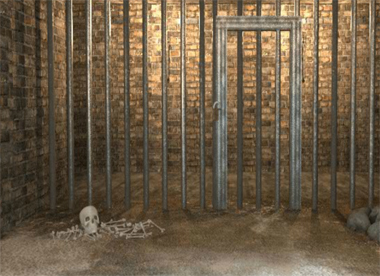
Level 1: Prison Cell
Exploration
The cell gate is locked with six square buttons that each have a smaller square on them. On the ground, there's a skeleton and a pile of rocks, and your extraordinary perception allows you to find the odd ones out: the bone laid horizontally just below (closer to you) and to the right of the skull, and the medium-sized rock just above (farther) and to the left of the rightmost one.
Checking the left wall, you find that one of the bricks is loose, but you have no way to pry it out.
Knife
Use the rock on the bone to give it a sharp point, and then use it on the brick four times to pry it out and reveal a scroll with corner clues.
L
Use the corner clues from the scroll to unlock the gate.
The L shape formed by each corner matches the one formed by the white area on each button.
So switch the buttons to the
◳(0) ◳(1)

◰(3) ◳(3)

◳(0) ◲(2)
positions by clicking them that many times. The gate opens so you can leave.
Level 2: Jailor's Desk
Exploration
The wooden door on the right is boarded up, and the locked cell on the left contains just a ball and chain. The desk beside the cell has (a drawer with) buttons that can be turned dark by clicking them, and a shield with an unusually white and black pattern hangs on the wall above. You can also look at the manhole cover and the chest without a keyhole.
Tabletop
Use the clue from the shield to unlock the desk.
Reproduce the checkerboard pattern on the shield by clicking the buttons corresponding to the black squares: odd-numbered buttons in the odd-numbered rows and even-numbered buttons in the even-numbered rows.
When you're done, the compartment opens up and you get a key.
Use the key to unlock the cell and get a ball and chain.
Heavyweight
Use the ball and chain to smash the wooden planks. There's no exit here, just a sword.
Slash
Use the sword to remove the lock on the chest, and take the hook tool from it.
Tunnel
Use the hook to lift the manhole, and climb down it to escape!
Level 3: Dank Sewers
Exploration
Your progress is blocked by another gate with a padlock. On the left wall, there's a torch you can take and a large tarantula holding something in its web. On the right wall, there's a set of empty pigeonholes, but the top-right one vanishes when you zoom in. Pick up 2 boxes from the floor, as well as another box and a bottle with a note behind the iron bars.
Kill it with fire
Or just drive the tarantula away with the torch, then pull the metal blade and the web off the wall.
Boxed
The three boxes you picked up can be placed in the pigeonholes, and you can click them to remove them again.
So use the clue from the note to place the boxes correctly.
Other than the top-right corner, each symbol on the note corresponds to a pigeonhole, and three of them are different from the others: the three-sided arch-shaped ⨅ symbols which appear third in the first row, second last in the second row and second in the last row.
So place the boxes in those slots, and a drawer containing a wooden handle slides out of the side.
Sharp
Attach the blade to the handle to make a file, and use that to cut the padlock.
The gate swings open, so walk through it to move on.
Level 4: Dim Basement
Exploration
The moonlight filtering in from your left adds to the illumination provided by the only lit torch in the room. The other wall torch is unlit, and you can pick up another unlit torch from the ground. The door forward has a tiny keyhole. On the left, there's another padlocked chest and a dark hole in the wall. On the right, a wooden table holds the hilt of a sword next to a number clue and a four-digit chest. A family portrait hangs on the right wall, but there doesn't seem to be anything special about it.
Light
Use the unlit torch on the lit one, and then use it to light the other torch on the wall, revealing a number clue next to it.
Also use the torch to light up the dark hole, and take the key from it.
That's not all! There's one other thing you can do with the torch.
Use the torch on the baby's head of the painting, and instead of burning it just glows. What now?
Using the torch on the mother's face resets the puzzle, which suggests that you need to light up the faces in the correct order.
That correct order is from youngest to oldest, starting with the baby and ending with the mother.
So use the torch to light up those faces (in counter-clockwise order), and the painting slides aside to reveal a slot in the wall.
Unlock
Use the key to unlock the chest, which holds the blade of the sword as well as a number clue beneath.
So assemble the sword by combining the hilt and blade, and then insert it in the slot behind the painting. Purple liquid spills out and reveals a fourth number clue.
Four digits
Use the digit clues you've found to unlock the four-digit box.
The clues beginning with the roman numerals I, II, III, IV end with the digits 2, 5, 9, 1.
So enter 2591 in the box to open it and find a key.
Use that key on the door to unlock it and escape!
Level 5: Wooden Bedroom
Exploration
The door on the left is super-secure, with three different padlocked chains. Scanning along the floor, you find a large tub of water, a broken drain cover from which you can see but not reach a floating box, a white marble object trapped behind some bars in the wall, an empty bucket and a bed with a bronze key hidden under the pillow. Along the wall, there are two platforms that fold up to show four clues with large and small wide T shapes, and a mirror which you break to get a glass shard.
Buoyancy
Fill the bucket in the tub and then empty it down the drain. The box floats on the raised water level and opens up so you can take a silver key.
Fragment
Use the glass shard to saw through the iron bars, and now you can reach the stone box which has large and small rings with 45° sectors colored white.
So use the remaining clue from the room to unlock it.
Each of the four clues on the wall corresponds to one pair of rings. Since the light parts of the rings are protruding out of the box, they correspond to the short lines of the T shapes. (At least, that's how I think it's interpreted.)
So for example, the top-left rings (first clue) should all have their white portions in the lower right.
Click the rings (outside/inside)
7/7 2/6

3/6 4/4
times, and the drawer of the box opens with a gold key inside.
Unlocks
Use all three keys to unlock the chains, and leave through the door.
Level 6: Abandoned Armory
Exploration
There's no one to stop you, so grab the spade next to the barrel in the corner, the third-closest sword on the rack, the hammer head on the ground beside the swords, and the rightmost spear. Unfortunately, the bow in this room is too high to reach. Look at the shields with shape clues on them, the pile of bricks blocking the door, and the mysterious unplastered patch of wall on the right.
Pacifist
Use the sword to open the barrel and get an arrow, the spear to reach the bow and the spade to clear out the bricks, revealing a wooden stick.
Combine the stick with the hammer head to get a hammer, and then use that to smash the wall, revealing some targets mounted on sticks with shapes at the top.
Aim
Combine the bow and arrow, and now you can use it to perfectly shoot some targets. (Yes, you can hit more than one, and you can click the targets afterwards to remove the arrows.)
So use the clues on the shields to figure out which targets to hit.
The clue on the left shield has a cross between a square and triangle, so you need to find a shape with a square on its left and a triangle on its right. The only such shape is the leftmost triangle. Similarly, the second shield tells you to hit the target marked by the rightmost triangle, and the third shield tells you to hit the one marked by the right circle.
So shoot the left target in the bottom row and the two right targets in the top row. The door opens up so you can leave.
Level 7: Ceramic Workshop
Exploration
You can't even see the lock on this door, but it's certainly locked. You can't do anything with the broom on the left. The table has a bunch of interesting pottery and four small differently-shaped skillet pans which can be rotated, arranged around a square indentation. Looking under the table, you find some sort of barrel with a red valve. To the right of the table, a chair has a rag that you can move aside to find a picture of a strawberry next to four vertical lines, and you notice that one of the supports at its base looks different.
On the left wall, a jumbled picture hangs above an empty fireplace with firewood next to it. Take the poker.
On the right wall, you can click the top shelf to find a saw, and the bottom shelf to find a book. Turning the book over, you find a clue with four lines and a banana, and there appears to be something else on that page.
Sawn
Use the saw on the chair to get a wooden rod.
Then use that rod on the barrel to release its contents on the floor. A clue with an apple/pear and four lines appears in the puddle.
Scramble
Solve the jumbled picture puzzle by rotating its tiles.
Click them
0 1 3 2 2

3 2 1 1 2

1 3 0 1 2
times, and the whole picture slides aside to reveal an exposed brick that seems to be half-removed.
Pointed
Use the poker to remove the brick and get a dagger. There's also a box with four witch hat buttons that change colors.
Pointy
Use the dagger on the book to find a secret compartment with a note, which has four arrows pointing in different directions.
Pointing
Use the clue from the note to solve the puzzle on the table.
Rotate the skillets
2 1

3 0
times so that their handles point in the directions of the arrows.
The hole in the table opens up, so take the matchbox from it.
Fuel
Place the wood in the fireplace and light it with the matches, revealing the last fruit clue on the side.
Four colors
Use the fruit/line clues to open the box in the wall.
In each clue, one of the lines is longer than the others. Looking at the clues where the 1st/2nd/3rd/4th line is longer, you find that their fruit colors are yellow, red, green, purple.
Click the hats 1, 3, 2, 0 times to open the box and get a key.
Use the key to unlock the door and leave.
Level 8: Stairway Gallery
Exploration
Finally, the rooms are getting bigger and grander! No more of those cheap wooden doors, this one's made of metal and you zoom in really close on the keyhole when you click it. The two paintings upstairs are all jumbled up, but the one below looks okay. The table in front of you has a six-digit lock with a six-letter clue, and you can admire the vase sitting on it. There's also a plant pot on one of three identical bases.
Replant
Place the plant pot on the rightmost base, opening up a floor compartment with a statuette inside.
Destruction
Use the statue on the vase, smashing a hole in it. Take the knife from it.
Then use the knife to cut through the downstairs picture. On the wall behind, there's a safe with symbol buttons.
Repair
Fix the two remaining portraits to make up for the damage you caused.
Rotate the tiles of the left picture
0 2 0

3 1 0

2 2 1

1 1 3
times (if you look closely, there's a white dot on the top-left tile that should be in its top right, and a bright corner of the top right tile that should be in its bottom left), and it slides aside to reveal a grid clue split diagonally between symbols and digits.
Rotate the tiles of the right picture
1 0 1

2 1 3

2 3 2

1 2 0
times, and it moves aside to reveal a grid clue split diagonally between digits and letters.
Six letters
Use the clue from the right painting to unlock the desk.
The diagonal line of darkened squares in the grid hints that you can reflect the halves onto each other, with the bottom-right corner matching up with the top-left.
If you do so, the letters TIZIAN end up on the digits 271743.
So enter that in the lock, and the left compartment opens up so you can take a rolled note with a math clue.
Four symbols
Use the clue from the note to unlock the safe in the wall.
The sum on the note works out to 8239. In the left painting grid, those digits reflect onto the
┌ ┐└ ⊐symbols.So click the buttons 9, 8, 7, 2 times, and the safe opens to give you the key.
Zoom in on the keyhole, insert the key, and the door to the next room opens. Moving on!
Level 9: Study Room
Exploration
There just aren't enough books to call this a library. Search the right bookshelf to find a book and a circular peg (and a small slot in its top right corner), then do the same for the middle shelf to get another book and a black ball with three dots (it's not a bowling ball!). You can't do anything with the left shelf because it's too dark to see. Look out the window at the bright stars, and at the table beneath which has a round hole.
Fill in
Place the peg in the table, and the left side unfolds to reveal a five-digit box with a five-letter clue.
Translation
Use the clues from the books to unlock the box in the table.
The letters APERI appear on the letter grid in the same positions as digits 91540 in the digit grid.
So enter that in the safe to open it and get a small scroll with more letters and numbers.
Star power
Use the ball on the window, removing all the stars from the sky and transferring them onto the ball.
Then use the ball on the left shelf to light up a box with a grid of buttons with numbers and letters around the outside.
Coordinate
Use the clue from the scroll to unlock the box on the left shelf.
Each row on the scroll has a letter and a number, indicating a button on the grid:
-- -- -- -- -- --

-- 2H -- -- K2 --

-- -- C3 D7 -- --

4A -- -- -- -- 8L
Push those buttons to open the box, and take the key from it.
Use the key on the slot in the right bookshelf, and it swivels open to reveal the hidden passage.
Halftime break! This walkthrough is getting too long, so let's continue in the other half.
Welcome back. If the first half of the game blew your mind, you haven't seen nothing yet.
Level 10: Alchemy Table
I don't see any explicit clues for the puzzles in this level. So use your instincts and guess, I guess.
Exploration
At the left of the table, a container holds something reddish. Take the empty flask next to it and notice the empty stand next to that. None of the books are interesting, but you can take the hammer there. Also pick up the flask of yellow potion and the lit candle.
Look under the table to find a box with nine unlit buttons, and a locked trapdoor.
Smash
Use the hammer on the container to get to the flask of pink potion inside.
Crack
Play with the box under the table until you get it open.
You need to press the buttons in the correct sequence, which you can figure out because the puzzle resets on every incorrect press.
The correct sequence is to press all the buttons in clockwise order:
1 2 3

8 9 4

7 6 5
The box opens to give you a green potion.
Blend
Place the empty flask on the stand in the middle of the table, and use the candle to heat it up.
You just need the right combination of reactants. How do you know what to add?
Notice that the color changes (kind of) every time you use a potion on the flask, and the flask empties itself after you add potions three times.
Now you need to know what color to make. It's got to be on screen somewhere…
How about the blue glow emanating from under the table?
You can reproduce that by adding the pink potion once and the green one twice (in any order).
The trapdoor opens, so climb down to the next room.
Level 11: Trouble Brewing
Exploration
You see something familiar on the right: more glassware connected to a boiler on the table. Reach under to get a shovel head. There's also an empty cauldron in the room, resting on some burning logs. You can zoom in on the logs and pick up a burning ember.
Now for the wall. The door is padlocked, and a picture on the right shows a jade-green creature with some sticks growing out of it (apparently). The large bookcase on the left also has a padlock on the top. Take the jar on its bottom shelf and the stick leaning against it. Look in the wall shelves on the left to find an ordinary rock and an orange-spotted mineral rock.
Mining
Use the rock in your inventory to smash the orange one, and pick up the nugget on the left.
Reaction
Attach the jar to the distilling apparatus, place the nugget in the left (empty) flask and heat it with the ember.
The jar on the right immediately turns orange, so pick the solution back up.
Pour the solution in the cauldron, and it creates a portal… no, it melts a hole in the bottom so you can climb down!
Exploration 2
We're not done with this Level yet. The basement is empty, but the seepage of the solution seems to have damaged the floor in front of the ladder. On the right side of the wall, a rack has adjustable arms next to a circular wall panel.
(You can leave the basement by pressing the back arrow button in the lower left.)
Excavate
Combine the shovel head and stick, and use the shovel to dig in the basement. You get a box with two holes on the side.
Crawly
Use the clue from the picture upstairs to unlock the rack downstairs.
Mentally straighten the clue so the head (pointy end) is up and the tail (dendritic root-like end) is down. From top to bottom, the sticks should now be on alternate sides, and point in the DDUUDDU directions.
So click the sticks on the rack (from top to bottom) 2, 2, 0, 0, 2, 2, 0 times, and take the key from the compartment that opens up.
Unlock
Use that key in the bookcase. In that compartment, there's two pairs of pipes mounted onto the shelf, each pipe bending and ending to leave the same space in between.
So fit the box in the gap, and open it to get another key.
Use that key to unlock the door and escape.
Level 12: Botanical Sanctum
Exploration
From left to right: a carnivorous plant faces you, an empty lectern has light shining on it, a tree has a dark hole in it, three candles on a shelf provide unnecessary lighting, a fountain is full to the brim with opaque blue liquid, some weeds cover a wooden puzzle, and a table holds an unlit candle, a clock that needs to be set, and a plate of rotting apples (surrounded by flies?). There's also a padlocked trapdoor.
Appetite
Give the apple to the plant. Its trap stays open so you can take the stick from it.
Vision
Light your candle using the ones on the shelf, and use it in the tree to find a clock face.
Time
Place the clock face and stick on the lectern (in any order), forming a sundial. (Fun fact: such a dial only works when its plane is parallel to the equator.)
Now that you know the correct time, use it to set the clock.
The shadow on the dial falls exactly halfway between 8 and 9, so click the left up arrow 7 times until the hour hand points at 8, and right up arrow 10 times until the minute hand points at 6.
The clock opens up and you can take a pair of shears.
Pipe dream
Use the shears on the vines to reveal a puzzle with pipe tiles, some bent, connecting to actual pipes in the top left and bottom right corners.
So use your puzzle-solving skills to solve it.
All the tiles must be included in the pipe, which means that each of the horizontal tiles must be in the center column, and the remaining corner tiles go around them to form a zigzag pattern.
Once you have the pipe assembled, the tiles will no longer be swappable. Look at the fountain to find all the water gone and a key in the top bowl.
Use the key to unlock the trapdoor, and proceed.
Level 13: Ritual Chamber
Exploration
A circular stand with lights is placed in front of the doorway here. There's two pedestals with interesting shapes on the left, and one with a fire tablet that hides a tattered note on the right. Pick up the crystal, dirt and staff from the floor, and look at the heads on the wall (one covered by planks) which have symbols above their eyes and mouths.
Spellcasting 1
Place the staff in the middle of the circle of lights, and attach the crystal to it, making it glow brightly.
Use the fire tablet on the staff to get a fire ball.
Skull 1
Use the clue from the note to unlock the left skull.
Matching the symbols on the skull with the note, you find that you need to put fire in its eyes and earth in its mouth.
Do so, and the panel beside it opens up. Take the semicircular (technically semi-annular) wooden piece and water tablet.
Spellcasting 2
Use the water tablet on the staff to get a water ball.
Skull 2
Use the clue from the note to unlock the right skull.
Following the symbols, place water in its mouth and earth in its eyes.
The panel beside opens, so take the other wooden piece.
Fusion
Place both pieces in the circular pedestal, and the square one opens up to give you a key tablet.
Spellcasting 3
Use the key tablet on the staff to get an unlocking bolt.
Then use that on the staff again to unlock the door and escape.
Level 14: Cosmic Nexus
Exploration
Oh great, where are we now? Six islands float in space: one large one with a blue force field around a pedestal and a rock in the corner, four small ones with pedestals on them, and one with a locked door and a semicircle piece on the ground. There are stairs to the two left islands, whose pedestals hold a puzzle with moon phases and a triangular tile with astronomical/astrological symbols.
Disruption
Place the rock on the wire connected to the force field to disable it. Now you can access another panel with more square plates marked with astrological symbols. You can pick up the other semicircle piece.
Two pieces
Placing both pieces on the pedestal on the big island, you find that another stairway appears, leading to a pyramid with various symbols on it.
One of the symbols is different: it's just a square. Click on it to find a circle piece.
Three pieces
Pick up the two pieces you placed earlier, and then place all three pieces in the puzzle on the left island. Which piece goes where?
In order to show the correct progression of lunar phases, the dark circle piece must go in the lower left, the left semicircle in the right, and the right semicircle in the top.
The middle panel opens up so you can take the circled cross piece.
One piece
Place the cross piece in its slot on the middle island pedestal, and another stairway appears.
This island has a puzzle showing the solar system. Each planet is a button that can be lit up, up to a total of three. There are astronomical symbols marked on the Earth and Sun, and in the lower left corner. The panel in the lower right has three rectangles on it.
Triforce
Use the clue from the triangular piece to solve the solar system puzzle.
As the picture tells you, the symbols ☉, ☿, ♀︎, ⊕ represent the Sun, Mercury, Venus and Earth.
The clues on the top part tell you that the Sun is above and to the left of each of the others.
So click each of the planets in the lower right direction from the Sun, and a rectangle lights up.
The lower-left part of the triangle tells you that the Sun, Mercury and Earth are aligned horizontally from left to right, and that Venus is above and to the right of the Sun (and above and to the left of the Earth).
So click Mercury, Venus, Earth in the right, upper-right, right directions from the sun, and another rectangle lights up.
The lower-right part of the triangle tells you that Mercury is above and to the left of the Sun, and Earth is to the right, and Venus is above and to the left of Earth.
This means you need to click Mercury, Venus, Earth in the upper-left, upper-right, right directions from the Sun.
Once all three lights are on, the panel opens up to give you the sun piece.
One more piece
Place the sun piece in the middle pedestal, and the door opens up with a portal that looks similar to the one you entered from. Where will it lead? There's only one way to find out.
Level 15: Guarded Lookout
Exploration
You can see mountains from here, but the doorway is blocked by iron bars and watched by two guards who have weird clues on their shields. Or maybe they're just suits of armor, since the right one doesn't notice when you steal his spear. Above the archway, there's another scrambled picture under three diamond shapes, and the picture has markings on each tile. Also in this room, there's a locked chest, a padlocked trapdoor(?) with locks on three sides each marked with diamonds, a crumbled section of wall, and a chisel on the right table.
Unscramble
Solve the picture puzzle by rotating its tiles.
Even though the colors are similar, you manage to make the edges line up by clicking the tiles
3 0 2 2 1

0 3 3 2 1

1 0 3 2 2
The gate opens and you can walk out to the rampart.
Exploration 2
Red and yellow flags are raised on flagpoles, with an empty flagpole holder in the middle. You can lower the flags or flip them to the other side by clicking. There's also a locked panel in the floor and a hammer on the left.
Breakthrough
Combine the hammer and chisel and use it to break the crumbled wall and get the key.
Then use the key to unlock the chest, and take the yellow flag from inside.
Semaphore
Place the spear in the flagpole holder, and attach the yellow flag to it.
Then use the clues from the shields to arrange the flags correctly.
Ignoring the blue flag clue, the other flags on the shields tell you that the red and yellow flags should be lowered, and only the orange flag should point to the right.
So click the left two flags twice and the right flag once, and the floor panel opens up to reveal a box with another key inside.
As easy as
Use the key to unlock the padlock that's visible when you zoom in on the three-diamond lock.
Nothing appears to happen, so it seems that you have to input all three diamond codes in the panels around it.
The one-diamond and two-diamond codes (⌜⌟⌝ and ⌞⌟ ⌜) are shown on the shields, so click the buttons on the left code panel 3, 3, 1 times and those on the right panel 1, 2, 3 times.
The three-diamond code is a bit more tricky: with three different rows of codes in the picture, which one should you use?
None of them! The corner symbols in each column are different, and you need to enter the symbols that don't appear.
So enter ⌝ ⌞●⌟ ⌜in the panel by clicking the corner buttons 1, 2, 3, 2 times.
Now that all the codes are entered, the trapdoor opens and glows purple, which surely bodes well for the next level.
Level 16: Beastly Cave
Exploration
The exit door has an angry-looking face with a shiny hook-shaped earring. In front of it, a puzzle in the floor has two concentric rings of shapes, and only the buttons around the outside work. On the left, there's a sword embedded in the wall, a spear on the ground and a piece of string in the corner- wait, that's a worm! On the right, a paw sticks out from a hole in the wall, and there's a pole with a rope tied to it next to a tiny water stream with a fish floating in it.
Slice
Use the sword on the pole to get the rope.
Use the rope, hook (earring) and worm on the spear in that order, and use this contraption to get the fish.
Carnivore
Use the fish on the paw, and the creature instantly transforms it into fish bones and a key.
Matched
There's no additional clue for the puzzle on the floor, so use your intuition to solve it.
Flipping through the possible shapes, you find that most of them are made of triangles and squares, and the area of each square is double that of each triangle.
Along with the visual similarity, this suggests that circles on the inside ring should become squares on the outside, and semicircles should become triangles. So the outer ring should show (clockwise from top) two squares side by side, one triangle pointing up, two triangles pointing towards each other, and a single square.
Click the buttons (clockwise from top) 3, 2, 2, 6 times, and the puzzle flips up. The box in the hole is locked and has a keyhole on its side.
Unlock
Use the key to open the box, and take a metal cup from it.
Hydrate
Fill the cup in the stream, and then pour the water in/on the angry face.
The doors open, so you can move on.
Level 17: Water Wheel
Exploration
Water (?) flows in on the left in a pipe that would drive the water wheel connected to the well, if that pipe wasn't clogged by rocks. Pick up the stick under the pipe, and notice the glass pane leaning against the pillar. The right side of the room is unusually dark except for a bright spot on the right side…
…which leads you to another room. (This end of the tunnel is also lit.) A minecart loaded with rocks is pointed towards a gate, and the chain leads to a winch post missing its handles. Look in the minecart to find a dagger. There's also a large tub of water on the left and a pickaxe head on the right.
Flow
Combine the pickaxe head with the stick, and use that to unclog the pipe.
Looking in the well, you find the bucket that got raised by the wheel. Cut it free with the dagger.
Shine
Fill the bucket in the water tub in the second room, and use it to wash off the dust on the glass pane.
The sunbeam reflects on the far wall, which has 4 sticks with notches on a shelf.
Barrier
Place the sticks in the winch, which rotates to raise the bars. The doorway's still blocked by wooden planks.
Release the minecart brakes anyway, and it just bulldozes through the blockage, allowing you to escape.
Level 18: Trapped Passages
Exploration
It's nice to be standing on grass again, but the two small hills with tunnel openings hint that it's not for long. There's a fancy axe on the ground, a huge pile of rocks between the hills (you can take some near the bottom) and a small tree.
In the left tunnel, your path is blocked by a row of spikes. In the right tunnel, there's a grid of squares which you have to cross.
Fill in
In the left tunnel, fill the spike gap with rocks, and then you can click the far door to walk to the next room.
The next room has only a single item that appears to be a hammer in a pile of rocks. But it's under a sunbeam that makes it too bright, or maybe too hot, to take.
Footsteps
You can only cross the grid of squares by moving between adjacent squares one step at a time, and stepping on a "wrong" square resets the puzzle.
So use trial and error to figure out the correct path.
Start on the middle tile on the bottom row, and then go URRUULLLLUURR to end on the middle tile of the top row.
Once you reach it, the tiles no longer respond to clicks, and you can proceed to the next room.
Exploration 2
The diamonds and triangles are back, in the form of clues along the wall with patterns of yellow protruding dots beneath.
On the ground, those shapes are repeated in a puzzle with yellow symbols beneath.
Clone
Use the clue on the wall to solve the puzzle on the floor.
You can produce the dot patterns by placing a dot at each end of the line segments in the correct symbols.
The symbols that make this work are
┌ / - └ /and you can enter that in the puzzle by clicking the symbols 2, 2, 5, 2, 3 times.
With the puzzle lock removed, you can take the round shield.
Structure
Use the axe to chop down the tree, getting sticks.
Attach the sticks to the shield so it can be propped up.
In the room with the hammer, cover it with the shield-on-stilts, and now you can pick the hammer up.
Use the hammer on the rock wall on the first screen, clearing the path out.
And that's all the levels!
"Escaped successfully! IQ's off the scales! Please look forward to:"
Click the Room Game 2 sequel banner to return to the title.
need help with Room Escape Mission
I followed the walkthrough on level 17 but it tells me to release the brakes and nothing i have done so far releases them and there's nothing in my inventory to release them. what am i doing wrong?
Please help.
@Paul: There's a lever
that controls the brakes, on the right side of the minecart. Zoom in on the rocks in the cart and you should be able to pull it (if the gate is open).
"Room Escape Mission" was quite fun! Had the same problem as Paul—seems like the hotspot is not exactly where it should be.
And perhaps it was just my monitor, but
the flag colors on level 15 "Guarded Lookout" only appeared distinct when on the poles. On the shields, the yellow and orange flags both looked yellow. Add that to the blue flag being a red herring (call that a pun if you wish), and I was baffled.
Solved that one completely by accident!
Update