
 Hi, new Weekday Escape just arrived fully loaded with new games!
Amajeto, up to date as always, takes you within view of vineyard in grape harvest time. Dassyutu then locks you in a room which purpose is not clear but your task is - escape from it! In Neat Escape's horror game you might wish to be anywhere else than in the room where you are threatened by unnatural forces - but they won't attack you, don't worry - you won't stay long anyway!
Have a good time and enjoy!
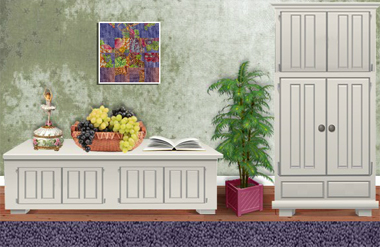
Today you are back in Amajeto's cosy living room, looking for keys, TV controller and clues, which are mostly based on grapes and wine - no wonder, the room is close to the source, you can see a vineyard from the window. And it's a fertile one, judging by juicy bunches of grapes of different colors lying everywhere around.The most important part of the game, puzzles, are solid and satisfying. Again. So may quality games in a row are impressive indeed!
The cursor is changing (its color), no save button, one ending.
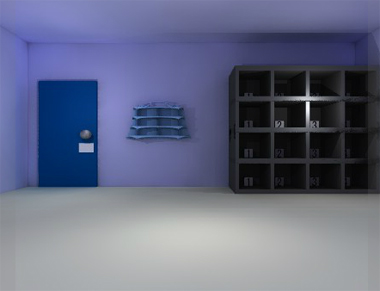
Bluish room by Dassyutu is full of miscellaneous stuff - plenty of shelves, a printer and something, what seems like architectonic model...hmm, did I mention shelves? Be prepared for some pixelhunting; some items are hidden quite well plus there are ten coins lying around (side quest only, you can escape without them)...however coins are easier to find than items this time (or maybe I was lucky). So, can you get out?
The cursor is not changing, save button, one ending.

You stopped for a drink in Neat Escapee's friend's room and fell asleep. Suddenly you wake up with strange feeling - nobody's around (seemingly), weird sounds can be heard and most importantly, there isn't any door! How to get out? While exploring the room, the situation turns worse - there is definitely something wrong going on here, the room is haunted! But don't panic, the game has only one ending and it's a good one - just look around for hints and items, and don't let yourself distract by ghosts. They aren't real, anyway.
The cursor is not changing, save button, one ending.
The game is available for Android too.
P.S. Horror games are rare in escape games genre, but do exist, here: Escape from the Haunted Room by MyGames888 (earlier Noprops) or Outbreak Escape by Esklavos. Or Rusty Lake of course.
We love escape games, and our readers love talking about them and sharing hints! How about you? Let us know what you think, ask for clues, or help out other players in the comments below.


Is the prospect of having to play a horror game getting you stressed out? Solve it with wine! (Or grape juice, if you want to avoid the side effects.)
Grape Escape
Exploration
You start off facing a scrambled painting hanging over some grapes. There are some cabinets on the right, and you can open the doors in their middle to find a square tile and pictures of four bunches of grapes.
Turn right to face the locked door to the balcony. The small cupboard to the right of it has a lock with four vertical bars that extend when clicked.
Turn right. Between the two locked doors, a TV is turned off above a cupboard with a grid on its front.
Turn right. Instead of the familiar setup of cupboards from the past few months, you notice that there are just four large cupboards with different locks: a four-letter and a purple grid lock on the left, and a two-button and a four-digit lock on the right. In the middle of this wall above a purple armchair, the picture in the purple frame tilts when its corners are clicked.
Unscramble
Fix the (randomized) painting puzzle by rotating its tiles until they align.
Once you're done, the entire painting slides to the left and you can take a square tile from the compartment it opens up.
Two buttons
Look for a clue that tells you the code for the cupboard in the top right of the armchair screen.
The light green color of the buttons matches that of the grapes hanging on both sides of the TV.
From top to bottom, those bunches of grapes appear on the LRLRR sides.
So push those buttons on the lock, and open the door to find a silver key.
Unlock 1 / Exploration 2
Use the silver key to unlock the balcony door. You can almost smell the grapes from here!
The balcony has a lot of grapes, including some on the table, which also has a dirty plate on top of the stack and a square tile beneath. That leaves the four wine bottles arranged along the wall, each with its own date and barcode printed on the label.
Four digits
Use the clue from the balcony to unlock the cupboard in the bottom right of the armchair screen.
Each of the barcodes on the wine labels has four black bars, one of them much thicker then the other three.
The thick bars are in the 3rd, 4th, 2nd, 1st positions from the left of their respective barcodes.
So take the 3rd digit of the year 1986, the 4th digit of 2013 and so on, to get the code 8392.
Enter that in the cupboard door and open it to find a golden key.
Unlock 2 / Exploration 3
Use the gold key to open the door to the left of the TV, which leads into the bathroom.
Since you're already familiar with where everything is, you have no trouble opening the doors at the back right to find a square tile. Also, the shower tap works.
Washer
Clean the plate in the shower, revealing the pattern of grapes on it.
Then use that clue to unlock the cupboard in the bottom left of the armchair screen.
Straightening out the pattern of grapes, you find that the light green ones are in the center, left, center, right positions of the top, second, third, bottom rows.
So click the
-G-

G--

-G-

--G
buttons of the grid to turn them light green, then open the door to find a remote control.
Watch
Use the remote on the TV repeatedly to view a clue with five bunches of grapes, then a clue with four labeled wine glasses, then a clue with eight squares where some of them are numbered.
Four corners
Use a clue from the TV to unlock the tilty corner picture.
The bunches of grapes on TV are (roughly) red, green, black, pink, green.
In the cabinet on the first screen, the grapes with the same color are in the ⌞⌜⌟⌝ ⌜ corners.
Click those corners of the picture, and it tilts loose, so turn it over to find another square tile.
Drinks
Use another clue from the TV to unlock the cupboard beside the balcony door.
The glasses shown on screen all have different heights, and you can match the relative heights by clicking the bars 2, 0, 3, 1 times.
Open the cupboard and take the square tile.
Blanks
Use the last clue from the TV to unlock the cupboard in the top left of the armchair screen.
The squares suggest that you need to find a nine-letter word where the third and sixth letter are the same.
You can find such a word on the wineglass screen of the TV: Champagne.
The squares numbered 1, 2, 3, 4 then correspond to the letters n, a, m, e.
So enter NAME in the lock, then open the door to find the last square tile.
Complete
Now that you have all seven square tiles, you can place them in the grid under the TV and zoom in to find another scrambled image.
So solve this (also randomized) puzzle by swapping the tiles into the correct locations. A small hint: the shadows on the image point away from the center.
Once done, the cupboard to the right opens up to reveal another gold key, which you can use to unlock the door and escape!
Room Escape 27
Now with at least 27 more things to click on!
Exploration
(Hotspots, including navigation, may take a while to fully appear on screen, so you may have to wait for that before you click.)
The door to this room has a lock with four colored buttons. On the right, a small wall shelf holds a single playing card: the 9 of diamonds. To the right of that, a huge set of black pigeonholes has a digit in each one:
1(♠) 2--- 3--- 4($)

1--- 2(L) 3--- 4---

1--- 2--- 3($) 4---

1--- 2--- 3(P) 4---
Looking through them, you find a playing card (3 of spades) in the top left, a coin in the top right, a bottle of liquid in the second hole of the second row, another coin in the third hole of the third row, and a printer cable in the third hole of the bottom row.
Look under the door to find a blank piece of paper.
Also look at the edges of the pigeonholes to find 2 coins.
Turn right to find a blue shelf high up on the wall. On the right, there's a normal-looking chest of drawers. The top one has a metal plate with four card suits screwed down over four buttons. The second one has four buttons marked by arrows, the third has four digit buttons, and the bottom one has an input box you can type in.
Click anywhere near the bottom of the drawers to find a flathead screwdriver beneath.
Also check above the drawers to find another coin.
Turn right to find a glass display case with some building models inside. The case is locked and its frame held shut with cross-headed screws. On the right, you see some wooden boards which are cut to just the right lengths for a ladder.
Look to the left of the case to find a sheet with four square holes cut in it.
Also look at the lower portion of the front of the case to find a coin on the floor.
Turn right to face a smaller set of sixteen pigeonholes, which have different colors as well as numbers:
3R($) 2B($) 4Y--- 1G(n)

4B--- 3Y--- 1G--- 2R---

2R--- 4G(b) 1B--- 3Y---

4Y--- 1R--- 3B--- 2G(s)
Looking in them, you find 2 coins in the two left compartments in the top row, some bolts and nuts in the top right, a pair of batteries in the second pigeonhole of the third row, and a Phillips-head screwdriver in the bottom right pigeonhole. To the right of the pigeonholes, a printer sits on a table and you can click its right side to find a playing card (7 of hearts).
Look to the left of the pigeonholes and under the table for the last 2 coins.
Unscrew
Use the flathead screwdriver to remove the card suit plate attached to the top drawer, revealing another set of four card suits!
Use the Phillips head screwdriver to remove the glass from the display case. The game then puts you in a top-down view of the buildings, with an extra yellow rectangle and yellow circle.
Leak
Pour the liquid onto the blank paper, and a grid of blue digits appears!
Then place the sheet over it to cover all but four of the digits.
Windows
Use the digit clue on the paper to unlock the second drawer from the bottom.
Reading the blue digits from left to right (as hinted by the numbers in the black pigeonholes) gives the code 1324.
(Alternatively, the numbers in the black pigeonholes that correspond to the blue digits 1, 2, 3, 4 also form the code 1324.)
So enter that in the drawer and open it to find a spanner.
Assembly
Use the spanner (or nuts and bolts) on the wood to assemble the ladder.
Then place it so you can reach the blue shelf, which holds a chisel.
Also look on top of the shelf to find yet another playing card (2 of clubs).
Chip
Find somewhere to use the chisel.
Hint: you don't have to tear up the furniture for this.
Zoom in on the bottom of the ladder, and use the chisel to whittle down the bottom step, which reveals a six-letter word.
So type that word (LADDER) in the bottom drawer, then open it and take the toy car.
Drive
You probably have a good idea for where to use the car, but first it needs to be powered.
Simply combine the batteries and car, and now you can use it in the city model, where it turns some corners to go from one yellow marking to the other.
Path
Use the clue from the car to unlock the second drawer from the top.
As the game helpfully reminds you, the car goes in the LDLDL directions.
So push the buttons labeled ←↓←↓← to open the drawer and get a pair of glasses.
View
While examining each playing card, select the glasses to reveal a hidden digit clue. (You need to view the clues on all four cards.)
Then use those clues to unlock the top drawer.
The playing cards with the hidden digits 1, 2, 3, 4 have the heart, spade, diamond, club suits.
So push all four drawer buttons from left to right to unlock it and find a compact digital camera.
Image
Use the camera to take a photo of the colored pigeonholes.
Connect
Attach the cable and camera to the printer (clicking its left side so you don't zoom in).
Then click any of them to print out the photo.
Selected
Use the clue from the printed photo to unlock the exit door.
All but four pigeonholes come out black in the photo. The remaining four have the digits 1, 2, 3, 4, and in that order their colors are green, red, blue, yellow.
So push the 2nd, 3rd, 1st, 4th buttons to unlock the door and end the game.
Coin list:
Here's where to find all 10 coins in the order they appear in this walkthrough:
In top right black pigeonhole
In (3rd row, 3rd black pigeonhole)
To left of black pigeonholes
To right of black pigeonholes
On chest of drawers
On floor in front of display case
In top left colored pigeonhole
In (top row, 2nd colored pigeonhole)
To left of colored pigeonholes
Under printer table
In case you haven't read, the top line of red text warns you that this game contains horror. In order to preserve/ruin the element of surprise, I've split out the scares and listed them at the end of the walkthrough.
Condominium
(Literal: "One Room Mansion - Remake", but the original was also translated to "One Room Apartment".)
Drinking at your friend's house comes with its own risks. You'll have to escape this condominium by yourself, but there are some… obstacles.
Exploration
Creepy music plays in the background as you explore. Ignore the wines on the table, and look closer at the sofa in the back, which has a laptop with a cryptic colored digit clue and cushions that hide a red star toy. You can also open the curtains but there's no clues behind.
Turn right. There's a variety of books, including some that look very similar, and a box that you can move aside, even though the space behind it is too dark to see. The top shelf on the right holds some sort of trumpet that plays a horrible noise (until you click its right side to lift it and tap it on the shelf, dislodging a blue star toy). The bottom shelf holds a box with two colored star-shaped holes.
Turn right. The TV screen is off, and below it is an oddly-shaped weighing balance, whose left side is tied down and right side has a metal pan suspended over a metal plate.
Turn right. The box on the bed has two bundles of wires sticking out of it. Drawing the curtains above, you see a column of red digits on the left side of the window.
You can look under the bed, but it's also too dark to see.
Passage
Now that the trumpet is cleared out, play it again by clicking its left side.
With that fanfare, the wall to the right of the TV opens up into a corridor.
Exploration 2
The right side of the corridor is a kitchen area, where you can't turn on the sink but can zoom in on the drain. To the left of the sink, there's a normal-looking shelf with some unusual items: a wooden safe with two long red buttons on the top shelf, and also a square metal can on the third shelf.
The bathroom door on the left side of the corridor is locked.
So proceed through the door at the end to reach the entryway of the house, where you find that the main door is locked. To the left of it, you can take an umbrella from the holder, and look at another wooden box on the shelf, this one with white and yellow holes.
Red and Blue
Place both toy stars in the box under the trumpet, and open it to find a red key.
Unlock / Exploration 3
Use the red key to unlock the bathroom door.
Look in the bath to see a wooden head with some pins stuck in it, and turn it around to find a lock with four buttons that each change from "LR" to a pair of colors.
The toilet bowl doesn't have anything you can use, but you can look in the water tank to find a flashlight that's missing its batteries.
Red and Red
Use clues from the bookshelf and window (above the bed) to unlock the box on the shelf beside the sink.
The red digits on the window tells you which bookshelves to look at: the bottom three from top down and then the top three from top down.
Those shelves have red books on the LLRLRL sides.
So push those buttons on the box, which opens up so you can take a TV remote.
Screen
Use the remote on the TV to view a clue with colored bars labeled R.
Brighter
Flip the remote over, take the batteries from it, and insert them in the flashlight.
Turn the flashlight on so you can use it. You can think of three places to do that…
After moving the box on the bookshelf (again), shine the flashlight there to find a pair of pliers.
Also shine it under the bed to find a yellow ball, which you can retrieve with the umbrella.
Also shine it in the sink drain to find a blue key, which you have no way of getting right now.
Snip
Use the pliers to cut free the balance under the TV, which immediately tilts to the right.
You can lift the right pan back up to reveal four colored rectangles under a letter L.
Paired
Use the colored rectangle clues to unlock the head in the bath.
(You can move the batteries back into the TV remote to review that clue.)
Each button of the head needs to show a pair of colors, one from the L color clue and one from the R color clue:
aqua/red, green/aqua, red/yellow, yellow/green.
So click the buttons 1, 4, 8, 6 times, then push the button on the right. The head looks… different.
You can pick up an eyeball from it.
Sockets
Place the eyeball and yellow ball in the slots of the box beside the main door, then push the button to open it up and find a section of wiring.
Electronic
Place the wiring in the box on the bed. After a short delay, its metal plate slides over to reveal three buttons with colored digits in different sizes.
So use the clue from the laptop to unlock it.
You need a large red digit, a slightly smaller green digit, and a significantly smaller blue digit.
From the laptop, the digits that match read 2, 9, 6.
So enter 296 in the box and open it to find a tiny coin.
Pop
Use the coin to open the can, and click the can again to pour out a pair of tweezers.
Pluck
(Move the batteries back into the flashlight.)
Shine the flashlight in the sink drain again. Now you can use the tweezers to pull out the blue key.
Ending
Use the blue key to unlock the door and escape.
Thankfully, your friend has already prepared some comfort food for breakfast!
List of scares
Most of these events only happen once, along with a sound effect.
Behind curtains on first screen: handprints appear
Behind box on bookshelf: hand reaches out
Trying the main door: doorbell rings repeatedly
Wooden head in bath: the head itself is creepy, even after you solve it
Hand in toilet bowl: extends after you click it
for some reason on "condominium" i'm having a problem
when i get to moving the box, then shining the flashlight at the empty space, all that happens is a hand comes out. there is no pliers. also the ball under the bed and key in the sink do not show up either when shining my flashlight on those parts.
I don't get it.
i apologize. turns out
I forgot to turn the flashlight on. i thought i did. Anyway i figured it out.
Thanks as always for your awesome walkthroughs kk :)
Update