
 Welcome! New Weekday Escape is here, relaxing and entertaining!
You start locked in tomoLaSiDo's room, where are hidden six blue-and-white capsules (necessary for escape) and five little fans (side quest); however, you have to deal with the fans in the main game link too. Then Kamonosoukutsu - no, not a new developer - just one more alias of Kamotokamotokamo - takes you to a small café and makes you hungry with all the delicious desserts they offer here. MysteriousBox wants you to escape strange place looking quite like spaceship interior - but after you get out of here, you aren't in the space but in Shiesuta's living room. And you stay here for a while, as puzzles are many.
Have a good time and enjoy!
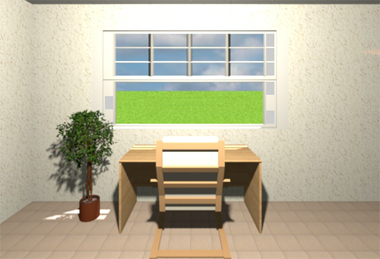
tomoLaSiDo's room is without nice round window, but with cheerful piano music, obligatory graffiti on toilet wall and the same potted plants as usual. Your goal is to assemble the exit key, or precisely, find six balls with its parts - the key assembles by itself. Besides, there are five portable fans you can find and take with you and notice, that this time you can zoom on items in your inventory and examine them.
The cursor is changing, no save button, one ending.
Kamonosoukutsu isn't a newcomer; it's well known developer Kamokichi, later Kamotokamotokamo, and later Den of the Kamo. Their games has always worked like small hapiness pills, soft and tender with lovely music and good puzzles - and this one isn't an exception. Recently they've added cute animals, sometimes not easily recognizable - is this sleeping creature a duck? - but always friendly and helpful. Can you escape?
The cursor is not changing, no save button, one ending.
The game is available for Android too.
Note: use Explorer if you meet problems with Firefox
MysteriousBox is back quite quickly with a new game, which consists of only two scenes and there's just one slot for items in your inventory - but puzzles are first-rate and also rare kind (these days) with their retro style and an emphasis on thinking and spatial orientation. Pleasant and clean surface, and also big game screen contribute to comfortable playing - even without changing cursor absolutely no pixel hunting. More of those, please!
The cursor is not changing, no save button, one ending.
Shiesuta took their time to create a new game (last one in WE N°162, almost year ago) - and it worth waiting for. We get classical escape game of high quality with many puzzles which require brain activity, and very good looks. The game's default setting has the music turned off so if you feel for relaxing jazzy music (Tesshi-e's games style) use the button in lower right corner and go! You may spend some time with the puzzles and with the lack of save button it's better to reserve time for playing.
The cursor is changing, no save button, one ending.
We love escape games, and our readers love talking about them and sharing hints! How about you? Let us know what you think, ask for clues, or help out other players in the comments below.


Escape Challenge 66: Room with Portable Fans
Exploration
You know the drill by now: window, desk, potted plant. This time, the rectangular window has different patterns on its left and right edges, and the desk has a key piece (in a capsule) on top.
Turn left to face a table with a yellow rectangle on top. Looking closer, you find three colored fans placed against the yellow background. On the wall above, a diagram shows you how breathing fan air through your mouth cools your brain down. On the left, there's a chest of drawers which have four-color, three-digit and three-color locks.
Look under the table to find a switch.
Turn left to face the locked doorway out. The smaller table on the left has a tube with its top and bottom of the tube both open, but the balloon inside the tube appears to be trapped along with its attached capsule. On the wall above, the clock has no hands but instead is divided into concentric circles with eight yellow/white segments each.
Turn left to face a machine which- wait, is this machine wearing sunglasses? The black piece moves up when you click it, hopefully that will help you get the capsule trapped inside. On the right, a wall box holds a portable fan (item), and the bin below is empty.
Follow the corridor on the left into the toilet, where you can sit down, look right, look up, and look left at a drawing of someone yelling into a fan ("Ah ah, can you hear me").
Three digits
Use a clue from the three colored fans to unlock the middle drawer.
From left to right, the fans have 5, 4, 3 blades, so enter that in the lock to open the drawer.
Inside, you find another portable fan and a key piece.
Three colors
Use the other clue from the three colored fans to unlock the bottom drawer.
You'll notice that the just entering the colors of the fans doesn't work. What's the trick?
Reach under the table and turn the fans on, making the blades appear different colors against the yellow background. This effectively mixes the original blue, red, yellow colors with the background to form green, orange, yellow.
Click the buttons 2, 3, 1 times accordingly, and open the drawer to find a key piece.
Now that you're done with the colored fans, you can click them to add 3 portable fans to your collection.
Push up
Use a clue from the room to raise the black piece on the face machine.
Since the piece is black, you need to look at the darker rectangles around the window. Since you're trying to move it up, you need to read the clue from bottom up. (The triangular nose also hints at this.)
The dark rectangles are (from bottom to top) on the RLRRRR sides, so click those edges of the black piece.
With the sunglasses off, the machine gives a surprised look, and you get the key piece from its open mouth.
Cool off
You might notice that the cursor still changes over the machine's circular mouth. What else can you do there?
The head diagram inspires you to put the fan up to the hole.
Instead of warm air, four colored streamers come out of the nose!
Four colors
Use the clue from the face machine to unlock the top drawer.
Click the buttons 4, 3, 2, 4 times to turn them red, green, blue, red (matching the streamers), then open the drawer.
Inside, there's another key piece and portable fan.
Push down
If you try to use your portable fan to blow the balloon down, you'll find it only sinks a bit.
What if we tried more power? Examining the fan, you find that it has a stronger power setting. But even on high power, the capsule doesn't reach the bottom of the tube.
Use the clue from the clock to unlock the full potential of the fan.
The sectors numbered 1 to 8 have 2, 1, 2, 2, 1, 2, 1, 1 yellow regions in them.
So click the UDUUDUDD buttons on the fan, which falls apart! (The game won't let you do this if you haven't already completed the previous drawer puzzle.)
Use the fan on the tube again. This time, the handle is long enough to push the key piece all the way, and you retrieve both the key piece and handle.
Exit
Now that you have the entire key and all 6 fans, you're ready to leave the room through the door!
Item list
6 key pieces:
Top left: in top drawer
Top middle: in middle drawer
Top right: in bottom drawer
Bottom left: in tube
Bottom middle: in machine
Bottom right: on desk
6 portable fans:
1 (usable) in wall box
1 in middle drawer
3 on display
1 in top drawer
We last saw this duck in Relaxation Escape, where his room was labelled Kamo-ni's Room.
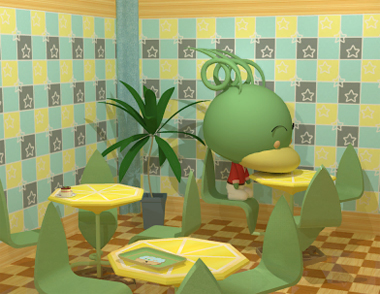
Escape from the Cafe
The slow music of this café perfectly captures my energy just after waking up.
Exploration
(Several hidden objects can be found by pixel-hunting, but I'll omit them until we reach their clues.)
Let's check on the duck (I'll just call him Duck) sitting at the back table, where he's too soundly sleeping to tell you what he wants. On the tables closer to you, there's a pretty cake and a tray with a picture clue.
Turn right to face the window (you can't see anything outside) which has some yellow and orange chairs lined up before a bar. The leftmost chair has a small creamer packet labelled Milk, and it faces a menu listing the prices of four items. From here, you can click the right arrow to slide your way over to the menu at the right end of the table. It looks very similar…
Flip the left menu around to find a duck token attached to the back.
Flip the right menu around to find a diagram with some colored squares and rectangles.
Moving on! Turn right to face the locked wooden door. Beside it, there's a poster advertising other games, some of which are currently Android-only. The top left corner of the poster looks brighter than the others.
Turn right to face the counter area. Note the stuff along the back wall which we'll come back to later. On the right side of the counter, you see a display case with three cakes. Clicking on the cash register zooms in on its grid of Coffee buttons which flip between green and orange backgrounds.
Back out from the register, and you find yourself behind the counter. The locked cupboard beneath requires a three-digit code. On the left, you can view the cake display from the back to find the case locked.
Turn left. Even though you see two cupboard doors, there's only one two-button lock with a hexagon, arrow, diamond above the buttons.
Turn left. Even though you see two cupboard doors, clicking either of them leads to you opening the left one to find a duck token. There's also four stacks of trays on top and a coffee grinder whose handle can be moved to three different positions.
Turn left to find shelves with bags of coffee in two different designs as well as coffee cups in several different colors.
Exit the counter area with the arrow on the left of the screen, and turn right to find a blue balloon floating near the ceiling.
Hidden 1
The diagram on the back of the right menu is sideways, as you can tell from the pattern of the coffee bags and the furniture beneath. After doing the appropriate mental rotation, you find that the arrow mark is painted on the fourth bag in the last row.
Clicking that bag, you find that there's a duck token on the back.
Blend
Use the clue from the coffee bags to unlock the cash register.
Five of the coffee bags are different from the others. In particular, their label has Coffee written on an orange background instead of green.
Click the buttons corresponding to the positions of those bags, in the fifth position of the first row, the first and fourth of the second row, and the second and third of the third row.
Once done, the drawer springs open and you find some sort of green bear-shaped lever inside.
Claw
Use the lever on the top-left corner of the poster to pull out the nail.
The whole poster comes off and reveals a slot for seven duck tokens!
Two buttons
The clue for the two-button cupboard has two shapes. Where have you seen those shapes, what does the arrow mean, and which buttons do you need to press?
The hexagon and diamond shapes appear on the stands for the menus by the (right and left sides of the) window.
From right to left, the chairs along that table are orange, yellow, orange, orange, yellow. Since the left button flashes yellow when clicked and the right button flashes orange, you need to click the RLRRL buttons to open the cupboard.
Inside, you find baskets of forks and spoons, and you can pick up a fork.
Meal
Use the fork to eat the cake, and you find a duck token at the bottom.
Hidden 2
The clue from the cake tray leads you to the front of the cake display, so zoom in on it until the down arrow appears at the bottom of the screen.
Click just above that arrow to open the hidden compartment, which contains a duck token in front of a clue with colored and black rectangles, along with a crossed-out three-digit number.
Three digits
Use the clue from the hidden compartment to unlock the cupboard under the cash register.
The colors in the clue match the colors of the cups, so you should look at the green and pink cups, then the green and gray ones, then just the green ones.
But if you just count them, you get 6, 8, 3 cups in those groups, which the crossed-out number tells you is the wrong code!
Instead, notice that the groups of cups spell out the digits 4, 0, 1.
Enter that in the cupboard, and open it to find a handbell and a diagram telling you the next step.
White
According to the diagram, you need to pour the milk onto a stack of four trays.
So use the milk on the second tray from the left to reveal a clue with six squares around filled circles with lines sticking out at different angles and an arrow running down the left.
Directions
Use the clue from the tray stack to unlock the coffee grinder.
Since the handle of the grinder starts in the middle position, you only need to move it to the top, bottom, middle, bottom positions by clicking on those circles.
Once the drawer is open, pick up the duck key from inside.
Unlock
Use the duck key to unlock the cake case. The only thing you can do inside is lift the empty tray to find a duck token.
Awaken
Use the bell on Duck to wake him up, then add him to your inventory by clicking him!
Pop
Place Duck on the floor under the balloon, then climb up and retrieve it. (Afterwards, Duck goes completely missing from the room.)
Then use the nail to pop the balloon, which gets you another duck token.
Complete
You should now have all seven tokens. Place them in the slot beside the door, which opens so you can escape!
The Congratulations screen has a picture of Duck adding the milk to his coffee from the tray.
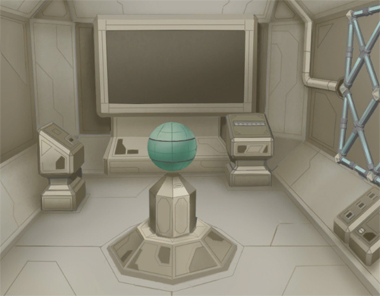
Future Room Escape
MysteriousBox gives us a glimpse into the escape rooms and puzzles of the future. As a non-future solver who had trouble with some of them, I hope I didn't miss any clues!
Exploration
The globe in the middle of the room catches your attention with its three rotatable parts and the card slot on its stand. From left to right across the walls, you see an octagonal hole in the wall (with some slots on the sides), a pedestal with a three-digit lock, a huge screen that's turned off, another pedestal with 1000000 written across its buttons which can be pushed down, a network of pipes which appears to have a part missing, and a three-letter lock below that with the letters written vertically.
In the lower left corner, you spot a power button mark with a red line entering 6 concentric circles.
Turn around to face the locked exit door with a question mark carved into it, which has a card slot beside on the right. There's also a weird clue on the left with some red symbols over white symbols in white squares.
Mega
Use the clue beneath the octagonal hole to unlock the pedestal under the screen.
The line and circles match up with the digits of 1000000. If you consider that 1 is usually written from the top down, it's natural to draw the other 0s from the inside out, following from the endpoint of the 1. (Alternatively, if you try reading the digits starting from the middle line, you'll end up reading the circles from inside out.)
Since the line is red and the 2nd, 4th, 5th circles from the inside are red, you need to click the 1 and the 2nd, 4th, 5th circles from the left:
1000000

RWRWRRW
Once you have it correct, you hear a beep and can look at the screen for another clue.
Click the screen for another clue, then click it again for another clue, then click it again for the option to save all the clue images next to your inventory for easy access.
Quarter
Figure out what the squarish white and red symbols mean.
You can get the arrows and red parts from the clue beside the door to match the markings on the screen by simply rotating them to the right, left and upside-down. (I strongly recommend you take out a piece of paper or image editor and try this.)
The symbols look a bit more like digits now, but some parts are still off.
What about those marked right angles on the screen? The red shape in the left box now only aligns with one side of the right angle, and the same is true for the other boxes.
(Here's an edited screenshot which shows what I'm referring to.)
You could make the red piece in the left box align with the other side of the right angle by rotating it clockwise through an angle of 90 degrees. When you do so, the symbols in the left box form the digit 3.
Similarly, the red piece in the middle box has to rotate counter-clockwise, and then it forms the digit 8, and the red piece in the right box has to rotate counter-clockwise, which would make it form the digit 9.
So enter 389 in the pedestal to the left of the screen, which extrudes a straight section of pipe.
Tubes
(In case you're interested in how the pipe looks, you can click the item box to examine it.)
Fill the empty spot in the pipe network with your own pipe (it's automatically selected so you don't have to). Some of the spots now light up in different colors.
So use the second clue from the screen to solve this puzzle.
Each colored triangle in the clue indicates a point in the network, a direction out from that point and how many intersections to move in that direction.
So for instance the top row of clues connect green to purple, yellow to aqua, red to yellow and purple to red. Drawing those out, you find that they form a letter M.
Similarly, the other two rows spell out Z and Q, so enter MZQ in the lock beneath, then push the open button to find an octagonal chip with a crystal dome on its front.
Core
Place the chip in the left wall on the starting screen, and it makes a loud crashing sound and flashes a light in your face. As you step back, you find that the beam of light illuminates the entire left half of the globe.
So use the third clue from the screen to fix the globe.
Notice that the globe pieces rotate towards the west (left), which means the side that faces you (with the people, tree and bird) is about to enter the light. In other words, it's experiencing dawn.
Matching the numbers from the screen up to a 24-hour clock, you see that 6 o'clock is on the day/night line, while 9 is on the day side and 3 is on the night side.
(Fun fact: the region separating day and night is called the terminator or twilight zone.)
So click the top, middle, bottom pieces 4, 3, 1 times to put the robot on the line, the thunder on the night side and the bird on the day side.
Then push the triangular button on the globe stand to eject a metallic card.
Credentials
Swipe the card on the door lock, which asks for a four-digit code.
You still have the card, so you should probably take a closer look at it.
The back of the card has four rows of word pairs separated by ∞ symbols. How do you get digits from those?
Let's try a little word association. Infinity? A loop? How about repeating the words? You'd have to wrap around from the second word to the first.
If you read the second word in each row and then the first, you'll find hidden number words. For instance, BIT WORLD contains the spelling of the number TWO.
Similarly, the other lines have SEVEN, ZERO, SIX split across the word boundaries.
Enter 2706 into the lock, then push the button to open the door and leave.
Congratulations! You passed the test, which probably makes you the top android now.
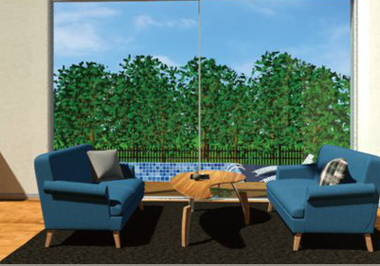
Country House
The background music here is basically the Mii Channel Theme of bossa nova, which is to say it's really great for both relaxing and solving puzzles to.
Exploration
You start off facing a table laid out with an empty glass (and cookies!). You can lift the couch cushions on both sides, but only the left one hides a small pointy wooden stick. The large window/glass doors of this house looks out over a pool, but you can't get out that way. (If you can read Japanese, Shiesuta has some words to say about swim classes in the text above the game.)
Turn right to face a door with a lock you don't know how to operate. On the left, a tree branch (sculpture) is mounted to the wall, with birds on some of the branches.
Turn right to face three picture frames showing a plant getting watered, a moonlit night, and a chain of party flags. Your escape instincts tell you to check the frames, and you find that the middle one tilts when you click its corners. Beneath, there are three pairs of cupboard doors for a total of six. The first has a four-digit lock, the second is unlocked and you can take an empty spray bottle, the third is bolted shut, the fourth has four buttons which change the patterns on their pictures, the fifth is unlocked but the compartment is empty, and the sixth has three green buttons that turn on and off when clicked. You also see a green box which you can access by clicking above the fifth and sixth doors. It has four buttons and a drawing of a bird. Finally, you see a sparkly potted plant hanging in the corner.
Turn right to face a locked door, a pin board and a curved wall. As you approach the wall, you notice a four-letter box on the upper shelf, and some items on the desk: a calendar with some days marked by colored triangles, a clipboard with some familiar objects drawn on it, and a book with several clues in it (flip the pages to see all of them).
Chirp
Use the clue from the birds (and the book) to unlock the green bird box.
The first page on the book hints to you that only the height of the birds matters, and you can completely ignore the branches.
The birds sit on four imaginary horizontal lines, and reading from left to right, you find that they sit on the 4th, 1st, 2nd, 1st, 3rd, 3rd lines from the top (143422 from the bottom).
So push those buttons to open the box to find another box — a matchbox, to be exact.
Stylus
Open the matchbox up, and then use it on the pointy stick to char the tip.
Then use this makeshift pencil on the clipboard to reveal four patterns, and then use that clue to unlock the fourth cupboard.
Click the buttons
2 3

2 1
times to produce wavy stripes, glitter streaks, a kanji for (shaved) ice, and a star.
Then open the cupboard to find a rope.
Snake
Use the rope on the pin board, and it wraps around most of the pins at right angles.
What could this be a clue for, and how do you read it?
Each of the right angles represents a corner you can click on the moon picture. However, only those corners on the red pins are part of the code.
So click the ⌜⌜⌞⌝⌟ ⌜⌝ corners of the picture, which slides aside to reveal a round box held shut by screws.
Letters
Use a clue from the book (as well as several other places) to unlock the box on the shelf.
Flip to the second page of the book with the letters. The triangle at the top left tells you to read each column downwards, and you find that they are the first letters of the colors blue, green, red, yellow.
But that's not all. Where can you find colored triangles?
The party flags in the picture frame are colored triangles, and the blue, green, red, yellow ones have the letters M, O, C, E.
Also, the calendar has squares marked by blue, green, red, yellow triangles, and those are numbered 6, 5, 2, 11.
Now we just need to combine these, and for that we need to look at the book again.
The circled clue reminds you that you can get from F to I by adding 3. In this case, that means counting three letters forward in the alphabet (F, G, H, I) or converting from letters to numbers and back (F=6, 6+3=9, 9=I).
Using the same method, you find
Blue: M+6=S
Green: O+5=T
Red: C+2=E
Yellow: E+11=P.
So enter STEP in the box to open it and find a flathead screwdriver.
Unscrew
Use the screwdriver to open the round box, and get a golden key from inside.
Unlock / Exploration 2
Use the key to unlock the door beside the pin board.
You spot some dreamcatchers (?) hanging on the left above a table with a stack of plates and a box with two shiny golden buttons as well as a power outlet on the wall. The cabinet on the wall above has one wooden door and one glass door, both secured by the same lock in the middle. There's also a working sink and some kind of rod on the floor with a hole in one end.
Turn right (you have no choice!) to face the back, where there's a shelf of cooking essentials. Don't worry about having to cook, for now all you need is a lemon from the basket on the bottom shelf. On the right, there's another cabinet with a four-digit lock, and a contraption mounted on the wall beneath that appears to be missing a part.
Triple
Use the clue from the dreamcatchers to unlock the rightmost cupboard.
The buttons all start green, which suggests that you need to read the dreamcatcher clue from top to bottom, row by row. Whenever a row is missing a dreamcatcher, you need to turn the button in that position yellow.
If that's too complicated to keep track of, all you need to do is observe the difference between each pair of adjacent rows. The sequence of buttons that you need to press is RLRLCRC.
The cupboard door swings open and you can take a box fastened shut with bolts.
Aerosol
Fill the spray bottle in the sink, and then apply it to the left picture, making a blue puddle and four digits appear on it.
Where does that clue go?
Since you got this four-digit clue from water, you should use it to open the leftmost cupboard (which has a blue button).
Enter 7903 in the lock, then open the door to find a grappling hook.
Height
If you try using the rod to reach the potted plant, the game tells you it's just a bit short.
So attach the grappling hook to the end of the rod, and use it on the potted plant.
The game tells you that something dropped on the floor, so look at the floor beneath the pot to find a silver key.
Unlock 2
Use the silver key to unlock the glass cabinet in the pantry.
You can open the glass door to look at three cups. Nothing special there, but you can open the wooden door instead to find a drink bottle.
Fizzy
You can't do much with the drink bottle while its cap is still on.
So use the screwdriver to uncap the bottle, and then pour it into the glass on the first screen.
Instead of rising to the top, the bubbles in this drink fly off to the left and right.
So use that clue to unlock the two-button box.
Following the directions of the bubbles, click the LRLLRLR buttons, and open the box to find a sharpened knife.
Citrus
Use the knife to cut the lemon in half.
Wait, what's this? Pull out the hexagonal wrench (or hex key) from the lemon half.
Wrench
Use the hexagonal wrench to remove the bolt on the third cupboard, then open it and take the toaster.
Also use the hexagonal wrench to open the box in your inventory to get a loaf of bread.
Heated
Plug in the toaster by using it on the power outlet.
Then slice the bread with the knife and place it in the toaster.
All you have to do is wait, and as usual that means leaving the pantry and reentering.
The toast has popped up, and clicking on it zooms in so you can see the clue burnt into it.
Math
Use the last clue from the book to unlock the cabinet beside the pantry shelf.
Hint: how are the number grids similar, and why?
The clue with mathematical operators is drawn in a bread outline, so you know it's related to the numbers on the toast. In particular, you notice that the lower-left numbers of each pair of grids are equal, just as the equals sign on the clue predicts.
Furthermore, where the minus sign appears (in the top right), the number in the right grid is less than that in the left grid, and the opposite is true for the plus sign. However, this is not the whole story, since the top left numbers don't follow the pattern with ÷.
Nevertheless! you can try to find the required equations. If you try this with the top pair of grids, you find that the numbers on the right grid are formed from those on the left grid by applying the operations shown in the clue:
2=8÷4, 1=8−7,

4=(4), 8=7+1.
and the second pair of grids follow the same pattern:
3=6÷2, 5=6−1,

2=(2), 9=1+8.
so therefore the third pair of grids must work out as follows:
4=8÷2, 5=8−3,

2=(2), 9=3+6.
Just one more step to go! Now we can look at the left page of the book.
You may recognize this drawing as a game of amidakuji, which means you need to trace paths along the diagram from top to bottom, passing over every horizontal bridge they encounter and moving downward otherwise. (Since this rule is symmetric, you can also start tracing from the bottom.)
Before you start tracing, substitute the solution you just got for the third grid into the card suit positions: ♦♣♥♠ = 5294.
Instead of tediously reading the diagram, I'll follow all four paths at once by starting with the top numbers and applying the effects of the bridges as we move down the diagram:
Starting clue : 5294

Swap two pairs: 2549

Swap one pair : 2459

Swap two pairs: 4295

Swap one pair : 4925

Swap one pair : 4952
Enter 4952 in the lock, then open it to find a lever.
Activation
Place the lever in the slot beneath the cabinet you just unlocked, and pull it. What was that mechanical clunk?
As you walk out, you notice a sailboat outside the window. (And yes, the pool is no longer empty.)
Check the lock on the main door to find that the sailboat and lock icons have changed to a grid of letter buttons!
Now all you need is the last password…
The password is written on the sailboat, so just click the buttons spelling VACATION, and the door swings open so you can leave!
The end story doesn't mention whether you get to play in the pool, but just looking at the boat sailing freely in the wind makes your troubles float away.
Update