
 The 200th Weekday Escape is here fully loaded with awesome games!
By a coincidence, we got several great games to this round anniversary. From Amajeto one more escape under the full moon on Halloween night with glowing pumpkins everywhere around. From Rinnogogo charming and poetic story about cats' emotional life and magic. From Detarame Factory lovely game about a girl, her chipmunk and a hot-air balloon, and from Flash512 another dungeon escape from a medieval castle. Bonus grow game by Jon Schubbe is almost as old as JiG and much, much fun!
Have a good time and enjoy!
Halloween is over, but Amajeto's created one more game with pumpkins, spider webs and ghosts, and very well-done. So once again, you return to the room on trick or treat evening and have to find two important keys to escape - from the door and from the courtyard gate. Apart from jigsaw puzzle, various codes and left-right puzzle, there are ten candies you need to find. Can you escape?
The cursor is changing (its color), no save button, one ending.
Beautiful and strongly atmospheric Rinnogogo's game narrates short story of a black cat (or charmed boy?) and a girl who lost her hat. Poetry, georgeous art, solving puzzles and cracking codes work together very well and I was really sorry that the game isn't longer. I can easily imagine full adventure game in this style
You (the black cat) need to return the hat to the girl you love, and on your way open few boxes and locks, and also bribe one old man. Will you find the way? Will you meet the girl?
The cursor is not changing, autosave, one ending.
The latest game by Detarame Factory is a remake of their older one, Fukuramu, with more puzzles, better graphics and the same cute chipmunk. You are a girl locked in a sea house, trying to escape with a little help of your pet. Don't underestimate his role, he helps you more than once! By the way, did you know what chipmunks dream about? Probably not but you will, after finishing the game! Not what you'd expect.
The cursor is not changing, no save button, two endings.
P.S. The 'two vessels' puzzle is quite frequent, as in Sphinx (2015) by Kotorinosu. Really worth replaying and stay tuned - their new game is coming soon!!
These dungeons by Flash512 are really nice and almost comfortable, and very, very clean; stones are like after in-depth cleaning with high pressure washer. Or it's pseudo-medieval castle finished recently. Or you are the first prisoner. Anyway, escaping is linear, you find item, use it and you get a clue and/or item for another puzzle - if you don't know how to continue, follow your cursor as few active spots are not obvious. Be observant and you'll be free soon!
The cursor is changing, no save button, one ending.
I was thinking about special game to this 200th WE trying to recall my first experience with JiG and remembered, how I had found an interesting one (many years ago), and after finishing it I was totally awed...it was my first Eyezmaze. I started frantically searching for more...MORE...and that's how I discovered JiG. That's why the bonus game is a grow one.
Jon Schubbe's game (inspired by Eyezmaze's grow games) consists of three time limited levels, each more difficult than the preceding one, having more objects to combine. You are an outlaw fleeing from Kingdom of Nudists, apparently, trying to start new life overseas in big style - not just find a place to stay and make your living somehow, but establish your own kingdom! It's not an easy game, and it takes time to figure out the right sequence of steps; however, it's rewarding. Can you get over the sea and escape pirates, manage to defend the new land's coast, and set up your kingdom, capable of defence against King's army?
P.S. Talking about grow games, don't miss psychedellic Poco Parco, it's fantastic!
How time passed by:
Weekday Escape N°1 Weekday Escape N°50 Weekday Escape N°100 Weekday Escape N°150 (the last game link is broken (Moon) and I haven't found working one yet, I'm sorry - the link for Android works though)
We love escape games, and our readers love talking about them and sharing hints! How about you? Let us know what you think, ask for clues, or help out other players in the comments below.


Just one word Chrpa for this Weekday Escape: thanks!!!!
There is a problem in Castle Dungeon Escape.
I had the knife, the stool, and the stool leg. When I "repaired" the stool by combining the leg and the stool. The repaired stool went into the inventory space occupied by the knife.
If this happens you will have to restart the game.
To keep this from happening, repair the stool before getting the knife.
Thanks! Happy to see players like it!
Hallo Candies
In case you forgot your sugary fix on Halloween, Amajeto makes sure you collect candies this time.
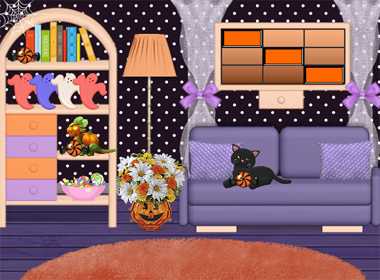
Exploration
The room is all decked out in Halloween colors, even including the black cat which you can take the candy from. While you're looking at that couch under the grid with missing pieces, move the right cushion to find another piece of candy. On the left side of the screen, there's a lamp you can turn on to make candy appear, as well as some shelves with various items: there's candy next to the books which contain a clue, four ghosts in rather non-Halloweeny colors, a pumpkin dragon guarding another piece of candy, and four drawers with a four-color lock, a two-button lock, a four-letter lock and a square tile.
Turn around to face the locked door. There are four colorful buckets of candy (you can't take, because they're the wrong type) on a cupboard, and you can click the buckets to change their designs. The cupboard itself only has one drawer you can open, and it contains a piece of candy, but the cupboard doors have locks with four buttons and four pairs of colored squares. More candy overflows off a carved pumpkin on the right, and you can take one from the pile on the floor.
(Examine the square tiles and candy in your inventory. You should have 1 tile and 7 pieces of candy.)
Big and Small
Use the clue from the buckets to unlock the right cupboard door.
Looking at the designs on the buckets, you find two similarities: the initial set of patterns has a white background in the circle and different colored backgrounds outside, and the other set has a gray background outside and different colored backgrounds inside.
Following those ordered backgrounds, you should make the outer squares purple, red, green, blue by clicking them 1, 0, 3, 2 times, and then the inner squares yellow, blue, red, purple by clicking them 2, 0, 3, 1 times.
Then open the cupboard door to find a flashlight and a square tile.
Codeword
You need a four-letter code to open the third drawer on the first screen, but there don't seem to be enough clues around to form a code. Where do you need to look?
The symbols on each bucket combine to form a digit, and the book hints at how to turn numbers into letters.
Observe (or guess and then check) that T is the 20th letter of the alphabet, so the digits 8514 formed from the symbols on the buckets represent the 8th, 5th, 1st, 4th letters of the alphabet: HEAD.
Enter that in the lock and open it to find a key.
Unlock / Exploration 2
The key opens the door to the yard. In addition to the locked door, you notice 2 pieces of candy and four unlit candles along the path. Is that really all?
Light
The changing cursor indicates that you can do something with the hollow log, so use the flashlight on it (after turning it on) to find the last piece of candy.
Four colors
The row of ghosts on the first screen would make a good four-color code, but if you try it in the drawer directly beneath you find that those colors aren't available. What's the trick here?
Shine the flashlight on the ghosts, which gain a yellowy tint from the light.
Now you can enter the color code: orange, green, yellow, orange (4, 3, 2, 4 clicks), and then open the drawer to find a lighter.
More light
Examine the lighter and open it up, then use it to light the four candles outside.
Four corners
Use the clue from the candles to unlock the left cupboard door.
The left page of the book tells you the correct order. Following the stripes, you look at the yellow, red, yellow, blue, green, yellow candles which are in the LR UL LR UR LL LR positions.
So click the⌟ ⌜⌟⌝ ⌞⌟ buttons to open the door and find a bright orange Halloween bucket.
Treat
Place all 10 candy pieces in the bucket, and its eyes light up.
So use that clue to unlock the second drawer on the first screen.
Since the buttons on the drawer point down instead of up, you need to invert the clue. Reading it upside-down swaps left with right, so the flashing lights indicate the RLLLR buttons.
Open the drawer to find the last square tile.
Complete
Place all three square tiles in the grid device, which shows a picture that you have to unscramble by swapping its pieces into place.
Once done, you get a key from it. Use that key to open the gate and escape!
The Windows: Cat Fell in Love
(Direct translation of the subtitle: Story of a Cat Fallen in Love)
A black cat wants to return a girl's hat, without scaring her.
Exploration
After clicking the hat to take it, you're ready to explore.
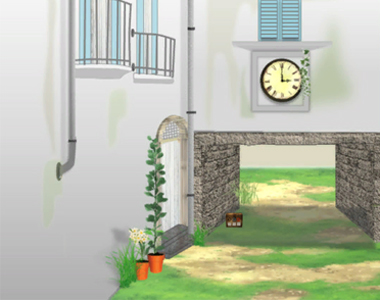
A clock hangs on a wall over a tunnel with a three-letter locked box on the ground. The box has black, blue and red circles over the letters. There are two hotspots to the left: a window with double wooden doors that you can't open, and a pair of potted plants with a coin in the left one.
Turn right to find a tree with a bucket next to it, as well as a bluish chicken with a brush in its hand/wing and a keypad on its front, sitting next to a blue manhole cover marked with the letter W.
Turn right to find a man sitting on a bench, who only asks you for a jar of sake.
Turn right to face a field. There's a pink-tinted glass box with a keyhole, a table with a palette next to a painting of flowers, and a no-stopping traffic sign.
Click just behind the tree to continue to a fence with an arrow and some letters painted on it. The ground is stained in some places.
Go right to find a padlocked door with a yellow outline. (You can return to the earlier screens by going left.)
Circled
Use the clues around the game to unlock the three-letter box.
The black, blue and red circles appear on the clock, manhole cover and traffic sign, and the shapes on them can be interpreted as letters: the hands on the clock form an L and the cross on the sign forms an X, so that the entire code reads LWX.
Enter that in the lock, then open the box to find a chick with a pink bow and a paper note folded into the shape of a plane, with several numerals written inside.
Three digits
Use the clue from the paints and the painting to unlock the chicken's keypad.
The flowers on the painting are pink, yellow, green, the corresponding paints are in the 2nd position of the lower row and the 2nd, 3rd positions of the upper row, and the digits in those positions form the code 286.
After entering that code, the chicken now has an egg in its lap!
Click the egg to examine- whoops, it cracked. But there was a golden key inside!
Unlock 1
Use the key to unlock the padlock on the yellow door.
Inside, you see several numbered translucent containers, a stick with a blue bag on its end, and a sake machine that requires 2 coins to operate.
Open
Use the stick to knock on the window, which opens up. (That's what it looks like, at least.)
The chicken now carries a chick on its lap!
Couple
Use the chick you have on the one sitting on the blue chicken. As they leave, you find another coin.
Drink
Use both coins on the sake machine, then push the labeled button to dispense some sake.
Give the sake to the man, who immediately disappears from the screen. With him gone, you can take the bench, and see a locked panel which needs a typed code.
Alphabetic
Place the bench in front of the wall of letters. Only four letters are still visible through the square windows of the bench.
A hotspot lights up under the bench, letting you look under it to find a note with some pictorial instructions.
Type the four-letter code from the wall (ROAD) into the panel where you found the bench, then open it to find a blue valve.
Turn that valve, and you hear the sound of water filling the fountain.
Grow
Fill the bucket in the fountain. Now you can follow the instructions on the note.
Go back to the first screen, and place the hat on the taller plant. Then pour the water into its plant pot.
When you back out, you find that the plant has grown up to the window! Checking the window, you find that there's still no response from inside.
But on the screen with the paintings, you find a new visitor who you seem to recognize from that other game, and he's carrying an umbrella and a box with three buttons.
Three buttons
Use the clue from the colored containers to unlock the box the creature is carrying.
The numbers 1 to 6 appear on containers with different shapes, and those shapes appear above the CLRRCL buttons.
So push those buttons to open the box, and take the pink key from inside.
Unlock 2
Use the key to unlock the pink box, which contains a magic potion. No, this one doesn't color you blue, it just transforms a cat into a less frightening human.
Pick up the red ball from the ground.
Knock
Throw the ball at the window, and then look in the window again to end the game!
Fukuramasasete
"Expand various objects to escape!"
The title (Fukuramasasete Escape) uses a conjugated form of the verb fukuramu, which (as you'd learn from the English intro to the original) means "swell out".
Exploration
You start the game with the squirrel on the title screen, who stands on a colorful mat and holds a blue bauble but doesn't want to hand it over for some reason.
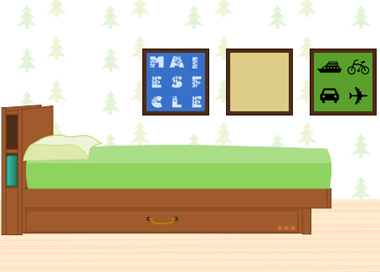
Turn right to find a bed with a three-digit drawer beneath as well as a helpful book stored in the headboard. Lifting the pillow, you find a packet of kirimochi (a rectangular/cuboidal slice of mochi) in a red wrapper. The pictures on the wall are just weird: one is a mess of letters and snowflakes, one is completely blank, and one has transportation pictograms as well as buttons at the corners that jiggle it.
Turn right to find a sink and a locked cupboard beneath with doors that have five-letter and three-color locks. There's also a jumbled image with arrows and the same pictograms visible, what appears to be a light switch covered by a panel fastened by screws, and a locked exit door.
Turn right. A circular floor hatch covers a valve handle which can be turned either way. A potted plant grows under a circular window which only has a view of the ocean.
Turn right to face some shelves with snowman figures on them, as well as three different-colored boxes with colored lids. The triangular one has buttons with hiragana on them, the circular one has buttons that turn red, and the square one has buttons with dots and pictures. The lower-left compartment is empty, and its back wall moves a little when you click it. To the right of those shelves, there's also a heater of some kind.
Turn right to face two locked wooden cabinets. The left one has kaomoji emoticons on its buttons and the right one has four sliders. There's also a cylindrical machine with a golden keyhole, and blue arrows pointing upwards from it. Following those arrows, click the top right corner to look up and find another kirimochi wrapper on a high wall shelf.
Growth
Let's start with the puzzle that doesn't need any clues: the yellow-and-green square box in the grid of shelves.
The pictures on the buttons depict the life cycle of a butterfly. Since this game is about getting bigger, the egg should come first and the butterfly last.
So click the buttons 0, 1, 2, 3 times, then open the box to find a pair of binoculars.
View
Use the binoculars to look out the window, where some dolphins jump out of the water.
What is this a clue for?
The dolphins from the left side rotate clockwise as they go, and those on the right counterclockwise, which tells you the order to turn the valve under the hatch.
Click the RRLRL arrows beside the valve, and then open that inner hatch to find a fishing hole, as well what looks like symbols from a seven-segment display.
Digital
Use the clue from the fishing hole to unlock the compartment under the bed.
The clue shows only those segments you need to remove from a full display, i.e. take the digits 888 and remove the indicated segments.
This gives you the code 705. Open the drawer to find a fishing rod.
Catch
Use the fishing rod in the hole to get a puffer fish. You can't do anything with it right now, because it's so sharp.
Paths
Solve the scrambled image to get a clue for the right picture frame.
After clicking the pieces to rotate them, you find a path starting at Car and then passing through Bicycle, Ship, Plane, Car.
So click the ⌞⌝ ⌜⌟ ⌞ corners of the frame, then shift it aside to find a sunflower seed.
Feed
Give the seed to the squirrel, who immediately eats it and gets a bulging tummy. Pick up the bauble it leaves on the ground to find a key trapped inside.
Pop
Use the bauble on the spiky fish to break it and get the key.
Unlock 1
Use this key to open the door of the cylindrical machine, which has a tube connected to an empty bottle.
Catch 2
The fish has vanished from the rod, so use it in the hole again to get a boot.
What can you do with only one boot- oh, a coin fell out of it.
Unscrew
What can you do with only one coin? Unscrew the light switch panel, of course.
The only thing that changes in the dark is the (previously) blank picture, which now has a glowing grid of blue lines, a hand pointing to the lower-left corner, and the symbols ×5.
Secret
The clue you saw in the dark refers to the empty bottom-left shelf. Now that you know what to do, you can just click its back wall five times to open it and find more kirimochi in a blue wrapper.
Asleep
The squirrel has fallen asleep, and sleeptalks a vivid picture of living together in a castle.
Pointy
Use the clue from the squirrel's dream to unlock the right door under the sink.
Following the colors on the castle towers, make the triangular buttons blue, pink, yellow by clicking them 4, 5, 2 times, then open the door to find a bottle of soap.
Wintry
Use the clues from the snowmen and the left framed picture to unlock the left door under the sink.
The snowmen appear in groups of 1 to 5, and the letters in the matching positions on the picture spell out the word SMILE.
Enter that in the lock and open the door to find 2 beakers with different capacities.
Volume
Each beaker can be filled and emptied in the sink (after turning the tap on), and you can use the beakers on each other to transfer as much water as possible without spilling.
The book tells you to use 10ml of water. How do you measure that out?
As is typical for this type of puzzle, you can only get to the solution by repeating a cycle of collect, transfer, dump, transfer:
(0,50) Fill the 50ml beaker in the sink.
(50,0) Transfer the water to the 70ml beaker.
(50,50) Fill the 50ml beaker in the sink again.
(70,30) Transfer water to the 70ml beaker to fill it.
(0,30) Empty the 70ml beaker.
(30,0) Transfer the water to the empty beaker.
(30,50) Fill the 50ml beaker in the sink again.
(70,10) Transfer water to the 70ml beaker to fill it.
Following the instructions, add the soap and then the 10ml of water to the bottle.
Then place the bottle back in the cylindrical device, and it begins to blow large bubbles! The bubbles rise just beside the shelf, but that doesn't help you at the moment.
Printed
The now-empty soap bottle has a clue with six squares, three of them filled. So use that clue to unlock the round pink-and-blue box in the top center shelf.
Click the 2nd and 3rd buttons in the top row and the 1st in the bottom, then open the box to find a scratch card.
Use the coin to scratch the card, revealing a hiragana character in each square.
Phrase
Enter the hiragana clue from the scratch card into the orange-and-purple triangular box on the middle left shelf.
(For those who know hiragana: notice that each button runs through a different line of the kana chart.)
Make the buttons read へそくり by clicking them 3, 4, 2, 1 times, then open the box to find some blueberries.
(By the way, the phrase reads hesokuri, which refers to a (gold) stash.)
Superfruit
Give the blueberries to the squirrel, who gets very hyperactive until you pick it up.
Ascend
Use the enthusiastic squirrel on the bubble machine. It floats up in a bubble, lands on the shelf, and jumps down with the last kirimochi packet (in a green wrapper), which you can collect after the squirrel returns to its mat.
Stove
The wrappers all have a fire symbol on them, so place them on the grill of the heater to bake them. (You can probably call this stove a shichirin or hibachi.)
After you back out, turn right and turn back left, you find that the mochi have swelled up a lot, and now have kaomoji on them. Use this clue to unlock the left cabinet on the same screen.
Click the buttons 4, 6, 2 times, then open the door to find a golden key and a bottle of plant vitalizer.
Unlock 2
Use the key to open the door and leave the house. You're not done yet, as all you can reach from here is a dock facing the sea and a hot-air balloon on it.
Growth 2
Use the vitalizer on the potted plant, then change screens to make it grow tasty-looking fruit.
Then use that clue to unlock the right cabinet.
Even though it may look like the fruit on each stem are vertically aligned, you can tell which is on the left/right by looking at their positions relative to the stem.
The fruit from left to right are the lowest, second highest, second lowest, highest, so click the tops of the sliders 0, 2, 1, 3 times and then open the cabinet to find a gas tank.
Balloon
Use the gas tank to inflate the hot-air balloon outside, and click it to leave.
As you rise into the air, the squirrel watches you leave from the dock. The End?
Hit the replay button on the end screen to return to the game just before the end.
This time, pick up the squirrel who looks really excited for an adventure, and then leave on the balloon.
Together, you travel to an island with a castle. Happy End!
Turns out that last title was so confusing I mistyped it and then copied the typo without realizing. Anyway, moving on:
Castle Dungeon Escape
What if you're not the first prisoner here, and everybody else restored the puzzles before they left?
Exploration
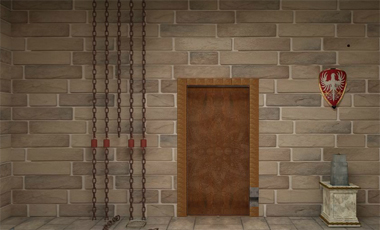
You face a door without a handle. Its doorframe turns gray in the lower right and is missing a stone block. On the left, you see five chains hanging from the ceiling, and the middle one is broken with its lower section on the floor next to a net. On the right side of the screen, a shield hangs beneath a small hole in the wall, and lifting the shield momentarily reveals a keyhole. Underneath that, you see a small pedestal that's missing something.
Turn right. Three blue shields hang on the wall and you notice the middle one missing a cross. There's also a fountain full of green water, and its column has a grid of four buttons. On the right, there's a box of straw and you can see something inside but not take it.
While looking at the pool of green water, click the left side of the column behind to find a crowbar (the right side is empty).
Also look at the left side of the straw box to find a clue with the outlines of some unusual vases.
Turn right. A very basic bed with a fancy pillow hangs from the wall, and you can look under it to see four unusual vases as well as a fork (pitchfork) tied to the bottom. The pot on the left is sealed with a tiny hole on the top, while the painting on the right is too high to reach and the space under it is empty.
Turn right. The window has two bars across it, and clicking the left one (almost imperceptibly) rotates it to reveal a sequence of chevrons/arrows. The bench underneath has a knife stuck between the planks. Pick up the broken stool on the ground, and look at the shield above, which has a pentagonal panel that you don't know how to open.
Force
Use the crowbar to tear a plank off the bench and get the knife.
Narrow
Use the knife to pry open the pentagonal panel on the shield beside the window, and take the key inside.
Murky
Use the net in the water pool to find a knob.
Lifty
Place the knob on the small hole in the pot, and open it to find a wooden carved cylinder.
Notched
Place the cylinder in the wall on the first screen, and then move the shield up to rest against it. Now you can access the keyhole.
Unlock
Use the key in the keyhole behind the shield to find an empty bottle (actually a jug).
Fluid
Fill the jug in the pool of water, and reach under the bed to fill each of the vases there. The surfaces of the vases glow with rectangular clues.
Toss
Search through the straw with the fork, and you get the missing stool leg.
Broken
Attach the stool leg back to the stool, and place it under the painting.
Now you can reach the painting, but it's still firmly bolted on and there's no wrench in sight!
Not to worry, as you can just use the knife to cut the painting off somehow.
Picking the painting up off the floor, you see more arrow clues on the back.
Directed
Use the clue from the window and painting back to solve the four-button puzzle on the fountain.
The diamond marking on the fountain and painting suggest that you rotate the painting clue counter-clockwise, but luckily it's symmetric so this doesn't matter.
The arrows on the window point down, right, up, right, left, which appear on the painting in the LL LR UR LR UL corners.
So click the ⌞⌟⌝⌟ ⌜ buttons, which opens the column and reveals a cross.
Place the cross in the middle blue shield, and nothing appears to change.
But if you click on the shields, they slide down and you spot some curly symbols behind.
Calligraphic
Use the clue on the pillow to solve the blue shield puzzle.
The symbols behind the left, center, right shields are calligraphic versions of the letters L, C, R.
Since the clue on the pillow reads RCLRLC, click the shields in that order, and the middle one slides down revealing a hidden compartment with a stone brick inside.
Stack
Place the stone brick in the doorframe, and then use the remaining clues in the room to push the bricks in the correct order.
The pots shown on the side of the straw box have clues where the filled rectangle is the 2nd, 4th, 3rd, 2nd, 1st, 4th positions from the top.
So push the bricks accordingly, and the hidden panel beside the puzzle opens up so you can take a cross-shaped handle.
Turny
Place the handle on the pedestal beside the door, and turn it to open a compartment with a reddish hook.
Repair
Attach the hook to the middle chain to repair it. Now you can pull the chains.
Just one problem: you don't have any clues for this puzzle, so how do you solve it?
By trial-and-error, you find that some chains stay down when pulled but some pulls reset the puzzle, so there's a hidden sequence you need to learn.
To make the chains stay down, you need to pull the leftmost chain, then the middle one, then the second left one, the rightmost one, and the second right one.
This opens the door so you can leave!
Bonus game: Mind Your Manor
Ah, way back from the time when Armor Games didn't have a sword sound in its intro. Even though this is a pretty standard Grow game, reading the How To on the title screen will make things a little clearer.
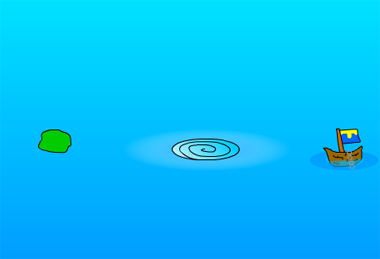
Level 1:
You've decided that the naked king has gone too far. It's time to find new land and leave those chumps behind! Unfortunately, they don't seem too willing to be left behind.
Items: Wind, Boat, Island, Whirlpool, Buoy
Hints:
You can mess around with the boat and whirlpool all you want, but you will get caught without a place to land!
The island has four growth stages, but it requires very specific conditions to level up.
Solution
Island, Whirlpool, Buoy, Boat, Wind.
Level 2:
The king is coming, and you only have a minute and a half to get all the defences up!
Items: Cave, Fence, Horse, Man, Dragon, Cart, Tree, Lake
Hints:
A good fence needs wood, and you can't move wood without a horse-driven cart! Horses are rather easily distracted though.
You can't clear the stage if the dragon is overleveled.
Solution:
Cart+Man+Horse, Tree+Fence+Water, Cave, Dragon.
I've put plus symbols where I believe that the item combination can be done in any order. However, other minor variations are possible.
Level 3
With the dragon well-fed, the king plans another attack! But you're more bothered about getting your own crown.
Items: Castle, Hut, Rock, Pebbles, Cart, Horse, Man, Water, Tree, Chest
Hints:
The young trees are needed to build the horse a pen, while the taller trees are needed to upgrade the hut.
You need to build more huts and a farm before upgrading to stone houses.
Horses can't cross a castle moat. Make sure you're in the right place before you make it.
Try as you might, you can't seem to open the treasure chest. Maybe it's just not worth the time and effort.
Solution
Tree+Hut+Horse, Man+Water, Cart+Rock, Castle+Pebbles, Chest.
There are lots more solutions, but I find this order most logical.
Update