
 Hi! The new Weekday Escape has just arrived!
This week we got three very good games, all quite long and nourishing. The first one is by the last WE newcomer Dasyutu who wants you to escape cosy place with many books. After a year pause returns AppGoya with quality game, and proves they still have it - hopefully their next game comes earlier! Finally you find yourself in Yonashi's strange room with strange devices (which you must find first) and strangely behaving animal(s)...
Have a good time and enjoy!
Nice to see Dasyutu feels like doing more games and has many ideas, let's hope it will last! Their approach to classic genre is creative and fresh, and though the game seems very simple is not so. You are locked in a library (or a bookshop) and you do look for items and use them as in any other escape; puzzles are only a bit different, not too much to overheat your brain, just enough to keep you entertained. Can you escape?
The cursor is not changing, save button, one ending. No slider puzzle!!
On starting game screen of AppGoya's (earlier Hottategoya) latest game you may switch language to English. Then the game starts - you wake up in the middle of a courtyard and the only exit door is locked - it almost seems as if you locked yourself out of your appartment by accident, but you'd hardly describe your own courtyard as mysterious or strange, so the story behind must be another one. Probably. Anyway, you need to get inside that living room which you can see through the set of window panels by solving few satisfying puzzles and more are waiting for you inside! The 'courtyard part' is shorther than 'living room part', much to do here.
The cursor is not changing, autosave, one ending.
The game is available for Android too.
New developer Dasyutu must know escape games laws very well, this one is only their third creation and it's satisfying also for much experienced players. Well known puzzles we all have solved many times have interesting twists, so the game feels fresh and new (creators have even resisted the urge to hang up a wobbling picture in their room!), and solutions are logic and intuitive. Very well done, hope to see the next room soon!
The cursor is not changing, save button, one ending.
Yonashi locks you in almost empty room with various wall paints for better orientation. Notice, that for moving around are side bars with arrows, but there are few views without any arrow. The room changes during playing; after you push buttons in those black and white squares in the right sequence, something happens, and also, items may miraculously transform. Notice, that the green silhouette you find in the cupboard is of a train, not a tram, and Japan trains are very quick indeed. As usual, you are rewarded for successful escape with a delicacy - a fruit sundae this time.
The cursor is not changing, no save button, one ending.
We love escape games, and our readers love talking about them and sharing hints! How about you? Let us know what you think, ask for clues, or help out other players in the comments below.


One ending each, no changing cursors, different save mechanisms… it's almost as if these three games were destined to form a Set.
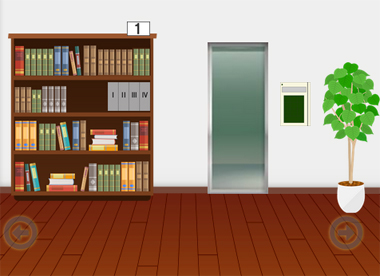
Game 004: Reading in Autumn
Silence in the library! You don't want to disturb the other- wait, why's nobody else here?
Exploration
(Reminder: you can examine items using the arrow button beside the inventory.)
There's a fancy glass door that looks like it should be automatic, but apparently you need to activate the card reader beside. The bookshelf on the left (labeled 1) has a bunch of boring books as well as an empty space with gray rectangular markings numbered with roman numerals.
Turn right to find all seven volumes of the bestselling HarryPitter series… but the middle ones are missing! Under them, you find a book with two colored circles on its spine, and you read its cover to find that it's an East book. The bookshelf on the right is empty except for four colorful sets of books that you can slide along the shelves. Also, there's an air vent above it, which has got to be useful for something.
Turn right to find two more bookshelves which look very similar to the first one. Comparing them, you find that the one on the right has a copy of Book 5 as well as a five-button device that doesn't work right now. The book at the top is too high to reach.
Turn right to find a reception counter in front of a locked door, shelf 6 which contains Book 4, and a potted plant which hides Book 3 behind its pot. You can click the top surface of the counter to find a calendar, and also click its left and right edges to look behind the counter and find a South book, a remote control for the air-conditioning, and a locked box with a keyhole.
Four colors
Use the clue from the calendar on the counter top to solve the puzzle of shelf 3.
After removing the crossed-out squares from the calendar, you find that the red, green, blue, yellow circles appear in the 2nd, 5th, 3rd, 4th columns.
So click those sets of books 1, 4, 2, 3 times, which activates the five-button device and turns its buttons different colors.
Series
Place all the missing Harry Pitter books on shelf 2 to complete the series.
One of the red books beneath magically slides over to the right, and then its spine displays an arrow pointing down.
So click where that arrow points to find a small key taped under the shelf.
Unlock 1
Use the small key to unlock the door behind the counter. Bright light streams in from the doorway…
But don't be fooled, it's just another room full of bookshelves. Let's start by picking up the stepladder and the blue book on the table. The blue book is secured shut with a belt that has two buttons on it.
Shelves 7 and 9 look completely normal, but shelf 8 has no books at all. Instead, its compartments have a four-digit lock, a seven-letter lock with an unusual drawn clue, and a lock with a keyhole.
Climb
Place the stepladder in front of shelf 5 so you can reach the West book.
Spell
It looks like you might be able to unlock the seven-letter lock, but first, what does that drawing on it mean?
The drawing is actually a cross with a compass arrow on it, so that the red circle indicates South.
So open the South book (by clicking its left side) to find a clue written on an otherwise blank page.
That clue tells you to read the letters on the HP books in the order indicated.
Since the letters on books 1 6 7 2 5 3 4 spell out MAGICAL, enter that in the lock to open it and find the North book.
Another series
Each of the compass direction books has a roman numeral on its spine, so place them in the gray area on shelf 1 (and they automatically move to the correct spots).
Nothing happens, but doing so gives you two more clues. What are they for?
The colored circles on the book spines tell you the order (in the direction of the arrow) in which to press the buttons on shelf 5.
So push the BPRGPOGR buttons (35125421), which makes shelf 4 slide aside to reveal a hidden passage! The passage is way too dark to explore, but there's a screwed-down metal plate next to it.
The letters and numbers in the yellow bands across the top tell you how to open the book: push the right button twice, the left one once, the right one once and the left one thrice.
After pushing the RRLRLLL buttons, you can open the book to find a small golden key.
Unlock 2
Use the golden key to unlock the box on the counter and find a battery.
Powered
Examine the remote control and flip it over to find that it's missing a battery. Luckily, we have that missing battery, so put it in.
Use the remote control on the air vent, and the air-con blows a paper note onto the floor.
Numbered
The note has a drawing with four parts numbered, so use that clue to unlock the four-digit lock.
The drawing is a map of both rooms, and the rectangles with the digits 1, 2, 3, 4 beside them represent the (initial positions of the) shelves numbered 5, 8, 4, 6.
Enter that in the lock, which opens the compartment so you find a screwdriver.
Unscrew
Use the screwdriver to unscrew the metal plate beside the hidden passage.
Now you can access the light switch (two buttons), turn on the blindingly bright lights, and step into the passage.
This room is just a blank wall with four rectangles labeled with compass directions.
Series 3
Pick up the four books from shelf 1, and place them on the wall. (Again, they automatically drop onto the correct spots.)
This opens up a hidden compartment on the right which has a more plain-looking key inside.
Unlock 3
Use this key to unlock the last compartment of shelf 8. The only thing inside is an ID card.
Exit
Swipe the ID card on the reader next to the exit. This activates a keypad with some unusual symbols on it.
Luckily, you have exactly the clue you need to solve this puzzle.
After placing the books on the wall, the arrows on the book covers connected together to form a path connecting the symbols: star, circle, cross with dots, cross, quaver, double circle, square, triangle, or ★⬤※✖♪⭗◼▲ for short.
So push the buttons in the
287

163

45
order, then click the door to slide it open and leave!
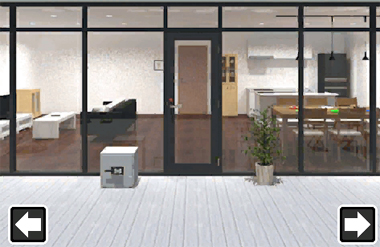
Mysterious Courtyard
Getting to play a courtyard escape again is so nostalgic. Retro, even.
(I'll go back to a single-spoiler format for this walkthrough, directly giving the solutions. You should use the in-game hints first.)
Exploration
You start off with the most interesting view of a living room through large glass windows, but the door is locked and has a red keyhole. The safe on the left has four unusual knobs.
Turn right to find wooden tables and chairs. Clicking on the tables gives you a bird's eye view of them. The red box on the left table has a three-digit lock. (The black rectangles are wall lights.)
Turn right to face four windows/mirrors. The pedestal in the middle has something wedged in its top, and some green symbols on the side.
Turn right to face more tables and chairs. Examining them, you find that the table on the right also has green symbols printed on it.
Three digits
Notice that the symbols are rectangular except for a circular one on the table, and a turned letter K on the pedestal.
So mentally turn the pedestal clue sideways and place it under the table one, and the green symbols combine to form the digits 874.
Enter that in the red box and open it to find a corkscrew.
Four knobs
The top-down views in the courtyard show you where the chairs are placed around each table. Notice that there's only one table with two chairs, corresponding to the top-left knob. This means that you need to combine the top-down views and orient it so the direction facing the safe (or door) is up.
Form the
┐(2) ┤(3)

┴(0) ├(1)
pattern by clicking the buttons that many times from the starting position (which you can see on the hint screen, if you've already changed it). Open the safe to find a glass bottle of water.
Displacement
Use the corkscrew to open the water bottle, and then pour it into the top of the pedestal. The wooden box floats up and you can open it to get a red key.
Unlock (red) / Exploration 2
Use the key to unlock the door and enter the room.
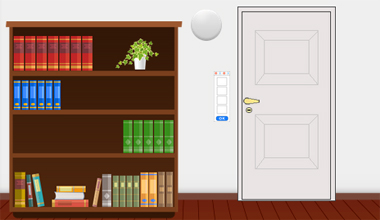
Right away, you're facing a door with a blue keyhole. A picture frame on the left has no picture, just the word "hint" repeated thrice with different capitalization and coloring. The dish cabinet on the right has loads of dishware, but the trays of cutlery only have one of each type. There are also three empty drawers with red bottoms, and the bottom cupboard door has a green keyhole.
Turn right. The picture frame on this wall has a pattern of red rectangles beside a downward arrow. There's also a table with six colored plates, and each place is set differently. Don't miss the red spot on the left of the screen which turns out to be a drawer you can't open.
Turn right to face the door back to the courtyard.
Turn right to face the couch, TV, and small cabinet tied shut with cable tie. You can operate the TV by using the remote on the table, but all the channels just show a static image with two letters.
Three drawers
The red rectangle picture tells you the steps to perform: each row from top to bottom shows the state of the drawers after each step.
Since the rows change in the RLCLRLC positions, click those drawers to open/close them. Once you're done, the wall opens up to reveal a shelf with a framed clue and a blue four-digit box with the digits appearing in two colors.
Four digits
The framed picture/hint beside the door tells you to color the uppercase letters red and the lowercase letters green.
As shown in the in-game hint, if you do so then the red letters read "NINETY THREE" and the green letters read "fifty eight".
Enter 9358 in the box, then open it to find a green key.
Unlock (green)
Use the green key to unlock the bottom cupboard door and find a smartphone which needs a passcode.
Screen
The phone asks for a PASSCODE, so that's what we'll give it.
On TV, the pairs of letters PA, SS, CO, DE appear on channels 0, 6, 4, 9, so enter that in the phone to unlock it.
Um, unlock what?
The phone's screen actually shows you that the drawer beside the sink is unlocked. Open it and take the pliers.
Snip
Use the pliers to cut free the handles of the small cupboard, which holds a small safe with a column of five colored buttons among several letters.
Colorful buttons
The colors of the buttons match those of the plates, and the letters match the initials of the cutlery used. So for example, the plate with the knife on the left and spoon and fork on the right is colored blue.
Turn the buttons blue, white, red, green, green by clicking them 3, 4, 1, 2, 2 times, then open the box to find a blue key.
Unlock (blue)
Use the blue key to unlock the door and escape! You get to enjoy a night view of the courtyard.
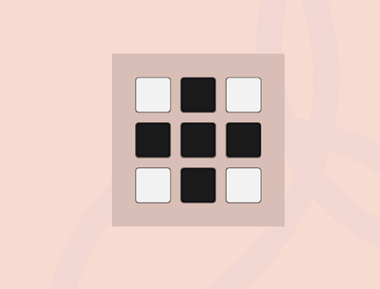
Strange Room
Not to be confused with Yonashi's earlier Strange House, this game packs a lot of strangeness into just one room.
Exploration
The pink wall you start with has only one thing on it: a grid of black and white buttons that don't seem to do anything.
Turn right to find another button grid, a large drawing of a bicycle and a wall clock with an interesting design.
Turn right to find another button grid, this time on the floor.
Turn right to find… nothing? You notice something red on the ceiling which turns out to be a large drawing of a plane, and something squarish on the floor which turns out to be a grid of digits in light and dark squares.
Turn right to find another button grid. You can still see a bit of that number grid on this screen.
Places
Use the clue from the number grid to unlock the button grids.
Each of the patterns on the button grids appears in the big number grid: the grids on the screens with pink, white, blue, yellow walls appear with their top-left corners at the (row #, column #) positions: (3,4), (4,3), (2,2), (1,1).
Matching the grids up, you find that they're numbered like this:
871 123 567 187

235 894 498 256

946 765 312 349

Pnk Wte Blu Ylw
So push the buttons on each grid in that order. What happens?
The pink wall opens up to reveal a grid of white shelves with interesting patterns on them. The doors on the left and bottom compartments are locked, and the compartments in the right middle and top right hide a square block (with two small bumps around one large hole) and a drawing of a tram… but wait! We've already been warned that this is actually supposed to be a train.
The white wall opens up (on a smaller scale) to reveal a lit hidden compartment with two round blue pieces. The left one looks like a stand for something and has two small holes in its base, while the right one is covered with a layer of black material.
The floor under the blue wall opens up, and a desk pops out of it! The pawprint is in the middle of two lamps which shine different-colored lights, next to a white button which doesn't seem to do anything. The long drawer holds an almost-complete jigsaw puzzle and a minimalist key, while the top drawer on the right has buttons marked with one and two dots and the bottom drawer has a triangle block and a rocket drawing.
The floor under the yellow wall opens up, and a blue couch pops out. It has a yellow cushion with some familiar patterns, and a white striped cushion with a car drawing. Picking up the white cushion, you find a circle block.
Unlock 1
Using the white key on the middle left shelf, you find a box of colored eggs with a four-digit lock.
Figures
Use the patterns from the shelves and cushion to unlock the egg box. (You can close each shelf compartment by clicking its door again.)
First, notice that each white pattern on the yellow cushion occurs in the negative space of an orange pattern on the shelves.
But you can make a lot more sense of the orange patterns, especially if you notice that there are 26 of them.
Each of the orange shapes resembles a letter of the alphabet, starting with A at the upper left and ending with Z at the bottom left.
Translating the yellow cushion accordingly, you find that its patterns correspond to the negative space in the letters
FIVE

ONE

SIX

TWO
Enter 5162 in the box, and open it. All the eggs jump out!
Hatch
The five colored eggs are now all over the room, and they open and close (a bit) when you click them.
So use the new clue from the egg box to hatch the eggs correctly. (Don't forget, green isn't exactly what it seems.)
"Fast first" refers to the transportation drawings around the room. From fastest to slowest, they are: rocket > plane > train > car > bicycle and the corresponding colors are pink, red, green, black, yellow.
So open the eggs under the bicycle, beside the shelves, beside the couch, on the desk, and on the ground under the plane drawing. (If you mess up, closing any egg will close all of them.)
The egg powers combine to materialize a large yellow box with three roman numeral buttons. Hmmm…
The yellow box appeared in the place where the yellow egg was. So let's check up on the other eggs, by turning right around the room.
The green egg is now a potted plant. Check in its leaves to find a pentagon block.
The red egg is now a rooster, but it doesn't seem to do anything.
The pink egg is now a chair, which means you can climb up to the wall clock and remove it to find a golden key and an arrow drawn on the wall.
The black egg is now a phone that rings loudly. Pick up the receiver to "hear" a sequence of letters.
Back on the screen with the yellow box, the rooster pecks at the wallpaper. Click it to zoom in on the wall, and tear that portion off to find a metal panel fastened with screws. (The rooster disappears immediately after.)
Unlock 2
Use the golden key to unlock the bottom middle shelf, which holds a dog. Since there are several steps to do before the dog becomes useful, let's leave it for last.
Geometric
Use the clue from the wall clock to place all four blocks on the blue peg (on the same screen) in the correct order.
Hint: what does the arrow mean?
Each of the four block shapes appears on the clock, three of them on the hands and one as the frame.
The arrow drawn on the wall starts from the edge of the circular outline and ends at its center, indicating that you should start from the furthest shape from the center and end at the nearest shape to the center.
Place the circle, square, triangle, pentagon blocks on the peg in that order (so that the circle block is on the bottom), and the other blue object opens its lid to reveal a small blue stick with a paw print.
Binary
Use the clue you got over the phone to unlock the top desk drawer.
Comparing the letters in the phone clue to those on the shelf, you find that each of them contains one or two circular holes. (Interestingly, Q has two holes in both the phone font and the shelf font.)
The letters in the clue have 21111221 holes in them, and so you need to push the buttons with that many dots to open the drawer, which contains a green apple labeled "paperweight" and some puzzle pieces with roman numerals.
Fitting
Use the clue from the puzzle pieces to unlock the yellow box.
You can't actually fix the jigsaw puzzle in the big drawer, so you need to use your imagination.
Whether by comparing colors or shapes, you figure out that the three contiguous missing pieces are labeled Ⅲ, Ⅶ, Ⅳ.
Enter that in the yellow box by clicking the buttons 2, 6, 3 times, then open it to find a screwdriver inside.
Unscrew
Use the screwdriver to unscrew the panel you found in the same screen as the yellow box.
Ugh, it's another button grid. You know what to do.
This grid can be found at the bottom-left corner of the larger number grid. Following that clue, push the buttons in the order
198

267

345
and the wall opens up to reveal a locked door.
Canine
Place the dog on the table between the lamps. Neither light seems to have an effect on him.
How about both? Use the apple paperweight to hold down one button, and then push the other button. The dog opens its mouth to reveal some scarily sharp and shiny teeth.
Give the stick to the dog, then push the white button to make it crunch down.
Retrieve the key from its mouth.
Escape
Use the key to unlock the door and escape. Ooh, sweet desserts!
Update