
 Wishing you peaceful Wednesday with the new Weekday escape!
Reliable Amajeto introduces another pleasant room you need to escape from. Then you can refresh with a beverage from tomoLaSiDo which strenghthens you for a jailbreak - you'll need much energy for this! One of Neat Escape's friends leaves you in his guest room to entertain yourself - so you try to escape from here, there isn't anything good on tv anyway.
Have a good time and enjoy!
The newest Amajeto's room in their new minimalist design is joy to play. The devs don't stagnate. They still surprise players with new variations on old puzzles, and we get what we are used too (comforting), but slightly different (not boring).
For escape from elegant living room you need to find the key from exit door, which means to collect eight tiles and complete a picture from them, as usual.
The cursor is changing (its color), no save button, one ending.
Time for short break. Next tomoLaSiDo's game could be a bit demanding so before you start, have a drink! Oh. I forgot to tell you that you that the can is unopened and you need to solve three puzzles (or four for the second ending) to unblock the pull tab. Can you open it and refresh yourself?
The cursor is changing, no save button, two endings.
Forget about pleasant living rooms, you are imprisoned in a vault with bare stone walls and small window near the ceiling. However, the essential principle of tomoLaSiDo's escapes is the same - collect six capsules with key parts. One capsule is for free, just find it, and each of five remaining lays on special table; to get it, you have to enter the code you figure out from clues.The puzzle in the toilet room is a bonus - you get rewarded if you solve it!
The cursor is changing, no save button, one ending.
When you came to Neat Escape's friend house, he told to go and play in a guest room (you know, adults sometimes need to be alone). So you did. The door suddenly snaps shut behind you - aaand it's escape time! The guest room where you're trapped looks like from a magazine, everything polished and shinig, and through the French window, which is also locked, can be seen outside pool. The usual routine starts - luckily, several tools with familiar orange rubber handles can be found here, will you escape?
The cursor is not changing, autosave plus save button, two endings.
The game is available for Android too.
P.S. Good news - Tesshi-e is still active! After a year, they released a new game, at the moment for Android only, here: The Happy Escape - New Year Santa. I really hope we get the PC version too.
We love escape games, and our readers love talking about them and sharing hints! How about you? Let us know what you think, ask for clues, or help out other players in the comments below.


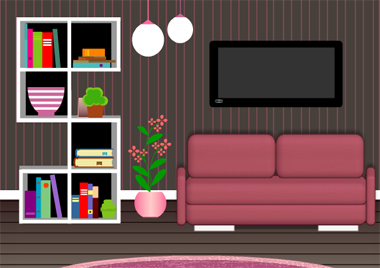
Room With Shelves
What kind of books does the owner of this room like? Shelf-improvement!
Exploration
You start off on a screen with a TV (having a socket in its bottom left), a couch and some groups of square shelves. The changing cursor helps you locate the square tile hidden behind a small plant pot on the shelves.
Turn right to find two vertical stacks of shelves connected by a single plank. Other than the shelves with letter blocks on them, the only important ones are the pink and purple compartments at the top of the right stack and bottom of the left stack, which have 2-button and 12-button locks. There's also a scrambled image on the wall to the right.
Turn right to face the door. The shelf here has a green compartment with a four-digit lock as well as a digital clock that shows some letters when you push its button. There's another picture hanging over the armchair, but this one tilts when you click its corners.
Turn right to find two more stacks of shelves. This time, they're not connected but thin planks extend from them towards the right. The yellow compartment has a five-letter lock, while the white one has a lock with four colored bars. There's also a grid device beneath the window on the right, but you can't use it yet.
Unscramble
Solve the (randomized) scrambled image puzzle by rotating its tiles until they align.
When you've done it correctly, the picture slides up and you find a slanted-looking square tile in the compartment behind.
Name
Use the clue from the shelves throughout the room to unlock the yellow compartment on the same screen as the window.
In the order you find them (clockwise from the starting screen), the shelves are arranged to form the letters SHELF.
Enter that in the lock, then open it to find another square tile.
Heights
Use the clue from the colored shelf compartments to unlock the white compartment.
The pink, green, yellow, purple compartments are placed at different heights, appearing in that order from the top down.
So click the bars 3, 2, 1, 0 times, then open the compartment to find a square tile and memory stick.
Content
Plug the memory stick into the TV, which shows a clue with what looks like a book and two letters. Click it again for another clue with a six-letter code.
Red squares
Use the first clue from the television to unlock the purple compartment.
Looking for the red books matching the clue, you see that they rest on some of the shelves shaped like the letters S and F, just as the clue says.
The arrangement of the shelves on each screen fit into the same grid that appears on the purple compartment, and you can use that to form the code, but the clue also tells you that the two columns corresponding to the S shelf should be on the left of the column corresponding to the F shelf.
So click the
R--

--R

---

-RR
buttons, and open the compartment to find a square tile and another letter block.
Two buttons
Use the clue from the clock and letter blocks to unlock the pink shelf.
Notice that the I block from the previous puzzle is below the T block, so the letters TIITIT from the clock tell you to press the UDDUDU buttons.
Open the compartment to find a square tile and another letter block.
Hinted
Use clues from the TV and letter blocks to unlock the tilty corner picture by the door.
The shelves holding the four letter blocks form a rectangle with the letters THHINT at the ⌜⌝⌝ ⌞⌟ ⌜ corners.
Click those corners of the picture to make it come loose, then flip it over to find a square tile and a clue with some circled letters in a word.
Four digits
Use the clue from the back of the tilty picture to unlock the green compartment.
The circled letters have to be digits, and you can decipher those by mentally rotating the clue.
When read upside-down, the circled letters hELE become the digits 3734, so enter that in the compartment and open it to find the last square tile.
Complete
Place all eight square tiles in the grid device under the window, which turns into another randomized image puzzle where you have to swap tiles into the correct positions. (Hint: the tree and sun are on opposite sides.)
When you're done, the windowsill opens up so you can take a golden key. Use it to unlock the door and escape!
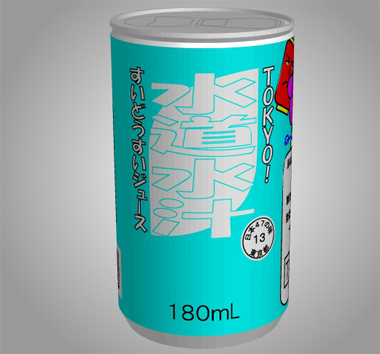
Motto Akeru 58
The bright blue color on this can might make you believe it's some sort of refreshing Japanese creation. Well…
Exploration
The front of the can looks normal with its TOKYO! text and can capacity printed, but a closer reading of the label reveals that it's actually "Tap Water Juice". The circular seal reads "47 Flavors of Japan, #13, Tokyo Metropolis".
As usual, the top of the can is sealed shut until you complete the other sides.
The right view has the ingredients list (Tokyo's tap water, juice base) and product information, a puzzle with dots and lettered buttons, a blue spot and a slogan(?) "Maybe you'll come and see, Tokyo." There's also a variety of drawn characters above commenting on the taste: "juicy, sweet, rich".
The left view has a "super purification plant" with colored buttons and a lever. It also has the exact same barcode as pretty much every other can in the series.
The bottom of the can has the date, a picture of a tap, a blue spot, and two dim lights labeled "good" and "more good". Hovering over the sides of the tap reveals red and yellow arrows that spin the handle.
Oriental
The letters on the buttons all appear in TOKYO! What now?
It doesn't matter which O you use, just push buttons that spell out Tokyo, then click on the blue spot beside to light it up.
Lights
Use the clue from the right view to operate the purifying plant on the left view.
The colored circles represent the red and yellow buttons on the machine, and the jagged line represents the two positions of the lever. Since the lever starts in the up position, all you have to do is push the correct buttons from left to right and flip the lever whenever you reach a vertical line.
So the correct sequence of actions is Red, Flip, Yellow, Flip, Red, Yellow, Flip, Red. At the end, click the blue spot to light it up.
This also makes the purifier spill out a fountain of water onto the barcode, revealing some digits over the bars.
There's just one puzzle left, and how you solve it determines how Good you are.
Flow (Solution 1)
Use the numbers on the barcode to solve the puzzle on the bottom of the can.
The digits on the barcode divide into two groups, appearing in ascending order (from 1 to 7) on the LRLLRRL sides. So click those arrows on the tap, which adjusts the water flow as you go.
When you have it correct, the blue spot flashes. Click the spot to light it up. A juice can falls out of the tap, and eventually the Good lamp lights up.
Flow (Solution 2)
But what if you don't just want to be Good, you want to be More Good?
Follow the first solution (LRLLRRL) until the blue spot flashes, then follow up with the clue on the right by clicking the red, yellow, red, yellow, red (LRLRL) arrows.
As you do so, the good water flow increases and decreases, changing color every time, until it squeezes out a juice can. Both the blue spot and the More Good lamp light up.
Open
Now that all three spots are lit, all you have to do is open the can from the top to end the game.
Guest room question
For the box with a screwdriver in it
I put the
push button into the device on the wine end table that turns the screw driver pictures around
but where's the clue for how to use that information to get the code?
The clue is on the paper you found in the box in the closet.
oh for crying outloud, that lamp does do something.
thanks!
Ever have the nagging feeling you just missed a clue?
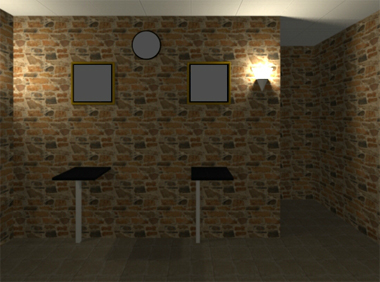
Escape Challenge 75: Challenge Room 2
For the first time in a long while, Escape Challenge has an actual challenge.
Exploration
The first things you see in this room are the window high above the table with a capsule containing a key piece and a challenge scroll. I'm going to make up some random excuse not to translate, because its contents are pretty much what you'd imagine.
Turn left to find two identical picture frames, each having the same number 242. The small tables underneath have more capsules clamped in place. The three-digit lock on the left table only has half of its digits visible, while the three-digit lock on the right table has something unusual going on with its buttons.
Turn left to face the locked exit door. The picture frame on this wall has a grid of digits, but one of them is not like the others. The table beneath has another capsule, this time with a four-button lock.
Turn left to face a wall with a clock that only has a single golden hand. The left picture appears to have a row of different colored digits and their reflections, while the right picture has four circles in a grid with some arrow equations. The tables hold the last two capsules, and you notice that the left lock has three digit buttons in thick colored frames, while the right lock has three digit(?) buttons separated by patterns of white lines.
Enter the corridor on the right leading to the toilet. This time, there's no sitting down or looking around. All that's on the toilet seat is a panel locked with a grid of four buttons. You can also look at the toilet paper holder and pull out pieces of toilet paper to find clues.
Palindromes
Use the clues from the two identical picture frames to unclamp the capsules beneath.
Since the clues are identical, the important part about the puzzles is in the locks.
The left three-digit lock only shows half of each digit, so you need to double the digits to compensate, making 484. Enter that and push the button to release the clamp and get the key piece.
The one on the right is more mechanical: each button also affects its neighboring digits, which means you have to figure out what combinations of the digit patterns 110, 111, 011 add up to 242.
In fact, there's a unique solution for every possible code and an easy system for working them out, but the solution for 242 just requires you to click each of the left and right buttons twice. Do so, and then push the button to unclamp the key piece.
Rows
Use the clue from the picture beside the door to unclamp the capsules beneath.
Hint: The arrangement of the digits into eight rows of four suggests that each row has a specific digit indicating a button to press. Other than the one that's not a digit, which digits are special?
The rows don't all have digits in common, which means that the special digit is different each row. The most natural way to do so is to have it be the 1 in the first row, 2 in the second row and so on.
Indeed, if you number the rows from the top down then each row includes its row number, and those numbers appear in the 32413241 positions from the left. So push those buttons to unclamp the key piece.
Colored
Use the picture frame clue with colored digits to unclamp the capsule beneath.
The aqua, red, yellow colors each appear on two different digits in the clue. Which do you use for the code?
Both digits are involved in the solution! Each thick rectangular frame is formed as the space between a large and a small rectangle, so you need to subtract the smaller digits from the larger ones to get 479−263=216.
Down
The digit lock beside the last capsule appears to be installed upside-down, but on closer look you realize that the digits are flipped vertically (i.e. across a horizontal plane). So look for three similar digits to solve its puzzle.
Two of the flipped digits are easy to find: the 4 near the lower left of the digit grid clue and the 2 on the clock face.
The last one is a little surprising: all the digits in the colored digit clue have vertical reflections in the shadows except for 5, which has an upright shadow. This makes all the shadows normal except for the upright 5 which is the shadow of a vertically flipped 5.
The symbols between the digits are greater-than signs, so you need to arrange the digits in descending order: 5>4>2. Click the buttons that many times, then push the button to unclamp the key piece.
One more puzzle
You're all ready to go but there's more to do! Use the remaining clues in the room to solve the puzzle in the toilet.
(Hint: as far as I know, the golden clock hand serves no purpose.)
Pulling the toilet paper gives you a clue that the up arrow is 18 and the down arrow is 6, but then pulling it twice more tells you that the right arrow is 6 and the left arrow is 12.
Now the rest is just basic linear interpolation. (What?) Not so basic, because the horizontal lines are fraction bars and it's possible to end up with fractional results if you use the wrong method.
Since each number on the toilet paper is at least the corresponding number on the clock face, take the differences to get 6 up, 3 right, 0 down, 3 left. This suggests that the differences between arrows and clock numbers should be (in clockwise order from top) 6, 5, 4, 3, 2, 1, 0, 1, 2, 3, 4, 5.
So start with the numbers on the clock, adding 0 to the bottom number (6+0=6), 1 to the next two from the bottom (5+1 and 7+1), 2 to the next two (6+2 and 8+2) and so on until you end up adding 6 to the top number (12+6), giving you the final values for the arrows:
___18___

__16_6__

_14___6_

12_____6

_10___6_

___8_6_

____6___
Now you can do the math on each circle to get (16+14)/6=5, 18/6=3, 18+12+16=46, 12=12, and arranging them in the original circle grid
_5 _3

46 12
reveals that you need to click the ⌟⌟ ⌝ ⌞⌜⌞ buttons.
After doing that and pushing the big button, the toilet finally opens up to give you a chocolate bar with the tagline "sugar for your brain".
Exit
Since you have all the key pieces, you can just leave through the door to end the game.
Item list
6 key pieces:
Top left: On right table, screen right of door
Top middle: On left table, screen right of door
Top right: On table beside door
Bottom left: On right table under clock
Bottom middle: On left table under clock
Bottom right: On round table
1 other item:
Chocolate bar from the toilet!
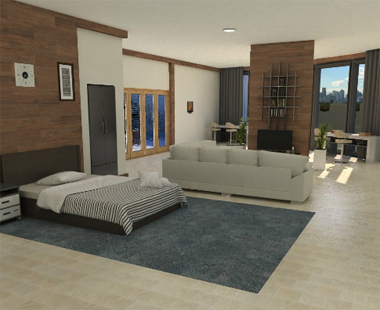
Guest Room
It's where the best guests rest.
Exploration
Perhaps surprisingly, the starting view only has two hotspots, left and right.
Click the left side to look at a bed, which has a single battery hidden under the pillow. There's a locked door on the left and a locked box beside with wires running out of it. The side table has a working lamp, an unlocked drawer with a pair of pliers, and a locked drawer requiring a four-digit code. (You can lift the lamp to find that its battery cover is screwed shut.) Above the bed, you find a wall clock that appears to be stopped. To the right of the bed, you see a wardrobe with a few pieces of clothing (after all, it's a guest room) and an empty clothes hanger, and you can look in a small box to find a piece of black paper.
Back out and click the right side to view the living area. Under the eye-grabbing but irrelevant bookshelves, there's a TV on a console with two locked wooden safes, the left one having three symbol buttons and the right one having four arrow buttons. Closer to you, there's a laptop on the couch with two folders, one containing an "ad" and the other containing a cryptic image of colored lines on a black background. To the left of the laptop, there's a cushion you can lift to find a red key. On a small table to the right, there's a wine bottle and wine glass set out, as well as an numbered wooden thing that looks like it spins but is missing something in the middle, as well as a piece of paper with some numbers written in a circle.
Now for the back wall. (Back out as necessary so you can access each area.) The doors on the left are locked and require a key. The table on the left has an incomplete jigsaw puzzle device in the wall next to it, as well as a phone next to a power socket and different shaped pots with a note about TV reception on the left. The phone has pictures of escape games (I don't recognize all of them) as well as a folder that you can't access because of low battery.
Look at the table on the right. The heater next to it has something stuck inside, as well as cracks in the top. The table itself has a long box with a hook on the inside of the far end, and a three-digit locked box with frosted glass through which you can faintly see a screwdriver.
Wire
Use the pliers to cut out the metal rod from the hanger and bend it into a hook.
Then use the hook in the long box on the right table to pull out a small drawer containing a TV remote. Of course, it has no batteries.
Shapes
Use the clue from the potted plants to unlock the left safe under the TV.
The pots have different shapes, so make the buttons display the square, hexagon, circle shapes by clicking them 9, 5, 7 times.
Then open the box to find a power cord.
Charger
Plug the phone in by using the power cord on the power socket beside.
Now you can access the folder on the phone to find another colored line clue.
Digits
Use both colored line clues to unlock the bottom drawer beside the bed.
Since the digit buttons are red, you only need to look at the red lines in both clues.
Superimposing the red lines from the laptop clue with those from the phone clue, you find that they form the code 4385. Enter that into the drawer and open it to find a push button on top of a puzzle piece.
Push
Attach the push button to the wooden wheel beside the wine. This makes pictures of hammers, spanners and screwdrivers appear around it, and you can push the button to make it rotate.
Dark
Turn on the bedside light and place the black paper under it to reveal a clue with a spanner in a circle of lines.
Spin
Use three clues from circular objects in the room to unlock the box with frosted glass.
On the black paper clue, the spanner appears in a circle with 12 evenly spaced markings.
So look at the clock, which has its hands pointing to where 4 and 7 would be.
This tells you to rotate the wheel until the spanners are at 4 and 7, so push the red button 6 times to do that.
Since the box contains a screwdriver, look at the numbers where the three screwdrivers are on the wheel.
The arrow around the PUSH button tells you to read those numbers clockwise from top right, forming the code 823.
Finally, enter that into the box to unlock it and get the screwdriver.
Unscrew
Unscrew the panel on the bottom of the lamp and remove the battery from it.
Control
Place both batteries into the remote, and use it on the TV. Oh no, there's an error. Is that bad?
Unlock (red)
Use the red key to unlock the wall box beside the bed, then push the bottom button inside to activate the antenna.
Now you can turn on the TV again to view a code with an arrow, a small circle and four numbers.
Arrows
Use the clue from the TV to unlock the right safe beneath.
The numbers go with the degree sign to produce angles, which you can read using the guide on the paper beside the wheel.
Since the circle tells you that the angles are measured clockwise from the top, the 90°, 225°, 315°, 180° angles indicate the →↙↖↓ directions. Click the buttons 2, 5, 7, 4 times accordingly, and open the box to find another puzzle piece.
Pieces
Place both puzzle pieces in the jigsaw puzzle, and push the OK button to dispense a blue key.
First Ending
Save your game, then use the blue key to unlock the door to the left of the bed and escape!
You enjoy a sumptuous dinner with your friend.
Unlock (blue) / Exploration 2
(Load your game, and) use the blue key to unlock the hinged doors to the left of the TV.
It opens to a swimming pool, but you're not dressed to go down the pool ladder. There's another frosted-glass three-digit safe between the deck chairs, this one containing a hammer. In the distance, you also see a yellow pole which you can't use yet, and a white staircase with a locked gate. Looking at the side of the staircase reveals a clue with a screwdriver and three digits.
Recycle
Use the new clue outside to unlock the new safe outside.
Rotate the numbered wheel until the screwdrivers are on 6, 8, 1 (by pushing the button 6 more times).
Then read off the positions of the hammers, clockwise from the top right: 734.
Enter that in the box to unlock it and get the hammer.
Broken
Use the hammer to (partially) break the top of the heater beside the right table, then pick up the round handle from inside.
Crank
Place the handle on the yellow pole beside the swimming pool, and turn it.
All the water drains away, and you can climb in to find a silver key on the pool floor.
Second Ending
Use the silver key to unlock the gate, then climb the stairs to escape!
You enjoy a nice sunset view from the observatory upstairs.
Having a problem with guest room.
i don't see a socket for the cord.
Please help.
sorry about that. i was paying attention to
the cell phone where the lamp was, and i got confused
by the way for a few days in here the spoiler tags were not working so i emailed Dora and she fixed it. that was weird.
It's great that it is fixed! I was having the same problem.
I didn't understand the walkthrough lite to "prison cell" perhaps a full step by step would work better. cant wait for the other walkthroughs too. and not sure why the first game has the same screenshot as the "end of year" puzzle from last month. oh well firstpremiercard login
I'm lost from the beginning. I'm thinking I didn't catch the first clue. I'm going to start over again. ceevoo hdtv antenna
Update