
 Welcome back after a week, welcome to the new Weekday Escape!
We are still deep in winter mode, but developers begin to feel spring in their hearts. Flowers, colors, green gardens and more flowers. Amajeto has decorated the room with flower pictures. Sarameya's lovely town bursts in colors at the end (if you do what you're supposed). Selfdefiant wants you to help to cute Marly the Mouse lost in lush green garden where everything grows a few inches every time you blink your eyes. And game by Rinnogogo is all about flowers, finding them or growing them by magical ways.
Have a good time and enjoy!
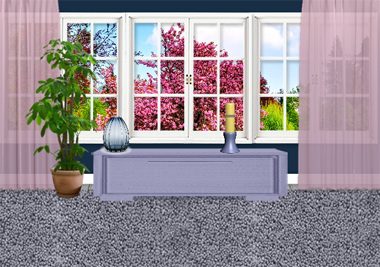
Amajeto's trying to entice spring apparently - pictures of flowers everywhere, vases waiting for fresh flowers, and trees in blossom outside. The room where you're locked in is their living room with bathroom and that means you need to find two keys to get out...can you?
The cursor is changing (its color), no save button, one ending.
Sarameya says hi, do you remember Daymare Town? Especially Daymare Town 3, Ra Square? Have you ever imagined how would the game look if this Mateusz Skutnik's word would be colored? Now you can see!
Beautifuly drawn short game takes you to small black & white town where local citizients need your help. Can you replace the old crystal with new bright one and thus bring colors to their lives?
The cursor is not changing, no save button, one ending.
P.S. Crazy Door of Rainbow Colors by Shanben Izakamakura is so original and enjoyable, higly recommended! And don't miss No Name Room by Yonashi which lets you play with colors too...and wonderful One Scene 7 by Robamimi.

Marly the Mouse while exploring a garden got lost and now he needs your help to get out from here to more familiar places. He feels where to go but unfortunately an obstacle is in this way, a deep ditch...well, not so deep but mouse's perspective is a bit different and he's so tiny and helpless...however, the Selfdefiant's garden isn't abandoned. It's well kept and inhabited, and animals living here are peaceful and co-operative, so if Marly runs few small errands for them, they'll help him.
The cursor is changing, no save button, one ending.
Atmospheric Rinnogogo's game differs.a lot - it's not just that it's so beautiful and charming, it's also clever and strange. To escape from the dark vault where you find yourself at the beginning you need to collect four flowers and put them in particular vases. That's clear. But before you can do that, you have to explore the place and reveal magical way to the landscapes where the flowers grow...and explore them closely too. Don't hurry as some items and areas can be easily overlooked being well hidden and/or placed at the edges of the screen. Don't forget there is a clue for each puzzle (just recognize it...). Scenes may change and revisiting them is a good idea. It's a slow game, take your time.
The cursor is not changing, autosave, one ending.
We love escape games, and our readers love talking about them and sharing hints! How about you? Let us know what you think, ask for clues, or help out other players in the comments below.


Colorful is pretty simple but there are a couple locations that are harder to find.
the dock
to get there click on the rubbish between the place with the fishing rod instructions and the mayor's office
the gate
to get there click on the rubbish in the very upper left corner of the game window
Pick Some Flowers exploration tip
When you're on the starting screen with the leafy branch
click the lower left corner of the game window to turn to a little alcove
There's something else really hard to find that I haven't been able to find myself yet.
I Picked Some Flowers, but had to brute force two of the puzzles.
I never saw a clue for the five switches, so I just counted in binary.
The Roman numerals are shown in the wrong order. I don't know what was intended (there are several possible clues depending on what you choose as the default order), but the clue NEEDS to end with "I".
I did look something up earlier in the Flowers game and came across some spoilers, but there's certainly no brute force required:
Hint: the clue for the five switches can be found by examining an item (which disappears when you're done with it).
and the clues are correct:
Hint: the roman numerals refer to something that you can count within each scene.
I managed to pick one flower, but now I only have two
walnuts
help, please?
The switch clue was to the left of the treehouse, it was leaves
The leafy branch
was upside down compared to the roman numerals
Found it!
it's right there and it's embarrassing that I didn't see it sooner
right on the guy asking
Pick a flower red door
key is in scene 1
near the green fairy
in the orange lampshade
Sorry Konrad, I was thinking of a different puzzle for that first spoiler.
Walkthroughs for the first three.
Flower Pictures Room
They may be low-maintenance, but I think I'd prefer actual flowers.
Exploration
Most of the objects in the room are already familiar to those who've played the series, but the changing cursor draws your attention to the purple unlit candle with black stripes. Above that, three pictures of flowers hang on the wall but the middle one is scrambled, and the left picture can be flipped over to find a clue.
Turn right. This screen is less crowded, with a beautiful view outside the window. There's a wide low cupboard with a four-color lock and a yellow candle on top.
Turn right to face two locked doors. In the middle, there's a television that's turned off, a grid device below and on the left, and a green candle below and on the right.
Turn right. There's a red candle next to the tilting corner picture, and of the ten compartments around it four in the upper row are unlocked and empty except for pink flowers marked on their backs. The locks on the bottom row of compartments (other than the middle one) have four colored dials, four colored letters, four vertical bars, and two pink buttons.
Unscramble
As usual, let's start with the randomized scrambled picture on the first screen, which you can solve by rotating the tiles until they align.
When you're done, the right picture slides aside to reveal a hidden compartment with a square tile.
Horizontal
Use the clue from the candles to unlock the wide drawer below the window.
Each screen has a colored candle and each candle has stripes. The candles with 1, 2, 3, 4 stripes are yellow, blue, green, red, so click the buttons 2, 1, 3, 0 times and then open the drawer to find a square tile and a golden key.
Unlock / Exploration 2
Use the key to unlock the door on the left of the TV.
The bathroom looks completely familiar, so you have no trouble opening the cabinets on the right side of the wall to find a lighter, square tile and some shaded rectangles.
Vertical
Use the clue from the bathroom to unlock the second-right compartment on the bottom row.
Since the rectangles from left to right are the 2nd, 1st, 3rd, 4th from the bottom, click the bars (from left to right) 1, 0, 2, 3 times to match, then open the compartment to get another square tile.
Burn
Examine the lighter and open it, then use it to light all four candles.
Each candle burns out by the time you leave its screen and come back, leaving a darkened letter in the melted wax.
Burnt
Use the clues from the candles to unlock two of the compartments in the bottom row.
The letters in the blue, red, green, yellow candles spell out HERB, so enter that in the second compartment and open it to find a square tile.
The wicks in the red, green, yellow, blue candles point to the ↘↖↓↙ directions, so click the buttons on the first compartment 3, 7, 4, 5 times then open it to find a remote control.
Watch
Use the remote to turn on the TV, which shows a clue with a square surrounded by blue flowers.
Square
Use the clue from the TV and left flower picture to unlock the tilty picture.
On the TV, the flowers with 4 5 7 6 4 petals are in the ⌟⌝ ⌞⌜⌟ corners, so click those corners.
The middle drawer on top opens up, and you see a pink flower and a square tile.
Pink
Use the clue from the flowers to unlock the last compartment on the bottom row.
From left to right, the flowers appear on the RRLLL sides of their compartments.
So push those buttons and open the compartment to find the last square tile.
Complete
Place all the square tiles in the grid device, which shows another scrambled flower photo.
So solve this randomized puzzle by swapping the pieces into the correct positions. (Hint: assemble the flower that's in focus first.)
When you're done, the device opens up to give you another key.
Use that key to open the door and leave!
COLORFUL
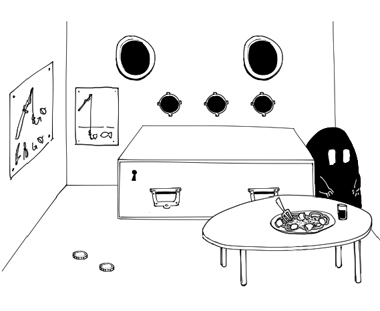
The art is very Daymare Town, but this time your quest is easy: "Please replace the old crystal with the new bright one."
Exploration
After hearing the mayor's request, you appear in a town square with four buildings around. A single tree branch lies between the second and third buildings.
Start with the left building, which has a cat blocking a safe. The cat wants a fish. On the left, a hand extending from a hole covers a key, and it somehow asks for a croissant.
In the second building, a dark figure hides in the corner beside a huge locked chest. Some unfinished dinner sits on the table, and you can pick up half a sausage from it. There's also a short guide to fishing on the left, as well as 500 G and 5 G coins on the floor.
Entering the third building, you find that it's the mayor's office from before. He's not any tidier than the others, so you manage to pick up the nearest bread roll on the table, a bundle of rope from the hooks on the right, and 50 G and 100 G coins from the floor.
One of the hooks on the left is shaped like an arrow. It's not pointing at anything, but you can take the hook off.
The fourth building has no entrance, but there are still more places to visit.
Pass through the gap between the second and third buildings where you got the branch, to arrive at a wooden dock with three 10 G coins.
Go back to the town square and click the top left corner where you see iron bars. The gate is locked and requires a key, but you can see a cavern through the bars, and pick up 603 G from a ledge on the left.
Croissant
Give the bread to the hand in the first building, which responds with a heart and then retracts into the hole. Pick up the drawer key.
In the second building, use the drawer key to unlock the chest. The drawer contains a diagram with digits, as well as 20 G, 500 G and 1 G coins.
Catch
In your inventory, combine the branch, rope, hook and sausage to make a complete fishing rod.
Then use that in the pier to get a fish.
Give the fish to the cat, who also responds with a heart and then vanishes.
Code
Enter the four-digit code from the diagram (4037) into the safe, which contains a gate key as well as one 10 G and two 100 G coins.
Cave
Use the key to unlock the gate, and pass through the cave. At the end, you find a pink crystal resting on a stalagmite.
Color
Return to the office, and give the crystal to the mayor, who puts it into his device, which fires out a pink beam, which turns the entire town back into color!
(The coins are optional, but isn't it nice to know there's a total of 2019 G in the game?)
Marly Mouse Escape - Garden
It's not a garden-variety escape!
Exploration
(Marly is on every screen but does nothing when you click him.)
You start off next to a large-looking chest with four colored digit buttons.
Start by going right. This puts you in front of a wall with a hose connected to a tap, but the tap handle is missing.
Go right to find a beaver asking you for something shiny in exchange for eating all the weeds.
Go right to find some carrots growing in the ground. The signs above have names of different crops with some of their letters underlined, as well as prices and how long to grow them for.
You find a tack attached to the rightmost carrot.
Go right to find a glass bottle. The bottle cap is too tight to remove.
Go right to find a small ditch/rut in the ground and a wooden box on the other side, blocking your way. There appears to a basket on this side, but it somehow has a six-letter lock.
Since you can't continue right, go back four times to the first screen and then go left. Four stepping stones in the ground have symbols that change when you click them.
Go left. There's a bright-colored snail looking at a flower that "appears to be sad".
Go left to find a caterpillar on a rock, who offers to help you for the price of 3 mushrooms. There's also a rather large coin mostly buried in the soil.
Six letters
Use a clue from the signs above the carrots to unlock the basket on the rightmost screen.
The underlined letters spell out ROTATE, so enter that in the lock and open the basket to find a thimble.
Four digits
Use the other clue from the signs to unlock the chest on the first screen.
Since the buttons are yellow, orange, red, green, look at the corn, carrot, tomato, lettuce signs, which indicate growing times of 8, 7, 4, 5 weeks.
Enter 8745 into the chest and open it to find a gear-shaped handle.
Splash
Attach the handle to the tap, which makes the water gush out of the hose.
Use the thimble in the water stream to fill it. Now where could you use this water?
Use the filled thimble on the gloomy flower to cheer it up. As you do so, the snail moves aside to let you take a mushroom.
Sharp and Shiny
Apparently the tack isn't shiny enough for the beaver, but you can use it to pry off the bottle cap.
The bottle cap isn't shiny enough either, but you can use it to dig up the dirty coin.
The dirty coin is even less shiny, but you can wash it in the water and give it to the beaver. (Or you can just give it directly and let the beaver do his own washing.)
After the weeds are all chewed up, you find another mushroom and a clue carved into the stone.
Steps
Use the clues from the large stone to solve the puzzle on the smaller stepping stones.
As the carved triangle indicates, you need to put the largest symbol on the left and the smallest on the right.
So make the stones show the flower, snail, butterfly, turtle by clicking them 3, 1, 0, 2 times, which makes a mushroom grow from the dirt.
Fungi
Give the mushrooms to the caterpillar, who gives you a mini trampoline.
Go to the rightmost screen and place the trampoline on the ground to bounce your way to freedom!
Is anyone doing a walkthrough for "Pick some flowers"? Otherwise I would do it.
Yes, I have it planned.
Are you planning it or already working on it? Because I'm half done with mine by now.
I have not started (though I already know what's needed in it), so go ahead and finish yours!
Pick some Flowers
General hints:
• Some spots are less obvious to find. Look around carefully. Try clicking on the edge of objects and screens.
• Fairly often you will need more than one or even two hints to solve a puzzle.
• Some things take a little time to grow!
• When entering a sequence, don't click too fast. Otherwise the game may not process your input correctly. Take your time.
• Once you have unlocked the panel in the starting area, you can click on the large button below your inventory to move between scenes.
Starting Area
Exploration
• You are looking at a panel where a number code can be entered. To find it, you will need a red, yellow, and green leaf.
• On the ground is a twig with red leaves.
Less obvious:
• On the right wall, you can zoom in to see some Roman numerals.
• In the bottom left corner of the screen, there is a light grey area. Click it to zoom in to a small niche with a yellow leaf.
Turn right.
• There is a table with four bottles on it. Behind the table is a locked door you cannot open.
• Under the table is a green leaf.
• On the left wall, a picture shows the same table, now with different flowers in the bottles. The door behind the table is opening.
Solution
Collect the yellow leaf from the niche.
Collect the green leaf from under the table.
Collect the red leaf.
It will drop off the twig.
The clue is the Roman numerals on the wall.
Compare the way the numerals are arranged to the position of the leaves on the twig.
Touch the leaves in the correct order (I, II, III, IV, V, VI).
Don't click too quickly! Each leaf should light up and make a sound when you click it.
If nothing happens, zoom out of the twig screen, then back in, and try again.
Click the leaves in this order:
4 1 5
6 2 3
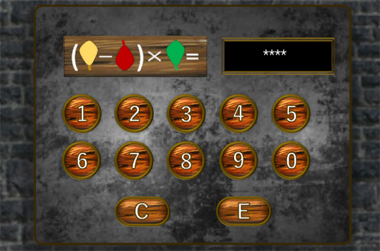
Unlock the panel.
Do the math, using the numbers on your leaves and input the code. Press "E".
Doesn't work? Note the position of the leaves on the panel. The yellow and green leaves point upward, the red leaf points downward.
The numbers on the yellow and green leaves are 80 and 91 (not 08 and 16). So the solution is:
(80-42)*91 = 3458.
The panel opens to show four "scenes" to select from. For the moment, only scene 1 is available.
You can return to the starting area any time by clicking on the image of the scenes below your inventory.
Right now, there's nothing else to do here, so let's move on to...
Scene 1
Exploration
• You are looking at some trees in a forest. On the tree in the foreground are some fruits and leaves. You can zoom in for a closer look, but nothing can be done with them.
Turn right. There are two zoom areas here:
• A large tree with a door in it. On the door is a panel with four square green buttons.
• To the right of the tree, someone has written "CLOUD" into the sand with a stick.
Less obvious:
• In the grass to the right of the door, there is a pair of green sunglasses.
• At the top of the CLOUD screen, there is another area, a small flower bed with a plant in it.
Solution
Open the door in the tree...
... using the fruits-with-leaves clue.
Have you found the sunglasses by the door? Pick them up.
Once you pick up the sunglasses, a green fairy appears in the first screen, near the fruits and leaves.
You should probably use the glasses here! (Click the glasses in your inventory first, then look at the fruits and leaves, not the other way round.)
An arrow appears, showing you the correct order: clockwise, starting from the bottom left.
"Remove" the glasses, then zoom in to the fruits and leaves again. How do they correspond to the buttons on the door?
Don't look at the direction of the leaves only (left or right), but also note where they sit in relation to the fruits.
Some leaves sit right on top of the fruits, some a little higher.
The "higher" leaves correspond with the two upper buttons, the "lower" ones to the two lower buttons. Now add the directions.
The sequence is: TR (top right), BR (bottom right), BL, TR, TL.
Or:
5 14
3 2
Again, don't click too quickly. If nothing happens, try again, slowly.
Inside the tree house
Explore:
Turning clockwise, you see
• a sofa in front of you, with a vine hanging above it.
• a circular shelf with a tree stump and a book on it. On the stump sits a small green dome. In the book, there's a grid with letters in it.
• a planting pot, which has a compartment secured with a padlock, by the door.
• a bed with a box with buttons lying under it. Take it.
Open the box with buttons.
The vine above the sofa is the clue.
What do the tablet and the vine have in common?
There are three pairs of buttons (one left, one right) on the tablet.
There are three pairs of branches on the vine. Some leaves hang on the left side, some on the right.
Have you noticed how the leaves are grouped together?
One branch has only one leaf, another 2 leaves, another 3, another 4.
One leaf sits at the top right of the vine, 2 leaves are top left, 3 are bottom right, 4 are center left.
Click the corresponding buttons in that order: TR, TL, BR, CL.
Or:
2 1
4 -
- 3
You found a screwdriver. The green fairy was also hidden in the box and is now hovering over the bed. Is it trying to give you a hint?
Where is it looking?
Look inside the lampshade to find a red key.
Open the tree stump on the circular shelf.
Removing the panel with the screwdriver is the easy part. Now, you can enter a code.
Hm. "CLOUD" doesn't work.
You will need the CLOUD clue to solve this puzzle. But it seems you cannot solve it by simply reading the characters as letters.
You will also need another clue.
The book.
Think of the characters in "CLOUD" as shapes, or outlines. Go outside to have another look at the letters as they are written in the sand. See how they are rather angular? Where have you seen shapes like that before?
Look at the grid in the book again. Combine the two clues.
"C" corresponds with the center-right cell of the grid, which has lines at the top, left and bottom, forming a "C".
"L" corresponds with the L-shaped cell, top right.
"O" is the center cell, which has lines all around it.
"U" is the top center cell.
That gives you the letters T, R, I, C. But what corresponds with "D"?
Sometimes it may be an option to close the book on something.
Close the book and look at the title. Do you see the D-shape?
It's the outline of the area with the "K" in it. So the code is TRICK.
Unlock the padlock with the green key you just found to get a water bottle.
Water the plant outside, above the CLOUD screen. Now wait until it grows.
Just waiting around won't work, though.
Go back into the tree. The green fairy is now by the door to tell you the plant has grown.
Pick up the Tsuwabuki.
Note that some leaves have remained in the ground.
Now here's something you will have to do with each plant you find: Remember its name, and how many leaves are left in the ground after you picked it (four, in this case).
Also, pick up the glass in the top right corner of the screen.
The next scene has been unlocked, so let's move there.
Scene 2
Exploration
• You are facing a tree with a small snow mound underneath.
Turn right.
• There's a wooden box, its lid secured with screws.
• To the left of it, an Inuit in front of an igloo asks you for three walnuts.
Solution
Search the snow mound under the tree to find a walnut.
Open the box with your screwdriver to find another walnut.
That's not all, though...
Search the box again. There's a towel hidden in a secret compartment.
Pick up the towel. That was easy. Now. where is the third walnut?
Have a close look at the Inuit!
Give the walnuts to the Inuit, who gives you a bronze key. Unlock the igloo with it and enter.
Inside the igloo
Explore:
• You are facing a table with some fruits on geometrically shaped plates.
Turn around to face the door.
• There is a decorated plate on the floor, with mud on it.
Fruits and shapes
Clean the plate on the floor with your towel. A code is required, hinted at by a sequence of shapes: circle, heart, square, star.
The shapes resemble the forms of the plates on the table. How can you make up a number or a word out of the arrangement of fruits?
There's a different number of each fruit: 1 banana on a round plate, 2 peaches on a star-shaped plate, 3 plums on a square plate, 4 apples on a heart-shaped plate.
You probably tried 1432? It doesn't work. Seems that just taking the numbers as a clue is not enough. The different fruits must mean something, too.
So if the order is circle, heart, square, star, the solution must have to do with 1 banana, 4 apples, 3 plums, and 2 peaches, in that order.
It has to do with letters in a word.
Take letter 1 from BANANA, letter 4 from APPLE, letter 3 from PLUM, and letter 2 from PEACH.
The code is BLUE.
The decorated plate turns out to be a manhole cover, which is now open. Climb down into the cellar.
Explore:
• There is a magic circle on the ground.
• Beside it is a quirky table with nothing on it.
• A sheet of paper instructs you to restore the missing three candles to the circle and to light them.
Less obvious:
• Click the right edge of the magic circle screen. Look closely at the leg of the quirky table to find a candle.
Turn around.
• On the other side of the room is a sideboard with two drawers and sliding doors. In the drawers, you find a candle and matchbook. The sliding doors are locked with another code panel.
• There is also a black couch,
• and a poster on the wall with letters in various colours.
Less obvious:
• Click the top right of the couch to look behind it. You find another candle.
Place the candles in the circle and light them with the matchbook. Coloured circles appear, with different numbers of pine cones in them. Also, a plant has appeared on the table - take it.
Unlock the sideboard.
The hint is the coloured circles.
The red circle has 1 pine cone, the green circle 2 pine cones, the pink one 3 pine cones, and the blue one 4 pine cones.
Find the corresponding letters on the poster, in that order.
The code is MOON.
Dump the earth you found into the wooden box outside the igloo. Put the plant in it. Hm, it has no blossoms yet. But Scene 4 is now unlocked. (Yes, 4 unlocks before 3.) So move on there!
After visiting Scene 4, you can water the plant.
Fill your bucket with water at the pool in Scene 4.
It has no blossoms yet. Zoom out and in again. Now you can pick up the snowdrop. Note the name and how many leaves are left in the ground (one).
Scene 4
Exploration
• You are looking at a wall covered with ivy. Stone steps lead up, but you can't climb them.
Turn left.
• There's a pool of water here. A blue fairy points at the water.
• To the left is a light blue dome with another plant in it. It is connected to a grey box. You can click the corners of the box, but in what order?
• Behind the pool is a red door.
Solution
Is there really nothing at all in the first screen?
Wait, there's a glint in the grass! Pick up the scissors.
Go back to the pool, fill your bucket with water. Use it to
water the earth in the box in Scene 2. (Click the earth, not the plant.)
Unlock the door with your red key.
Explore the house:
• On a ledge behind a sofa are six yellow ducks facing either left or right. Each duck has a small symbol on it.
Turn around:
• A large bowl of flower growth agent is locked with a chain and padlock.
• Behind it is a sideboard. Click between the bowl and the left wall to move around it. The sliding doors are locked; you'll need a left-right code to unlock them. Some symbols give you a hint.
Less obvious:
• Click on the right edge of the sideboard for a side view. Notice the nail.
• On the right wall, a skimmer spoon hangs on a string below the ceiling.
Unlock the sideboard.
The clue is the ducks.
Look closely at the ducks, taking note of the symbols and where each one is looking. Apply that to the sideboard lock.
Circle = L, pentagon = L, triangle = R, sun = L, heart = R, cross = R.
Now enter the correct sequence for Heart, heart, triangle, circle, cross, pentagon.
R R R L R L
Wait, we didn't use the sun symbol at all?
Let's have closer look at that duck. Aha!
You just found a tack puller, which comes in handy, since the sideboard's sliding doors appear to be stuck.
Click right of the sideboard to find a nail, remove it with the tack puller.
Open the sideboard. You find a small table, a schematic with a yellow line, and a fish tank with a gold key in it.
Get the gold key from the fish tank.
You will need a tool.
The skimmer spoon, obviously. But it hangs too high.
Drop the small table on the floor below the spoon so you can climb up. Cut the string with your scissors. Use the skimmer spoon in the fish tank.
Unlock the padlock on the bowl with the gold key. Fill your glass with flower growth agent. Now you can fertilise the plant in the dome by the pool - if you can open the dome.
Unlock the dome.
The lock mechanism is in the small grey box in front of it. You must press the corners of the box in the right order. The clue is the one hint you haven't used yet in this area.
The schematic in the sideboard. Look at it very closely.
Have you noticed that the yellow line is not continuous? There are small interruptions in it.
Each segment of the line consists of two small lines, forming a right angle. (Remember, you are looking for corners!)
See how these angles can be viewed as corners? The first segment from the left (down - right) represents a bottom left corner.
The next segment (right - down) is a top right corner. There are six corners altogether.
Follow the line, taking note of the corners. Then go outside and press the corresponding corners on the grey box by the dome.
The sequence is: BL, TR, BR, TL, BR, TL.
Scene 3 is now unlocked.
The plant has no blossoms yet. Give it a little time (move away from the screen and back again), then pick up the Wasabi. Again, take note of how many leaves are left in the earth (two).
Scene 3
Exploration
• You are looking low doorway in a stone wall. A long stick leans against it. You can move one step closer to the entrance, but there is nothing to do there right now.
Enter the doorway. Inside the cave:
• A small brown cat asks you for a fish.
• On the floor is another manhole cover with sliders on it.
• Steps lead up to pedestal carrying a yellow dome with a plant in it, secured with a padlock.
• At the bottom of the steps, to the left, is a net with a handle.
Turn around.
• Facing the doorway, you see a stone slab with the letters R and T written on it. Between them, there are six buttons that can be pressed.
Solution
Take the stick. Enter the cave. Take the net.
Unlock the stone slab with R_T on it.
This one is almost too obvious: R - something - T.
Think alphabet.
The missing letter is S. Trace it by pressing the buttons in the correct order.
Like this:
2 1
3 4
6 5
Again, don't click the buttons too quickly.
Take the picture - X marks the spot! You can't dig with your bare hands though, it seems, so that will have to wait.
Unlock the manhole cover.
Have you opened the stone slab already? If not, do that first.
The picture in your inventory holds another clue.
Look at the picture closely. Not just at the image itself...
... but also at the border.
There are faint grey stripes on the top and bottom borders.
Set the sliders on the manhole cover accordingly.
U U D U D.
Dig with the trowel you just found at the spot marked on the picture. You find a string.
Fishing time!
First, you need a fishing tool.
Have you found the stick (outside the cave), the string (by digging a hole), and the net (in the cave by the steps)?
Combine them, beginning with the net, adding the stick, then the string. Now where to fish?
There aren't too many places with water.
Go back to scene 4 and use your fishing tool in the pool. (No, you can't fish in the fish tank ;)) Return to Scene 3.
Give the fish to the cat, who gives you another gold key. Unlock the padlock on the yellow dome. Pick up the Kan aoi, taking note of how many leaves are left in the earth (three).
You should have collected all four plants now.
Starting Area, revisited
To return there, click on the large button below your inventory, then back out.
Put the plants in the bottles. The door is now open. Step through.
Final Area
Exploration
• You are in a courtyard, facing a door with two knockers that can be clicked. You don't know the correct order yet.
Go right.
• A circular slab on the wall displays the Roman numerals I, II, III, IV (from top to bottom).
• There is also a small pillar with a red, a blue, and a pink square that can each be set to digits 0 - 9.
Less obvious:
• Click right of the pillar to look at its side: Yellow = 7.
Go back to the door, then left.
• There are plants in a flower box, like the ones you collected.
• On the floor beside them is a circular slab covered with ivy. It resembles the slab on the wall on the other side of the room.
• A square tablet with a 4x4-grid leans against the wall. In some of the small squares are geometrical shapes in the same colours you saw on the pillar: red, blue, pink, yellow.
Solution
Digits on the pillar
You need three digits to enter into the red, blue, and pink squares. You know that a yellow square = 7.
Now this one's a bit tricky.
The clue is the tablet, which also has squares and the colours red, blue, pink, and yellow. Look at it again.
Each colour sits in exactly two squares. Since we are looking for digits, each pair of coloured squares must represent a digit. How can a digit be represented by two squares?
Take note of how the digits on the pillar look.
They are digital characters, made from horizontal and vertical lines along a grid that looks like two squares sitting on top of each other:
___
|__|
|__|
How do the two yellow squares match a digital 7?
Focus on the vertical and horizontal lines where the colours touch the squares surrounding them. For the two yellow squares, that means:
In the upper square, the colour touches the top and right sides:
___
|
In the lower square, the colour only touches the right side:
|
Now, combine the two squares, imagining (or drawing) them on top of each other, the upper one on top, the lower one at the bottom:
___
|
|
7 - that's what we were looking for. Now do the same with the other coloured squares.
Red:
In the top square, the colour touches the top, right and bottom sides.
In the bottom square, it touches the right and bottom sides.
___
___|
___|
Blue:
In the top square, the colour touches all four sides.
In the bottom square, it touches the left, right and bottom sides.
___
|__|
|__|
Pink:
In the top square, the colour touches the left and top sides.
In the bottom square, it touches all four sides.
___
|__
|__|
So the code is 386. You receive a paper with numbers on it.
Circular slabs
Cut the ivy on the slab on the ground with your scissors. You can now enter a code.
The slab resembles the one on the other side of the room, with the Roman numerals.
The paper from the pillar is a another clue. (If you haven't solved the pillar puzzle yet, do that first.)
A third clue is the flower box with the four plants you collected.
Combine the clues!
Do you remember the names of the plants and the number of leaves that were left in the earth when you picked each one up? If you don't, visit each scene again and take notes.
The numerals (I to IV) refer to the leaves left in the earth.
So, from top to bottom, you get:
I = one leaf = SNOWDROP.
II = two leaves = WASABI.
III = three leaves = KAN AOI.
IV = four leaves = TSUWABUKI.
Combine that with the paper:
8
6
3
8.
You solved a similar puzzle before. Remember the fruits in the igloo?
It's about letters in a word again.
Take the 8th letter of SNOWDROP,
the 6th letter of WASABI,
the 3rd letter of KAN AOI,
and the 8th letter of TSUWABUKI.
The code is PINK. Enter it to open the slab.
W = V?
One last puzzle. Beneath the slab, you have discovered a series of strange symbols, an arrow pointing from left to right, and a scribbled instruction: "W = V".
What do the symbols mean, and how does "W = V" help?
What do the symbols and the letter W have in common?
They are horizontally symmetrical.
With regard to symmetry, what could "W = V" mean?
Only take half of each symbol (the left half). That gives you:
r r r l r r r.
Two door knockers
Use the clue you found under the circular stone slab with the door knockers.
The door opens and a black cat walks happily out into the open air. Let's follow it and celebrate our escape!
One thing I should have made clearer: The key to the red door in scene 4...
... is in scene 1, somewhere inside the house.
(I thought you couldn't unlock the next scenes without finding it first, but you can.)
Nina, Good job on the walkthrough. I was a tiny bit confused on a couple of parts but i figured it out though. Well Done.
i forget if this was mentioned but i went bac to the early days of these online point and click games here, and some games no longer load. I'm not sure if its because the game no longer exists, or if it has moved to somewhere else. Could someone look into that? thanks.
Thank you, Paul! This was my first walkthrough here, and I tried to emulate the excellent walkthroughs of kktkkr. If mine was only half as helpful as his/hers, I am happy!
Hi Paul,
when you find a broken link leave a comment which one, please. I'll check it and try to find a correct one. Sometimes, it can be fixed. Some sites are gone, I'm sorry.
chrpa there are a lot of the early ones, like the ones that made daymare town, and several others. when i click the link to the game i get a blank page but i see 3 sections like comments, description etc but no game. a lot of the more current but yet older games work fine. It does this with Edge,Chrome,and Firefox
Paul, I've had something similar happening to me. It seems that what's happening is that the browsers are blocking the Flash plug-in.
At least for me on Chrome, what's been fixing it is to click the lock icon to the left of the "https" and set the Flash option to "Allow". Unfortunately, I've not found a way to whitelist JiG, so the fix only works until the browser window closes, then I've got to redo the setting.
Did forget one detail... The page will have to be reloaded once the setting change is applied, but the single reload is only needed *when* the setting is changed. For the rest of the browser session it *should* work.
Paul, I checked PastelGames and links are correct. As ShadowWolfSBI says it's browser issue. Browsers are more or less blocking Adobe Flash Player (I tried Edge, Firefox, Chrome).
You need to allow Adobe Flash Player in your browser. Did you try to do what ShadowWolfSBI advised? Did that help?
oh i adore Mateusz Skutnik's games -- can't wait to play!!
Update