
 Welcome back after the week! New games are here!
This week we've got attractive Amajeto's room and moreover one late Easter greetings from the same authors. Quite long Nicolet's room, dominated by cold and closed fireplace, is very well done (again) and no need to mention that it's fun as always. Flash512 locks you in a room with still wrapped christmas gifts and a Christmas tree, and while being stuck and searching for a hotspot you've overlooked you may appreciate truly relaxing soundtrack.
Have a good time and enjoy!
On your way through the rainbow...no not this time...so, on your way around the palette you arrive to mustard yellow room and it's very elegant! Vivid colors, stylish furnishings and clever puzzles. Amajeto's creativity is impressive and the fact, that they are able to confuse player on such a small space with few well known puzzles, still amazes me.
The cursor is not changing, no save button, one ending.
Not my fault you get bunnies one month after the Easter Holiday! Amajeto apparently got lost among colors and only now realised that they missed an important event. But nothing is lost. Bunnies and eggs are finally here and you can play now! Happy Easter (additionally)!
The cursor is not changing, no save button, one ending.
P.S. I've completely forgotten about the Easter too. I'm sorry. Here is one more Eggs and Bunnies game.
The fireplace screen in Nicolet's room is closed, and the hearth appears cold without a trace of logs or even ash - but there must be something important about it when it's in the game's name, right? Explore the room carefully, notice, that there are several clues not matching the puzzles around this room (yes the game is bigger than seems) and try to open the firescreen and reveal what's hiding behind it!
The cursor is not changing, autosave, one ending.
The game is available for Android too.
P.S. Talking about fireplaces hiding secrets - try Room Marine by Place of Light. Very enjoyable.
Flash512's latest creation is here - nice, pleasant, relaxing - and looking at the Christmas tree, few months late. Or early, it depends. The game's scheme hasn't changed, it's linear as usual - find an item or clue, use it, you gather another item/clue, use it, and so on - but few hotspots are difficult to find so be observant and pay attention to details. Also, some zoomed-in views may be red herrings. Will you escape?
The cursor is not changing, autosave, one ending.
The game is available for Android too.
We love escape games, and our readers love talking about them and sharing hints! How about you? Let us know what you think, ask for clues, or help out other players in the comments below.


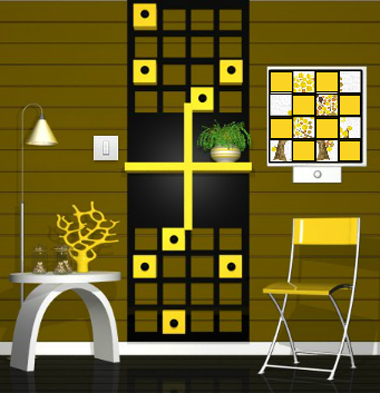
Color Room: Mustard Yellow
Exploration
(As usual, I'll ignore most irrelevant objects, like those potted plants all over the room. Since "cupboard door" is inconveniently long to type, I'll refer to each compartment as just a cupboard even if they belong together.)
The first screen is divided by two grids, one above the other, with a large yellow cross between them. Some squares in the grids are protruding from the wall and have dots in their middle. On the left, there's a light switch that controls those pieces, and a table with glass jars of gold-plated heart decorations around a yellow square tile. On the right, there's a folding chair and a grid device that shows a picture but missing many of its pieces.
Turn right to face two windows with a picture of a yellow flower in between that tilts when you click its corners. Checking the cupboards beneath, you find that the two yellow doors in the middle have a lock with four shape buttons and a lock with what looks like a thin line but is actually four adjustable vertical bars. Some words are printed above and on the rightmost black cupboard, where you find that the letter O has a screw in its middle.
Turn right to face the locked exit door. To its left, there are four colored flower pictures which you can click to flip over and find star shapes. Checking the table, you find some diamond markings in the teacups as well as a square tile behind the teapot.
Turn right to face a television that's currently turned off, above a shelf with a colorful decoration next to a working clock. The top white cupboard directly above the slightly taller folding chair has a two-button lock, and the two cupboards below the TV have locks with four digit buttons and sixteen buttons that turn yellow.
Grid
Use clues from the first screen to unlock the right cupboard under the TV.
The cross-shaped shelf is actually a plus sign, telling you to combine the dotted parts from both wall grids:
OO--

O--O

O--O

-OO-
Push those buttons and then open it to find a square tile and screwdriver.
Unscrew
Use the screwdriver on the black cabinet with yellow letters.
More specifically, use it on the screw within the letter O, which rotates and messes up the letters.
Numbers
Use the clue from the changed letters to unlock the left cupboard under the TV.
The screw now sits diagonally to form a multiplication sign, and the letters to its left and right are now numbers, forming the formula 773×3.
Since that works out to 2319, enter that in the door and open it to find a square tile and remote control.
Watch
Use the remote on the TV to make it display a pentagon shape.
Then use it again to switch the clue to some colored squares on a yellow background.
Shapes
Use clues around the room to unlock the left yellow cupboard under the windows.
Ignoring the most common shapes, you find that the others form a pattern:
One pentagon on the TV
Two diamonds in the teacups
Three heart decoration-filled jars
Four stars behind the flower paintings
Enter those shapes by clicking the buttons 5, 4, 3, 1 times, then open the door to find a square tile in front of an orange background.
Vertical
Use the other clue from the two grids on the first screen to unlock the right cupboard under the window.
After lighting up the dots and mentally combining the grids, you find that the lit dots in the left two columns are in the 3rd and 4th rows from the bottom, while those in the right two columns are in the 1st and 2nd rows from the bottom.
So click the bars 2, 3, 0, 1 times, and open the door to find a square tile in front of a purple background.
Pair
Use the clue from the TV and window cupboards to unlock the top white cupboard to the left of the TV.
With the window cupboards open, you see that orange is on the left and purple on the right.
This means the TV clue tells you to press the RLRRLR buttons. Do so, and open the cupboard to find a square tile.
Colored
Use the remaining clues from the room to unlock the tilty picture between the windows.
The wavy things below the TV have colors that match those of the small flower paintings.
So click the ⌟ ⌜⌝ ⌜⌞ corners of the tilty picture appropriately. It comes loose and you can flip it over to find the last square tile.
Complete
Place all eight square tiles into the picture on the first screen, and solve its randomized puzzle by rotating the tiles until they align.
(Hint: start with the rarest colors, and beware of the almost-blank tile.)
Once you're done, the picture opens up to give you a golden key. Use it to unlock the door and leave!
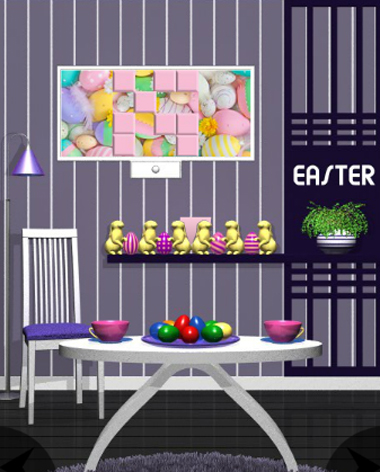
Bunnies Room Escape
Exploration
The word at the right of the first screen proudly informs you that it's Easter (or you can just pretend it is). Ignore the table with the pile of colored eggs, and notice the picture on the wall that's missing some tiles, as well as the shelf of creamy bunnies holding purple/yellow eggs, with a square tile hidden between the middle two.
Turn right. The bunny on the chair is holding a square tile, and zooming in makes the different-colored spots on its paws quite obvious (so much that you might even fail to notice its uneven ears). There's also a round tray of colored eggs with a narrow slot in its front. The cupboards beneath that have a lock with a grid of sixteen buttons and a lock with four digit buttons.
Turn right. Beside the locked door, there's a pink couch and you can lift one of its cushions to find a square tile. On the wall, there's a very wide painting that tilts when you click its corners.
Turn right to find a television screen beside a small window. Four orange eggs are simply labeled EGGS, and you notice that the row of three cupboards has one with a four-button lock (quite a rare sight!), one with a four-letter lock and one with a two-button lock.
Yellows
Use the clue from the bunnies on the first screen to unlock the rightmost (two-button) cupboard under the TV.
The bunnies face the RRLRLL directions, so push the buttons in that order.
Opening the cupboard, you find a square tile in front of a small orange grid clue with some squares filled in.
Sequence
Use the clue from the tilty egg painting (beside the door) and patterned eggs to unlock the left cupboard under the TV.
The patterns on the eggs in the painting match those on the 4th, 1st, 2nd, 4th, 3rd, 1st eggs from the left on the shelf.
So push the corresponding buttons and open the cupboard to find another square tile and a remote control.
Screen
Use the remote on the TV to make it display a clue with a potted plant and four digits.
Then use it again to switch to a clue with five colored eggs under a rectangle.
Switch
Hmm, you have a four-digit clue that doesn't work on the four-digit lock, and a four-letter clue that doesn't work on the four-letter lock.
Let's make them swap roles! First, the letters in EGGS can easily be converted to digits.
Reading EGGS upside-down gives the digits 5993, so enter that in the right cupboard under the window and open the door to find a square tile.
Now for the other direction: how do we get letters out of the digit clue on TV?
Looking around for potted plants, you realize that there's one directly beneath the word EASTER.
The 3rd, 4th, 2nd, 6th letters in that word spell out the code STAR, so enter that into the middle cupboard under the TV and open it to find a square tile, a golden coin and a brown grid clue.
Round
Place the coin in the egg dish under the window, which makes the eggs spin around.
Using that clue, and the other clue from the TV, you can unlock the tilty painting.
The green, red, yellow, blue, yellow eggs are on the
⌟ ⌜⌝ ⌞⌝
corners of the tray, so click the corresponding corners of the painting to loosen it, then turn it over to find a square tile and a clue with pink and black grids.
Four by four
Use the grid clues and the plush bunny clue to unlock the left cupboard under the window.
Combining the clues in the order shown by the bunny (pink and black on top, brown and orange below) gives the final grid
X--X

-XX-

-XX-

-XX-
Accordingly, click the buttons in the top row and middle two columns but not where they intersect, then open the cupboard to find the last square tile.
Collection
You should now have all nine square tiles, so place them in the picture on the first screen, activating a randomized puzzle that you can solve by rotating the pieces until they align.
Hint: try assembling the eggs with lines first.
Once you're done, a compartment opens up so you can take a golden key. Use it on the door to leave!
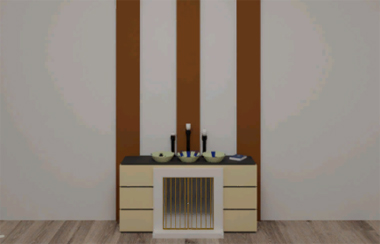
Fireplace
Thankfully, the game doesn't occur entirely within a fireplace.
Exploration
You start off facing what appears to be a tall locked door, but the top section is actually fake and the door has normal proportions. Anyway, look in the chest of drawers on the left to find a box with three round buttons under a row of five lights, a box with a cross-shaped cover fastened with a hexagonal bolt, and a box which somehow has a zipper but no puller to open it with. On top, there's a vase with a plant (or at least some leaves) sticking out of it, and it's labeled with a spade suit marking, and there's a screwdriver next to it.
Turn right. In between the two windows, there's a small bench with a box that has its lid fastened with bolts. Above it, there's some sort of handle/grip bar attached to the wall. Below it on the floor, there's a folded note which shows an arrow with digit markings.
Turn right to find a fireplace accented by some brown stripes on the wall. Oddly, it's empty and the gates are held shut by a coil of wire. On the mantel, you see three plates with blue markings around their rims, as well as a book numbered 2 with a picture of a plant. On the left plate, there seem to be two pickled cucumbers wearing top hats, and you can lift the left top hat to find a diamond suit marking. To the left of the fireplace, you see a round white spot on the floor and a dark spot in the ceiling directly above it.
Turn right to find a small but cozy four-poster bed, on which book 3 has a picture of something you haven't seen, and a box has four columns of colored square lights controlled by round buttons. The wall behind has a rectangular clue with smaller numbered rectangles.
Unscrew
Use the screwdriver to remove the handle from the wall.
Bisection
Use the clues from the arrow note and the plates to unlock the three-button box in the top drawer.
The plates with 2, 4, 2, 8, 4 marks on their rims are the LRLCR plates.
So push those buttons and open the box to find a pair of pliers.
Access
Use the pliers to open up the fireplace gates. As you look within, you find a ladder leading up, but the bottom rung is missing.
So replace the missing rung with the handle you found earlier, and now you can climb up.
Now that you're on the roof, you have a clear view of seven stars in the night sky. The four colored pillars in front of the orange wall have some yellowish things on their tops. On the left, you find a birdcage on top of a bronze column, and a shorter column beside that has a lid fastened with screws.
Heights
Use the clue from the colored pillars upstairs to unlock the box on the bed.
The pink, green, yellow, blue pillars have different heights, being the 2nd, 3rd, 1st, 4th shortest.
Click the buttons 2, 3, 1, 4 times and then open the box to find a pair of scissors.
Unscrew 2
Use the screwdriver on the shorter bronze column. After removing the lid, you can look down… what's this?
It seems you're looking directly at the white spot on the floor of the room. A red hook is attached to the near right side of the porthole, and something is hanging/taped to it?
Snip
Use the scissors to cut the object from the hole, and then return to the room to pick it up. It's a plain golden key.
Unlock / Exploration 2
Use the key to unlock the door to the room. You're not out yet!
Instead, you're facing an almost identical door in a new room, but this room has a gray pattern on the ceiling above. The small table on the left has a U-shaped base, and it has a bolt in its top.
Turn right to face a pair of windows. In between them, there's a chest of drawers with a thick golden stripe running across them. The top drawer has a locked box with four dials, the middle drawer has a box with four color-changing square buttons in different sizes, and the bottom drawer has a box with four digit buttons. On top, there's a photo frame with a pattern of pink and green rectangles, and you can pick it up to flip it over. Also, book 1 stands on the right, and contains a photo of a chair.
Turn right to face the doorway back. There are three small pedestals on the left, and the middle one has a toy carousel with pickle seats and a tiny pickle riding one of them. Pushing the red button makes it spin around, momentarily revealing a spoon at the back.
Clicking around, you find that the carousel has a small hole in its bottom-left corner, as well as a narrow slot along the right edge of its black disc.
Turn right to find a table with yellow bowls on minimalistic placemats, with the right bowl full of some soup. In between them, you can take a walnut from a smaller bowl. Checking the chairs, you find book 4 which has a picture of small green things wearing top hats, and a heart suit marking on the right chair.
Unscrew 3
Flip the picture frame on the drawers over, and use the screwdriver to remove its back panel. This reveals a clue with four red arrows.
Pointed
Use the red arrow clue to unlock the top drawer.
The arrows indicate that the red dots need to be on the top, right, top, bottom sides, so click the dials 0, 3, 0, 2 times and then open it up to find a hammer.
Crack
Use the hammer to smash the walnut, leaving just the short nail inside.
Sizes
Use the clue from the placemats to unlock the four-button box in the middle drawer.
Notice that the colors on the box buttons match those that appear on the placemats.
In order from least to most total placemat area, they are red, dark gray, light gray, blue, so click the buttons 4, 2, 3, 1 times and then open it to find yet another locked box that's metallic with a keyhole, as well as a black rectangular block.
Halt
Place the nail in the hole on the left side of the carousel, and the block in the slot on the right.
Now when you start it up, the block strikes the nail and the carousel stops in the perfect position for you to take the spoon.
Looking closer, you also spot a small hole in the nearest pickle horse.
Consume
Use the spoon on the full bowl to drink its contents, revealing a four-digit code on the bottom.
There's an obvious place to use this…
Enter the code (7128) into the box in the bottom drawer, and open it to find a spanner.
Unbolt
Turn back to the U-shaped table, and use the spanner to remove the bolt from the top. You find a bag of bird seed and a clue with a club suit, as well as a nail on the left side.
So zoom in on the nail and hammer it in. A drawer springs out with a box in it, having five buttons that change between pink and green colors.
Before we go around solving that, there should be some more bolts around…
Return to the first room and use the spanner to remove the bolt on the right box in the top drawer. This reveals that the box has a lock with four colored letter buttons (that only have the letters A to D).
Also use the spanner to remove the bolts from the box on the chair. Inside, there's a box with a button.
Pushing that button opens up the birdcage upstairs.
Two colors
Use the clues with rectangles to unlock the box in the drawer that appears in the U-shaped table.
The rectangles that are numbered 1 to 5 in the bed clue are pink, pink, green, green, pink in the framed picture clue.
So click the buttons 1, 1, 2, 2, 1 times, then open it to find a broom-like duster.
Sweep
Place the duster into the hole in the pickle carousel, where it cleans up the pile of bricks leaving just a zipper handle.
Split
In the first room, repair the zip on the box in the bottom drawer. This just leaves a locked box with card suit buttons.
Suits
Use the clues around the room to unlock the card suit box in the bottom drawer in the first room.
The books each display a different photo, and each item in the photos has a different card suit mark:
Book 1 (near picture frame): Chair = Heart
Book 2 (on fireplace): Vase = Spade
Book 3 (on bed): Table = Club
Book 4 (on chair): Top hat = Diamond
Click the buttons 1, 0, 3, 2 times, then open the box to find a red string tied to a cannonball.
Feed
Climb back up to the roof, cut open the bird seed bag, and place the feed into the now-open birdcage.
This attracts a bird to fly down and land. Just beside it, something curly holds a silver key that you can retrieve with your scissors.
Unlock 2
Use this key to unlock the box in the middle drawer in the second room. It's a telescope!
Gaze
Climb back up to the roof once more. For some reason, the game won't let you take a closer look at the stars.
But you can still use the telescope on the top of each colored pillar to view some birds (at least, their feet) and some letters.
This clue also fits in the obvious place.
In the first room, enter the code (CABD) into the right box in the top drawer. Inside, you find a glass bulb blown into a cylinder with a key inside that you can't reach.
Destructive
Place the glass bulb on the white spot on the floor, then climb up to the roof and drop the cannonball through the hole to smash it.
Climb back down and move the cannonball aside, revealing the golden key that was there. Use that to unlock the door of the second room and escape!
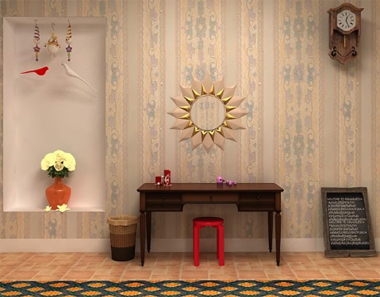
Dream Home Escape
Exploration
Let's go from left to right this time. On the left side of the screen, there's some ornaments hanging over a flower vase that you can rotate to find a keyhole. There's a desk with four empty drawers and one large drawer without a handle, as well as a red stool you can take. You can see some of the opposite wall through the sun-shaped mirror above it. On the right, there's a clock missing its pendulum, and a small blackboard with some text that rapidly goes from a welcome message to nonsense, twice.
The right corner of the carpet is missing, and you can peel it back to find a seashell panel with something missing from it.
Turn right to find some framed art over a cage-shaped table with a yellow cartoonish figure that you can slide aside to find a round weight. To the right of the locked door, there's a stopped clock missing two of the numbers on its face. Under that, there's a chest of drawers with a piggy bank on top. The top row of drawers has a locked drawer with a keyhole, an unlocked empty drawer and a drawer with a four-digit lock, while the other three drawers below that are all empty.
Turn right. There's a bottle on the wall but it's fastened with a screw, and on the floor there's a platform with lots of other bottles, some of which you can lift. In particular, the left one hides a yellow triangle which you can click to look around the edge and find a three-digit lock. Looking at the fireplace, you notice a cat figurine over a star-shaped recess. That's it; you can ignore the deer head, fluffy cat decoration, and completely empty cupboard. (There's also something else on the screen but I'll come back to it later.)
Turn right. A Christmas tree has a star too high to reach, as well as a pile of presents on the right and a sleigh of presents on the left. The right side of the wall has some pretty inlays of boats, fish and turtles, but there's only one turtle because the other is missing.
Swing
Place the pendulum weight into the clock on the first screen. It's rather hypnotizing to look at…
But anyway, a drawer springs out of the clock and you can take a key from it.
Unlock (bronze)
Use the clock key to unlock the vase. Inside, there's a seashell.
Marine
Use the seashell in the panel under the carpet, which opens up so you can access a turtle.
Place that turtle into the matching wall recess, which makes the larger one fall off, revealing a number 12 that you can pick up.
Stars
Place the stool in front of the tree, allowing you to reach the star. After clicking it to turn it around, you find a smaller star on the back.
Place this star in the fireplace recess, and then push it down. What changed?
You can now access a panel to the left of the star button. It has four arrow buttons pointing outwards from the center.
Starred
You may have noticed that the view in the mirror doesn't exactly match that of the wall.
There's a star marked in the mirror, on the white wallpaper stripe between the deer head and the fluffy cat.
So click the matching spot on the wall to find a hidden panel. Inside, there's a simple maze (more like just a bent path) starting at a green oval piece and ending at a hole.
Slide
Use the clue from the hidden wall panel to push the correct buttons on the hidden fireplace panel.
The code involves a sequence of directions in which the oval piece has to move to navigate the maze: RURDLDR.
Push those buttons. The button panel slides aside and you can take a fancy bottle opener.
Plug
A close look reveals that the bottle on the wall doesn't need opening, so what else can you use the opener for?
Attach the opener to the middle drawer of the desk. You automatically open it up to find a screwdriver.
Unscrew
Use the screwdriver to release the glass bottle from the wall (on the fireplace screen).
Then click the bottle again to invert it, making a scroll fall out.
Examine the scroll and unroll it to find a four-digit clue. There's only one place to use it!
Enter the clue from the scroll (3587) into the top-right drawer (under the piggy bank), which opens up to reveal a silver key.
Unlock (silver)
Use this key to unlock the top-left drawer under the piggy bank. It contains a blue block that the game helpfully identifies as an eraser.
Remove
Use the eraser on the blackboard. It's not very effective…
But it gives you a clue that you can use on the platform beneath the bottle collection.
The erased areas form the code 673.
Enter that into the hidden three-digit lock to pop open a drawer with a coin inside.
Saved
Place the coin into the piggy bank, which drops a curly item in the shape of a 6.
Time
Place the numbers 12 and 6 into the clock beside the door, which makes a hidden compartment open up with a door key inside.
So use that key on the door to escape!
Update