
 Let's play! The new Weekday Escape has arrived!
The main themes of this week's featured games are two, boxes and islands. Both Amajeto and Dasyutu have added containers to their living rooms, and seems that they've started new series. Nicolet's escape takes place on beautiful island without any inhabitans (human) and with many carefully constructed puzzles. With Yonashi, you find yourself in the dark alley at night, and only door which leads out of here is locked. And the island? Well you wouldn't believe it, but you can get from here to an island too!
Have a good time and enjoy!
Amajeto definitely isn't out of ideas - look, in their living room are new boxes! - but I am, at the moment. So, we've got another good game with good puzzles, as usual.
The cursor is not changing, no save button, one ending.
Dasyutu's games have simple graphics, they concentrate more on content than form, and their games are always clever and amusing. This one isn't an exception. However, apart from descriptions of items in Japanese (not a big deal) there's also one puzzle in Japanese and without translation are non-Japanese reading players lost. It's this one; the second drawer (from the top) of the greyish cupboard requires three digit code. The hint says: 'if the total price of a pencil and an eraser is 110 JPY, and the eraser's price is 100 JPY higher than the pencil's, how much does the eraser cost'? Can you do the math? Eraser's price is the code.
The cursor is not changing, save button, two endings.
Island escapes are favourite among developers, but a bit monotonous, as islands from which we are usually escaping are sunny, sandy, and in the tropical belt - simply, dreamy islands ideal for vacations - even though motivation for escaping rainy, rocky and cold island in the Northern Sea would be much higher I guess. Not surprisingly, Nicolet chose the standard version with palm trees, sea shells and sky blue lagoon for their latest game too - and absolutely no complaints, it's very enjoyable, good looking and charming game.
The cursor is not changing, autosave, one ending.
The game is available for Android and also iOS.
P.S. One of the best island escapes is Solitude, with excellent sequel Evolution, sadly the last game for PC by 58works.
Yonashi wants you to escape dark alley. It's not as bad as it sounds - the street is tidy, small shops are friendly and offer usual products like food, and these few pieces of garbage lying here seem quite clean. People you meet are nice and have simple wishes (though it may take some thinking to figure out how to fulfill them) and this is exactly how the game looks - nice and simple. On the second and third sight you can see more layers, and also poetry and magic. And you can visit a sunny and sandy island in the tropical belt too!
The cursor is not changing, no save button, one ending.
We love escape games, and our readers love talking about them and sharing hints! How about you? Let us know what you think, ask for clues, or help out other players in the comments below.


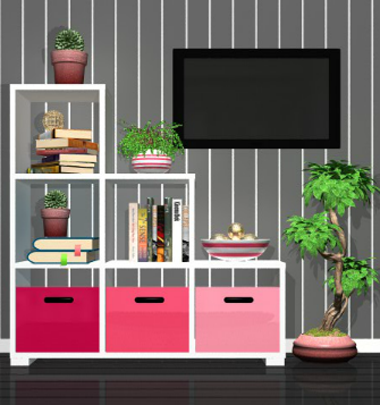
Room with Boxes
It's a good time to think out of the box.
Exploration
This week, you start off facing the television screen that's turned off. The shelves on the left are rather uninteresting, so check the red and pink compartments beneath them. The left one is unlocked and contains a square piece as well as a tiny white square marking, the middle one has a lock with four colored bars that get taller when clicked, and the right one has a four-digit lock.
Turn right. Between the purple couch and the clock on the wall, there's a shelf with a yellow plastic basket, which is empty but has a green base with a black stripe next to some black dots. (Pay no mind to the distracting fitness magazine.) The lamp stand on the left has one empty drawer and one locked drawer with four pairs of small and large colored square buttons.
Turn right. Beside the locked door, there's a picture above the armchair with some pieces missing. Searching the shelf on the left, you find two more plastic baskets with very similar clues, and the bottom one has a square tile in it.
Turn right. There's an even smaller chair here and the picture above it tilts when you click its corners. The top drawer of the desk has four dials marked with different colors, while the bottom drawer has two unmarked buttons. There's also another wall clock that shows a different time from the one you saw before, as well as a plastic basket under the desk with similar clues to the ones you've seen.
Circles
Use the clue from the wall clocks to unlock the top desk drawer.
Each hand on the two clocks is a different color, and the yellow, green, red, blue hands point towards the ↘↙←↗ directions.
Click the dials 3, 5, 6, 1 times and open the drawer to find a square tile and a clue with some black squares in each corner.
Boxes
Use clues from the colored baskets to unlock the top drawer beneath the lamp.
Each basket has a color on the outside (that of the basket) and a color on the inside (that of its base), so the only remaining issue is what order to put them in…
The clue in each basket also has a different number of dots. Putting them in that order gives:
1 dot: blue outside, red inside
2 dots: purple outside, yellow inside
3 dots: yellow outside, green inside
4 dots: green outside, blue inside
So click the outer squares 2, 0, 1, 3 times, and the inner squares 3, 0, 2, 1 times, then open the drawer to find a square tile and remote control.
Bars
Use the other clues from the plastic baskets to unlock the middle compartment under the TV.
The black stripe appears at a different position in each basket.
Since the baskets with yellow, red, blue, green bases have the stripes at the bottom, upper, lower, top positions, click the bars 0, 2, 1, 3 times, then open the compartment to find a square tile and two more tiny white squares.
Screen
Use the remote control to turn on the TV and flip through its three screens, each showing a grid of squares and circular quadrants covering a third of the screen.
What could that be a clue for?
You can mentally combine the clues (or mash the remote quickly enough to experience some persistence of vision) to realize that they spell out the code 5802.
So enter that into the rightmost compartment under the TV, and open it to find a square tile and some more tiny white squares.
Trail
Use the clue from the compartments under the TV to unlock the bottom desk drawer.
By opening all three compartments, you can see that the white squares fall in two rows (also, the left compartment has the fewest squares and the right one has the most).
From left to right, those squares are on the DDUUUD edges, so click those buttons to unlock the drawer. Inside, there's a square tile and a magnifying glass.
Fine
Use the magnifying glass on the black squares in the top drawer to reveal that they're actually digits.
Then use that clue to unlock the tilty picture on the same screen.
The digits from 1 to 6 appear on the ⌜⌝ ⌞⌟ ⌜⌟ corners of the drawer clue, so click those corners of the picture to loosen it, then turn it over to find the last square tile.
Complete
Place all eight tiles into the picture beside the door. All that's left is to solve its randomized puzzle by rotating the tiles until they align.
Once you're done, a small drawer under the picture opens up so you can take a golden key.
Use that key to unlock the door and leave!
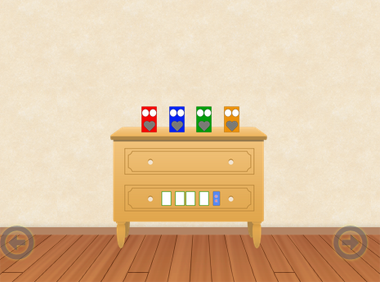
Game 0008: Escape Game Box-1
With the new calendar era starting, the nearby Karaoke Box has converted into an Escape Game Box. It's an opportunity you can't pass up, so you visit on the weekend.
Most importantly, the friendly staff member informs you about a lucky item that you can bring out!
Exploration
The chest of drawers on the first screen has some colored boxes with heart-shaped holes and googly eyes. The top drawer is empty, but the bottom drawer has a four-digit lock which is slightly different from the ones you're used to.
Turn right to face a couch with two cushions. Lifting them, you find a small key under the right one. On the wall, the alphabet (and a full stop) is printed out in a long grid.
Turn right. There's a cabinet here but all its doors are tied shut. You know it's secure because the rope winds around so many times. On the right, there's a picture showing some stick figures and a podium (but no medals in sight).
Turn right to find a locked door and a taller chest of drawers. There's a locked drawer with a keyhole, a drawer with a word problem and a three-digit lock (see the next spoiler), a drawer with four screws, and an unlocked drawer with a pink heart piece.
Cheap
In case you missed the text in the post, here's the word problem translated again:
An eraser and pencil bought together cost 110 yen.
The eraser is 100 yen more expensive than the pencil.
How much does the eraser cost?
Imagine paying 100 yen more to replace the pencil with another eraser. You'd be buying 2 erasers for 210 yen.
Therefore, one eraser costs 105 yen. Enter that into the lock and open the drawer to find another heart piece.
Unlock
Use the small key to unlock the top drawer (above the word problem drawer).
Inside, there's a note with some handwritten letters in circles.
Numbered
Use the clue from the tied cabinet to unlock the bottom (four-digit) drawer on the first screen.
The lines on the digit buttons suggest that you view the cabinet sideways.
Read in that direction, the rope forms the roman numerals for 3, 12, 2 on the cabinet doors, so enter that in the drawer and open it to find a pair of scissors.
Snip
Use the scissors to cut the rope. Opening the cabinet doors, you find a colored box in each. The top one has a four-digit lock with an unusual clue, the middle one has a three-letter lock, and the bottom one has a much more complicated lock with four pairs of circles. Each pair has a color-changing button in the middle surrounded by a ring of buttons, where at most one button in each ring can light up at a time.
Alphabetical
Use the clues from the note and the letter grid to unlock the box in the middle of the cabinet.
Each letter on the note represents the location on the grid labeled by that letter, and consecutive letters have a suspiciously neat horizontal/vertical/diagonal alignment.
In fact, the path from S to A to U to C runs up, down-right, then up again, in the shape of a letter N. Similarly, the other circles on the note indicate one and two strokes that combine to form the letters I and T.
Enter NIT into the box and open it to find a heart piece.
Minuscule
Now for the four-digit box at the top. This doesn't require any other clues, so just read the hint creatively to solve it.
The S in "small" isn't capitalized, which is your hint that "small" actually refers to lowercase letters.
So you need to replace each letter in the clue with its lowercase form. But you still can't work out the math without any numbers!
Each lowercase letter looks like a digit, especially if written without serifs:
Lowercase: zoo × b + qsl
Digits: 200 × 6 + 951
This works out to 2151, so enter that in the box and open it to find another heart piece.
Emote
Place all four hearts into the colored boxes on the first screen. Each box gains a mouth in a different shape, and looks towards a different direction.
So use the clue from those faces to unlock the box at the bottom of the cabinet.
As indicated under the lock, you need to find the faces with mouths pointed in the LURD directions.
Those faces are on the green, blue, yellow, red boxes (so click the inner buttons 3, 2, 4, 1 times), and they are looking in the DLRU directions (click those buttons on the outer rings).
Once you're done, push the OK button to open the box and find a screwdriver.
Unscrew
Use the screwdriver to remove the panel on the third drawer to the left of the door, revealing four buttons that change color when clicked. (Ignore the typo on the labels.)
Ordinal
Use the remaining clues from the room to unlock the four-color panel you just uncovered.
The podium picture shows you which person did best (the highest), second and so on until the fourth (lowest).
Since those people were looking in the RDUL directions, they match the faces on the yellow, green, red, blue boxes.
Click the buttons 4, 3, 1, 2 times, then open the drawer to find another key.
Ending 1
Save your game, then use the key to unlock the door and leave.
The staff from earlier thanks you and reminds you to come back for new escape rooms.
And on the way back, you suddenly remember… that it's now the Reiwa era.
Ending 2
Reload your game (and load your game using the second option on the title screen).
Use the key to unlock the door but don't leave through it, because there's something else to look for.
As you start searching through the room again, you lift the gray (left) cushion and a new heart piece falls out from it. Take the heart piece and leave the room!
As a reward for finding the lucky item, the staff offers you a commemorative photo service. Rather than posing for the photo yourself, you choose to take a photo with the staff, which is her.
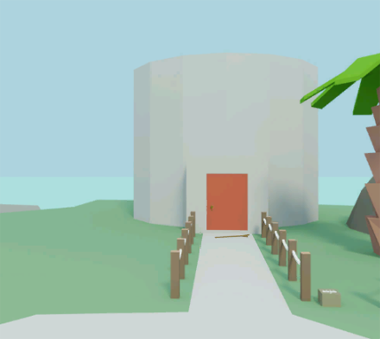
Island
With the magic of a cool color palette, even a vast desert island can feel like a relaxing solitary paradise.
Exploration
Even though you only see a path forward with a rock visible on the left, you're actually standing in a junction with several possible exits.
Shore:
Click the end of the path to find that it leads to a beach, where you find a white seashell that opens up to reveal a clue, as well as a message in a bottle.
Turn left to find the rocks from earlier. You can look at the yellow star(fish) on the ground as well as three more seashells with clues inside.
Turn right twice to find some pine trees. Walking up to them, you find that the red shovel is tied tightly to the left one.
(Back out and) Turn right once more to find the way back.
Totem:
As you walk back to the starting point, you find three pillars with colored dots and red tips at their tops, as well as some green worms on the ground. The path visible on the left leads to a dead end with a box, but it's blocked by a snake.
Silo:
Turn left, and notice the four-symbol box beside the path. The path has a long branch you can pick up, right in front of the locked door to the building.
Hill:
Back out and turn around until you're facing two paths. One leads up the stairs and into the distance, while the other leads to a dead end. In between, two pink chicks sit on a rock.
Take the stairs, and you find that the path turns left. There are some rocks along its right railing, but one is black and one is white.
Further along the path, some white ropes are missing from the railing, and some colored ropes at different heights are there instead.
The path ends at a cliff where you can look over the edge, right where a wooden post is driven into the ground.
Four symbols
Use the clue from the seashells to unlock the box beside the path to the building.
The symbols on the box appear in red, yellow, purple, blue on the seashells.
So click the buttons 4, 3, 1, 2 times, then open the box to find a magnifying glass.
Attack
Use the long branch to drive the snake away. Now you can continue along that path to access the box, which has four sliders labeled with letters.
Mail
Open your bottle to find a friendly note with colored letters.
Then use the clue from that note and the colored ropes to unlock the box you just found.
The letters H, E, L, O on the note are pink, gold, green, black. Since the ropes of those colors are the 3rd, 2nd, 1st, 4th lowest, click the sliders 2, 1, 0, 3 times.
Then open the box to find a sturdy plain brown rope.
Descent
Attach the rope to the post on the cliff. After the animation finishes, click it to climb down.
This area looks rather impressive, but all the stuff in the background is unreachable for now because the wooden boat alone isn't enough to cross it. That means all you can do is admire the flowers on the left and pick up a key from the boat.
Unlock
Use the key to unlock the red door, and enter the building.
Instead of a circular room, you find yourself in a circular corridor (or a dodecagonal one, whatever). The right side is cordoned off but there's a three-digit box with shape clues on the ground. The left side is also blocked off, preventing you from accessing the ladder visible there, but you can still open the white wall panel to find three oval holes in it.
Three shapes
Use the clue from the plants under the cliff to unlock the three-digit box in the building.
The flowers with triangular, octagonal, square shapes are surrounded by 6, 4, 8 leaves.
Enter 648 in the box and open it to find a knife.
Slash
Use the knife to cut the paddle free from the tree on the beach.
While looking at the boat, use the paddle on the water to cross it.
Now that you're across, you see an empty metal brazier standing just outside the entrance to a cave. You can enter the cave, but it's too dark to do anything. You can also click the miniature wooden pier on the left to walk there, but all you can see from it is water.
Burn
You have wood in the form of a branch, but you need to optimize its burning capability by cutting it up with the knife.
Put the firewood into the brazier. You're now ready to light it, but with what?
Use the magnifying glass on the brazier, which focuses the sunlight onto the kindling and starts a fire, and you immediately pull a lit torch out of it.
Exploration 2
Enter the cave and use the torch to light it up.
A mural on the wall has various instructions, most involving some kind of blobby guy, over a box with a four-digit lock.
Turn right to find an empty pot, above which you can faintly see a sealed wall compartment.
Turn right to find the way back, as well as a straight wooden stick on the left and a heap of soil on the right.
Turn right to find three pedestals with two eggs on them (and another sealed wall compartment).
Zoom
Use the magnifying glass on the symbol at the bottom-right corner of the mural to reveal a four-digit code.
Then enter that four-digit code (4992) into the box beneath and open it to find some sort of curved spike with a hole in its center.
Scrape
Place the spike onto the stick to form a pickaxe.
Use the pickaxe on the soil to remove it and find a box with a grid of four buttons and a row of four red lights.
Corners
Use a clue from the mural to unlock the four-button box you just found.
Leading away from the circle in the center, the quadrants with 1, 2, 3, 4 lines are in the top-left, bottom-right, top-right, bottom-left.
So push the ⌜⌟⌝ ⌞ buttons on the box, then open it to find a green oval piece.
Smash
You still have the pickaxe, so walk back to the junction and use it to smash the rock to the left of the pink birds.
Among the rubble, you find an extremely short rake, as well as a four-button box where the buttons cycle through different-sized trapezoids, and the row of buttons has a dark square on the left and a light square on the right.
Scale
The dark and light squares on the box you just found match the colors of the rocks along the path up the hill.
So use the clue from those rocks to unlock the box.
From left to right (which matches the color hints) the gray rocks are largest, smallest, second smallest, second largest.
So click the buttons 3, 0, 1, 2 times, and open the box to find a wheel with a hole in its middle.
Below
Use a clue from the mural to find hidden treasure.
The bottom-right corner of the mural points to something buried beneath the star, and you saw that same star on the beach.
So use the rake to dig up the star. Under the sand, you find an open box with a yellow oval piece inside.
Void
Use the bottle on the water visible from the pier to fill it up.
Then use the full bottle on the pot to fill that. The wall compartment opens up so you can take a egg figurine.
Placing the egg on the empty pedestal does nothing, but now you can click the three eggs to rotate them.
Hat
Use a clue from the totem poles to adjust the eggs correctly.
The red tabs at the top of the poles extend towards the left, right, right.
So click the eggs 1, 3, 3 times. A chime sounds and the compartment opens, so look inside to find a purple oval piece.
Ovals
Now that you have all three oval pieces, use the other clue from the totem poles to place them correctly into the wall panel inside the building.
From top to bottom, the dots on the poles are yellow, purple, green.
So place the pieces in the panel in that order. When it's correct, you hear another chime, and you can now access the ladder.
The ladder leads up to the top of the central column, where you find a three-digit lock with some familiar icons.
Numbers
Use the remaining clues from the game to unlock the three-digit panel at the top of the ladder.
The net, bag and seed don't actually exist, but the mural tells you that they would be used for the worms, seashells and birds.
Since there are 3, 4, 2 of those, enter 342 into the panel and push the button to reveal an empty space with an octagonal protrusion.
Spin
Place the wheel onto the shaft, which makes a colorful balloon pop out of the column.
After getting in the balloon, there's just one more thing to do…
Use the knife to cut the rope and release the balloon. Congratulations, you've escaped!
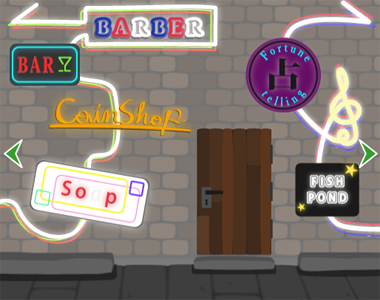
Night Alley
The night is long and the alley never sleeps.
Exploration
The locked door in the middle of the alley looks like the way out, but it seems you'll have to pass through all of the other places first. To the left: a barber, a bar, a coin shop and a sop. Is it a soap shop, or is it a (click sign) soup shop? The right side is less confusing, with fortune telling, some music, and a fish pond.
So let's go right first. The fortune teller is a mysterious hooded figure who wants a feather.
On the next screen, you find a double bass player who's seem to have hit a creative block. His bass case is completely empty.
Further right, there's a crocodile painted on the wall which is somehow holding a mop. Clicking on it reveals that it wants to have some fire.
Even further, there's a bicycle with flat tires, and in its basket a stuffed toy is holding a bottle with a whole apple inside. There's also a lot of junk on the floor, as well as a black four-digit safe with the buttons arranged vertically.
Keep going right. On the left side of this screen, you find a bright red artwork of a lady wearing a hat with a feather. Beside the traffic cone, there's also a manhole cover with apples and 4s.
Click the Open sign which points to the base of a tree. Looking up, you see a treehouse on the top as well as a floating balloon on the right. Closer examination of that balloon reveals that there are two of them, a pink rabbit and blue cat with spiraling arrows in different directions.
Climb to the top of the tree, where you find a fisherman who asks for some music.
Backtrack to the starting screen and then go left. Outside the barber shop, there's a capsule machine. Enter the shop to find that the barber is missing some soap.
Back out and go left to find two shops operating out of small windows: the coin shop and a soap shop whose owner is hungry.
Go left to the bar, which has a shiny gold coin lying on the ground beside a tree. The bartender doesn't really have anything to say, but you see a box along the right edge of the screen which is actually a vending machine for matches.
If you had shifted the soap sign on the first screen, then instead you find a soup shop which is very similar except hat it sells soup for one coin. Shift the sign again to get the soap shop back!
Vision
Give the red feather to the fortune teller, who shows you a silhouette of a hand pointing to a bicycle seat.
So go to the screen with the bicycle, and zoom in on the seat to find one of the wall bricks behind it looks cleaner than the others.
Remove that brick to find a pair of binoculars. (Once you pick them up, the fortune teller goes back to asking for a feather.)
Priceless
The coin you picked up doesn't fit in any machine. Perhaps it's worth too much?
(The text along the top of the coin seems to read ILMARE, but I have no idea what that has to do with dolphins.)
Trade in the coin to the coin shop for three coins, which are also golden but just read "coin".
Purchase
Use one of the new coins on the capsule machine, and turn the handle to make it dispense a capsule containing a switch.
You can flip the switch right now, but you'll need to leave it in the on position for later.
(The machine refuses to dispense any more, and if you leave the screen and come back it's now "out of order".)
Use another coin to purchase some soup from the soup shop.
And use the last coin to activate the match vending machine.
Triangles
Use the clue from the soup/soap shops to make the matchbox vending machine work.
The triangles on the soup shop's staff (with the hat labeled I) point RLRL, and those on the soap shop's point RLLL.
So click the RLRLRLLL triangles to dispense a matchbox. Wow, that was the last one!
Barter
Give the soup to the soap shop, and you get back a complimentary bar of soap.
Give the soap to the barber, who hands you a free drink ticket.
Give the ticket to the bartender, who serves you a cocktail along with a bottle with a tropical label.
Portal / Exploration 2
Use the binoculars on the bottle the bartender served you. Amazing, it's like you're really there!
That's because you're actually on the beach. A sparkle in the sea catches your eye. Using the binoculars, you find that it's a glass bottle with a number label floating beside a bobber.
There's also an umbrella with a small table that holds a cocktail glass and a bell. Click the blue pail at the edge of the screen to find a boy digging in the sand for a star.
Back out and turn around. A house on the left has a stone bird sitting on a barrel, which appears to be missing its heart. The path on its right leads into the woods, where you easily get lost in the forking paths but have a handy button to get unlost.
When you're done hanging out among the waves, ring the bell to return to the alley.
Changes
As you walk back through the alley, you notice that the soap/soup servers are now rather bored.
Outside the barber shop, a guy asks you for help opening a box.
Entering the barber shop again, you find that a bear now sits in the seat, wearing a numbered bib.
(The people only get bored after you return from the beach, but the other changes happen before you leave.)
Soot
Use the matches to light the cigar, and the crocodile lets go of the mop.
(When you revisit the crocodile, you find that it smokes out a chain of animal shapes.)
Talk to the musician again, and use the mop to clean up his thought bubble. Now he plays a short tune.
Hook
Click the eighth note at the end of the musician's tune to pick it up.
Then give it to the fisherman, who fishes up a star!
More changes
The musician is now missing from his usual spot, with a square green button left in his case.
Then when you revisit the fisherman you find him talking to the musician, with the fishing rod set aside in the corner of the room.
Help
Use the clues from the balloons and crocodile to help out the man standing outside the barber shop.
Confusingly, the clockwise button is on the left side and the counterclockwise one on the right. Also confusingly, the clue in the cigar smoke runs vertically, so you have to rotate it into an upright position.
Since the clockwise balloon is shaped like a cat and the counterclockwise one is shaped like a rabbit, the shapes in the clue (from bottom to top, so that they're left to right when rotated) correspond to the directions on the LRLLRRR buttons.
Click those buttons slowly to open the box, revealing the ring inside. The man thanks you and disappears.
You find him talking to the lady in red, with a heart dangling from the ceiling between them.
Pieces
Use the binoculars to return to the beach.
Give the heart to the parrot, who regains its green color and flies away. Now you can lift the lid of the barrel to find a clue with a bicycle numbered 5.
As you back out, you find a green feather on the floor.
Also give the star to the boy, who sits back, kicks off his flip-flops, and nibbles on it. (Don't worry, he's fine.)
Now you can look in the bucket to find a crab there.
Leave the screen and immediately check back in on the boy. He's gone!
And in the bucket, you find a flowery button.
Numbered
Use the number clues you've seen throughout the game to unlock the safe in front of the bicycle.
Hint: all four numbers appear next to objects. Where and how do those objects appear connected?
All four of those objects appear behind the safe, with the apple being carried in a bottle held by the bear on the bicycle. Converting those to numbers gives:
Apple: 4 (from manhole cover)
Bottle: 7 (from sea)
Bear: 3 (from bib)
Bicycle: 5 (from barrel)
Enter 4735 into the safe and open it to find a rolled-up map. In addition to the simple diagram of paths, you find a blue button taped to it and then another clue.
Second vision
Give the feather to the fortune-teller, who shows you a hand pointing to something. It's not a roman numeral you're looking for, it's the left one out of three objects.
Those objects are the bar stools, and you can shift the left one aside to find a round brown button.
(The fortune teller has left for the night, two colored feathers richer.)
Route
Follow the instructions on the map to navigate the jungle.
Hint: focus on where you have to enter and exit each junction.
Comparing the entrances and exits to each junction, you find that you have to go forward, right, forward, left, right, left.
Enter the jungle and then click those arrows accordingly, and you should find yourself at a lake with large rocks along the shore.
Following the other clue on the map, place the crab on the fishing rod and use it in the lake to fish up a golden treasure chest. On its front, there's two buttons with seven letters above them.
Spell
Find a way to turn the seven-letter clue into a sequence of left and right buttons.
The only place where all those letters appear together is on the neon signs on the first screen, and the only thing you could possibly use to control those signs is the switch you're holding.
Indeed, the switch turns off most of the signs even though it's not connected to anything. This even has the effect of disabling the soap/soup sign, but seven of the letters remain lit up.
The remaining lit letters from A to G are on the LLLRLRR sides.
So return to the lake and push those buttons on the treasure chest, then open it to find a smaller wooden box with five button-shaped holes, beside a silver coin.
(This coin has a horse and the word EQUUS, which is much less obscure.)
Worthless
Trade in the silver coin at the coin shop for an almost-identical white button.
That completes your collection of five buttons (from the bass case, bucket, map, bar stool, treasure chest).
Place them in the box you're holding and open it to find a black key.
Ending
Since there's no save function, this is your last chance to do anything else in the game, like visiting the boy again for a final message.
Once you're ready, use the key to unlock the door where you started, and leave the alley!
Update