
 Welcome! It's Escape Wednesday again!
You start locked in Amajeto's living room, and continue in another one of theirs, both colorful and fresh, with nice puzzles. Nickelodeon's game isn't about escaping; you're supposed to find seven magic scarabs, each carefully hidden in one of seven rooms, and deliver them to a specific place. With Maroya you return to their kittens' new home, where kitties got themselves trapped and need someone to help them out. According to ground plan, there are more rooms to be explored on this floor...I can see a staircase too...hoping that there are many floors in the house!
Have a good time and enjoy!
This time has Amajeto hidden more tiles in the room, eleven. Finally you get to a balcony - if you open it, of course - to enjoy a beautiful view, home grown lemons and maybe find some clue or item. Can you find all the tiles and escape?
The cursor is changing, no save button, one ending.
P.S. Here is Summer Night Escape. Amajeto/Tomatea has long experience in growing lemons, obviously.
...and talking about lemons, in the second game by the same developer you also find few of these. But what you are really looking for are tiles, as usual. Just eight this time.

Nickelodeon takes you right into the middle of last preparations before opening of an exhibition of ancient Egyptian artefacts. Things aren't going well. Precious Mask of Anubis can't be found and on its place is lying a scroll containing demands - if you want to see the mask again, bring seven scarabs to the statue in the park at night. Hmmm, the exhibition starts tomorrow, you don't have much choice...can you find the scarabs and get the valuable Mask back?
The cursor is changing, autosave, one ending.
After Maroya's kitties escaped two rooms on the first floor, they got trapped in the third one. Again. Without water, without any food - they don't seem worried though, as the situation looks simple, just solving few puzzles and quickly out. Well...not so quickly, as intuitive and logical puzzles are also cunning, and there's more than one room to explore. Will you help the kitties to get out?
The cursor is changing, no save button, one ending.
P.S. Prequels are here: WE N°204 and WE N°217.
We love escape games, and our readers love talking about them and sharing hints! How about you? Let us know what you think, ask for clues, or help out other players in the comments below.


Solved the kitchen puzzle but didn't get the second scarab. Even checked a walkthrough to determine if I was doing something wrong, which I wasn't. Must be a bug of some kind (pun intended).
Sorry to hear that. Had the same bug when I played it last week but two days later I tried in two browsers and it was ok. I thought they'd fixed it. Now I tried again (in Edge) and on my PC is the puzzle without problem so maybe try to reload and make sure that all scarabs have head and tail.
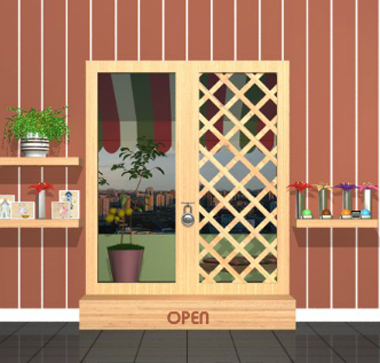
Room With Balcony
It's not the only room with balcony, but it is a room with balcony.
Exploration
Your access to the balcony is blocked by a padlock. Despite appearances, it's certainly not "open", and it's not a combination lock. The shelf on the right has four vases with colorful flowers, four colorful round candles in front of it, and a grayish square tile.
Turn right to find a kitchen post. At least, that's what's printed on the side of the small counter in bright flashy letters. (They're actually plain-looking letters, but they flash when clicked.) Clicking the top of the counter, you find that it comes equipped with a sink that doesn't seem to work. Take the square tile there to reveal a sequence of four colored circles.
Turn right to face the locked door. There's a lot of stuff on the left, including cupboard doors with a four-color lock, a four-letter lock, a lock with four white vertical bars and a lock with two brown buttons. The picture with two plump birds tilts when you click its corners, and the shelf under that has a square tile leaning against two rows of translucent apples as well as a display of porcelain birds.
Turn right to face a small table with two cups of coffee (or tea?) served on a tray, with a square tile in between them. You can also click the tray to move it slightly and reveal some numbers on the table beneath. The framed picture above has a grid in the middle that's missing most of its tiles.
(Since there's more tiles than usual to find, do a quick check that you have picked up 4 tiles.)
Words
The text below the balcony door and in the kitchen seem to be in the same font, which means…
…that the OPEN text is the code for the kitchen buttons.
Click
O P E Non the counter, and the hidden cabinet to the right opens up! Take the square tile and then click the valve to turn it.Flow
Now that the water supply is on, turn on the tap to reveal a key in the sink.
Unlock / Exploration 2
Use the key to open the balcony door.
Stepping out on the balcony gets you a better(?) view of the city and more importantly of the lemon tree growing in a slightly decorated pot. You can also lift the last cushion of the deckchair to find a square tile hidden beneath.
Swirly
The pattern on the pot matches something in the room. Once you find it, use that clue to unlock the lower-right cupboard.
The spirals on the pot come in two types, one that goes clockwise as it grows outwards (3rd and 5th), and the other counter-clockwise (1st, 2nd, 4th).
The coffee in the cups isn't mixed fully, and the cream forms spirals in those two different directions (right and left).
So push the LLRLR buttons on the cupboard door and then open it to find a square tile.
Corners
Use the number clue under the coffee tray to unlock the tilty picture.
There are a total of six digits which can be revealed by moving the tray to two different positions.
Following the order of the digits, click the ⌝ ⌜⌟⌝ ⌜⌞ corners of the picture. It comes loose, so flip it over to find a square tile and a clue with numbered boxes.
Letters
Use the clue you just found on the back of the picture to unlock the top-right cupboard door.
The lengths of the rows (7 and 4 boxes) matches the lengths of the words in KITCHEN POST (7 and 4 letters).
Matching them up, you find that the boxes numbered 1, 2, 3, 4 correspond to the letters SPOT.
Enter that in the door and open it to find a square tile.
Heights
Unlock the bottom-left cupboard door using a clue on the same screen.
The porcelain birds are different sizes, with the left being biggest and the others in increasing order.
So click the bars 3, 0, 1, 2 times and open the door to find a square tile.
Colors
Use the color clues around the room to unlock the top-left cupboard door.
Since brown/orange is unavailable on the lock, the color clues in the sink and on the candles cannot be entered, which means that the correct colors are those on the flowers.
However, the sink and candle clues have the same colors in a different order, which suggests that the flower colors should be rearranged, which also suggests that the candle colors need to be rearranged to match the sink…
So let's start with the sink. The colored circles there are brown, green, blue, orange, matching the 2nd, 1st, 4th, 3rd candles.
The flowers above those candles are yellow, red, pink, purple, which is the code you need to enter.
Click the buttons 0, 2, 1, 4 times, then open the door to find the last square tile.
Complete
You should now have all 11 square tiles, so place them in the picture above the coffee table.
It's time to solve the randomized puzzle that comes up by rotating its tiles until they align.
Once you're done, the small compartment under the picture opens up and you can take another key. Use it to unlock the door and leave!
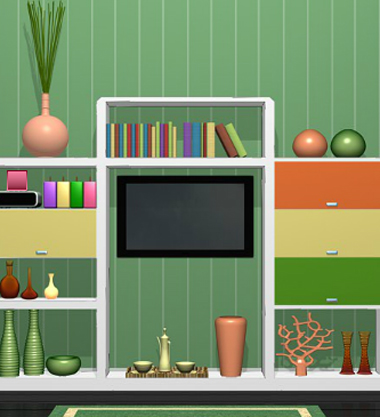
Amajeto Citrus Room
Easy peasy!
Exploration
Your exploration of this room starts with a classic frame of shelves built around a television screen. On the left, a pink square tile rests on a digital clock that doesn't show the correct time, next to four colorful candles that's almost certainly a clue. The yellow compartment (that I'll call a drawer) under it has a four-letter lock. The colored drawers on the right side have a four-button lock, a three-digit lock and a two-button lock with two different colors.
Turn right to find a couch, a picture split into three with several tiles missing from the middle section, and two side tables. Under the right couch cushion, you find a square tile. You can't do anything with the right table, but the left table has four square buttons that grow bigger when clicked.
Turn right to face the locked door. On the left, there's an inspirational quote in a picture frame that tilts when you click its corners. (The table, chairs and bowl of fruit are all unhelpful for this escape.)
Turn right to face the windows surrounded by small lamps. There's a fridge with a wide variety of foods, a shelf with four colored lettered jars, and an oven-stove combination with one of its knobs missing.
Binary
Use the clues from the milk in the fridge to unlock the green drawer.
The row of milk packages is blue, white, white, blue, blue.
Since the left button is white and the right is blue, push the RLLRR buttons to unlock the drawer. Inside, there's another square tile.
Palette
Use the clues from the jars and candles to unlock the left yellow drawer.
Following the order from the candles, look at the purple, yellow, green, pink jars.
In that order, their letters spell out GYLO. Enter that in the drawer and open it to find a square tile and a mysterious object. Do you recognize it?
The mysterious item is a handle for the oven!
Powered
Place the missing handle on the stove and turn it. (It's the only one that works.) This makes the stovetop light up a sequence in red.
So use that clue to unlock the orange drawer.
Following the sequence that appears on the stove, push the ⌜⌝ ⌞⌟ ⌜buttons on the drawer to open it, and open it to find a square tile, a remote control, and a clue with some fruits.
Comparison
Use the clue from the fruit picture you just found to unlock the left side table beside the couch.
The largest fruit is red, then orange, then yellow, then green.
Click the buttons (from left to right) 1, 3, 0, 2 times, then open it up to find a square tile.
Screen
Use the remote to turn on the TV, which shows a clue with several objects under a gray rectangle.
Then use the remote on the TV again to switch it to a simpler-looking clue hinting at some math.
Vitamins
Use the first clue from the TV and the contents of the fridge to unlock the tilty picture.
The lemon, bananas, eggs, bananas, jam are located in the ⌜⌝⌟⌝ ⌞ corners of the fridge, so click those corners of the picture.
After it comes loose, turn it over to find a square tile on the back.
Digital
Use the other clue from the TV and the time shown on the clock to unlock the right yellow drawer.
hh represents the two digits for the hour, and similarly mm represents the minutes. In between them, the asterisk represents multiplication.
Since 14 times 36 is 504, enter that in the drawer and open it to find the last square tile.
Complete
Place all eight square tiles into the picture above the couch.
You know the drill: the puzzle is randomized, and you have to click the tiles to rotate them until they align. (Pay careful attention to the tiles which are almost all red.)
Once you're done, take the key that appears and unlock the door to end the game.
Hunter Street - The Mystery of the Seven Scarabs
Before you ask, I don't know the secret code or what it does.
General tips
Make full use of the changing cursor to find stuff. Some items are only visible in the dark, so you might want to just leave the lights off. (But don't mess with the lights too much, I've crashed the game that way.)
Using the notepad icon, you can review objects you've found (or reveal those you haven't).
All the puzzles seem to have their starting position randomized, so I won't give full instructions for them.
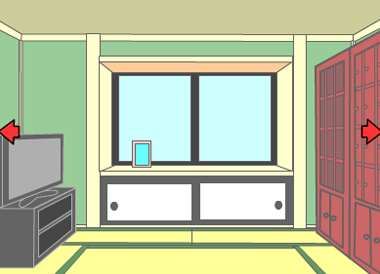
1: Living Room
Exploration
There's not much to describe here, so I'll just put the unimportant stuff in italics. The hotspots, from left to right, are an armchair, light switch, plastic flowers, bad painting, cushions hiding a key, lamp without a lightbulb, other chair, locked wardrobe, and a table with an unsolved puzzle.
Turning off the lights doesn't change much.
Using items
Drag the key on the wardrobe to unlock it, then take the lightbulb from inside.
Use the lightbulb on the lamp to fix it.
Turn off the lights, and you find a diamond-shaped shadow on the lamp which turns out to be the missing piece.
Drag the missing piece onto the puzzle.
Puzzle 1
Drag the pieces to complete the square. You can't rotate them. Don't think too hard about it!
If you try solving the puzzle logically, you might find more than one solution. But the game only accepts one.
Helpfully, the puzzle pieces snap into place when you place them correctly.
Along the bottom edge, the pieces with long diagonal (up-right) edges match up:
Bright red (triangle), magenta (parallelogram), purple (big triangle).
Moving upwards from the bottom-right corner, the remaining short diagonal edges in that direction match up:
Purple (small triangle), dark blue (diamond), blue (concave hat)
In the top right, the remaining space is filled by the two scalene right triangles:
Light blue, teal.
This leaves a smaller square to fill in with the remaining pieces. The green chevron goes in the bottom right of the available space, forcing the large dark green and yellow triangles to the top right and bottom left.
Finally, the two parallelograms fill in the top left corner, and the light green square fits in the remaining space.
Completing the puzzle gets you the red scarab!
2: Kitchen
Exploration
From left to right: cork board, empty oven, blender, shape decorations, full oven with cake, cake knife, oranges, light switch, dishwasher.
Turning the lights off reveals a locked compartment under the window.
Using items
Now that you've removed the cake, cut it with the knife. In the sliced cake, you find a key.
Use it to open the locked compartment you found in the dark, and find a puzzle box.
Puzzle 2
This mystery box is full of scarabs. Or rather, tiles with half-scarabs along their edges. Click the tiles to rotate them until the scarabs match.
(If you've had no trouble with the Amajeto games above, you can think of this as a different version of the scrambled-image puzzle.)
Each scarab in the interior of the pattern must have a front and a back. Comparing the left two tiles in the top row, you find that only a purple scarab can be formed.
From there, you can just continue the pattern. Eventually, the scarabs in each row face right/right/left, which you can use to check your work.
Completing the puzzle gets you the orange scarab.
3: Library
Exploration
Light switch, ship painting, books, small drawer with blue key, locked box with slots, fireplace, suitcase with two keyholes, armchair.
Turning off the light reveals a red key in one of the jars.
Using items
Once you have both keys, use either of them to open the suitcase and find letter tiles.
Use the tiles on the box to activate the puzzle.
Puzzle 3
Place the tiles in the correct order to form a word.
It seems that this puzzle is randomized, but if you're really having trouble you can try an anagram solver.
Completing this puzzle gets you a yellow scarab.
4: Museum
Exploration
Light switch, serious painting, Chinese vase, landscape painting, table with hidden puzzle box, record player, golden giraffe head, oil lamp with symbols, egg bowl, painting hiding box of matches.
Turning off the lights changes nothing.
Using items
Use the matches to light the oil lamp.
Also turn off the lights so you can read the code projected on the wall.
Puzzle 4
Not really a puzzle, just push the buttons in the order indicated by the code.
I don't think this code ever changes, just push the 2nd, 1st, 3rd, 4th, 5th button from the left.
(This also means that you can actually skip picking up the matches if you already know the code.)
Inside the box, you find a green scarab.
5: Secret Room
Exploration
The left candelabrum and the painting above the table have no dialogue, but feel free to look around at the other stuff: record player, light switch, other candelabrum, vase with a key, rusty suit of armor, locked wardrobe, armchair, end table.
Turning off the light gives you a cool glowing effect, and you see a laser striking the bottom edge of the painting. Touching it makes the painting slide up to reveal the puzzle box, missing some of its pieces.
Using items
Use the key to unlock the wardrobe, and take the can of oil from inside.
Use the oil to loosen up the suit of armor, and you get the missing puzzle pieces.
Use the pieces on the puzzle box and now you can start solving.
Puzzle 5
This one's just a standard jigsaw in the shape of a scarab (but with polyomino pieces), and the pieces will snap into place just like in the first puzzle.
Start with the flattest parts of the thin yellow curves, which will outline the top and bottom of the scarab. Place them at the top/bottom middle of the grid.
Then work outwards by continuing the thin yellow border.
This leaves just six pieces, which you can place by looking at the unoccupied grid areas, or by observing that the blue area forms a rectangle and so the yellow goes along the outside.
Completing the puzzle gets you a blue scarab.
6: Games Room
Exploration
Light switch, balloon animal, dartboard missing a dart, clapperboard, hourglass painting, game shelf, skateboards, locked lamp, dart on carpet, screwdriver on shelf.
As you might expect, there's nothing to see in the dark yet.
Using items
Use the dart on the dartboard machine, and you win a weird lightbulb.
Use that bulb on the lamp to fix it.
After turning the lights off, you find a marked panel between the dartboard and TV.
Use the screwdriver to pry the panel off.
Puzzle 6
This may be the hardest one so far. You need to get the scarab slider out, but all the sliders can only move in the directions they're pointing.
(You might be able to reset the puzzle by reloading the game, but I haven't tested this.)
In this puzzle, it's essential to free up room for movement where it's important, and that empty area in the top right is a lot of wasted space. There are two obvious ways to do this, but one short solution is to move the vertical pieces into the corner:
For conciseness, I'll use some rather quirky notation:
One letter (r or c): horizontal or vertical slider
One digit (1 to 6): row/column number, 1 being left/top. Column 3 has two pieces but there should be no ambiguity.
One letter (L, U, R, D): direction to move.
To keep things simple, move each slider as far as possible.
Start by freeing up the long piece on the third row:
c1D c3U r3L
The vertical pieces fill in the space, and the horizontal piece from the fourth row replaces them:
c5U c6U r4R
After moving the last block, the scarab has a straight path out:
c1U c3U r6L c4D.
Once you've completed the puzzle you get the indigo scarab.
7: Bedroom
Exploration
(While your magically flipping shirt is distracting, it's a red herring. Anyway!)
Light switch, desk cabinet with puzzle box, intricate painting, plastic cactus, inspirational sign (on a skateboard), plug missing fuse, bowling pins, alarm clock, unread books, locked cabinet.
And you may have seen one more thing…
Turn the lights off and walk to the right end to find a glowing key.
Using items
Use the key to unlock the cupboard and find a fuse.
Use the fuse to fix the plug on the floor, which turns the red lights on.
Make sure the lights are on, and look at the painting to find a clue with symbols.
Puzzle 7
Just enter the clue (star, heart, flower, moon) into the puzzle box, which automatically opens.
You get a light blue scarab to complete the set.
8: Statue
Click on the statue to jump right into the puzzle. It has seven roman-numbered holes that seem to fit your seven scarabs.
Drag each scarab onto its number of dots, and they should snap into place. Or if you find color more intuitive, form a rainbow starting from red at the top and moving clockwise.
Anubis himself shows up to solve the mystery for you! Kind of.
Other walkthrough coming soon.
Maro and New Home - 1st Floor - Part 3
Previously…
Maro and Komaro are exploring a new house.
They carelessly exited into the garden but made it back in safely.
The adventure continues.
Komaro: Maro's favorite younger brother.
Maro: the reliable(?) older brother.
(Translation note: 分 at the end of these descriptions indicates that they're more like sworn brothers.)
Moving on to the next region.
Komaro: "Go forth."
Maro: "Go wild!"
Exploration
(You can click on Komaro for some Japanese hints about what you're looking at. These hints may be rather direct, but that's probably not an issue if you're reading this walkthrough.)
Now that we're back in a room with tatami mats, the abundance of storage space is overwhelming. For example, each of the shelves on the left has a different description of the item inside, while each of the small compartments on the right appears to be empty. Under that, the left compartment has a flashlight while the right one has a four-digit lock. Also, you can see the exit to this room: a locked sliding door.
Turn right to find some large closets with sliding doors. (There are compartments above but they're too high to reach.) The narrow ones have a three-color lock with shapes on its buttons, while the wider ones have a two-button lock with arrows on the buttons.
Which leaves a narrow space beside the room door. Click there to find a colorful clue posted on the wall.
Turn right to find the window you entered from, as well as a television that's turned off.
While there appears to be an empty space under the TV, Maro says it's just too dark to see.
Turn right to face slightly larger windows. There's a picture frame with colorful fish anong colorful bars. Looking in the compartment beneath, you find a locked box with colored balls in the left side, as well as a clear sheet of plastic in the right that has some shapes on it.
Light
Use the flashlight to illuminate the area under the TV, which has a battery.
Horizontal
Place the clear sheet over the photo frame, which makes some arrows appear.
Use that clue to unlock the wider pair of sliding doors.
Komaro: "The fish picture has arrows all over."
Keeping in mind that arrows have a triangular head on a rectangular body, the arrows in the picture point left (red), right (yellow), left (pink), right (purple), right (blue), right (orange), left (blue).
Push the LRLRRRL buttons and open the doors.
Behind the right door, you find a stack of futons and a bunch of uninteresting containers with a remote control on top. Flipping the remote, you'll find that it's missing two batteries. Behind the left door, you find a set of small windmills, but one of them is slightly different, and also a box with several wheels marked with four symbols each.
Playing with the futons, you find a orange ball in the bottom one.
Spin
Komaro: "Maybe the patterns next to each other should match."
Unlock the box in the closet you just opened by spinning the disks accordingly. (The top-left one doesn't move.)
There's no bugs in this one, and it's not randomized either, making it very straightforward to match up the shapes.
Click the buttons
- 1 3 3

3 2 1 3

1 2 3 1

1 1 1 1
times, and a small panel opens up so you can take a key.
Grid
Komaro: "I think every one contains a different number."
Komaro: "This shelf has the same shape as the one next to it."
Indeed! Use the clue from the left red shelves to do something to the right side of it.
It should be quite clear that the rabbits, pigs, dango on the skewer and stars in the constellation come in different numbers, and Maro will happily point out the numbers included in the five-pointed star, six-sided die, figure-eight flying formation and nine o'clock time.
That leaves the calendar clearly marked with a 10 and the figure holding the sword, who must certainly feel like he's number one. Which means the S (start) flag is next to 1 and the G (goal) flag is next to 10:
S_ _5 _6

_1 _4 _7

_2 _3 _8

G_ 10 _9
To match that order, click the top-left compartment, then the others from 1 to 10, then the bottom-left compartment, which now contains a green bead.
(It doesn't matter if you've already opened some compartments. As long as you click them in that order, the item will spawn.)
Flagged
If you pick the previous item up, you can get a different hint.
Komaro: "The platforms are quite colorful."
Once again, use the clue from the left red shelves (and a clue elsewhere) to do something to the right side.
As the note on the wall shows, you now need to start at G, then go through white, aqua, orange, pink, green, blue before ending at S.
So click the compartments counterclockwise along the edge starting from the bottom left. Once you reach the top left, you'll find that it contains a battery.
Electronic
Place the batteries into the remote, and use it to turn on the TV.
Komaro: "I've seen these pictures somewhere."
So use the clue from that place to unlock the bottom-right cupboard under the red shelves.
Counting the numbers of each type of plant/animal on the closet doors, you find that there are 1, 4, 2, 3 of them.
Enter 1423 in the lock and open the cupboard to find a purple bead.
Colors
Now that you have all three missing beads, place them in the box beneath the large window.
Komaro: "There are slots for the beads between the pairs of beads that are already there. Surely this has something to do with the colors."
With red, blue and yellow as primary colors, the beads have the secondary colors:
Green (=blue+yellow)
Orange (=red+yellow)
Purple (=red+blue)
Place the green, orange, purple beads at the bottom, right, left slots, and you hear the box unlock. Open it to find a green key.
Unlock 1 / Exploration 2
Use the green key to unlock the sliding door. It's another room!
There's a desk with a cat pirate in a barrel with five vertical slits. Both drawers of the desk are locked and have keyholes. There's a bookshelf on the right, and while the books on top seem identical and unlabeled, those on the bottom are neatly numbered and arranged in order.
With the help of the changing cursor, you find the hidden books among those on top:
Top shelf, 5th book: There's no pages, but a tiny toy sword instead.
2nd shelf, 2nd book: Clue with three geometric diagrams.
2nd shelf, 7th book: Another clue with three drawings.
Click the brown doors on the right to find that they are another pair of locked sliding doors. Thankfully, Komaro believes this is the final obstacle before you escape.
Unlock 2 / Diverse
Use the other key to unlock the top desk drawer. Inside, you find a magical board where you can color a diagram by selecting a color on the right and then clicking a region to fill.
Color the diagram in the drawer using the clue in one of the books.
Looking in the book, you have some ideas about how to proceed.
Maro: "Some parts are colored in."
Maro: "It seems that identical colors must not be side by side."
It may seem daunting at first to find a specific 3-coloring of a planar graph, but you can do this systematically by noting that for any pair of adjacent regions (which necessarily have different colors), all regions adjacent to both of them have the same (third) color.
So for instance, it's given that the top-right region is yellow. It borders three regions, a circle and two others, and those two others have one other common neighbor (the heart-shaped one to the right of the triangle), which must also be yellow by that reasoning.
Now, that heart-shaped one is adjacent to five different regions, and among pairs of those regions there are two new common neighbors…
Anyway, let's just get to the solution. I'll leave the shaped regions (star, circle, triangle) unnumbered, the other regions that don't touch the bottom edge numbered 1 to 5 (from left to right)(by center of mass), and the other regions that do touch the bottom edge numbered 6 to 9 from left to right.
The regions that are yellow are:
3 (top middle), 5 (top right), 6 (bottom left), 8, and the star.
The regions that are green are:
2 (middle left), the circle, the triangle, and 9 (bottom right).
Which means the regions that are pink are:
1 (top left), 4 (middle left) and 7 (bottom middle).
But filling it in does nothing.
Shapes
Go back to the first room, and use the clue from the picture you just filled in to unlock the narrow closet.
Komaro: "Look for the circle, star and triangle. Somehow I feel it's in another room."
The circle, triangle, star on the completed picture are green, green, yellow.
So click the buttons 2, 2, 1 times, and open the closet.
The top area has a stack of numbered drawers with nothing interesting in them, as well as some bottles and a plate that holds a small key. The bottom area has a treasure chest with a four digit lock, as well as an empty toy box.
"Kuro-nyan: A Dangerous Hair's Breadth"
Komaro: "An old-fashioned nostalgic toy box, where you cut the ropes to free the tied pirate. It's not about him flying out from the stabbing pain."
Unlock 3
Bring the key back to the second room, and unlock the bottom desk drawer to find another toy sword.
Stacks
Use other clues from the bookshelf to unlock the chest you just found in the first room.
Komaro: "I think the hint is in another room. For example, if 4 23 8 are lined up from the right it's 8 23 4, so pay attention to the order."
Either Komaro's reminder or my translation is confusing, so let's trust the book which says to look for the color of the drawer numbers, and then look in the bottom of the bookshelf from right to left. In our case, the book numbers with light blue colors are (from right to left) 8 14 1.
Enter 8141 into the chest and open it to find a toy sword.
Collection
Wait, you're still missing two swords. Due to meticulous exploration, we've already seen both early on when the game wouldn't let you take them. Where are they?
One toy sword is held up by the small man on the red shelves, and the other toy sword is attached to the third windmill in the wide closet.
Now that you have all five swords, place them in the barrel on the desk. The cat pirate flies up off-screen and is now missing.
Zoom in on the desk to find the cat key on the floor beside it.
Ending
Use the key to unlock the brown doors and end the game!
3rd area conquered!
Maro: "We're covering good ground. Let's keep up the pace!"
Komaro: "But there's more than half (?) left… will this pace be okay?"
Maro: "Why? Without the fierce beast our exploration is going quite well." (See previous game.)
Komaro: "That's right. We'll play a lot more. Exploring with Maro is fun!"
Maro: "Alright, let's charge into the next room!"
Komaro: "Charge!"
(Congratulations, thank you for helping out, the house exploration went smoothly, we'd like you to help out again if you want.)
Komaro: We're back at the start.
Maro: Something looks familiar.
Reloaded & game played fine. Thanks for the help chrpa!
Update