
 Hi everybody, this is Halloween Special Weekday Escape 3!
The whole year is over, it's Halloween already, and all games featured this week are exclusively about skulls, witches and vampires only. BOO! Oh, and the ghosts too, sorry! Your first task is to participate in reuniting of vampires' metal band in Karabina-7's game - if you help, you can see part of their special concert in the end. In Shigeyuki Kagamura's game you need to solve several puzzles before you may spend some quality time at a cemetery. Games which follow are point'n'click genre, one exciting adventure in a haunted house by InkaGames (where you die many times but very amusingly), another one in Esklavos' magical forest (where you won't die but will be seriously threatened) and finally comes Halloween adventure by Carmel Games. The full stop is lovely and nonsensical Minoto.
Have a good time and enjoy!
Karabina-7 locked you in a room with brooding vampire...what does he think about? Hopefully not the next meal...no, he isn't dangerous, just nostalgic - his mind is wandering in the past. Maybe he reminisce about lost fame and his former music group...and maybe you can help him with repair of the guitar and also with finding his bandmate - will the revival be successful?
The cursor is changing, no save button, one ending.
Shigeyuki Kagamura in their 'horror' game - which isn't scary at all - trap you in a house crammed with ghosts, skulls, bones, a coffin and much more, and also four colorful crocodilles from some reason. Puzzles are nicely arranged around the room and even outside - notice that there are two doors leading out - and you are going to spend some time here. After you open everything what can be opened, a pleasant evening at the cemetery awaits you!
The cursor isn't changing, autosave, one ending.
The game is available for Android too.
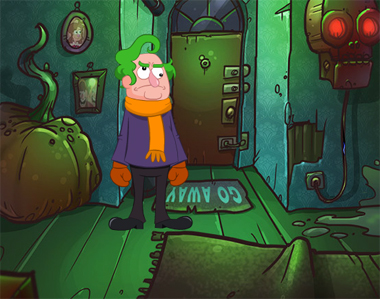
Cody Jones went for a peaceful walk on Halloween Night when he suddenly got involved in a strange and dangerous business with an evil house. Just because he's nice and asked sad kids what's wrong...'the nasty house' said kids 'took our ball away'! How's that even possible? Easily. Don't forget that you're in InkaGames's adventure game and it's the night when nightmares may come true. Your target is simple - get into the house, find the ball, get it and return it. Also rise from dead several times. Don't let the kids wait long!
The cursor is changing, no save button, one ending.
On contrary to sensible and musical vampire you met earlier, the witch you run into in Esklavos' magical forest fulfills the cliché of black hearted creature. She's lethal. True, you shouldn't have returned to her, she told you so before (viz. prequels in previous Halloween Specials mentioned in P.S.), but now you are here and your only chance for survival is to collect six pumpkins and bring them to the Evil Beauty. Or you'll be part of her skull collection...what will you choose?
The cursor is changing, no save button, one ending.
Carmel Games presents chapter from CrazyFamily's live with CrazyDad in leading role. In supporting role stars the mathematics and in walk-on part trick or treaters. The script is simple - just find candies which CrazyMom (not present) hid somewhere and do it right now as it's getting dark quickly and kids must be here any moment. They would be much disappointed not to get anything! .
The cursor is changing, no save button, one ending.
After long time you return to Minoto's poetic and charming word, and reach Dr. Frankenstein in the middle of creative process. His skills are surprisingly flexible, but seems that he needs some help with finalisation of his master piece. Will you help him or leave the 'creature' unfinished?
The cursor is not changing, no save button, one ending.
P.S. Previous Halloween Specials are here: Weekday Escape N°160 and Weekday Escape N°199.
P.P.S. Here is one of the most halloweenish escapes (and that's why I remind about it for the second time): Haunted Halloween Escape by Teralumina. Here in WE N°99 is Neutral's great game Wicked Room. And here puzzle platform adventure Jacko in Hell.
We love escape games, and our readers love talking about them and sharing hints! How about you? Let us know what you think, ask for clues, or help out other players in the comments below.


wow. 6 this time. that rules!!! :)
Yes Chrpa did a great job especially with the choices of the games which are good to play. Well poor kktkkr, too much walkthroughs to do now :p
Vampire Roomate is adorable. But was not able to figure out the slot machine. I finally pulled up a walkthrough and they got it on the second try.
The numbers spinning are not the numbers to solve the puzzle. I had to resort to watching the walkthrough to see how it ended.
Hmm I played it three times and it was going well so I can only assume you were extremely unlucky...
The slot machine:
insert all three tokens
look at the hints above the slots
it's a vampire, a bat, a lampshade
50, 33, 21
notice that the middle slot is stuck in the right position
pull the lever and randomly click on the left 'vampire' button
it stops very probably in the right position
50
if not retry
once you get the right number it stays stuck
pull the lever again and click the right 'lampshade' button
it takes two or three attempts usually
YOU WIN
Vampire Roommate
Hopefully he's not leeching off of you.
(There's some backstory in Japanese on the games list or blog, but nothing you can't figure out by just playing the game.)
Exploration
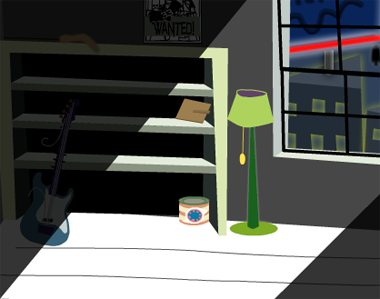
The moonlight through the window only illuminates a small chair with a metronome on it, which is broken enough that you can remove its pendulum. While there's other stuff in the room, you can't use any of it in the dark.
Turn left. The moonlight here falls on the standing lamp, so click it to turn it on. Now you can see the number on the lampshade, as well as the shelves on the left from which you can take a furry cat toy, an electric guitar with broken strings and a tin can. You can also look at the Wanted picture above the shelves and the framed picture that's face down on the second shelf, as well as the neon sign outside the window.
Keep turning left to find a slot machine, which you can't do anything with until you find the tokens shown above the coin slot.
And above that (when zoomed in) you spot a blue piece of plastic that turns out to be a combination bottle and can opener.
Turn left to find a coffin with a keyhole, a cat clock which does different things when you move its limbs, and another guitar that you can't do anything with.
Turn left once more to reach the first screen. Your roommate is still standing there without moving. You can now remove the pin from the poster on the right (and then click the poster to look at it), as well as move the blanket and pillow on the bed, revealing a casino chip guarded by a small paw as well as a winding key near the bottom.
Turn off the lamp and look around the room again, and you'll find bat markings on the wall where the poster was, and on the cat clock.
(Turn the light back on.)
Cut
Use the can opener to open the tin can. Inside, you find a chip that looks exactly like the can's label.
Cat
Perhaps you've figured out, from intuition or from the framed picture, that the blue paw in the bed is a cat.
How do you get it to move elsewhere?
Attach the cat toy to the metronome (in place of the pendulum), along with the winding key (onto the right side of the metronome), then turn the winding key.
The metronome goes crazy, making the cat leap towards it, knocking it over. At the end of all that, you can finally pick up the chip (token) from the bed.
(The cat now sits by the window, and you can click it to make it look outside.)
Bat
Use the bat-shaped clues that are visible with the lights off to unlock the clock.
(The bottom-right paw of the clock resets it, but you can just back out and try again too.)
The clues from the neon sign and the wall behind the poster combine to give the time 9:30, and the remaining glow on the clock tells you to enter it there.
In order to do that, you need to click the paw on the left 13 times (making the hour hand point between 9 and 10) and the paw on the right 6 times (making the minute hand point to 6).
Then click the bottom-left paw to make the cat stick its tongue out. If you set the time correctly, the tongue will have a green chip on it.
Bet
Place all three chips into the slot machine, and pull the lever to start it.
Do you know what numbers you need to win?
The vampire picture near the bed, the bat poster above the shelves and the lampshade have the numbers 50, 33, 21.
The middle button is broken but its number is already correct. Simply pull the lever and push the left/right button until it's correct (which locks it into place), then continue pulling the lever and pushing the other button!
(I couldn't find out how this works, but somehow it usually takes only one or two button presses for each number to lock into place. It's not really a puzzle, I guess.)
Once all three numbers are correct, they stop changing, and the machine dispenses a green balloon that floats towards the upper left.
Pop
Use the pin on the balloon to burst it, dropping a key on the ground.
Then use that key to unlock the coffin, which contains a caped guy who holds out a green packet.
The label on the packet indicates that it contains guitar string, which you can take after flipping it over and opening it up.
Fix
Use the string to repair the guitar.
Then give it to your vampire roommate to end the game!
Escape from a Scary Haunted House
"Slightly" scary. Actually just spooky.
You can access Japanese hints from the menu, after you click the left button to activate them (presumably asking to show ads, but none of that appears for me).
Exploration
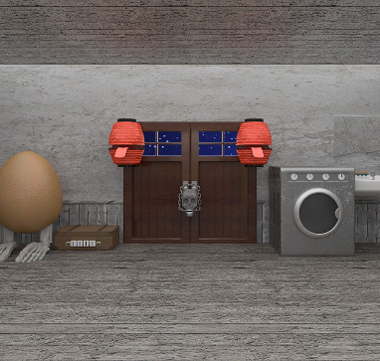
The main door (with the weird tongue lanterns) is now chained shut with a skull biting down on the chain. To its left, there's a four-digit box (the digits only go up to 5) and a huge egg with bony legs. Zooming in on the right leg, you find that the toes shatter and reform in sequence when clicked. To the right of the door, you see a washing machine with four dials, as well as a sink with a broken mirror. On the sink are four tiny cocktails next to a miniature cupboard with ghost (actually a sheet on a hanger), and around the drain are lots of card suit shapes made out of metal.
Turn right. This screen is also organized in two halves. On the left, a candelabrum sits on a small chest of drawers with four colored skull buttons above four pictures of food, and a pink heart balloon sways left and right in front of some expressionless ghosts. On the right, a cupboard has a four-digit lock (digits go up to 4) with card suit buttons, and a bandaged doggy lies in bed dreaming of balancing a bucket on its head. Next to the dog, a small treasure chest has four colored buttons that cycle between different accessories.
Turn right. You can see the garden through the locked back door. On the left, four colored crocodiles sit on a pumpkin-patterned couch, and they seem to all want presents. A four-button box beside them has a ghost on top and small orange buttons above its buttons, each divided into three color-changing parts. To the right of the door, there's a coffin with six symbol buttons, and a barrel with a lighter next to more cocktails and another small ghost cupboard.
Turn right. The left half of this screen has a clothes rack with some geta sandals on it and a screw in the middle, as well as a mummy who's fallen and can't get up. The right half of the screen is a beautiful but spooky table with colored skulls bobbing up and down next to plates of food and more cocktails. There's another mini cupboard and ghost at the right end of the table.
Wine
Use the clues from the cocktails and ghosts to unlock the box on the couch beside the back door.
Each set of cocktails has one of each number of lemons, from 1 to 4, and appears near a mini ghost cabinet with the ghost in a different spot.
So for example, the glasses with one lemon are blue on the table (ghost on left), green on the barrel (ghost middle) and red on the sink (ghost right), which means the left button on the box should be blue-green-red.
(But thankfully, there aren't that many options for colors and just focusing on the table clues should be enough.)
Following the same logic, you get a sequence of colors that you can enter by clicking the buttons 1, 2, 3, 2 times. This makes a large skull pop out of the box with a golden ring(?) between its teeth.
Suits
Use the clue from the sink to unlock the wardrobe next to the heart balloon.
There are 2 diamond, 3 heart, 1 spade, 4 club shapes in the sink.
So enter 2314 into the wardrobe and open it. Inside, there's a shirt with a red bloodstain.
Treat
Use the clues from the table to unlock the dresser beside the heart balloon.
The plates with banana, apple, ice-cream, dango are next to skulls that are green, blue, red, yellow.
Click the buttons 2, 1, 3, 4 times to unlock the drawer and find a screwdriver.
Unscrew
Use the screwdriver to remove the rack of sandals, which end up on the floor pointing in different directions.
Wash
Use the clue from the sandals on the floor to turn on the washing machine.
The sandals point left, up, down, right, so click the buttons 3, 0, 2, 1 times.
Then throw in the stained shirt to wash the blood off, revealing a four-digit clue.
Where can you enter that clue?
Enter the code (3521) from the shirt into the box beside the front door, which opens up so you can take a handgun.
Wait, this pistol is made out of wood. Would it even work?
Projectile
Load the golden ring (actually a rubber band!) onto the gun, and use it to shoot down the heart balloon.
The ghosts have mixed reactions upon seeing this, which reminds you of a lock elsewhere…
You can enter the eyebrows/eye shapes from the ghosts onto the coffin by clicking the buttons
1 3 2
3 1 2
times. The coffin opens up to reveal some wrapped presents among the velvet padding.
Gifts
Give the presents to the crocodiles on the couch, who immediately unwrap them.
That gives you a clue to unlock the treasure chest beside the doggy.
Since the colors are in the same order, you just need to make the buttons show the spectacles, tie, hat, meat.
After setting it correctly, the chest opens to reveal a small key.
Use the key to unlock the back door, and enter the garden.
Exploration 2
Beside the well is a box with five candle buttons that fill up with black when clicked.
Turn left to find a tombstone with "Escape" carved into it. It also has some bones that crumble apart and then immediately reform.
Bones
Use the clue from the egg to unlock the tombstone in the garden.
The clue from the egg is upside-down compared to the bones on the stone.
Keeping that in mind, click the rightmost, leftmost, middle-right, middle-left, middle bones.
This opens up the stone so you can take a bony hand.
Helping
Use the bone hand to pull the mummy up. It's now in a squatting position, and holds out some toilet paper.
Candle
Use the lighter to light the candles near the heart balloon (or where it used to be).
Then use the clue from that to unlock the candle box in the garden.
Following the heights of the burnt-down candles, click the buttons 3, 2, 1, 2, 3 times.
Inside the box, you find a bucket.
Watered
Attach the toilet paper to the bucket and fill it in the well.
Then use it to feed the doggy some water. A hammer appears beside it.
Smash
Use the hammer to crack the egg… which reveals two hands with eyes!
After taking those eyes, place them in the door and leave.
thanks kk. awesome games so far. Can;t wait for the others.
Cody Crazy Halloween
Since I'm tired of typing out Game Over! over and over, I'm replacing them with flashy emojis this time. They're perfectly harmless anyway.
Exploration 1
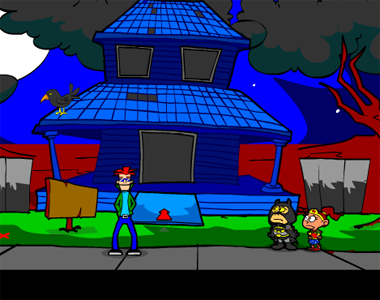
️After speaking to the kids, you might decide to go into the house yourself to check it out. But that's a bad idea, as the tree on the right is actually guarding it 😱 The tree doesn't stop you from taking the shovel beside it though. On the left side of the screen, there's a crow, dog and two red crosses on the ground, and a blank sign from which you can remove a piece of wood.
Also, you have some options for interacting with the kids. Talking to them again gets you some candy balls and a popsicle.
Hire
Use the shovel on the red cross on the ground (the right one, but if you click the left one it will work too) to dig up a yellow bone.
Then give that to the dog, who sits there waiting for you to pick it up.
Use the dog to get rid of the tree, and now you can enter the house!
But the trap the kids warned about is still there. ☠️
Floor / Exploration 2
Place the board on the carpet to neutralize it, and now you're free to look around.
This room has a bride doll, a feeding plate next to a small skeleton, and a carton of milk that will get you scared dead by the lion if you try to pick it up. 🦁
Go right to find a dissected swordfish (or is it just taxidermied?) on the wall above a large red X on the ground. The cat above the fireplace doesn't seem friendly, but no harm is done and you can continue to pick up the croquet mallet, horseshoe magnet and crystal ball. The ghost on the right is harmless too, and you can talk to him to learn about his history and favorite candy.
Go right. After picking up a small vacuum cleaner by your feet, you can examine the floating TV screens above a ball and an empty plant pot. Picking up the ball reveals that the plant pot isn't empty 😨 There's also a suit of armor blocking the doorway, and it's so heavy you can't move even its spear.
Haunt
Give the popsicle to the ghost (after talking to him and selecting the second option), who joins you on your mission.
…very briefly, as you can immediately tell the ghost to possess the suit of armor and move it.
Exploration 3
Two more paths are now open.
Behind the suit of armor, you find a corridor with a cracked section of wall blocking your path to the plunger and locked door on the other side. Well, it's not actually blocking but if you ignore the red X and step over the dotted line then you will get attacked. 👾
As for the doorway where you met the helpful ghost, it leads to a room with a candelabrum on a table next to an armchair that's too snug 🛋️ Pick up the net in the bottom left.
Go right to find a floating bed over a basket of bananas, which is a trap that crushes you 🛏️ There's another red cross on the left, and you can pick up an armchair cover nearby as well as the bride doll in the corner (perhaps a groom doll?).
Sheet
On your way back, place the armchair cover on the dangerous armchair (in the corridor).
Now when you sit on it (select the fist), it slides aside to reveal a piece of paper on the floor.
Riddle
Use the clue from the paper to set the television screens (near the suit of armor) correctly. This puzzle is randomized, so good luck!
Each sentence on the paper mentions a different character/symbol, so click the TV screens to make them appear.
Once you have it correct, the potted plant vanishes and you can take the croquet ball.
Aim
In the room with the floating bed, set the ball on the cross marking and use the mallet to hit it into the basket, which you can pick up later.
However, the skateboard is still fiercely guarded by the bedsheet. 👻
Buster
Use the vacuum to pull the bedsheet off the bed, and now you can just take the skateboard.
Caw
Return to the outside of the house, and use the basket on the remaining X mark. This places a single banana, which attracts the crow to fly down.
Which leaves you four seconds to trap the crow with the net.
Feline
Place the crystal ball into the lion's mouth, and now you can take the box of milk.
Place the plate on the cross near the fireplace, and pour the milk in. (Or you can pour the milk before placing the plate.)
The cat jumps over, drinks some of it, and falls asleep.
Sparks
Now that the mantel is clear, you can place both dolls there (click the blue area).
Their passion ignites the logs in the fireplace!
Light the candelabrum there.
Bright
In the corridor beyond the suit of armor, you'll need to defeat the shade with the power of light.
So place the skateboard down and then the lit candelabrum on it. (Or you can combine them before placing the skateboard down.)
(If you forget to light the candelabrum, the game will let you pick the whole thing back up and separate it.)
Push the skateboard into the middle of the room to remove the monster, and now you can walk across and pick up the toilet unclogger.
Locksmith
Use the swordfish to pick the lock, and enter the next room… where a pumpkin man immediately attacks you. 🎃
Gourd
Use the crow on the doorway to unleash it on the pumpkin.
You can now safely walk into and across the room, but don't miss the nail on the floor next to the large crack!
Battle
You finally reach a dead end with a portrait on the wall next to a ball, but you can't just pick it up. 👿
How can you defeat Mike and retrieve the ball, and what do you have to do at the red X?
The trick is to get the ghost to chase you out of the painting, and you need to prepare a trap in the room for it.
That trap is very simple: just scatter the candy onto the X.
Then attach the nail to the toilet unclogger, throw it at the ball and use the magnet to pull it towards you.
Pick up the ball to set off the chain of events that ends the game!
Magic Halloween Escape 3
You've already defeated this witch at least twice, how hard can it be?
Exploration
After you click through your conversation, you can look around at the pumpkin on the left (that doesn't count towards your requirement) and the skulls on a stake on the right.
Turn right to find an angel statue seemingly sprinkling something onto a pot, and you can talk to her to get a list of ingredients. Six leaves remain on the seemingly dead trees, and clicking on them summons and moves a seed around.
Turn right to face some arches (that will continue on the next few screens). The middle column has a grid of buttons. There's a rock that drips water on the left (that you can then collect water drops from), a row of colorful flowers (and one more in the right corner) that attract a butterfly, ending in an easily-missed dirt mound, a circle symbol on a rock that's actually a more complicated puzzle with six rocks and six circled dots, and a padlocked treasure chest.
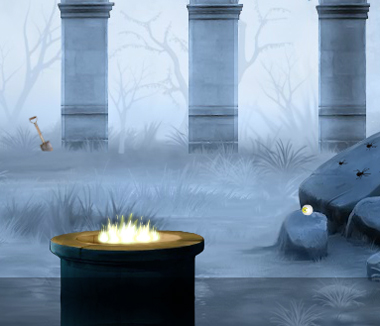
Turn right to find a weird stone statue that you can only take hair from, next to an empty pot and a paper clue. Take the stick from the right side of the screen.
Turn right. Near a raised fire pit, a tree has some clues on a piece of paper. Take the shovel in the background and the eye resting on the rock, which leaves a bunch of spiders you can rotate and a dark rectangular slot next to them.
(Turning right once more brings you back to the first screen.)
Three clues
Use all the clues from the piece of paper near the fire.
The pattern of dots goes into the grid of buttons (on the screen with the flowers).
Push every button in the 2nd and 3rd rows and the 3rd and 4th columns, and a pumpkin appears.
The weird symbols are a clue for the circled dot puzzle (also on the flower screen).
Specifically, the on the top left circle tells you to start with that one and go clockwise.
Numbering the stones 1 to 6 from top down, you should drag them to the following positions:
- 2 5 -

4 - - 3

- 1 6 -
Each circle should light up, and when you're done another pumpkin appears.
The colored petals are a sequence of flowers.
Click the 3rd, 2nd, 4th, 3rd, 1st, 2nd, 3rd flowers from the left. Once you're done, another pumpkin appears.
Eye
Place the eye in the top skull on the first screen, which makes a key appear.
Use that key to unlock the treasure chest. Inside, you find a doll.
Burn
Place the hair on the doll to make a voodoo doll.
Also, use the stick on the fire to make a torch.
Place the doll on the pot next to the petrified man, and then burn it with the torch.
The man disappears and only a pumpkin remains.
Dig
Use the shovel to dig up the dirt mound beside the treasure chest. You find a bone, and you also get to keep some of the soil you dug.
Plant
Follow the angel statue's instructions to grow something.
Place the soil into the pot, click the rightmost leaf to make the seed move onto it, and then add water to grow a pumpkin.
Spiders
Place the bone in the lever slot near the spiders, then use the clue from the other piece of paper to solve that puzzle.
As shown on the clue, the large spiders should face down (4 clicks each) and the small spiders should face left (6 clicks each).
Once you're done, pull on the bone to make a pumpkin appear.
Escape
Use all 6 pumpkins on the big pumpkin on the first screen, which ends the game.
Awesome games indeed! Thanks chrpa for finding them (and for not choosing ones that were too long).
Thanks again KK. can;t wait until the last 2.
Crazy Halloween
What's really scary is the math. As the Carmel Games page says, you might wanna grab a pen and paper for this one!
Exploration
CrazyDad is looking for the candy stash, but there's nothing like it in this entrance area, just a giant pumpkin on the left and a metallic skull device on the right with a broken wire.
Go right to find more stuff. As the changing cursor points out, you only need to look at the cupboard above which has a two-digit lock and at the computer which needs a floppy disk to activate.
Click the ajar door to go forward. CrazyBat sits in the bedroom window, and you see a four-digit lock on a section of the pipe.
Back out to the first screen, and then go left. A television shows some vintage vampire video, while the cabinet on the right has a three-digit lock. And I'm sure the old curtains are completely harmless…
Anyway, go left again to reach the kitchen. There's a safe with a five-digit lock, and the cupboard under the candles has a hugely complicated lock with a grid of colorful pictures and numbers on the sides.
Square
Use the clue from the picture grid to solve it (by setting the highlighted numbers in the bottom-right corner).
There are systematic methods to solve this and guesswork is an option too (and there are only 100 possible answers to try!), but the easiest way is to use your skills of observation: the addition works by rows and columns, and rows/columns with fewer pictures are easier to solve.
The top row and the left column read:
2 pumpkins + 3 candy corn = 16
4 pumpkins + 1 candy corn = 22
Double the first equation and subtract the second, and you'll find that 5 candy corn makes 10, so one has a value of 2. Substituting that value back in, you find that one pumpkin has a value of 5.
The middle column reads:
2 pumpkins + 2 candy corn + 1 bat = 18
Using the previous values, you can work out that 1 bat = 4.
The second row (you could use the third row too) reads:
2 pumpkins + 2 bats + 1 ghost = 19
Using the previous values, you can work out that 1 ghost = 1.
You can now use any of the remaining rows/columns except the bottom/rightmost one. Regardless of which you choose, you'll find that 1 cat = 3.
In summary: the ghost, candy, cat, bat, pumpkin have values 1, 2, 3, 4, 5, which you can check against all the clues in the grid.
But we're only concerned with two totals:
Bottom row: 2+3+2+3+1 = 11
Right column: 5+1+1+3+1 = 11
Click each of the number buttons once and then push the glowing button to open the cupboard, which contains a knife.
Sharp
Use the knife to cut the giant pumpkin (near the entrance) into a jack-o'-lantern. Mysteriously, doing so exposes a hammer and note.
Triangle
Use the clue from the note to unlock the two-digit cupboard above the computer.
Just follow the pattern to fill in every single square.
For example, 8 is the sum of the two squares below (4 and blank), which means the square below and right of 8 contains 4. Similarly, the square to the left of the labeled 7 contains 5.
Using the same logic twice on each side of the bottom row, you find that the bottom row reads:
2 2 2 1 4 3
(A little shortcut allows you to work out the total as 1(2+3)+5(2+4)+10(2+1), but it's a bit too complicated to explain here.)
The other rows of the pyramid are (in reverse order):
4 4 3 5 7
8 7 8 12
15 15 20
30 35
65
The highlighted square is 65, so enter that into the cupboard and open it to find a piggy bank.
Saved
Use the hammer to smash the piggy bank, which contains a floppy disk.
Insert it into the computer to activate another puzzle.
Routes
Solve the puzzle on the computer. (You might want to open that hint, although it isn't necessary.)
Logic:
(If you are very algorithmic in your thinking, it may help to notice that each unmarked square in the completed puzzle must match, in color, exactly two of its horizontal/vertical neighbors.)
Let's label the grid squares chessboard-style, with A being the left column and H being the right, and with 1 being the bottom row and 8 being the top. As an example, the squares at a1, d8, h4 and h5 must be colored the same as their adjacent men.
Anyway, the key to this puzzle is the yellow pair, which has both ends of its route on the edge of the board. This means that the yellow pair divides the board into a left section and a right section (which have complicated shapes so left/right are mostly just names). All green squares are in the left half, and all purple and blue squares are in the right half, and the red squares are either all in the left or all in the right half.
By definition, the two halves are not allowed to touch, even diagonally. The green and blue houses on the board are very close together, and so both the squares that are adjacent (horizontally/vertically/diagonally) to both of them must be yellow. Similarly, b2 must be yellow because it's diagonally adjacent to both a green and blue square.
Now the bottom yellow square (d3) is too close to the yellow house (d1). If any of the three squares between them (c2 to e2) are yellow, then blue would end up on the left half. Thus, those three squares must be either all green or all blue. If they were all green, then that would create a yellow dead-end at d3 or d1, depending on whether the green line turns up or down in the f column.
So c2, d2, e2 must be blue, which means e3 and f3 must be yellow, which means blue continues along e1, f1, g1, which means red continues along g2 (which means blue continues and completes along the bottom and right edges) and then g3, g4. Yellow takes f4, which means green takes e5, and the same logic of avoiding dead-ends extends red to completion, yellow one layer in through e6 and purple one layer out through e7.
Still using the same logic, purple continues horizontally straight line to completion, green follows the path shown on the hint, and yellow fills in all the remaining squares.
Solution:
Each button cycles through yellow (1 click), pink, green, blue, red (5 clicks). Click the buttons
1 1 1 1 2 2 2 2

1 p 2 2 2 r 5 2

1 1 1 1 1 1 5 2

3 3 3 3 3 1 5 2

3 1 1 1 g 1 5 2

3 1 b 1 1 1 5 4

3 1 4 4 4 r 5 4

3 1 1 y 4 4 4 4
The printer prints out a pink note.
Digits
Use the clue from the pink note to unlock the pipe in the bedroom.
Based on the first and third hints on the note, the last digit is nine times of the first. Since digits can't go over 9 (and the first digit can't be 0), the last digit must be 9, the second 3 and the first 1, which makes the third 4.
Enter 1349 in the lock and open it to find some duct tape.
Patch
Use the duct tape to fix the broken wire on the first screen.
The skull opens its jaws so you can take a tape (of the video cassette kind).
Watch
Place the tape in the player above the TV, which makes a new clue appear on screen.
Then use that clue to unlock the safe nearby.
There are a total of 8 candles in the house, so the math on screen works out to 800.
Enter that into the safe and open it to find a bell.
Ring
Ring the bell to drive the bat away.
All that's left behind is a clue on the bedframe, directly under the open window.
Spell
Use the clue from the bedframe to unlock the large safe in the kitchen.
The letters NSWWE refer to the north, south, west, west, east directions.
The letters at those positions on the diagram spell out BROOM, so enter that into the safe and open it to find the candies.
Mission accomplished, and Halloween is saved… perhaps.
Hallo Ween2
Wrap up your Halloween adventures with the help of some magic animals.
Exploration
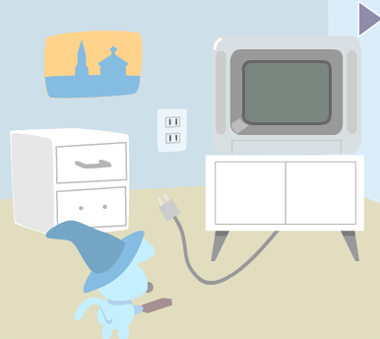
A dog (?) wants to watch TV, but it isn't plugged in. The bottom drawer is missing a handle, but the top drawer and cupboard can be opened and contain a blueprint and key. You can also plug in the TV and then click the dog to make a blurry image appear on screen.
Go right to find a bird next to a golf ball on tee, an empty cardboard box, and a moving truck that you can zoom in on to find a slightly old "toride" (handle) behind the wheel.
Go right to find the doctor and his creation, who both seem to be waiting for something. The lever doesn't seem to do anything, but you can zoom in on the table and pick up the cutter.
Check the bricks on the wall. One of them comes off and reveals a cup.
Go right to find a mouse next to a thermometer with something on the shelf at the top. There's also a huge machine (or perhaps everything else is small).
Build
Give the blueprint to the doctor, who immediately crafts a pair of 3D glasses that look like sunglasses.
Illusion
Use the 3D glasses on the turned-on TV to make a clear image of a lamp that you can actually pick up.
Warm
Use the lamp on the thermometer, and the mouse hitches a ride on the rising mercury to tip the packing tape off the shelf.
Package
Use the tape to seal the cardboard box, and a ghost drops by to load it onto the truck and then lock the doors.
Use the key to unlock those doors, then zoom in on the box again and use the cutter to unpack it.
There's a brand new golf club inside!
Fore
Give the golf club to the bird, who launches the ball into the air…
…hitting a UFO which crashes down, and then an alien comes out and leaves his favorite plastic model box on the ground.
Open the box to find some strong adhesive.
Pull
Place the handle on the bottom drawer and pull- oh, it broke.
Glue it back together with the adhesive, and pull again to open the drawer to find some "Creep" (Creap is a brand of creamer).
Beverage
Place the coffee cup on the machine (near the thermometer) and push the button to make coffee.
Then add the creamer to it, which forms a heart shape you can pick up.
Beat
Place the heart on the device above Frankenstein's monster, and pull the lever to inject it!
Thanks again kk. was a little confused at first on Esklavos game,however i did figure it out
even though you said "clockwise" on the circle puzzle, you also indicated that 1 is top left, 2 is bottom right, etc. i looked at the paper and put whatever was on the far left as top left, #2 bottom right as indicated but it didn't work, but i tried the "clockwise" way and that worked. So as you can see it confused me some.
Also it is good to see a carmel game on here. It's been a while since their games were on here. I had assumed they no longer did games.
Thank you chrpa!
I was clicking the right button first. This time I did what you said and clicked the left button first. The correct number came up on the third try. Then the right button had the correct number after about five or six tries.
What a cute game.
I also played some of the prior games. Weekday Escape N°160 has an adorable game "Halloween Puzzle Room Escape". I found in one of the scenes that if you click the left arrow to enter the scene there is a tiny little pumpkin that you can click and it moves up and down.
If you enter the scene clicking the right arrow, the pumpkin isn't there.
It's odd that I encountered two Halloween games that have left right issues.
Update