
 Time for a break is here - the new Weekday Escape arrived!
This week we get typical escape games only - four rooms with firmly closed door. The first comes Amajeto who locked you in their nice living room and now wants you to collect ten pieces of a jigsaw puzzle. Then you get trapped in much less friendly room by Smart Code - you escape it too, of course - and end up in Pixel Kobo's office which turns out to be less boring than one would said. Spiceapp is the same as others; imprisons you, but also provides the chance to set yourself free.
Have a good time and enjoy!
Amajetois silent from the beginning of 2020 and I do hope they would return soon. Meanwhile, we can play their older games as there are many which weren't posted yet - no wonder with their high productivity - and here is one of those. The room's design is obviously inspired by deep sea life, fish and shells everywhere and the game's title too, after all. For completing the last puzzle, an image of fish, you need to get ten green tiles. Can you?
The cursor isn't changing, no save button, one ending.
In the first chapter of Smart Code's escape (the second chapter is out already, at the moment for mobile devices only) you find yourself in an underground room, and no matter how forcefully you rattle the door handle, the door stay shut. Oh well. There is neither keyhole nor keypad so you need to figure out another way how to open it...so, start with exploring. You escape, in the end, but it's only a beginning of a long way to freedom. Hopefully, we get the second chapter of this very atmospheric and overall interesting game soon.
The cursor isn't changing, no save button, one ending.
The game is available for Android and iOS too.
We continue in Pixel Kobo's series. You spent a while in a spaceship already, then you were running around a tropical island hunting for yellow buttons and trying to avoid snakes (both chapters in previous WE). Now the mission takes you to an office. Nothing special about it. Just an office with copy machine, binders, few pc's - but somewhere inside is hidden an importatnt chip which you need, will you get it?
The cursor isn't changing, autosave, one ending.
Rooms by Spiceapp (Gotmail earlier) are always nice, polished and very clean (and also not giving an impression of rooms where anybody actually lives), and this one isn't different. The slightly dramatic tune is the same as usual and we already know that there aren't any ghosts or zombies waiting to scare players, so don't let yourself disturb (or switch the tune off), look for hints and items, and you escape soon!
The cursor isn't changing, autosave, one ending
We love escape games, and our readers love talking about them and sharing hints! How about you? Let us know what you think, ask for clues, or help out other players in the comments below.


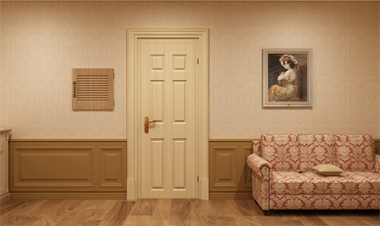
The Beautiful Resident
Exploration
1. Click on the light switches, then click the largest switch. Head back.
2. Turn right. You'll see another door and a small cabinet. Clicking on the cabinet, you can open the top drawer to see a package wrapped in string. We can't do anything with that yet, so head back.
3. Turn right. You'll see yet another door, a small paneled door, a couch, and a painting. Open the small door, and you'll see three slots. Click on the couch, and you'll see a pillow. Click on the painting, and you'll see a small circular slot below the painting. We can't do anything with any of this yet either, so head back.
4. Turn right. You'll see a wardrobe and a blue dumbwaiter. Open the dumbwaiter and take the white wine. Click on the painting inside and take the green key. Head back.
5. Click on the left door of the wardrobe and take the red wine. Open the left drawer of the wardrobe and take the green USB stick.
Office Supplies
1. Turn two times from here, back to the screen with one door and the small cabinet. Use the green key on the door, and head inside.
2. Inside, you'll see a desk, a bookshelf, and a plant. Click on the desk, and you'll see a red book and four drawers.
3. Click on the red book, and you'll see a picture of two meals - a steak with red wine and fish with white wine. Click back to the desk.
4. Click on the drawers on the right - in the top drawer, move the envelope aside to get the squirrel token, and in the middle drawer, you'll get the scissors. The bottom drawer is locked, so we'll have to come back to it.
5. Navigate to the bookshelf, and you'll come to a screen with many red and white books. Tucked in the middle of these books is the pink USB stick. Take it, and head back to the first room.
Special Delivery
1. Back in the first room, click on the top drawer of the small cabinet, and use your newfound scissors to cut the string on the package. Now that the string is out of the way, pick up the metal rod and open the package. Inside is a blue book, showing three movie tickets: first green, then blue, then pink.
2. Double click on our new metal rod and click on it once to bend it a bit.
3. Head back to the office room and use our new lockpick to open the bottom drawer of the desk. Inside, you'll find the blue USB stick. We've got three now!
Books, Briefcases, and Breaking In
1. Return to the initial room and turn to the screen with the couch. Click on the pillow, and use the scissors to cut it open.
2. Inside, you'll find a yellow book. Open it up to see a vanity, briefcase, and robber (ninja?). After this, you'll find the yellow key.
3. Use our new yellow key to open the bottom half of the small cabinet, in which you'll see a safe.
4. Use the hint from the yellow book and adjust the dials on the safe. This will open the safe, giving you a green rock.
1. Mirror
2. Key
3. Diamond
Data Entry
1. Open the panel door and put the USB sticks in the order we learned from the blue book. Doing so opens the door next to the panel door.
1. Green
2. Blue
3. Pink
2. Head inside, and you'll see two tables with meals on them, a door with four yellow slots, and a painting of a tree with a circular slot on it.
Dinner Time
1. Click on the lefthand table, and you'll see a steak and salad dinner. Place the bottle of red wine on the spot marked for it, which causes the steak to move. Pick up the deer token which was under the steak, and back up.
2. Click on the righthand table, and you'll see a fish and salad dinner. Place the bottle of white wine on the spot marked for it, which causes the fish to move. Pick up the brown rock which was under the fish, and back up.
3. Click on the painting of the tree, and place the green rock into the slot. Back up and open the now-unlocked painting, and you'll find a green book.
4. Open the book and you'll see four beautiful scenes of nature: birds, rabbits, squirrels, and deer. Click past the deer scene and you'll find the rabbit token.
Tokens To Get Out
1. Return to the first room, and click on the painting of a woman. Place the brown rock into the slot. Back up and open the now-unlocked painting, and you'll find the bird token.
2. Return to the dining room, and place the four tokens in the order we learned from the green book.
1. Bird
2. Rabbit
3. Squirrel
4. Deer
3. This will open the door, revealing a silhouette (the beautiful resident?). Click through the text and on the silhouette, and congrats! You've escaped!
Hi Thomas. Great job on the walk through. Hope you can help with those more often.
Reoda Chapter 3, So many left right puzzles. I resorted to a video walkthrough. I have been stuck for awhile on the one with the spinning knob.
I think this may be one of those games that you have to find the clue first before you can solve. I have no idea where the clue to this is.
The video walk through sequence is:
RRLRRRLLR
and it opens the canister in the video. It does not work for me.
I give up. I read somewhere else that the tree picture gives you the clue for the spinning knob.
But now when I try to solve, the know takes 5 to 10 seconds for each click. On the last click it is stuck to the right. Firefox said a web page was slowing down my browser. I clicked stop it and now it is frozen.
I don't think I will be finishing this one. Fun up to that point.
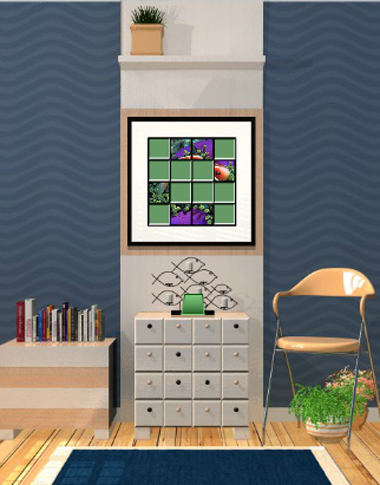
Deep Blue
The focus of this game may be the dark and deep blue, but there are many other colors to explore in this game!
Exploration
You start off facing a picture with several of its pieces missing. One of those pieces is the square tile right underneath, on top of a grid of drawers with black and white handles that don't work.
Turn right to face a couch with four fishy pictures (actually four parts of one picture) framed above it. One corner of each picture is marked in a different color. In front, the table has a square tile leaning against some stacks of shiny stone beads.
As you probably guessed, clicking the corners of the third picture tilts it.
Turn right to face the locked exit door and a television screen that's turned off. Under the TV, there's a row of shells above some colorful words with a square tile on them. And then there are two drawers, the left one having four colored bars that grow vertically, and the right one having four digit buttons.
Turn right to face the window, under which there's a square tile leaning on a fishy display. Under it is a small cupboard with a grid of buttons, and to the left of that is an identical cupboard that instead has two buttons. On top of that two-button cupboard, there's a stack of drawers, one of which has a lock with four color buttons.
Grid
Use the clue from the small drawers on the first screen to unlock the cupboard under the window.
The buttons which need to be turned dark are indicated by the darker-color drawer handles:
D - - D

- D - -

- D D -

D - - D
Push those buttons and open the cupboard to find a square tile and a remote control.
Screen
Turn on the TV to view a clue with five colored squares.
Then use the remote on the TV again to view a word clue.
Then use the remote on the TV again to view a clue with colored rectangles and lines.
Corners
Use the first clue from the TV to unlock the tilty picture.
The red, yellow, yellow, blue, green corners on the picture frames are the
⌝ ⌞⌞⌟ ⌜
corners of their frames, so click those corners of the third picture, which makes all four pictures come loose.
Flip the pictures over and remove the square tile, and you find that each one has a different number of corner triangles marked on it.
Corners 2
Use the clue you just found to unlock the right drawer under the TV.
The yellow, blue, red, green corners are on pictures which have 1, 6, 2, 4 triangles on their back.
Enter that in the drawer and open it to find a square tile.
Spell
Use the second clue from the TV to unlock the drawer to the left of the window.
The letters LUGE on the TV also appear beneath it as part of the phrase, in red, yellow, dark blue and green.
Click the buttons 3, 5, 2, 6 times and open the drawer to find a square tile.
Stacks
Use the last clue from the TV to unlock the left drawer under it.
The brown beads on the table appear, from highest to lowest, on the 1st, 4th, 2nd, 3rd (from the left) stacks, which are represented by red, purple, green, yellow on the TV.
Click the bars (from left to right) 1, 2, 0, 3 times and open the drawer to find a square tile.
Left and right
Use the remaining clue under the TV to unlock the cupboard under the stack of drawers.
The shells are arranged with sharp points on the RRLLR sides.
So push those buttons and open the cupboard to find the last square tile.
Complete
Place all ten square tiles into the incomplete picture on the first screen, which activates a randomized puzzle where you have to rotate the tiles until they align.
Once you're done, the picture slides up to reveal a gold key. Use it to unlock the door and escape!
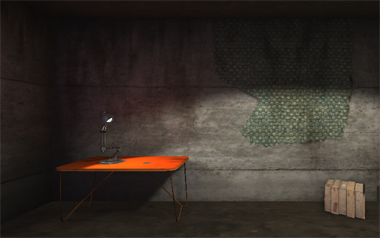
Laqueus Escape - Chapter 1
It's a 3D escape game! And also completely mouse controlled, which may take some getting used to.
Exploration
(After you start the game, you can adjust audio settings in the menu accessible from the top right corner.)
You start off facing a table with a lamp, a torn piece of rough gray paper, and a coffee stain. You can click the lamp twice to zoom in really close on its bulb and find out how much power it consumes.
To the right of the table, there's a wooden crate with screws on one face, as well as a super deep-voiced grate.
Between the crate and the wall, you see a card on the floor.
Turn right (by dragging of course) and take a closer look at the exit. The door has a stuck handle and through the peephole you only see darkness.
Turn right. The wall seems to be telling you to run, but there's no way to do so. Instead, you can look through the chest of drawers to find that the top one is empty, the middle one has an unusual keyhole, and the bottom one has a screwdriver.
But keep the top drawer open and look at its right side to find another card.
A purple lamp, very similar to the previous, lights the right corner.
Turn right to get a better look at the safe under the lamp, covered in a bunch of identical logos and three digit dials.
In between the safe and wall, you find a spooky photo that shows you a hidden spot on its reverse side.
Plain
Zoom in on the purple lightbulb and use (or examine) the gray paper there to reveal a three-digit clue.
Unfortunately, this code doesn't work on the safe.
Unscrew
Unscrew the crate and open it to find a roll of black tape.
You still have the screwdriver, so perhaps you can find somewhere else to use it.
Zoom in and unscrew the door handle.
Handle
Place the handle into the middle drawer and open it to find a box cutter.
Hidden
The photo tells you to zoom in beside the door.
Even if you don't see the very tiny seam in the wallpaper, you can just use the cutter on the wall to reveal the hidden compartment, which has two wires cut in half.
Fix the wires using the tape. It's not obvious what moved, but perhaps you can figure out what the wires were connected to.
Looking at the peephole, the game no longer tells you that it's dark on the other side.
Indeed, if you zoom in you should now see a little crescent-shaped glow. What can you get from it?
Drag the mouse/screen to the left (thus moving your camera to the right and looking at the left wall past the peephole), and you should see some white markings.
Three digits
Those markings you just saw form the code 279 written sideways, so enter that into the safe to unlock it and find a hammer.
Breakout / Exploration 2
Zoom in on the area where the door handle was, and use the hammer to break it.
Open the door, and the game helpfully moves your viewpoint into the corridor. You can't pass through the doorway at the end, but you can zoom in on the keypad beside it.
Turn right to face a faded poster for a game, with a card behind it on the left.
Further to the right is the doorway back (and yes, you can go back if you want). Closing the door, you spot a note on the ground.
Math
Read the note and use its clue, along with the other number clues in the game, to unlock the keypad.
The numbers indicated on the note are:
Paper on lamp: 547
Seen through peephole: 279
White wattage: 60
Purple wattage: 75
Work out 547+279+60×75 (and remember that multiplication is done first) to get the code 5326, and enter that into the keypad to unlock the door.
Ending
The writing on the wall is not subtle at all. And once again, you're told to run but cannot do so.
After you're done looking around, push the green button to end the game.
Thanks as always for the walkthroughs, KK. I hope Chapter 3 of Reoda will be just as good as Chapters 1 and 2.
Make sure you have that sequence exactly correct!
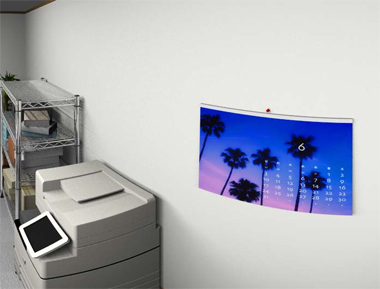
Reoda: Chapter 3
Chapter-03: Doctor's Office
(Not that kind of doctor's office!) Dr. Reoda has locked down his top-floor office so tight that nobody can get in, so this time you're playing as a drone with arms.
General tips
I didn't notice any lag, but if the game does then you should refresh the page.
Don't push the power button! The main menu is accessible (without any confirmation) from the TOP button.
Also, items are used automatically. Don't worry too much about selecting them.
Navigation in this game is lax and easily confusing. If you're not following the Exploration spoiler, try to be systematic about which areas you've covered.
This is especially true because some puzzles require you to collect many clues. Write them down for later reference!
Exploration
For some reason, you start off facing a calendar (for June, but probably not 2018 because the story's set in the future) that you can click to lift up and reveal a clue with a sequence of corners.
Turn right. We'll continue to focus on the left wall, where a weird picture can be flipped over to find a clue with N in a circle and a red dot at the bottom. Under that picture, there's a shelf with all sorts of items you can zoom in on. In particular, the middle picture frame hides a clue with G in a circle.
You can also zoom in on the left plant pot for some reason.
Back out and look at the couch area, where you see a giant picture of the islands from last episode's story. Among the stack of books, you find that the blank brown one with three dots on its cover can be opened to find an asterisk clue. Use the down arrow to look closer to you, where there's a remote control without batteries and a yellow device missing a chip.
On the right side, you see a picture of a tree on a blue background that tilts only when you click its lower corners. The door to the right seems to be an exit, but because of the lockdown we don't even have to look at it.
Turn right, and before you do anything look down. This desk has a chair you can move to reveal a Z in a circle, and the stack of papers hides a K in a circle. Click the desk to the right to switch over, and you see a green book with three dots on its spine that only holds a dollar sign inside.
Back out and click the other desks with the wooden tops. From here, a white figurine catches your attention, so you click it to find a stormtrooper bobblehead (the game autosaves for you) that you can play with a little.
Look down from the figurine and open the drawer to find a lot of symbol buttons around a slider marked ENTER.
Look up and back out, or just click the wooden tables. From here, you can look down at the drawers, one of which has a green keyhole. The green drawers on the desk are unlocked and one of them has color pencils of different lengths, all marked with three white dots. Beside those drawers, there's an unusual ornament next to the phone which you can lift to find a clue with W in a circle.
Back out, turn right, and click the desk to zoom in again. The only thing you can do with this desk is open its drawer to find a futuristic-looking keyboard in it. Also look at the wooden pinboard on the right where one of the photos hides a P in a circle.
Turn right, where the game automatically zooms in on the advertisement and autosaves. Since Awa-odori won't be helping you escape, you can just back out and turn right.
This bookcase has lots of stuff, but you've probably already noticed the pattern: on the left side, a red book with three dots shows you a star shape, and on the right side a blue book shows you an octothorpe and a light-blue book shows you a triangle.
To the right of those bookshelves, you see a fish ornament on top of a metal locker. You can zoom in on both, but the locker won't open using either of its handles.
Turn right and click the metal shelving. The only thing you can do here is open the blue drawers to find a clue in the bottom drawer.
(If you've been keeping track, you should have six letter clues for NGZKWP and five symbol clues for brown, green, red, blue, light blue.)
Deep
Use the clue from the fish decoration to unlock the locker beneath.
From top to bottom, the fish face RRLLLR.
So click those handles to open the locker and find a box with a hexagonal keyhole as well as a purple book with an exclamation mark.
Tilt
Use the clue from the calendar to unlock the tree picture.
As indicated behind the calendar, click the LRRRLL (bottom) corners of the picture frame, which opens to reveal four buttons on an unusual background.
Shelf
Use the clue from the shelf beneath the weird picture to unlock the panel behind the tree picture.
Since there are 1, 3, 5, 3 items on each level, click the buttons (from top to bottom) that many times, and the panel pops open to reveal a hexagonal dial.
Dial
Place the dial into the box under the fish, and now you can turn it left and right. Where do you find the clue for it?
The shape on the dial looks like a leaf, so refer to the tree picture again.
From top to bottom, there are 2 leaves on the right, 2 on the left, 3 right, 2 left, 1 right.
So turn the dial RRLLRRRLLR to open the box, and then take the key from inside.
Unlock
Use the key to unlock the drawer under the left side of the wooden table, which contains a yellow book showing you a plus sign.
In the second drawer you find that one of the notepads has a circled Y clue.
In the third drawer one of the cans has a circled E clue.
Letters
You should now have all eight letter clues, so use them to unlock the keyboard.
Arranging the letters starting with the red dots in the top left and proceeding clockwise, you get the code
KZPYNGWE
Click those buttons to open the case on the right which contains a button-type cell battery.
Power
Place the battery into the remote. Now you can push the red button to raise the screen and reveal a keypad.
Symbols
You should now have seen all seven books, so use the clues in them with the clue from the color pencils (green drawers) to unlock the panel under the bobblehead.
As the clue from the blue drawers tells you, you need to consider the color pencils from longest to shortest.
Matching their colors with the symbols in those books, you get:
brown: *
aqua: ▼
purple: !
green: $
red: ★
yellow: +
blue: #
Push the buttons in that order and click the slider to find an access card.
Chip
Place the card into the yellow device next to the remote, which is actually a projector that flashes a sequence of numbers onto the screen.
Raise the screen and enter that code (592734) into the keypad, which opens the safe, which contains a case with a microSD card inside.
Also, this ends the game. Next time, we find out the shocking announcement contained within!
ya but what can you do about that .
mcdonalds survey code
Update