
 Hello - the new WE is here! Wishing you beautiful spring and happy playing during this quarantine time!
Amajeto is definitely back and has changed remarkably, the latest game is bigger and feels more like their older escapes. Very nice. Shigeyuki Kagamura wants you to break free from a bear who imprisoned you - and only two months ago you were in a similar situation! Apparently, bears in Japan are getting out of hand these days. TomoLaSiDo's also wants you to escape and on your way to find some clovers. An important quest follows - you have to help to a team of escape artists who got stuck in Arktivez's game and aren't able to return on their own.
Have a good time and enjoy!
Huzzah, Amajeto is on a new platform! Finally! The layout has also changed and makes playing much more comfortable and enjoyable - the gamescreen is bigger and horizontal, and the game longer. Wish this format would stay. Puzzles are of the sort we're used to - four-letter/digit codes, left-rigt ones and collecting the tiles, of course (five this time). Will you escape?
The cursor isn't changing, save button, one ending.
P.S. Here is another spring themed Amajeto: Amajeto Hotel: Spring.

Scroll down the page first, you find the game under a big image, a teaser and some texts in Japanese. After short sight at bear's house you suddenly find yourself locked inside it. Shigeyuki Kagamura wants you to explore the house and solve few surprisingly advanced puzzles - who would say that a mere bear is capable to set such cleverly constructed hints? The bear living here is very civilized, though, his trendy toilet is spotless and the TV set seems up-to-date so maybe another step in evolution. Can you outsmart him?
The cursor isn't changing, no save button, one ending.
P.S. We haven't heard Robamimi from a while. Meanwhile, here is their beautiful Kumakinoko (where are starring several bears). Another very interesting (and quite difficult) game featuring a bear is here: Galves Adventure by Eyezmaze.
Clean TomoLaSiDo's room is obviously freshly redecorated - maybe that's the reason why we had to play outside last week - and apart from usual six capsules containing key parts hides seven clovers. Only three leaves ones. But if you be patient and resourceful, you may get a four leaves clover, too. Who can't use some luck and good fortune, right?
The cursor isn't changing, no save button, one ending.
In Arktivez's game you are supposed to find out what happened to a team of game developers which got missing, and bring it back. Well we can all see that many - too many - developers are missing but thought that they just retired from various reasons - in fact, some of them are being held hostages! To help them, you need to enter the game and figure out solutions of several problems which were too complicated for them. At the starting gamescreen, push the red 'start' button. At the next gamescreen notice the green text in upper left corner and do what it says - and only then the game starts. Go! Hurry up! This mission is serious!
The cursor is changing, no save button, one ending.
We love escape games, and our readers love talking about them and sharing hints! How about you? Let us know what you think, ask for clues, or help out other players in the comments below.


Do I need to be able to read the Japanese poem on the computer screen in order to win Escape from Bear's House?
No you don't. No language barrier in this game.
The Escape Artists is very frustrating. I keep running into dead-ends, where I can't go forward anymore and have to start over completely. It seems you have to do things in exactly the right order or you will get stuck.
@Thorzdad
I agree - very frustrating. I made it to the room with the supplies box. The only way to get to it is to mash 3 buttons in the exact order to lower / lift 3 boxes to create a bridge to the supply box.
Not working for me. Walking away from this one.
Bear's House
I guess I'm just having a bad day. I can not get past the 3 buttons. The clue is the 3 bear heads in front of the TV.
I resorted to a video walk through. The sequence presented did not work for me.
I'll come back next week and see if there is a walk through.
Any way sweet games. Thanks for sharing.
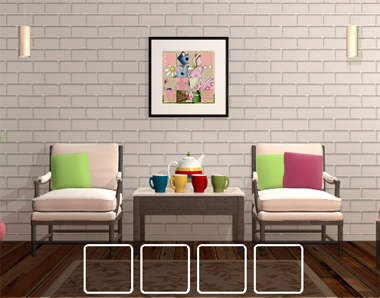
Home Sweet Home: Spring 2020
TV Screen Puzzles
Left Cabinet Puzzle
1. This puzzle consists of a 4x4 grid of squares which toggle back and forth between light and dark brown.
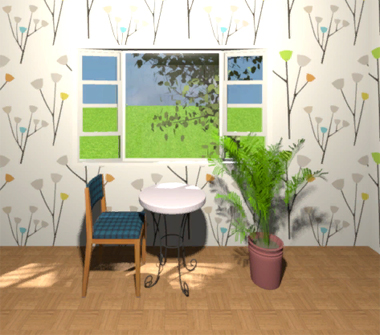
2. The hint for this puzzle is on the window screen.
The solution is on the decoration above the storage unit.
Mark the squares marked with an X dark and O light.
O O O X
O X O O
O X X O
X O O O
3. Inside this cabinet, you find a tile and a button.
Right Cabinet Puzzle
1. This puzzle consists of two buttons.
2. The hint for this puzzle is above the cabinets.
The solution is on the abacus-like decoration above the cabinet.
R R L R L
3. Inside this cabinet, you find a tile and see two hints for other puzzles.
Shelf Screen Puzzles
Left Cabinet Puzzle
1. This puzzle consists of four dials.
2. The hint for this puzzle is on the teapot table screen.
The solution is the combination of the teapot and teacups.
The colors on the teapot (from top to bottom) are yellow, red, blue, and green. The handles of the teacups, when viewed from the top-down, are west (blue), southwest (yellow), southeast (red), and east (green).
Combine these two clues to arrive at the solution:
SW SE W E
3. Inside this cabinet, you find a tile.
Right Cabinet Puzzle
This puzzle cannot be solved until you solve the right cabinet puzzle on the TV screen.
1. This puzzle consists of four squares which cycle through the following colors, in order: yellow, orange, red, pink, purple, cyan, blue, green, brown, and grey.
2. The hint for this puzzle is on the window screen and TV screen.
The solution is on the storage jar decoration under the windows and in the right cabinet on the TV screen.
Combining the two, you come to the solution: pink (3 clicks), grey (9 clicks), green (7 clicks), then brown (8 clicks).
3. Inside this cabinet, you find a tile.
Window Screen Puzzles
Cabinet Puzzle
This puzzle cannot be solved until you solve both TV screen puzzles.
1. This puzzle consists of four dials which cycle from 0 to 9.
2. The hint for this puzzle is on the TV screen.
The solution is the alarm clock screen after using the button.
The clock appears to show an M 8 downward facing triangle 8.
Combine this code with the MIRROR clue from the right cabinet, you arrive at this code:
1 3 7 3
3. Inside this cabinet, you find a crank key.
Storage Unit Puzzle
This puzzle cannot be solved until you solve both TV screen puzzles and the window screen cabinet puzzle.
1. This puzzle consists of four dials that cycle through A, C, E, H, I, L, M, O, T, V, Y, and Z.
2. The hint for this puzzle is on the shelf screen.
The solution is the train set after using the crank key.
Four symbols pop out of the TV after using the crank key.
Combine this code with the MIRROR clue from the right cabinet on the TV screen, you arrive at this code:
MYTH
3. Inside this cabinet, you find the last tile.
Teapot Table Screen Puzzles
This is the final puzzle in the game.
1. Place the five tiles in the picture frame.
2. Rotate the pieces to make the picture clear.
3. Take the key, and escape!
Congrats! You've escaped!
Escape from Bear's House
Given the lack of a true "exploration" phase for this game, this is less of a walkthrough so much as a solution list.
Balloon Box Top Drawer
The solution for this puzzle comes from the multi-colored balloons above the box. Try clicking them.
L R L R R
Large Storage Cabinet
The solution for this puzzle comes from the rats on the pipe and the TV. You need a remote to turn the TV on.
3865
Red Box on Shelf
The solution for this puzzle comes from the toilet. You need a ladder to reach the box.
U U D U D U U
Balloon Box Bottom Drawer
The solution for this puzzle comes from the computer screen and the bears below the TV. You need the cans from the red storage box.
L M R M L
Many people have reported issues with this puzzle, so try re-entering the code a few times. It worked for me during my first playthrough.
Small Brown Storage Box
The solution for this puzzle comes from the computer and the poster with a smudge on it. You need the towel from the bottom balloon box drawer.
ROCK
Thomas, Thanks for the walkthroughs. I had the same issue you did buntil i did this:
i clicked the bears and they made those images from the buttons. once i did that and only when i did that it work. not sure if that was the problem though but anyway...
hope that helped and i appreciate you and i think i speak for everyone on this as well.
For the bear puzzle in Bear's House, this is the relevant section of the Japanese walkthrough under the game:
- Red freezer
Pay attention to the toilet
Up, Up, Down, Up, Down, Up, Up
- Drinks
Give them to the bears
- Drawer (lower)
Refer to the bear's expressions and the computer monitor
Left, Middle, Right, Middle, Left
The game won't accept the code if you skip the middle step, even though you can already figure out the code from
the Japanese clue on the monitor:
To Mom:
Thank you for the green peppers.
The first bag was bitter....
The second bag was spicy!
The third bag was sweet.
The fourth bag was spicy!
The fifth bag was bitter....
From Son
(Of course, what the bears say after you give them the drinks is Bitter, Spicy and Sweet.)
Escape Challenge 107: Room with Clovers
Exploration
You start off facing the usual combination of window, table, chair and potted plant. The table has a flier encouraging you to search for a four-leaf clover, the chair has a capsule containing a key piece on it, and the potted plant has a number 5 in a square. While zoomed in on the table, you also spot a three-leaf clover on the windowsill.
Turn left to face an armchair under a wall box beside a machine on a table. The machine has a grid of nine buttons that turn gray when clicked, and the triangular button beside makes each square in the grid change color. The wall box has a column of three color buttons. The armchair has a clover balanced on its cushion and a question mark drawn one of its armrests, but clicking the question mark only gets you a mocking face.
Click the other armrest to see a clue with 6 in a square.
Look under the table to fid a key piece.
Turn left to face the locked door, wall clock, chest of drawers and blue bin. As usual, the wall clock has no hands, but it has some unusual numbering and three different types of lines. The top drawer has two buttons, the middle has three digit buttons, and the bottom has three buttons arranged in a triangle. The blue bin is empty but examining it gets you a view of the side of the chest of drawers, which has a clue with 2 in a triangle.
Turn left to find two more machines (on tables), as well as a framed picture of a clover with numbers. At the top-right corner of the picture is a circled 1. The left machine is a glass case with a single clover inside, but its numbered buttons are outlined in shapes that change when you push the buttons. The right machine is just a slot machine but it's very clear that there's only three-leaf clovers on the reels.
Look under the slot machine to find a key piece.
Enter the corridor leading to the toilet, which is refreshingly open at the back. You can still sit down, look right, look up and look left to find a complicated drawing with a gray spot above the smiley at the right.
Leave through the backdoor to get to the rear of the house. A pipe leads into a trough that runs into a grayish drain.
Click the trough to get a view of some clover patches. They seem identical.
Go left to view even more patches. Still identical.
Two buttons
Use the clue from the flier to unlock the top drawer.
The stems of the clovers point LLRRLL, so push those buttons and open the drawer to find a clover and key piece.
Three buttons
Use the clue from the framed picture to unlock the bottom drawer.
The digits from 1 to 6 appear on the RURLUL leaves in the picture, so push those buttons and open the drawer to find a clover and key piece.
Three digits
Use the clue from the slot machine to unlock the middle drawer.
Each reel has a different number of consecutive clovers on it. The first reel to stop has 4, the second has 1 and the last has 3.
Enter 413 into the drawer and open it to find a clover, key piece and a clue.
(You can also guess this code from other clues in the game.)
You can now leave the room (through the proper exit), but the game is only halfway through!
Colors
Use the clue from the clock to solve the grid machine.
Since the dotted lines connect I, 1 and 3, click the buttons in the I row in columns 1 and 3 (i.e. the top left and top right).
Similarly for the dashed lines click the left button, and for the solid lines click the bottom-right button.
If you click the triangular button now you'll find that all the remaining squares turn red, yellow and blue together.
Which is okay, but now you need somewhere to put that code.
Make the buttons on the wall box red, yellow, blue by clicking them 4, 1, 3 times.
Then open the box to find a clover and a brown paper note.
Shapes
Use clues throughout the game to unlock the glass case.
The numbered shapes are:
6 square: on side of armchair
5 square: on plant pot
4 circle: in drawer / on note
3 triangle: in toilet drawing
2 triangle: on side of drawers
1 circle: near framed picture
Click the buttons 2, 2, 0, 1, 1, 0 times and open the case to get the clover.
Flush
Return to the slot machine and turn the handle, which comes off.
Then refer to the note to figure out how to use it.
Go back to the toilet, sit down, look right, up and then left, and finally place the handle on the hole in the wall.
Turn it to flush!
Near the number buttons on the glass case, there are lines that look like those beside the clover patches.
So the circled 4 on the note tells you to look in the fourth patch from the right (i.e. third from the left).
And the numbers 2-II on the note tell you to look in the middle of the screen, both vertically and horizontally.
There's a four-leaf clover in the middle of the patch!
Now that you've completed every puzzle, simply open the door to end the game.
Item list
6 key pieces:
Top left: in top drawer
Top middle: in middle drawer
Top right: in bottom drawer
Bottom left: under grid machine
Bottom middle: on chair
Bottom right: under slot machine
7 three-leaf clovers:
On windowsill
On armchair cushion
In top drawer
In bottom drawer
In middle drawer
In wall box
In glass case
Three other items:
Handle from slot machine
Note in wall box
Four-leaf clover from the garden
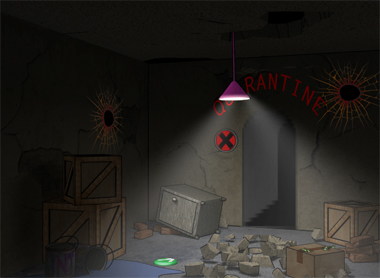
The Escape Artists
It can be a nightmare to develop or play a glitchy game. But it's not just a figure of speech, as this game has all sorts of mildly scary tricks up its dimly lit sleeves.
Exploration 1
After clicking in the box, typing RUN (in all capital letters) and pressing Enter, a pair of ornate wooden doors materializes in front of you. Clicking them gets you into the escape room.
The walls have holes surrounded by fiery-hot cracks, and a lamp dangles from the ceiling and swings distractingly. The doorway to Quarantine flickers into pixels, and the cross-shaped mark beside it "looks like a button". As for floor items, you can see (from left to right) a pool of purple paint, an arrow button you can take, a locked cabinet, and a sealed cardboard box covered in bugs.
Place the arrow button over the cross mark, and can click it again to proceed.
This room has a bright blue lightbulb that dims occasionally. The window next to it is cracked. The easel has a musical score, and even if you can't read music you can click on the notes and the game will tell you. On top of a crate, there's an empty paint can and an empty bug spray can. In the red toolbox, you find a sharp knife. The planks on the right hide a map/arrow guy who has a story to tell, and then an offer to trade. And on the right there's another cross mark, requiring an arrow to proceed. (Thankfully, the arrow on the left side of the screen already works.)
Keen
The game tells you what's needed to open the box. The knife won't work!
The name of the object is just the two capitalized words in the message.
So use the knife to cut out the second musical note, which is an A Sharp.
Then use the note on the box to cut it. All the bugs are suddenly gone, and in the box you find 2 blank discs.
Use both discs on the arrow guy to get 2 arrows.
Then place one of them on the cross mark so you can proceed.
Exploration 2
Broken links hang from the ceiling, dripping molten steel onto the floor. You can examine the lock panel on the shutter but the game tells you you haven't seen its clue.
And then there are two cross marks on the wall, which presents an interesting choice.
Scary looks notwithstanding, there are no dead-end paths in this game. Let's avoid the right side until later.
After placing the arrow on the left cross and then clicking it, a flat-looking man with a bowtie tells you not to move.
But you'd really be stuck if you complied, so click the arrow at the end of the corridor to make a Worm appear. It now blocks the path.
Squares / Storage
The man's face goes a bit crazy from shock, but you can use that to open the shutter.
His eyes turn yellow, purple, green, red, blue, so click the big buttons (from left to right) 2, 5, 3, 1, 4 times.
Similarly, matching the eye positions, click the top left corner of the yellow square, bottom right of the purple, top left of the green, top right of the red, and bottom left of the blue.
The shutter opens and all you see is a puddle of red paint on the floor.
Entering the dark room, you see a ladder you can't take, as well as a pair of red reptilian eyes staring at you for a while.
But once again you're out of clues, which means it's worth searching a bit more. (Or you can cheat a bit by turning up your monitor brightness all the way.)
The bright line at the upper left is the power duct to the light switch, which you can find using the changing cursor.
But the switch doesn't stay down for long! While the room is lit, take the cork-shaped patch from the top box, as well as a blank disc from the right shelf.
Blocked / Exploration 3
Use the patch on the worm to drive it back into the hole and keep it there.
Moving forward, you find an electric purple portal. Some bugs crawl around near the cross mark on the right, and there's a hole in the wall through which a large ball-shaped monster quickly appears and disappears.
Enter the portal to find a warning sign wearing a helmet who asks you to look for tools so he can be freed from his leg chain which isn't attached to anything at all. The antivirus panel has some chains attached to handles at the top, as well as some handles not attached to anything. A (cork) patch is stuck in the electrified column on the right.
(I'm not describing the purple portal in the room because that's just the way back.)
Seen some movement yet? No? Then you're in for a surprise when you bring your blank disc back to the arrow guy and there's a huge worm just snapping at your face.
Short circuit
There's only one thing you can do right now to divert power out of the antivirus room.
Turn on the switch in the storeroom and then quickly make your way to the antivirus room before the switch turns back off.
While the column is unpowered, you can pull the patch out of it.
Use the patch to plug the worm up. The arrow guy is now back in business!
Exploration 4
Swap your disc for an arrow, place it where the bugs are and then go forward.
Your path is blocked by a virus and its bug army, but you can take a blank disc from the floor as well as a key that the big key (just for pun's sake I'm calling him Master Key) gave you to help in your search for bug spray.
Unlock / Debug
Bring the key back to the first room, and use it to open the safe and find an almost-empty can of bug spray.
The game helpfully reminds you not to waste your bug spray on the couple of isolated bugs, so you bring it to the virus and spray it.
Master Key is now free and gives you another key to use.
Also, you can examine the gate lock to find that it takes a five-digit code.
Helpful
The code from the bug spray doesn't work in the keypad lock, so it seems you need help with the missing piece. Thankfully there's someone whose job is to just give you a clue.
Read the barcode piece that the puzzler now holds in his hand, then use that clue to unlock the keypad.
The full barcode number reads
25272+73070
which works out to 98342, so enter that into the keypad and open the gate forward.
Exploration 5
It's a room full of crates. There's a supplies box on the far side, three crates controlled by the panel in front, and a recycling bin which has an empty jar on top.
Supplies!
Operate the control panel to get to the supplies crate.
(You can always leave and reenter the room to reset the puzzle.)
Here's a brief explanation:
Each of the three boxes needs to be lowered to form a bridge level with the starting platform. In other words, no climbing should be necessary.
The only indication that you've solved the puzzle is that you can pick up the box.
Each box returns to the top when it reaches the bottom.
Each button controls two boxes, and consumes one of the ten red bars.
When all ten red bars are gone, the puzzle resets even if you end with the correct arrangement.
Boxes move the same way regardless of which button you use to move them.
Now that you know how the puzzle works, you can do some math:
Count the number of moves each box makes, say A, B, C. Their total T is A+B+C, but each button press contributes two moves to the total, so T is even. You only get a maximum of 9 button presses (the tenth resets the puzzle), so T is at most 18, and each of A, B, C is at most 9.
Notice that the first and last boxes have only four positions, and they need to be moved 2 times. The middle box has five positions, and only needs to be moved 3 times.
So A can be equal to 2, but A=6 would also work. Similarly we have either B=3 or B=8, but since B=T−A−C and T, A, C are all even, B must be an even number, so B=8.
Eight of the button presses must affect the middle box, but these eight presses must affect other boxes as well, so that A+C is at least 8. Based on the restriction that T−B is at most 18-8=10, you can work out that A+C is exactly 8 (and T=16). In other words, either A=2 and C=6, or vice versa.
Normally you'd do one more step of working out the numbers of button presses (T/2−A, T/2−B and T/2−C respectively), but we've already pictured this scenario in the previous argument: of the 8 button presses, 2 of them move the first two boxes and 6 of them move the last two boxes (or vice versa).
which tells you to push the top button twice and the middle button six times. Then just pick up the supply box!
Exploration 6 / Unlock 2
Swap your disc for an arrow, and place it on the remaining cross mark beside the storeroom.
Here, you see a door without a doorknob but with bright light shining through around its edges. There's a supply box with another blank disc in it. The padlocked box marked fragile shakes a lot when you click it.
Use the key to unlock the box. It seems like this tool guy is just wearing the box! Anyway, he asks you to look for the wrench that he's going to hide somewhere.
Hunt
Backtrack to the starting screen, and take the wrench leaning against a crate.
Give the wrench to the warning sign guy in the antivirus room, who rewards you with a doorknob.
The portal vanishes when you leave.
Exit?
Use the doorknob on the glowing door and open it. A white path has a blocky gap in it, and the warning sign guy needs supplies.
Give the supply box to him, and he builds an impressive bridge. Click the tiny doorway in the distance.
You arrive at a brick wall with a password panel. Everybody is now stuck in front of the wall, and their skills don't seem to be of much help.
Wrong
The puzzle guy tells you what happens if the lock works correctly, or rather what isn't the answer.
If you can prevent that lock from working correctly, perhaps what he says will become the answer!
Make your way back to the screen where the portal was, and use the jar to catch some glitchy bugs.
Then return to the wall and apply the bugs to the panel.
Finally, enter BLANK into the lock and push the red button to remove the wall.
Battle
The warning guy tells you to link the filing cabinet to the antivirus through the purple portal.
And when you zoom in on the filing cabinet, the tool guy tells you to look for a can of bug spray.
Backtrack to the place with the melted chains, and you find that you can now take the remaining intact link.
Also return to where you got the bugs, and pick up the full can of bug spray from the left wall.
Make your way back to the filing cabinet, and go through the portal. Attach the link to the antivirus circuit.
Then return through the portal, pick up the other end of the link, and move it towards the filing cabinet, where you immediately get blocked by a huge virus.
The virus tries to dodge your bug spray while you're wielding it, but you easily catch it three times. All that remains is to connect the chain.
Victory! Leave through the exit door that appears, and enjoy the ending artwork.
i got stuck at the end.
the part where it says "go back to where you found the bugs and collect the spray" i never could find that area again.
i hope someone can help.
I had the same issue even though I knew exactly where to go back to, until I realized
I had not actually clicked on the tool guy. Once I did & he told me about the bug spray, I went back to where I knew it should be & it had appeared (it wasn't there until I did this).
About the end
in the area with the filing cabinet click the tool guy - the one in the box
he had a full can of bug spray but he hid it somewhere
click the arrow button and leave
cross the bridge
open the door and you are in the room with a box
click the arrow button and you are in the room with broken links
click the leftmost arrow button and you are in the corridor
click the button in front of you
you are in the area when you got bugs - on the left wall are shelves where you find the spray
Update