
 Hi, another week is over and four fresh games here!
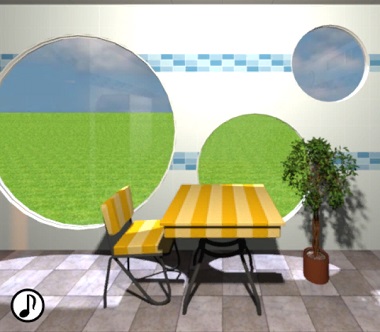
The first comes Amajeto with their standard quality escape followed by tomoLaSiDo's tiled living room with three lovely round windows, new tune, new color of the room key, and lots of canned fish. After several months we get enjoyable Neat Escape's which is really nice...now we know they didn't abandon us, pc players. Good. The last comes touching and sweet story by Rinnogogo, clever and relaxing, too.
Have a good time and enjoy!
Amajeto's room isn't a storeroom or a warehouse, what suggests the game's title, but their tidy and pleasant living room where can be found only four decorative boxes, and also many locked drawers which require a code. Will you escape?
The cursor isn't changing, no save button, one ending.
P.S. Previous games about boxes: Room with Boxes you find in WE N°223, and here are Room with Boxes 2 and Room with Boxes 3, which weren't posted on JiG.
Mackerel is full of omega-3 fatty acids and contains a wealth of essential vitamins and minerals. The oily fish is one of the healthiest seafood options available. And tomoLaSiDo hid fifteen canned mackerels in their room! What a treat! Even if you aren't able to find all the key parts and stay trapped inside the room, you won't die from hunger for quite a long time. Like two weeks or so. More, probably. However, puzzles are not too difficult - can you escape?
The cursor isn't changing, no save button, one ending.
You wake up in your room and suddenly realize that something has changed at night. Somebody (Neat Escape) refurbished your room and you can't get out! Well, it's time for proving your escaping skills and find the key probably hidden in one of the locked closets. Your reward is healthy breakfast so hurry up!
The cursor isn't changing, save button plus autosave, one ending.
Old man has invited you to visit his small cafe; he often feels lonely when days turn to nights he said, and promised you won't be bored. When you came in the nightfall he was dressed up like a panda - what you didn't expect - and before you could ask him anything he left to take a rest. Soon you see that he had prepared earlier a game for you - the cafe is locked and full of interesting puzzles. And he's keenly watching you, not resting, what you realize later...it's not scary though, just kind. Rinnogogo's little old man is very playful and wants you to have some fun, too.
The cursor isn't changing, autosave, one ending.
We love escape games, and our readers love talking about them and sharing hints! How about you? Let us know what you think, ask for clues, or help out other players in the comments below.


Night Fall was sweet. Some of the puzzles were hard for me.
Check the same areas. Some clues are used more than once.
The kitty was cute.
Also (not really a spoiler, but might give something away early):
I laughed when the bathroom rose up revealing stairs to the basement. That is some amazing plumbing.
Hi fellow escapers,
Ever since Amajeto changed their format, I've been having trouble playing their games. The buttons and button icons seem to be in different places, and sometimes, I can't even find the button to submit a puzzle solution. Does anyone know what the problem could be, and perhaps how to fix it? Any help would be much appreciated. :)
Thanks for fixing the "tagged with escape" page!
Can't wait for these :)
Von, what is your browser? Internet explorer?
Could be a browser issue as Pulsaris suggests. I had similar problems with Amajeto's games in Edge (Explorer) but the latest update fixed them. There were also problems in Firefox (the game didn't even load properly) and after the latest update it's fine.
I haven't experienced problems with Amajeto, but switching browsers is always a simple option to try for such issues.
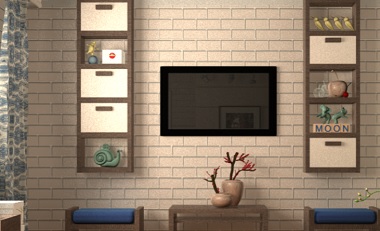
Room with Boxes 4
Exploration
You start off facing a television screen (turned off) surrounded by two shelves. You can zoom in on the four-digit compartment on the left as well as the four-color compartment on the right, where you also see some colored letter blocks.
Turn right to face two unusual paintings of faces, the left having a color clue on its back and the right having a grid of buttons. In between them under the wall shelf, there's four boxes with card suit markings and colored lids with triangles.
Turn right to face the locked door and a picture grid with numbered tiles, eight of which are missing. Under two more sets of letter blocks, the left drawer has two buttons and the right has four shape buttons. Amazingly, you have no trouble climbing up to the second spotlight to retrieve a square tile from it.
Turn right to face the windows. Under them, there's more letter blocks, a four-letter drawer, and a four-dial drawer.
Two buttons
Use the clue from the
shelves around the TV
to unlock the left drawer on the door screen:
From top to bottom, the white (closed) compartments are on the
LRLLR
Inside, you find a square tile and remote control.
Use the remote control on the TV to view some clues,
and don't forget to keep using it on the TV. There are three clues in total.
Puzzles on window screen
You'll need clues
from the TV, letter blocks, and the spotlights.
For the top drawer:
The first clue from the TV tells you to read:
the 1st letter of the green word (H)
the 3rd letter of the yellow word (A)
the 4th letter of the blue word (N)
the 2nd letter of the red word (D)
The code is HAND.
For the bottom drawer:
The spotlights point towards the bottom-right, bottom, bottom-left, top-right.
Click the dials 3, 4, 5, 1 times.
Take 2 square tiles.
Shapes
Use the clue from the
TV
to unlock the right drawer on the door screen:
The triangles pointing UDLR are on the boxes with the
Club Spade Heart Diamond
Inside, there's a square tile.
A list of numbers
You'll need the clues from the
TV and tile picture.
For the right painting:
The numbers on the screen appear in the
_1 __ 10 __

__ __ _4 __

__ _5 __ __

__ 15 __ __
positions on the painting.
Behind it, there's a square tile and a clue.
Puzzles on TV shelves
You'll need the clues from the
paintings, tile picture and boxes.
For the left shelf compartment:
The right painting gives you a sequence of squares, but you need a sequence of digits.
So read the squares from the top left to the bottom right of the tile picture:
1 3 6 8
It contains a square tile.
For the right shelf compartment:
The left painting tells you how to get a single color from combining pairs of colors in each of four corners.
So combine the colors on the four boxes with their lids, in the order indicated by the gray arrow:
Top left: White + Red = Pink
Top right: Yellow + Red = Orange
Bottom left: Blue + Yellow = Green
Bottom right: Red + Blue = Purple
Click the buttons 3 1 7 4 times to enter those colors.
It contains the last square tile.
Complete
Place all 8 square tiles into the tile picture, and rotate the tiles until they align.
3 1 1 20 2 1 3
3 2 0 2
1 3 1 2
Take the key and use it on the door to end the game.
Thanks kk. hope the others are cool too
The others are certainly cool. But it's a busy week for me, so hope you can wait!
Escape Challenge 111: Room with Canned Mackerel
Exploration
We start with the usual window(s), table and potted plant. The table has a flyer advertising the canned mackerel (and making cold miso soup with it) and you see a numbered rectangle in the background. Take a capsule containing a key piece from the potted plant.
Turn right to face a wall with a number painted on it. The table below has a glass case of cans with a three-button lock. There's also a wall clock that goes wild for a bit, and under that a box on a table has a weird-shaped hole in it.
The left side of the clock has a switch. You can look under the right table to find a key piece and a numbered rectangle.
Turn right to face the locked door. A wall box with two buttons says something about fermentation, and the chest of drawers under it has a lock with three digit buttons, a lock with five numbered buttons, and a lock with three color buttons having shapes on them.
Turn right. There's a wall box with three circle buttons over a blue bin. The large white machine has three large buttons in the top right and two buttons in the bottom left (that don't make any sound yet).
Enter the corridor leading to the toilet, where you can sit down, look right, look up and look left to view a drawing featuring even more things to eat with canned mackerel.
Chest of drawers
You'll need the clues from
the painted wall, the wall clock and the flyer.
For the top drawer:
Enter the number on the wall:
123
For the middle drawer:
(You can) flip the switch on the left side of the clock to slow down its clue.
The spinning hand of the clock jumps between the numbers on the right side in the order
24315
For the bottom drawer:
By considering the different colors that appear on the flyer, you find that the diamond, circle, square are green, cyan, white.
Click the buttons 2, 3, 0 times.
After all that, you get a total of 3 key pieces and 3 cans.
Circles
Use the clue from
the windows
to unlock the wall box:
Follow the sizes of the windows:
Big Medium Small
You get a key piece and 2 cans.
You can now leave, but you'd be missing out on the fun part!
Dispenser / Labeler / Stash
You'll need a clue from
the flyer.
For the big machine:
enter the price (380) into the top right corner.
Some cans scan by but one of them is different. You get a bloated can.
Place the bloated can in the box under the wall clock, which makes some lights flash.
Enter the code (LLRRLR) into the bottom-left of the machine, and you'll get 4 cans.
Back out and zoom in on the big machine again, and you'll find some parts lit up in the bottom left.
Enter that code (RLLLR) into the machine on the door screen, and open it to find a round platform.
Place your bloated can on that platform, where the machine certifies that fermentation is complete.
Back out and zoom in on that machine to find a three-digit clue.
Together with clues
on the walls of the room
use that to unlock the glass case on the table with the checkered tablecloth:
The numbers 12, 347 and 56 are written in a tall rectangle, a square and a wide rectangle.
Those are precisely the shapes of the gaps between the cans in the glass case.
Reading the digits from 1 to 7, you find that you have to push the buttons on the
LLUURRU sides.
Open the door and leave!
Item list
6 key pieces:
Top left: in top drawer
Top middle: in middle drawer
Top right: in bottom drawer
Bottom left: under table below wall clock
Bottom middle: on potted plant
Bottom right: in wall box
15 cans:
1 in top drawer
1 in middle drawer
1 in bottom drawer
2 in wall box
4 from big machine
6 from glass case
and one other item:
a bloated can from the big machine.
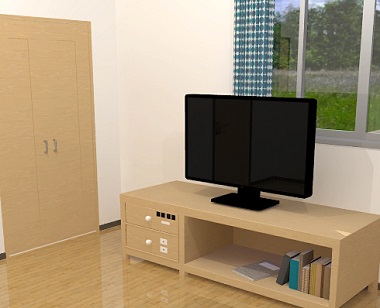
My Room
While short and simple (as a mobile game), this game carries a lot of Neat Escape's style.
Exploration
Our exploration of this room begins in a corner. The wardrobe on the left has three blue shirts hanging inside.
Wait, why are there two bars in there? Click the right end of the bars to find that one of them is bolted to a holder on the wall.
A television screen is turned off, and under it you see a four-digit drawer, a drawer with two buttons marked with tiny rectangles, and some books, one of which tells you how to mix green and red.
Turn right to face a desk. The computer monitor shows a beach, and using the mouse makes it show a number. Two of the desk drawers can be opened to reveal number clues.
Turn right to face a bed. Near the pillow, there's a digital clock and a three-digit lock.
Under the bed, you see a battery you can't reach.
The only bedpost you can zoom in on has a circular lid you can remove to find a remote control.
Turn right to find a couch, a picture of tools, and the locked door. Checking the couch cushions, you find a box with its lid screwed shut.
Drawers under TV
You'll need the clues
from the desk and the bedside clock.
For the top drawer:
Enter the time on the clock:
0738
You get a screwdriver.
For the bottom drawer:
The desk drawers have the digits 1, 2, 3, 4, 5, 6 in the
UUDUDD
drawers, so click those buttons.
You get a hammer.
Tool use
Use the screwdriver to unscrew the box and get a battery.
Also use the hammer
on the tool picture
and take the spanner, then use that
on the right side of the closet
to get a stick, then use that
under the bed
to get a battery.
TV time
Place both batteries into the remote, then use it on the TV to view a simple clue.
Use that clue together with those from
the book and computer
to unlock the lock near the pillow:
The yellow code is green (123) plus red (235), which is
358
Take the key, unlock the door, and escape!
Hey, so I'm using Chrome, always have, and never had these issues before, only since they started using a different platform.
Thank you everyone who responded. I'll definitely try a different browser.
Thanks again, KK. looking forward to the last one.
Night fall
The Japanese title seems to suggest some sort of devilish encounter, but nope, it's just twilight.
By the way, the game will let you skip most of the items and puzzles, and you don't even need to talk to the main character!
(In case the new layout leaves you a bit lost: the home button above "How to play" is the game menu.)
Exploration
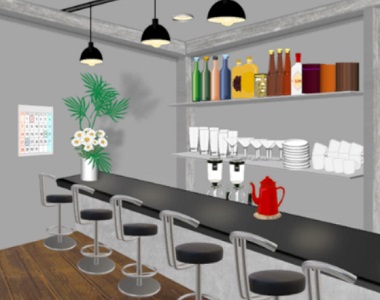
You see a corner of a table, a keypad door, a potted plant, a normal locked door, and a panda on a couch who's actually an old man. On the table is a box with an underwater picture and four weird buttons. The man on the couch talks to you a bit and then vanishes somewhere, leaving a bottle of alcohol.
Turn right. You see lots of stuff behind the bar counter, but the only thing you can use here is the calendar on the wall.
Turn right, where you see a dessert display case, a shelf you can't look closer at, and a locked door with a narrow green slot next to it.
Click the dessert case, and you'll see an arrow pointing at a red cash register that's actually just a keypad with an unusual picture under it.
Back out. This time, click the arrow above the dessert case. Now that you're on the other side of the bar, you can pick up a wineglass and look at three colored saucepans.
Back out again, and turn right. This wall is basically all window, giving you a great view of the forest outside. The left table has an unusual device with four colored buttons. You can also look at the picture on the wall.
Digit door
Use clues from the
calendar and saucepans
to unlock the left door on the first screen:
The shape and colors of the saucepans remind you of the circles on the calendar (and of course, the calendar has five saucepans drawn on it).
If the green, red, blue saucepans represent the circled numbers 19, 2, 22 on the calendar, then the tips of their handles are the numbers:
Left of 19 is 18
Under 2 is 9
Below and right of 22 is 30
Enter the code 18930.
It's just a storage cabinet where you can pick up a notebook and a tall bar stool.
Color grid
Use the clue from the
dessert display case
to unlock the device on the left table:
The four types of desserts are
Pink(3) Green (2)
Yellow(4) Brown(1)
Take a kitchen knife.
Cutting edge
The clue from
the first page of the notebook
tells you how to use the knife:
Cut a hole in the framed picture, above the letter V in LOVE.
Take the key, and then use it to unlock
the door beside the green slot.
Exploration 2
Welcome to the bathroom, where you can't clean up at all but can look very closely at a bolt extending from the floor.
(There's also a hidden spot that I'll get to later.)
Turn around to face the bathroom door. A pink lucky cat (pig?) has a four-digit lock on its apron, and there's another clue with circles above.
Going back
As you return to the main room, you notice something different:
On the first screen, the table now has a pot of soup on it, along with a friendly note.
So you
finish the soup
and get a clue from it.
The clue you just found unlocks the red keypad beside the display case (as hinted by the soup picture).
Solution:
The bottom of the bowl has 4, 3, 2 groups of symbols, while the note has words that are 4, 3, 2 letters long. This means each symbol represents a letter: the two E's in HERE, and the two O's in YOU GO.
However, the clue has four upside-down digits, so you should either read your screen upside-down or rotate each of the letters you get:
3003
You get a screwdriver (and the table is cleared).
High
Based on the clue
on the second page of the notebook
you find the hidden spot in the bathroom
above and slightly left of the flowers
which contains a wooden board held by screws.
You'll need to
place the chair in front of the flowers so you can get closer to the board.
Then use the screwdriver to unscrew it.
You find a button that turns on a lightbulb.
The only thing this changes is
in the main room when you leave, where a glowing clue now appears on the shelf.
Flipper
Use the clue you just saw:
glowing dolphin clue on the shelf
to unlock the box on the table on the first screen:
Focusing on the tail parts (specifically, fins) of the dolphins, you find that appear on the
D L R U
sides (of the box).
Take the spanner.
Finishing the bathroom
Use the spanner you just got to remove the bolt on the bathroom floor.
Nothing happens, but you need to do this step in order for the next one to work.
Solving the dolphin puzzle has made a new clue appear in the main room:
The saucepans are now all red and pointing in different directions from before.
Use that clue, as well as
the clue from the calendar
to solve the lock held by the pig:
The circles above the pig tell you to read the saucepans from left to right. Using the same logic as before:
Below 2 is 9
Left of 2 is 1
Below and right of 2 is 10
Enter 9110.
Take the lever handle, and then
use it on the green slot and click it
to gain access to the basement.
Exploration 3
At the bottom of the stairs is what I can best describe as a one-room studio apartment: there's a bed, a couch and even a chandelier and TV. The right pillow hides a battery. A black cat is waiting for its food, but that doesn't stop you from taking the shiny stick behind it.
Turn around, and click the couch. The table in front has a circle and a square hole on its top.
Look under the couch to find a battery.
Back out. In the background, you see a picture of some very round flowers. The cupboard underneath has some cool items, as well as two doors boarded up with nails. To the right of the stairs is a set of cupboard compartments containing colored orbs.
(There's another hidden spot that I'll mention later.)
Powered
Use the stick
by examining and bending it first, then using it under the couch
to get the battery.
Also, place the
wine bottle and glass into the holder on the table near the couch
to get a remote control.
Now you can place
both batteries into the remote
and then use the remote to turn on the TV and flip through its channels.
The first clue from the TV tells you to
look at the stairs when climbing up.
Specifically, click the gray panel on the middle step.
You get a crowbar.
Use the crowbar to remove the boards from the cupboard under the picture.
Hmm, the right sliding door doesn't seem to work, and the left sliding door seems to have nothing behind it.
But there is! Click the false bottom behind the left sliding door to remove it, and now you can move the right sliding door.
After doing that, you find a slider box with one slider missing.
Colorful
Use the clues from
the flower picture and TV
to unlock the orb compartments:
The flowers with 1, 2, 3, 4 leaves are
yellow, pink, blue, red.
Click the
- 1

4 -

- 3

2 -
compartments.
Take the moon piece that appears.
The third TV clue tells you that you can now enter the color sequence from the second TV clue.
The red, black, green, pink, blue orbs are in the
- -

1 3

- 5

4 2
compartments.
Take the sky photo that appears.
Moonrise
Place the moon piece into the slider puzzle, and use the clue from the sky photo to unlock it:
Based on the combination of the daytime photo and the night photo, the sun appears highest followed by the moon and then clouds.
Click the sun, moon, cloud sliders 2, 1, 0 times.
You get a bag of cat food. Feed it to the cat to get a key!
Then use that key to unlock the remaining door upstairs, and escape!
Update