

![]() What's the deal with Wednesdays? I mean, they come in, the middle of the week, and there they sit. Hump day, Wednesday. You heard about that before? You know the jokes. I think Wednesday is a little too proud, though: "Hey, look at me. I'm two whole days closer to Friday than Monday. Yippee!" Meanwhile, Friday's just sitting back at the end of the week, feeling pretty dang good about itself as well. And you know what? I bet every day wishes it was Friday. Well, it's not a lie if you believe it. What I like, though? I like any day I can eat soup and play some free online escape games. And so I'm telling you, that's what I like about today. Here we go with another one of FunkyLand's Alice series, and it's truly wonderlandastic if I do say so myself. Next, you got your standard Yomino Kagura fare just to keep things moving and, finally, a little tea with newcomer, Ponpoko to wind things down. Speaking of soup, did I ever tell you about the time...
What's the deal with Wednesdays? I mean, they come in, the middle of the week, and there they sit. Hump day, Wednesday. You heard about that before? You know the jokes. I think Wednesday is a little too proud, though: "Hey, look at me. I'm two whole days closer to Friday than Monday. Yippee!" Meanwhile, Friday's just sitting back at the end of the week, feeling pretty dang good about itself as well. And you know what? I bet every day wishes it was Friday. Well, it's not a lie if you believe it. What I like, though? I like any day I can eat soup and play some free online escape games. And so I'm telling you, that's what I like about today. Here we go with another one of FunkyLand's Alice series, and it's truly wonderlandastic if I do say so myself. Next, you got your standard Yomino Kagura fare just to keep things moving and, finally, a little tea with newcomer, Ponpoko to wind things down. Speaking of soup, did I ever tell you about the time...
 Alice House No.7: The Queen's Croquet Ground - There are only so many ways I can tell you how much I love FunkyLand—it's one of those slow growing loves that just keeps building into a comfortable contentment. Like your nerdy pal: you can be having a bad day and he walks into the room with some goofy look on his face and, right there, cheerfulness. To find the key, first find five pink flamingos. This particular episode of the Alice in Wonderland themed rooms makes it on the Weekday Escape roster because it doesn't offer much substance or much originality in puzzle design to go along with all those stunning visuals. Not that there's anything wrong with that. Besides, it's one of the most detailed and colorful FunkyLand rooms so far, and it won't fail to entertain for the brief while you're locked inside of it.
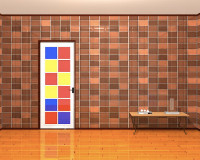 Escape from the Room of the Colorful Door - Yomino Kagura's entries can always be relied on for its logical puzzles and neat interface, although they often give only a smidgeon of the potential for a truly epic escape game. The changing cursor helps clue you into active areas and, even without an English narration, it's not difficult to infer what it might be saying according to what you're doing at the time. It's disappointing that some clues are spelled out so blatantly, though, taking away from the cranial pleasure of correctly reading into the clues. It's all how you look at it though: if you have time only for a quick, no fluff escape, Room of the Colorful Door has you covered.
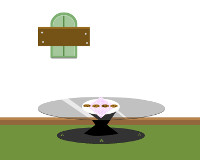 Tea Time Escape - Debuting into Weekday Escape, this little number from Ponpoko is as cute as can be. Short and sweet I should add. If you find a big grin on your face when playing such games as Rain, Kagome or Graffiti 2, then your cheeks are about to dimple with Tea Time Escape. There is just the right amount of challenge and visual appeal to engage but it's light enough to relax with. That's just what you'd expect out of an afternoon tea: won't fill you up but will warm you up and leave you feeling cozy.
We love escape games, and our readers love talking about them and sharing hints! How about you? Let us know what you think, ask for clues, or help out other players in the comments below.


Walkthrough Guide
(Please allow page to fully load for spoiler tags to be functional.)
Walkthrough for Alice House No 7
Flamingo #1
Zoom in on the back wall, then on the right-hand chair.
Take the heart from the flower vase.
Zoom out, then zoom in on the left-hand chair.
Place the heart on the crown.
Take flamingo #1 from the mirror (?) held by the Knave.
Zoom all the way out.
Flamingo #2
Click on the playing cards in the foreground to zoom in.
Take a good look around.
Flamingo #2 is hidden under the 5 of Hearts.
Zoom all the way out.
Flamingo #3
Zoom in on the left-hand wall, then zoom in on the box with hearts.
By clicking around the box, you can view it from all sides.
Note the number of hearts on each of the six sides.
Next, click on the front of the box.
The squares represent a folded-out cube.
Enter the appropriate number of hearts for each side.
From top left to bottom right: 7, 5, (already filled in), 3, 5, 3
Click OK, then open the box.
Take the bucket with red paint and brush.
Zoom out
Zoom in on the back wall, then zoom in on the middle chair, and finally on the red roses.
Take note of the numbers 1 and 7 and how they are connected.
It's a sequence!
Zoom out, then zoom in on the right-hand wall.
Zoom in on the bush with white roses.
Use the paint brush to paint the roses red in the order you noted.
Take the card that appears behind the bush's trunk: flamingo #3.
Zoom all the way out.
Flamingo #4
Zoom in on the right-hand wall, then on the barrel with flowers.
Click on the flowers, and take the watering can.
It's a bit hard to see; just click below the flowers until you get it.
Zoom out, then zoom in on the back wall.
Zoom in on the middle chair, then on the hare.
Use the watering can on the hare.
The pedestal below will open (hey, who cares about logic?).
Take flamingo #4.
Zoom all the way out.
Flamingo #5
Notice the playing cards on the walls. Note their colors and values.
Zoom in on the right-hand wall, then on the cupboard.
Enter the values of the cards: 3 of Spades, 10 of Diamonds and 1 of Clubs.
Then click OK. Zoom out, and open the cupboard.
Take the rope with hooks.
Zoom all the way out.
Zoom in on the left-hand wall, then on the bucket with flowers on the left.
Use the rope on the bucket. Then pull the handle just below the tree.
Take the bucket: flamingo #5.
Zoom all the way out.
Escape
When you have all 5 flamingos, they are magically transformed into a key.
Take the key.
Zoom in on the left-hand wall, then on the door.
Use the key on the door, then click on the door to escape.
Posted by: hans.vogelaar |
November 5, 2014 1:52 AM
|
November 5, 2014 1:52 AM
Okay, first time writing this. I hope it's coherent!
Walkthrough for Tea Time Escape
Exploration
1st Wall
Click on the bunny, go on. Ah, looks like we need to give this good sir something. All right, let's go ahead and click on the cabinet...nevermind, looks like we need something to open it with. Let's move on.
2nd Wall (To the right, dearie.)
Okay, a chest of drawers, let's start clicking.
Top right, top middle, and bottom middle are opening with ease but it seems like the top left and center middle drawer require a key and a numerical sequence. Allons-y!
3rd Wall (Then a step to the right!)
A wall cubby that's boarded up. This one is rather self-explanatory. However, what's on the table?
Could the cookies on this table be used for something we've seen? Perhaps we should count the chips and save this tidbit of intel for later, yes?
Let's keep going.
4th Wall (Just ignore the camera and scoot onto the right, sweetie.)
Ooooh...a refrigerator, wonder what's inside? Shall we?
Top Door
The top door opens easily but we'll need a two-button code to enter the tea case.
Bottom Door
The bottom door also needs a code. Guess it's time to start solving some puzzles!
Code Cracking Time!
The Cookie Caper
Quite simple. There's only one place where we need to use numbers.
Do you have the number of chips per cookie written down? Brilliant! We can use those numbers for the center middle drawer from the chest of drawers on the 2nd wall.
A puller! Bet we can use that, now what's this about "BEARS"?
A Grizzly Thing
Now that we have a puller, why don't we head back to the 1st wall and open the cabinet?
Different coloured bears with letters on them? Hm, best write down the colours and corresponding letters. We will definitely need this information. Onto the fridge!
Do you remember when we opened the central drawer? Yes? Wonderful! Let's use the clue we got from there and combine it with the one we found in the cabinet we've opened up.
To the bottom door of the refrigerator on the 4th wall!
The letters on the bears from the cabinet spell out the word from we found in the central drawer. Let's sort the colours into the right order, shall we?
For those who are colour blind click the bears in the following order from left to right: L-0, L1-3, M-4, R1-2, R-1.
Success! We have a key! It also looks like we have another clue that we may want to jot down.
Moving On Up!
Why don't we back up from the bottom door of the fridge and venture to the top door?
It's a two button puzzle that looks awfully familiar. Didn't we just get the solution for this particular puzzle?
Why yes, yes we did! Those cookies from the bottom door are deliciously helpful, aren't they?
Huzzah! We have a teacup! Wait, why do we have a teacup and where does the key go? Oh! That's right!
Can We Deconstruct It? Yes, we can!
Time to open the top right drawer on the chest of drawers on the 2nd wall.
Fantastic! A screwdriver! Could make it sonic later so I can put up those cabinets, but for now, let's see what we can open with this beauty.
Surely we don't need that board on the 3rd wall, right? Let's take it down.
Why, bonjour, Monsieur Porter, do you need a hug? No? Oh...you want the teacup. That makes more sense, let's hand him the teacup. Wait, Monsieur, where are you going?
Looks like we need to have something in order to see Monsieur Porter again. Maybe he dropped something on the table while walking away?
A drink ticket next to the cookies? That's odd. It seems we may have something to give to Monsieur Porter after all, except it seems that he's not opening the doors for it. Hm, wonder who else would like this ticket?
Garçon Lapin
Quick! To the 1st wall!
Let's see if Garçon Lapin would be so kind as to take this drink ticket.
ESCAPÉ!
YES! Congratulations, why don't we enjoy some biscuits and a spot of tea?
Posted by: SeikoGiliw |
November 5, 2014 4:04 AM
|
November 5, 2014 4:04 AM
Escape from the Room of the Colorful Door Walkthrough
Left cabinet doors
Two red squares, left and right. Where else have you seen something like this?
The exit door itself is your clue.
From top to bottom: right, right, left, right, right, left. Take the METAL STICK.
Center cabinet doors
Hmm...two squares wide, six squares tall, and each square can only be blue or black.
Once again, the exit door is the clue.
The first and fifth squares on the left, and the sixth square on the right, are the ones that you should turn blue. Take the YELLOW TRIANGLE.
Wobbly picture
A framed picture of a coffee mug? Odd choice of decor, so I guess that mug must mean something.
Take a look at the shelves with four colored mugs and six colored balls.
The mugs represent the four corners of the picture, and the balls represent the order.
Lower left, upper left, upper right, lower right, lower left, upper right. There's something in the recess behind the picture, but you can't reach it.
Use the METAL STICK and take the RED CIRCLE.
Right cabinet doors
That red circle on the door looks awfully familiar.
Open the RED CIRCLE in your inventory and look at the back.
Another picture of a mug and the letters "GRY." Green, red, yellow, perhaps?
Go back to the mugs on the shelves and click on each for a closer look (lower left, upper right, lower right).
The code is 739. Take the BLUE SQUARE.
Final puzzles
Place the three colored pieces where they belong in the checkered box on top of the cabinet, and take the KEY CARD.
Go over to the table next to the exit door and insert the KEY CARD into the device on the right.
That arrangement of squares should look familiar by now.
Looks like the star, diamond, and triangle correspond to particular panels on the door.
Remove the KEY CARD and insert it into the device to the left.
Enter the three-color code that you get by combining the shapes on the device with the panels on the door.
Yellow, blue, blue. (Two clicks, one click, one click.) Take the KEY.
Use the KEY on the door and you're out. Wow, that was fast!
Posted by: abfdrumz |
November 5, 2014 5:05 AM
|
November 5, 2014 5:05 AM