

![]() This is the story of Wednesday. Wednesday, the little sister of Tuesday, sometimes got left behind. Everyone else seemed to have all the fun and, being a middle child, Wednesday often felt overlooked and under-appreciated. But Wednesday was clever—she had more than a few tricks up her sleeves. Everyone likes games, she thought, Especially escape games. So she devised a way to gather up all the escape games herself, be special, be unique, be attention-getting. This is how Weekday Escape came to be; it was Wednesday's master plan for popularity. Did it work? Well, you are here, aren't you? And you're not alone. Making an appearance this week, Selfdefiant presents a dragon cave from which you must escape along with two quickies from new guests, Pixel Kobo and Umi Escape...
This is the story of Wednesday. Wednesday, the little sister of Tuesday, sometimes got left behind. Everyone else seemed to have all the fun and, being a middle child, Wednesday often felt overlooked and under-appreciated. But Wednesday was clever—she had more than a few tricks up her sleeves. Everyone likes games, she thought, Especially escape games. So she devised a way to gather up all the escape games herself, be special, be unique, be attention-getting. This is how Weekday Escape came to be; it was Wednesday's master plan for popularity. Did it work? Well, you are here, aren't you? And you're not alone. Making an appearance this week, Selfdefiant presents a dragon cave from which you must escape along with two quickies from new guests, Pixel Kobo and Umi Escape...
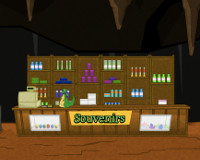 Must Escape the Dragon Cave - Selfdefiant is one of the most prolific game designers out there and, sort of like Stephen King is to fiction, this results in a diverse gamut of escape adventures for us to indulge in. As part of his "Must Escape" series, this episode has just enough going on to court the adventure tag while remaining compact enough to fit nicely into Weekday Escape. It begins like this: you were enjoying a nice tourist stop at a dragon cave when you suddenly felt very tired. So, you went down for a nap, right then and there (hey, narcolepsy is nothing to trifle with). Upon waking everyone was gone, leaving you trapped. Lucky for you, the whole place is rigged with locks and codes that a little exploration and ingenuity will soon crack. The changing cursor helps guide your investigations as you gather up necessary items and clues but some of those clues can be easily overlooked in the details. Still, with some methodical searching, the hindrances to your liberation are few.
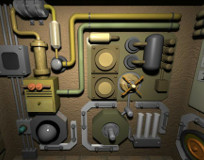 2015 New Year Escape - Even if you don't read Japanese, you should encounter no language barriers in this nifty creation from Pixel Kobo. Just click past the first few screens and you'll find yourself immersed in a rather intriguing scenario: Apparently you're exploring the secret insides of a mechanical box. The scope-like cursor and navigational arrows along the frame indicate a more hi-tech venture as you inspect walls covered with pipes, pistons, levers and cranks, all animated and quite lively looking. You could say this game has a very Haretoki familiarity although it's more about inspiration than imitation. To succeed in this venture, click on everything—the resulting responses range from nothing to amusing to highly helpful. Despite the effusion of interesting gizmos, the game itself is quite short, much too short (its only disappointment). After you've honed in on the clues themselves, completing the puzzle and opening the box is a snap.
 Small Room Escape 1 - There are times when all you want is a small fix, just a teeny little exercise in decoding and escaping to satisfy those urges. Small Room Escape 1 from Umi Escape is remarkable for one reason: it lives up to its title in the most quintessential way. Lending new meaning to the phrase "short and sweet," this miniature escape will hold you up only as long as it takes you to interpret a smattering of coded clues. Once you've learned the game's lingo, you'll be well-equipped to solve the puzzles and acquire the three tile pieces needed to open the door. Just keep in mind that you'll need to place all three tiles at once (they won't stay in the slots otherwise), and achievement unlocked door is all yours!
We love escape games, and our readers love talking about them and sharing hints! How about you? Let us know what you think, ask for clues, or help out other players in the comments below.


Walkthrough Guide
(Please allow page to fully load for spoiler tags to be functional.)
2015 New Year Escape Walkthrough
Understanding your mission
I'll be referring to the four walls of the room as follows, from the starting wall and proceeding to the right: the heart wall, the green panel wall, the propeller wall, and the number panel wall.
Turn right once to face the green panel wall. Near the center at the bottom of the panel is a large green button.
When you press the button, a panel opens to reveal eight symbols, loosely described as follows: "triangle, cross, diamond, star, circle, hash, square, concentric-circles."
Each of these symbols corresponds to a number. Your goal is to match each symbol to its number.
Finding the symbol and number pairs
For each pair, I'll start by telling you which wall(s) you should investigate, then provide the more specific locations.
Triangle
Propeller wall
Just below and to the right of the propeller is a row of three tall gray buttons.
Pressing and holding the second button causes the dial to the left to rotate and reveal the match: triangle = 1.
Cross
Propeller wall
For this symbol, you'll need to flip the two orange switches in the panel on the left in the correct sequence.
Take a look around the room for additional switches that look like these.
The sequence can be found on the heart wall: left, right, right, left, right, left, left.
When the light on the panel below the switches turns red, you've entered the correct sequence and can open the panel to reveal the match: cross = 7.
Diamond
Heart wall
In the upper right of the lower panel are two rows of four buttons each.
Pressing the third button in the second row opens a panel that reveals the match: diamond = 4.
Star
Propeller wall
Just above and to the right of the propeller is a column of four buttons.
Pressing the third button causes it to pop out, revealing the match: star = 8.
Circle
Heart wall
The lower panel is surrounded by four gray brackets, one of which looks slightly different from the others.
Clicking the green hinge on the lower left bracket rotates the bracket to reveal the match: circle = 5.
Hash
Green panel wall
At the top of this large panel are two smaller square panels.
Pressing the button on the left panel reveals the match: hash = 2.
Square
Heart wall
Toward the lower left of the lower panel are two small buttons, arranged vertically within their own panel.
Pressing the lower button opens a panel that reveals the match: square = 3.
Concentric circles
Number panel wall
Take a close look at the five columns of gadgets with the moving pistons.
Clicking the fourth valve just above the green LED reveals the match: concentric circles = 2.
The final steps
By now, you should have an eight-digit code to enter into the number panel, but it looks like the panel's missing something.
There's a relatively prominent pair of switches on another wall that you haven't used yet.
Check out the "plus" and "minus" switches on the heart wall. It looks like they need to be pressed in the correct sequence.
The clue for these switches is on the propeller wall.
Press and hold the blue-green button in the lower left to reveal the sequence: plus, minus, minus, plus, minus, plus, plus, minus.
When you've entered the sequence correctly, the heart-shaped panel above the switches turns orange, and you can open it to take the LEVER.
Insert the LEVER into the slot next to the number panel.
Enter the code that you've assembled from the symbol and number matches: 17485232.
When the LED turns green to indicate that you've entered the code correctly, click the lever and win your freedom!
Posted by: abfdrumz |
January 7, 2015 3:28 AM
|
January 7, 2015 3:28 AM
Small Room Escape Walkthrough
We start at a door with a panel next to it. There are 3 diamond shapes we need to collect to put in the panel.
Turn left, and zoom in on the table, then click to zoom in on the box. We have a string of L and R, and two buttons to press, so L means left and R means right. But if you use the letters shown it won't work. If you click on one of the buttons, notice that the square flashes blue. You need to only use the BLUE letters for this puzzle. Now we got our first diamond piece.
Zoom all the way back out and turn left again. Click on the table here, and then again on the box. It says SUN, and we need 3 numbers to put in. You'll notice that there are letters on all the walls except the one with the door. You need to count how many S's, U's and N's there are, and put those numbers in. This gives us the second diamond piece.
Turn left again to get to the last table. Zoom in on the box, and you'll see 3 circles: red, black (I know it looks grey, but it's meant to be black) and yellow. The box needs 3 letters to open it, so all you have to do is find the letter on one of the walls that matches the colour. It will spell out a word! This gives you the last diamond.
Go pop those diamonds into the panel next to the door, and out you go!
Posted by: Squiddly |
January 7, 2015 11:40 PM
|
January 7, 2015 11:40 PM