
What Makes You Tick:
A Stitch in Time
Platform: Mac, Windows, Linux
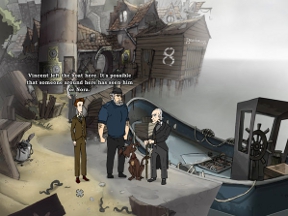
![]() A troubled town seemingly locked in time, a prestigious institute of scientific research in diaspora and dissolution, a cryptic note from an estranged father, and a miraculous mechanical heart. They all have a part in the story of What Makes You Tick: A Stitch in Time, a handsome, evocative adventure game from Lassie Games. We reviewed the original What Makes You Tick when it was released years ago, and previewed the demo of A Stitch in Time last spring. Now you can get the full adventure and see for yourself the fate of Ravenhallow, the Smith Institute, and the mad Dr. Vincent.
A troubled town seemingly locked in time, a prestigious institute of scientific research in diaspora and dissolution, a cryptic note from an estranged father, and a miraculous mechanical heart. They all have a part in the story of What Makes You Tick: A Stitch in Time, a handsome, evocative adventure game from Lassie Games. We reviewed the original What Makes You Tick when it was released years ago, and previewed the demo of A Stitch in Time last spring. Now you can get the full adventure and see for yourself the fate of Ravenhallow, the Smith Institute, and the mad Dr. Vincent.
 While many of the characters from the original What Makes You Tick make important appearances, the main protagonist of A Stitch in Time is a new arrival. Nigel Trelawnty has just travelled to Ravenhallow, hoping to settle his late father's estate, when he is caught up in events proceeding from the plot of the original game. Like many adventure games, you control Nigel with the mouse, clicking to move, collect items, and interact with the environment. The controls for A Stitch in Time are a little unusual, but easy once you get the hang of them. When you find a person, place, or thing to interact with, click and hold the mouse button and a verb coin will appear, with which you can look at, speak with, or handle the object in question. Your inventory is accessible from the bottom of the screen; click on an item to select it, click on another item or on the screen to use it, and double-click to dismiss the item. Other than that, if you like adventure games, then you know the drill: explore, meet the locals, collect items, solve puzzles, and unpiece the mysteries of the Smith Institute.
Analysis: One thing we remarked on in our review of the demo was how difficult it is to make a "serious" adventure game with puzzles that respect a serious tone, and how the demo managed to achieve that. The complete version of A Stitch in Time does a fair job of living up to that promise. A few more puzzles than I would have liked breach the line into goofy territory, and many puzzles rely on favor-trading that seem very tangental to the main plot (though they serve well in fleshing out the characters of Ravenhollow), but many puzzles also stick to the story in a way that fits.
The puzzles themselves are solid, and while some are a bit silly, they are never illogical. Since the game uses hot spots for key locations, you'll never get stuck because you couldn't find an important item lying around. You might get stuck because you haven't explored everywhere, or interviewed every character as thoroughly as you can. It's important to be a comprehensive investigator in A Stitch in Time, both to fill out your inventory and to gather important clues. Pay attention, for many details are important.
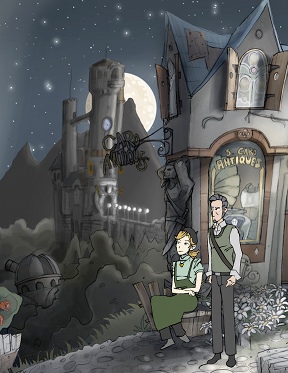 Being a good explorer will also give you a deeper appreciation of the game's storyline. I continue to be entranced by the world of Ravenhallow and vicinity. Maybe I just need to visit more European seaside villages, but there is something about Ravenhallow's timelessness, coupled with the lore of the nearby Smith Institute and Northwest Castle, that I find very intriguing. I feel like there are a billion nooks and crannies in Ravenhallow to investigate, and every new scene feels like a discovery. One novel feature of A Stitch in Time is the ability to play every scene in both day and night. The differences between Ravenhallow in the day and nighttime are not only crucial to solving certain puzzles, but give you nearly twice as much game to explore. Ravenhallow becomes an entirely different world at night.
The excellent presentation is what makes A Stitch in Time so immersive. The music is evocative and well-selected. The sound design is atmospheric and inviting. The backgrounds (some of which are by John Green) are absolutely gorgeous and possibly my favorite part of the game. The weakest part of the design is perhaps in the characters; some of the dialogue feels a bit forced, and the stiff movements and lack of voices take some of the animation out of the animation. But even here, the developers populated Ravenhallow with some excellent characters, like the enigmatic mask-maker Mandelbaum and his precocious daughter Eve; the despondent, Lorre-esque lawyer Lionstone; the stubborn, put-upon trader Captain Amayi; and the taciturn, plainly torment Baron Northwest.
I feel that What Makes You Tick: A Stitch in Time is a few clicks shy of a masterpiece, and as it stands it is very good. There are some small weakness in the gameplay, the writing, and the design, but other elements are impeccable, and the overall package is very strong. If anything else A Stitch in Time creates a small but immersive and fascinating world to explore, and for this alone it is a success.
![]() Windows:
Windows:
Download the demo
Get the full version
![]() Mac OS X:
Mac OS X:
Download the demo
Get the full version
![]() Linux:
Linux:
Download the demo
Get the full version


Walkthrough Guide
(Please allow page to fully load for spoiler tags to be functional.)
What Makes You Tick: A Stitch in Time Walkthrough
About this walkthrough
This is a walkthrough, not a hint-through. The game's included walkthrough is more like a hint-through in style. Even the direct instructions are not always that clear, and its primary focus is directing you to where, in game, you can get the clues you need to solve the puzzle yourself. Which is great! This walkthrough is meant to complement that one. It is as direct and clear as I can make it.
However, because of this, if you just follow this walkthrough, you will miss most of the fun of the game. You will only talk to people to the extent needed by the game, and you will only interact with objects that solve puzzles. In many places you will pick up items without ever seeing the clue that indicated you needed the item. This can make the script rather strange, as the characters will talk about things that literally never happened, because you never bothered to do the things they assumed you would do in order to know what to do next.
Everything you always wanted to know about What Makes You Tick (but were afraid to ask)
The game throws you right into the action, and it can be confusing. Read the handbook PDF that comes with the game for instructions. Here are some instructions in my own words, and a note on some missable plot extras.
Interacting with the Game World
Most of the game is controlled with the mouse; the only keyboard controls are not strictly necessary. The cursor will usually be a gray X. When it hovers over an exit, it will become a red arrow. When it hovers over an object you can interact with, it will become a red X.
Click and hold on an object that you can interact with to call up a mini menu with three circles, which is called the "verb disc".
The top circle has a picture of an EYE. Use it to look at, read, or otherwise visually interact with an object.
The lower left circle has a picture of a MOUTH. Use to talk to, whistle at, or otherwise vocally interact with an object.
The lower right circle has a picture of a HAND. This is the catch-all "verb" interaction, and what the verb is totally depends on the object. The default is "use" the object, but it will also do other things. For example, the hand icon might "open" a box, or "push" a person.
Keep holding the mouse button and hover over the various circles to get a better idea what they will do with the specific object.
When you've decided what to do, release the mouse button over one of the circles to do that action.
Inventory and Menu
Hover the mouse near the bottom edge of the screen to bring up the game control options. There will be a gear symbol to bring up the game menu, a satchel icon to bring up the inventory, and starting in act two, a notebook that contains documents.
Click on the game menu to save, load, quit, all that good stuff.
Click on the inventory to bring up the inventory screen.
You can interact with objects in the inventory just like objects in the game world by clicking and holding to bring up the mini menu (verb disc) and looking at, talking to, and using the objects.
A single click on an object in the inventory picks up the object. Your cursor becomes the object. You can now use that object on other objects inside and outside of the inventory. For example, use a KNIFE on a PUMPKIN to make a JACK O' LANTERN. In this walkthrough, all inventory items are CAPITALIZED for clarity.
Put your cursor outside of the inventory display to make it close.
Click on the notebook icon to bring up the notebook. Click on the left and right arrows to go through the documents you have collected. Leave the notebook by placing the cursor outside the notebook display.
Keyboard Controls (optional)
The TAB key skips dialogue and cutscenes.
The ESC key changes from fullscreen to windowed mode; you can also do this via the game menu.
The left arrow key brings up the game menu.
The up arrow key brings up the inventory.
The right arrow key brings up the notebook.
Everything else must be done with the mouse.
Missable Documents
There are 3 documents in the game which the plot doesn't force you to pick up, and therefore you can potentially miss them altogether. They provide backstory. You can pick them up at various points in acts 2 and 3 once you unlock the areas they are hidden in. They cannot be picked up once you get to act 4.
Trelawney house, top shelf on the right.
The Smith Institute, on a table on the lower left.
Dark area of the castle cellar, across from the crash test dummy.
And now, the actual Walkthrough
ACT ONE
INTO AND OUT OF THE BOATHOUSE:
After the opening cut scenes, go left through an archway into an area with a lighthouse and dock.
Talk to Dr. Coppelius, the old man.
After another cutscene, go through the conversation. It doesn't really matter what you say; you'll get locked in the boathouse at the end of it.
Use the tarpaulin to reveal a mysterious girl. Cutscene. You lose your photograph, but get a DEAD FISH.
Look through the door. This may be disorienting at first, but you're actually in the boathouse with the number 8 on it.
Take the CHILDREN'S SLINGSHOT from the barrel to the left of the door.
Combine the DEAD FISH with the SLINGSHOT to get a FISH LAUNCHER.
Step back inside the boathouse.
Use the FISH LAUNCHER on the roof hatch.
Go back to the window.
Talk to Shroom, the dog, to whistle to him.
Take the DOG TAG from the dog's collar.
Use the DOG TAG on the hinges of the door.
Leave.
GET TO THE VILLAGE, PART ONE:
Go back to the main part of the harbor.
Talk to Wavetamer, the Harbormaster, who is standing smoking a pipe on a little dock in the harbor, and mention the chest. He will give you a WINCH CRANK.
Go into the Port Authority office, to the right.
Take the LETTER OPENER that is stuck in the little table under the fish.
Go back to the lighthouse docks.
Pick up the BUCKET O' TAR next to McManus and the dog.
There is a wrecked boat left of the lighthouse. Use the LETTER OPENER on the patch on the boat to get a STEEL PATCH.
Go in the boat house.
Use the WINCH CRANK on the winch box to the left of the door.
Use the crank to lower the boat.
Use the BUCKET O' TAR on the STEEL PATCH to get TARRED BOAT PATCH.
Use the BOAT PATCH on the boat.
Push the boat to break open the door.
Use the boat to row it to Wavetamer.
FISHING MINI-GAME
Try to get a RED SNAPPER and a GRIMY BOOT if you can, because you will need both of those later.
If you get at least 300 points, you get to keep some of the catch, and you can sell this to Captain Amayi for money.
You can fish as much you want, and you can replay if you don't like your score within a fishing trip.
When you finish a fishing trip, it will switch from day to night or night to day, so this is one way to switch that.
GET TO THE VILLAGE, PART TWO:
Walk to the end of the dock, past the two men in yellow raincoats.
Take the FISHING CLUB NOTICE from the bulletin board, and you'll also get a LONG FISHING HOOK.
Use the PORT AUTHORITY KEY on the door to the Port Authority.
Use the radio to change the station to a soothing station.
Use the LONG FISHING HOOK on the ship in the bottle to get the RUSTY KEY.
Go back to the boathouse.
Use the RUSTY KEY on the wooden chest.
Take the confiscated goods to get a BOX OF PRETZELJAX and SHIP LOG.
Give the SHIP LOG to Captain Amayi to get a VILLAGE PASS.
Give the VILLAGE PASS to the Northwest Castle guard standing on the bridge.
Go through a cutscene and some conversation--your choices of dialogue don't have any plot effect.
ACT TWO
Sleep on the sacks of hay. There will be a cutscene and at the end Lionstone the lawyer will give you a notebook. Documents you pick up during the game will go into the notebook.
From here you have some choices about what to do first. This is longest and least linear chapter. If you just wander around, you'll probably pick up a lot of inventory items before you can use them, and you can get many of the steps done in any order you like. However, not all of the rings can be found at once. At this point, you can find the Coppelius Ring and the Zygmunt Ring, in either order.
Once you find the Zygmunt Ring, you can complete the "Uncle Slappy" quest.
After completing the "Uncle Slappy" quest, you can do the Steven Lafayette, the Henry Lafayette, the Sigmundson, and the Smith ring in any order.
After completing the Smith ring quest, you can complete the Von Sterberg ring quest.
You must get all eight other rings before you can get the Goodchild ring.
From there to the end of the act, it is linear.
COPPELIUS RING
From the main Town Square (just outside the inn), take the left hand road up. Enter the antique shop.
Look at the ANGEL STATUETTE to the left of Mr. Caro. He will let you have it for free.
Go down to the harbor and walk down to the pier where Captain Amayi and her sailors are.
Open your inventory and click and hold on the box of PRETZELJAX, then choose to open it. The prize is a MAGNET.
Use the MAGNET on the ANGEL STATUETTE to create MAGNETIZED STATUETTE.
Talk to Jacopo and bet the angel figurine, which is now magnetized and will spoil his rigged dice.
Coppelius ring get! Yay! And you didn't have to lose any money to get it.
ZYGMUNT RING
Take the right-hand path north from the Ravenhollow Town Square (the area just outside the inn).
Talk to the kids there.
You should see a street sign with "Turtle Ln" in one direction and "Castle Rd" in the other. Go down Castle Rd, around the corner behind the kids, to get to the main map.
Click up, towards the castle.
You'll be told you can't enter.
Talk to the castle guard and mention the stone eagles.
Go down, back to the main map, and enter Ravenhollow and go back to the town square.
Enter Mandelbaum's Masks and talk to Mr. Mandelbaum, and say you'd like to buy a mask. He will give you a CRAYON.
Use the CRAYON on the FISHING CLUB FLYER to create PAPER AND CRAYON.
Go back to the castle gate.
Use the PAPER AND CRAYON on the eagle statues to draw them.
Go back to Mr. Mandelbaum and give him the EAGLE SKETCH IN CRAYON. Mr. Mandelbaum promises to have it ready the next day.
Now you need some more elements for your eagle costume. First step: feathers. Go down to the harbor. Over top of the McPherson Storehouse (on the left of the main harbor scene) is a bird nest with feathers.
If your slingshot is not already loaded, combine ROCKS with SLINGSHOT to get LOADED SLINGSHOT.
Use LOADED SLINGSHOT on the birds nest. Pick up the FEATHERS which fall.
Go back into Ravenhollow to where the Kids are (Turtle Ln).
There is a turtle fountain with a clogged drain. Use LARGE FISHING HOOK on the drain to clear it and get some more money.
Go through the narrow alley to the Antique shop.
There is a cloak hanging on a mannikin. Try to buy it. When Mr. Caro asks what you'd like to pay, offer the coins you just found in the drain. You're the new proud owner of a POTATO SACK CLOAK.
Use the BUCKET O' TAR with the POTATO SACK CLOAK to get TARRED CLOAK.
Use the FEATHERS with the TARRED CLOAK to get FEATHERED CLOAK.
Now go back to the inn and sleep.
Go into the Mask shop and you'll be given a HAND CARVED EAGLE MASK.
Use the mask on the FEATHERED CLOAK to get COMPLETE EAGLE COSTUME.
Go back into the inn and sleep to make it nighttime.
Go back to the castle gate.
Use the COMPLETE EAGLE COSTUME on the guard.
After the short scene, talk to him and ask him the time.
Take the KIDS TROPHY RING from the eagle statue.
Go back to the inn and take a nap to make it daytime again.
Go to Turtle Ln and give the kids the trophy ring.
Zygmunt ring get!
"UNCLE SLAPPY" - ZYGMUNT RING REQUIRED
Go back to the main map and go towards the windmill in the upper right.
Take the TWISTED METAL ROD that is stuck in the mill wall.
Go down to the pier and the harbor and give the TWISTED METAL ROD to Forkbeard, the blonde tall guy with the hook for a hand. He will make it into a HANDMADE CROWBAR.
Go into the inn. Turn off the radio on the righthand side.
You will talk with the bartender. Choose the bottommost response every time, and he will give you a BRAND NEW RADIO TUBE.
Go to Turtle Ln and use the HANDMADE CROWBAR on the boards covering the doggy door on #27 house.
Talk to the kids and ask them to go through the doggy door.
Enter #27. You might as well take the diary pages from the top shelf on the right now for your notebook.
Use the TRELAWNEY SEAL RING on the round metal socket on the desk, to the right, to unlock the desk.
Use the BRAND NEW RADIO TUBE on the radio inside the desk.
Use the list of frequencies in order to have a radio conversation with a lot of static.
Go back to the inn and sleep twice, to the following morning. In the morning, go to the main map and go to the windmill in the upper right.
Knock on the door of the old mill.
You'll have a nice long conversation with "Uncle Slappy", during which he'll give you a BRASS LOCKET.
STEVEN LEMUE LAFAYETTE RING - "UNCLE SLAPPY" REQUIRED
Switch to day time if it isn't day already. Go to the main map and go to the woods, in the left. The arrow will be pointing to the lower left.
There will be the remains of a campfire. Take the EMPTY RUSTY KETTLE and the METAL HOOK from the fence.
If you didn't catch a snapper in the fishing minigame, go back and keep trying. If you have one go to the Twon Square.
Give the RED SNAPPER to the Greengrocer.
She'll give you a JUICY APPLE.
Change from day to night by sleeping on the hay in the inn.
Go back to the woods campfire. Use the jUICY APPLE on the bubbling puddle of mud to get WORM INFESTED APPLE.
Go to the harbor and down to the end of the pier. Lars Sigmundson will be standing there. Give the WORM INFESTED APPLE to Lars. He'll give you a wire FISHING LEADER.
Go back to the mill and inside. Use the FISHING LEADER on the ring in the wall.
Use the METAL HOOK on the mill shaft.
Use the end of the fishing leader on the metal hook on the shaft.
Take the RING from the broken wineglass.
SIGMUNDSON RING - "UNCLE SLAPPY" REQUIRED
You should already have the EMPTY RUSTY KETTLE since it was necessary to pick it up in order to complete Uncle Slappy.
Go to the harbor and fill the EMPTY RUSTY KETTLE from the bronze fountain.
Go to the inn and use the WATER FILLED KETTLE on the cooking plate to get KETTLE FULL OF BOILING WATER.
Go to the Port Authority in the harbor.
Use the KETTLE FULL OF BOILING WATER on the old globe.
Click on the globe and pull the WET OLD MAP off the globe.
Go outside and give the WET OLD MAP to Captain Amayi. She will give you a POSSIBLY BROKEN TELESCOPE.
If you have not already gotten a GRIMY BOOT, go fishing with the Harbormaster. There will be a boot at the bottom of the ocean.
Go to the main map and go to the old mill. Take the WINDSOCK near the top of the path.
Click on the GRIMY BOOT in the inventory menu and use it to untie the shoelace. It will become SINGLE SHOELACE and SHOE LEATHER SCRAPS.
Use the SINGLE SHOELACE on the WINDSOCK to make WINDSOCK NET.
Go to the woods, the campfire scene (make sure it is night). To the left of the trees, you should see fireflies.
Use the WINDSOCK NET on the fireflies. You'll get a BOTTLE O' FIREFLIES.
Use the BOTTLE O' FIREFLIES on the POSSIBLY BROKEN TELESCOPE to get a TELESCOPE FILLED WITH FIREFLIES.
Go to the antique shop, still at night. Give the TELESCOPE FILLED WITH FIREFLIES to the starry-eyed girl (Cecily Caro). She will give you CECILY'S LOVE NOTE.
Go left to the river and give CECILY'S LOVE NOTE to the throughful looking young man (Stig), who is standing by the river.
Change back to daytime. via the inn.
Go back to the river and use the PRETZELJAX on the sticks and leaves. The adorable little duck will eat the thrown pretzeljax, revealing a statue under the water.
Go see Uncle Slappy at the mill, and talk to him about heaving the statue.
Go to the antique shop. You will receive the DIAMOND RING.
Change to night.
Give the DIAMOND RING to Stig by the river. Sigmundson ring get!
HENRY LEMUE LAFAYETTE RING - "UNCLE SLAPPY REQUIRED"
Go to the inside of the mill and take the REMOTE from the lower left.
Go the #27 house on Turtle Ln and take the TOY SUBMARINE from the box of dishes in the lower left.
Open the TOY SUBMARINE in the inventory to get BROKEN TOY SUBMARINE and BATTERIES.
Use BATTERIES with REMOTE to get ACTIVE REMOTE.
Change to night if it is not night already.
Go to the campfire and talk to the entertainers. When you ask about fire, they will give you CHERRY BOMBS.
Use the CHERRY BOMBS with the BUCKET O' TAR to get STICKY BOMBS.
Go into the woods and use the ACTIVE REMOTE with the remains of the crash landed balloon (up in the tree, at the left side of the scene with the iron gate covered in white roses).
Use the STICKY BOMBS with the CHILDREN'S SLINGSHOT to get EXPLOSIVELY LOADED SLINGSHOT.
Use the EXPLOSIVELY LOADED SLINGSHOT on the crash test dummy and you'll get the Henry LeMue LaFayette ring! Hooray!
SMITH RING - "UNCLE SLAPPY" REQUIRED
Go to the inn, and change the time to day if necessary.
Close the open door.
Open the first aid cabinet from the back of the door.
Take the contents of the first aid kit. You get TWEEZERS.
In the inventory, open the BRASS LOCKET.
Use the TWEEZERS on the OPEN BRASS LOCKET to get BRASS LOCKET HALVES.
Go to #27, the Trelawney house in Turtle Ln.
Take the WRENCH from the shelves on the right.
Use the BRASS LOCKET HALVES on the oval shaped sockets under the bird statue.
Enter the elevator and go across the bridge to the other side, into the Smith Institute.
Go to the right in order to climb stairs and get close to the telescope.
Use the WRENCH on the telescope.
Push the telescope so that the beam of light is pointed towards the safe.
Use the TELESCOPE LENS on the beam of light (note: it MUST be used on the beam of light itself, not just on the telescope).
Go downstairs.
Take the contents of the open safe. You get a new document for your notebook, and a SEALED MANILA ENVELOPE.
Open the SEALED MANILA ENVELOPE to get a set of SLIDES and the Smith ring. The slides will be important for the next ring.
While you're here, you might as well pick up the document on the table in the lower left for your notebook, and open the door on the left, so that you can enter and exit that way instead of the secret passage.
VON STERBERG RING - SMITH RING REQUIRED
Use the SLIDES on the slide projector in the Smith Institute.
View the slides. The last slide contains a clock set to 11:35.
Go to the antique shop and talk to Mr. Caro about seeing the archives. He will give you three JARS.
Switch to night.
Go to the mill and catch the noisy locust in the hole in the tree with the WINDSOCK NET
Go to the treehouse area (Turtle Ln) and use the WINDSOCK NET on the glowing gecko to the right of the tree trunk.
Swtich to day.
Go the castle gate and use the WINDSOCK NET on the red butterfly by the right hand lion.
Go back to the antique shop.
Give Mr. Caro one of your specimens and he will take the GECKO and the BUTTERFLY but not the LOCUST. He will give you access to the archive.
Look at the castle model, and Mr. Caro will tell you what you want to find in the archives.
Search the archives and get CLOCK HANDS DIAGRAM.
Go see Mr. Mandelbaum and give him the CLOCK HANDS DIAGRAM.
Go into the secret passage between #27 and the Smith Institute.
In your inventory, combine SHOE LEATHER SCRAPS with BUCKET O' TAR.
Use the TAR COVERED LEATHER SCRAPS on the burst pipe.
Go to the antique shop. There is now a RED RUBBER BALL floating in the well.
Go back to Mr. Mandelbaum and give him the RED RUBBER BALL. He will suggest you give it to the cat directly.
Give Mr. Mandelbaum the CLOCK HANDS DIAGRAM and he will give you the HAND CARVED CLOCK HANDS.
Go back to the antique shop and use the HAND CARVED CLOCK HANDS on the clock tower.
Change the time on the clock to 11:35.
Take the contents of the secret compartmen. You get a new document for your notebook, and the Von Sterburg ring!
GOODCHILD RING - ALL OTHER RINGS REQUIRED
Go to the main map. You'll see the zeppelin fly to the castle.
Go see Uncle Slappy at the mill and talk to him. You will receive the Goodchild ring and an OPEN ENVELOPE, and then take a nap.
ENDING THE ACT
Go to the town square. A cutscene will take you into Mr. Mandelbaum.
Go to the inn for another cutscene. You get VERY OLD KEY and CRYPTIC POEM.
Talk to Webb the bartender and talk to him about your troubles until he gives you a bottle of CHEAP WHISKEY.
Go to the campfire and take the GLOWING EMBER from the campfire.
Enter the woods and use the VERY HUNGRY LOOKING LOCUST on the overgrown archway to clear away the plants.
Use the VERY OLD KEY on the archway.
Look at the CRYPTIC POEM in your inventory to read it.
Pick up the MALLET on the left.
On the right there is a CHISEL stuck in a log. Douse the log with the CHEAP WHISKEY.
Use the GLOWING EMBER on the whiskey-soaked log.
Take the CHISEL.
Use the CHISEL on the rose on the base of the praying statue.
Based on the clues in the poem, you need to press the round metal plates on the bases of the statues in this order: praying statue, woman with dove statue, bat statue, owl statue, statue with sword.
Enter the castle.
Investigate the fish crate. Cutscene.
Push Baron Northwest to wake him up.
Pick up the CUP OF STONE COLD TEA.
Use the CUP OF STONE COLD TEA on the ivy pot.
Put the EMPTY CUP OF TEA on the silver plate.
Put the HELP ME NOTE on the empty cup.
Ring the service bell.
ACT THREE
REVERSING HYPNOSIS:
Go back into the train station and operate the lift controls to get out via the Smith Institute. Short cutscene.
Go back up the tower via the secret passage in the castle. Short cutscene.
Pick up the HYPNOSIS DEVICE.
Go back to the swamp area and give the HYPNOSIS DEVICE to Dr. Coppelius.
Receive RECONFIGURED HYPNOSIS DEVICE.
DR. COPPELIUS'S LIST
At this point, read the list Dr. Coppelius gave you. You can get the needed components in any order, but let's do the propeller first, as it's quickest.
PROPELLER
Go to the main map and down to the lighthouse dock where McManus and his dog have been since act 1, poor things.
Use the RECONFIGURED HYPNOSIS DEVICE on McManus.
In gratitude he gives you MCMANUS' GAFF.
Go to the old mill's cliff.
Use MCMANUS' GAFF to get the PROPELLER on the overhang (next to the little duck thing).
For both the plates and the crystals, you'll need to light up the castle basement, so let's do that next.
LIGHTING THE BASEMENT:
Go to the outside of the antique shop and pick up the BOTTLE OF MILK and DAIL MAIL (typo, I think) on the doorstep.
Enter Mr. Mandelbaum's shop and use the RECONFIGURED HYPNOSIS DEVICE on him.
Pick up the EMPTY BOWL (for milk) from below the window.
Go to Turtle Ln.
Use the BOTTLE OF MILK on the EMPTY BOWL to get BOWL OF MILK.
Use the BOWL OF MILK on Mr. Boots.
Pick up the CAT.
Give the CAT to Mr. Mandelbaum.
Your reward is CARVING KNIVES.
You'll be taken outside to the town square. Give the CARVING KNIVES to the juggler in exchange for the JUGGLING TORCHES.
Enter the inn.
Search the soapy sink water behind the bar to find the LIGHTHOUSE KEEPER SHIRT.
Search the LIGHTHOUSE KEEPER SHIRT to find LIGHTHOUSE KEY.
Go to the harbor and then left to the docks.
Use the LIGHTHOUSE KEY on the lighthouse door.
Take the CASTLE STICKER from the top of the lighthouse (this is needed for the crystals).
Use the JUGGLING TORCHES on the oil funnel.
When you go back to the castle cellar, you can use these OIL-SOAKED TORCHES with the LIGHTER to light the cellar by using them on the torch holders, but you might as well get the stuff for the plates next.
PLATES
Read the propeller instructions for how to get MCMANUS' GAFF if you don't have it already.
Go to #27 house in Turtle Ln and use MCMANUS' GAFF on the large oil painting on the ceiling.
Go back into the castle basement (where you found Nathan in the fish crate).
if you haven't already, use the OIL-SOAKED TORCHES with the LIGHTER to get FLAMING TORCHES, and use the FLAMING TORCHES on the torch holders.
Walk over into the previously dark area.
Push the painting towards the back.
Pull the mysterious shroud that was behind the painting.
Pick up another OIL PAINTING.
Go to the inn.
Use both the OIL PAINTINGS on the aluminum foil behind the bar to get METALLIC PLATES.
CRYSTALS
Go to the previously dark area of the castle cellar if you aren't there already.
Open the crate on the right hand side, above a document that you can add to your notebook, across from the dummy.
Pick up the LC 1983 MODULE from the crate.
From the shelves directly to the right of the torches, pick up a BOX O' PAPERWORK.
Use the CASTLE STICKER (from the top of the lighthouse, go pick it up if you missed it the first time) on the BOX O' PAPERWORK to create DECOY CHEST.
Enter the Smith Institute.
Use the LC 1983 MODULE on the strange device on the right side of the screen.
Go outside and stand close to the strong box that the guard is guarding.
Use the UNIVERSAL REMOTE on the strange device (the glowing red dot on the top right of the Smith Institute building).
Quickly use the DECOY CHEST on the strongbox to swap them. The guard will only cower for a short period of time. Try again if you don't make it the first time. You now have the CASTLE GUARD CHEST.
Go back to the top of the lighthouse and throw the CASTLE GUARD CHEST by using it basically anywhere in the air (tower freefall).
Oh dear! When you go down to the bottom and pick up the contents of the chest, you find a BROKEN FABERGE EGG, a SMASHED MING VASE, a TORN HONUS WAGNER BASEBALL CARD… and a PAIR OF DICE.
Go to the main part of the harbor and give the PAIR OF DICE to Jacopo.
Your reward is the COLORFUL CRYSTAL TIKI HEADS.
THE TIME RIFT (COMPLETE LIST FIRST)
Take the PROPELLER, METALLIC PLATES, and COLORFUL CRYSTAL TIKI HEADS to Dr. Coppelius in the swamp. Cutscene.
Take the PIECE OF STRING from the left.
The big propeller has a rusty edge on the bottom. Use the rusty edge to get SHARP METAL SHARD.
Combine SHARP METAL SHARD with the PIECE OF STRING.
Use the SHARP METAL SHARD ATTACHD TO STRING to get the DOWSING ROD.
Use the METAL SHARD on the DOWSING ROD.
Use the METAL SHARD on the RUBBER BAND.
Use the RIPPED RUBBER BAND on the DOWSING ROD to get SLINGSHOT.
Take the DRIED UP CLAMSHELL from the middle post on the right.
Use the CLAMSHELL on the SLINGSHOT to load it.
Look out the window of the door.
Use the LOADED SLINGSHOT on the castle guard. Cutscene.
ACT FOUR
PREPARING
Pick the SELF-HEATING CUP OF NOODLES from the box of food rations.
Pull the upper handle bar on the control booth to get INSULATED HANDLE BAR.
Go outside.
Go down-right, to where there is a buried joist in the snow.
Excavate the buried joist by using it.
Pick up the BROKEN POWER CABLE.
Use the EMPTY MILK BOTTLE on the snow pile to get BOTTLE OF SNOW.
Combine the INSULATED HANDLE BAR with the BROKEN POWER CABLE to get REPAIRED POWER CABLE.
Use the SELF-HEATING NOODLE CUP to make it hot.
Use the HOT CUP OF NOODLES on the frozen tile in the lower middle part of the screen to melt the ice.
Pick up the METAL WALKWAY PLATE.
Use the LIGHTER with the BOTTLE OF SNOW to melt it.
Use the BOTTLE OF WATER on the impression in the snow from the metal plate to create ICE BLOCK.
Go back inside.
Open the utility panel to the right of Uncle Slappy.
Use the REPAIRED POWER CABLE on the power junction under the panel. Cutscene.
Talk to Trelawney to get a SMALL KEY.
STOPPING VINCENT
Use the SMALL KEY to unlock the booth door.
Your cursor will turn into a down arrow over the glowing blue control panel inside. Click to look at it.
Turn off the power to the train platform, and turn on the power to the attractor-1 lift.
Go outside.
Use the lift to go up.
Toggle the attractor-1 switch manually.
Take the lift down and go back inside.
Go to the control panel and turn off the attractor-1 lift. Turn the Lab Elevator on (and the train platform too if you want).
Go up the lab elevator (on the train platform). Brief cutscene.
Go right to go to the walkway to the second switch. Some tiles will fall.
Use the METAL WALKWAY PLATE and the ICE BLOCK that you got while preparing to bridge the gap.
Toggle the attractor-2 switch.
Go inside. Brief cutscene, then take the lab elevator down.
Go to the control panel and turn on all three devices.
Finale!
Posted by: joye |
October 10, 2010 5:52 PM
|
October 10, 2010 5:52 PM