
![]() Miranda and her clockwork companion Sprocket are back in Total Eclipse's hidden object adventure game, The Clockwork Man 2: The Hidden World! Featuring elegant hand-drawn visuals, twice the content of the original game, and the series' standard scrolling and zoomable levels, it's exactly what you would expect from a follow-up and delivers a solid, well-balanced hidden object experience from beginning to end.
Miranda and her clockwork companion Sprocket are back in Total Eclipse's hidden object adventure game, The Clockwork Man 2: The Hidden World! Featuring elegant hand-drawn visuals, twice the content of the original game, and the series' standard scrolling and zoomable levels, it's exactly what you would expect from a follow-up and delivers a solid, well-balanced hidden object experience from beginning to end.
 Miranda Calomy's parents went missing over eight years ago, and she's on a quest to find them. Exploring a cave in Ireland, their last known location, she stumbles into a plot much bigger than herself, discovering secrets her father had kept hidden for years. Strange cylinders, a distrustful professor, cloaked figures in the background, and an entire world hidden from view. Good thing she's the crafty daughter of an inventor.
Gameplay switches between hidden object scenes and puzzle-oriented adventure areas. Many parts of each scene can be interacted with, as indicated by the changing cursor. Often you'll need an item from nearby to proceed. To pull a lever, for example, you might have to remove a piece of metal blocking the way. What better way to do that than with a crowbar? To gain certain key items, you'll participate in a number of short hidden object scenes. Sometimes you'll need to move to another location to find the things you need, but since everything is readily accessible from the map, you'll never get lost or have to backtrack very much.
The Clockwork Man 2 takes an extra step to make hidden object scenes interesting. Instead of flat, still pictures to stare at, many of these environments can be manipulated with the mouse, keyboard, or on-screen controls. Zoomable stages are introduced right away, allowing you to roll the scroll wheel to zoom into the background and take a gander at what's down the way. Scrollable stages can be dragged left and right, moving several parallax background layers in the process, and uncovering some things you might not have noticed before.
 Sprocket is more than a collection of gears and metal, as he functions as Miranda's companion as well as a hint buddy. You'll find several gadgets on Sprocket's icon at the bottom of the screen, each designed to help you find items in different ways. You can get a direct hint that shows you where one random item is, for example, or take a peek at several items at once, receive a picture of the item in question, or even read a text-based hint. Plenty of ways to make sure you don't get stuck in the game, and each ability recharges after a short time.
Analysis: Another gorgeous game from Total Eclipse. The Clockwork Man 2 is a stunning piece to look at, and the artwork will capture you in every scene. Even the character portraits are nicely done, with subtle animations that help convey emotion or just add an extra flourish to the picture. You'll find a lot of living things in the environments as well, like birds perched on reeds or squirrels nibbling on acorns. That, along with the interactive scrolling, help pull you in to the game's world an extra step.
Compared to its predecessor, The Clockwork Man 2 improves on just about everything, especially overall length. The original game was short and had a less-than-satisfying ending. The sequel, on the other hand, is twice the length and won't leave you scratching the head when the credits roll. The visuals are just as stunning as ever, though unfortunately the steampunk has been dialed back a bit, leaving more countryside scenes and indoor environments to sift through.
The Clockwork Man 2 never tells you exactly what to do next, but it's always easy to figure out what needs to be done. For this reason, the challenge is somewhat lacking, though not so much that you'll never get stuck. The story also falls somewhat short, especially when compared to the first game. You won't be quite as interested in what happens next, as it's a bit predictable, even if well-told.
Better than the original, and a solid hidden object/adventure game in its own right, The Clockwork Man 2: The Hidden World is one of those dependable games that deserves a space on your game shelf. You know, if you had a game shelf and the game came in a case and such...
![]() Windows:
Windows:
Download the demo
Get the full version
![]() Mac OS X:
Mac OS X:
Download the demo
Get the full version


Walkthrough Guide
(Please allow page to fully load for spoiler tags to be functional.)
The Clockwork Man: The Hidden World - Walkthrough
General
The game provides four kind of scenes:
Normal scenes as you are used to, what you see is what you get.
Zoom able scenes, in which you can move forward or backward. There are 4 ways to move within a zoom able scene: via the arrows on the screen, the arrows on your keyboard, the mouse wheel, or by dragging your mouse back and forth.
Scrolling scenes work the same way, but from left to right.
Vertical scrolling scenes work the same from top to bottom
A hand icon means that you can pick up an object.
A gear icon means that you can interact with an object or a location.
A magnifying glass signifies that you can take a closer look at the area.
When in a closer view, click anywhere outside the window to exit.
Yellow listed items in hidden-object scenes will go into your inventory or journal.
There is no skip option for puzzles; however, you will be able to use a hint.
The Advanced Object Locator gadget shows the location of a random item in a scene.
The Object Database gadget shows an image of a selected object from your list.
The Sonar Gadget reveals the location of all needed objects in a scene (only for a few seconds).
"Progressive Hint" gives you a hint or tip on what to do next and will also help you to solve puzzles
Hints need to be recharged before you can use them again.
Some hint gadgets recharge faster than the others.
If there are no objects to find in a scene, the object locator and database gadgets will be unavailable.
The map icon on the bottom right lets you travel between locations. New locations are added as you progress further into the game. When a new location is available, the Map icon will blink and display a thumbnail of it.
Prologue
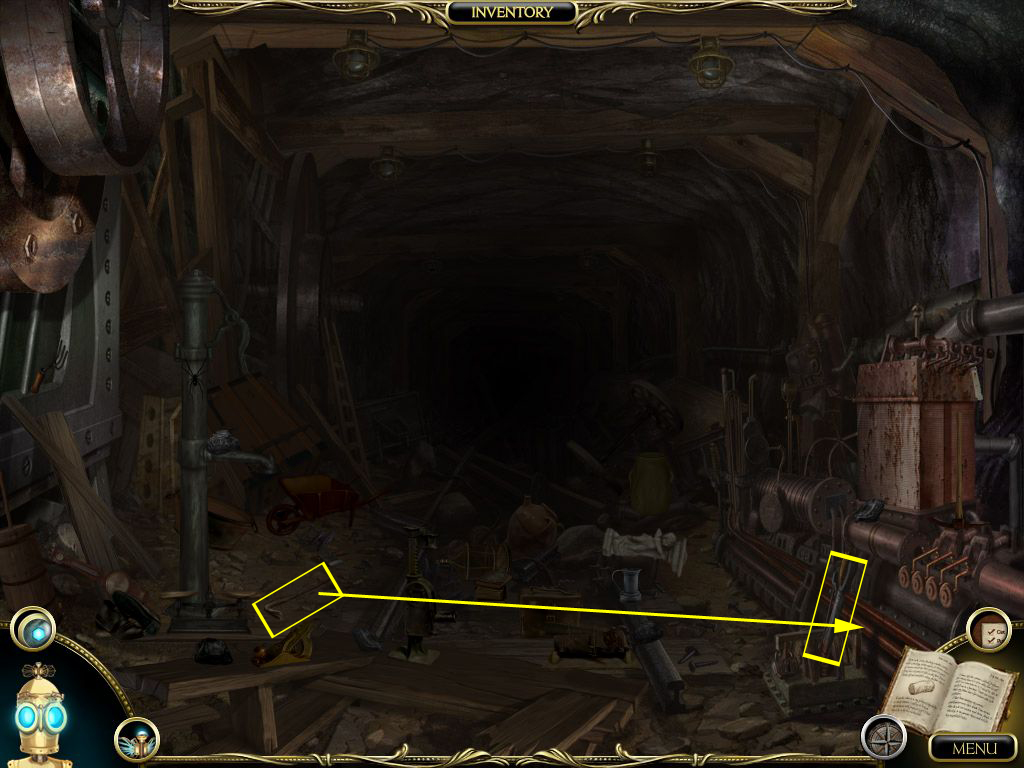
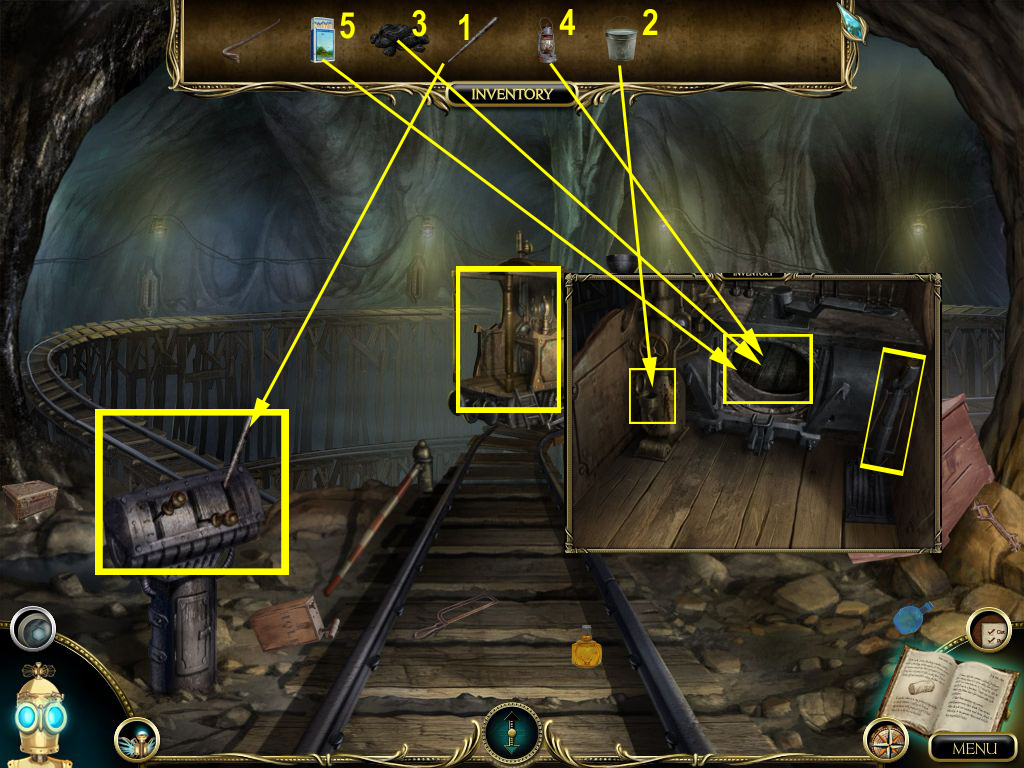
Abandoned Mines/Tunnel
You will need to lighten up the tunnel.
To do so pick up the crowbar right side from the water pump.
Use it as lever on the device in front of the generator.
Click the middle lever and the light goes on.
Screenshot
Go forward and click the locomotive to get a closer view.
Open the boiler and grab the bucket for your inventory.
Close the pop up to get your first hidden-object scene.
The matches and the 10 coals will go into your inventory.
Screenshot
Place the bucket from your inventory on the water pump and click the lever. It will break.
Get the lever back into your inventory.
Screenshot
The map icon shows a new location - go to the map and choose the village stream.
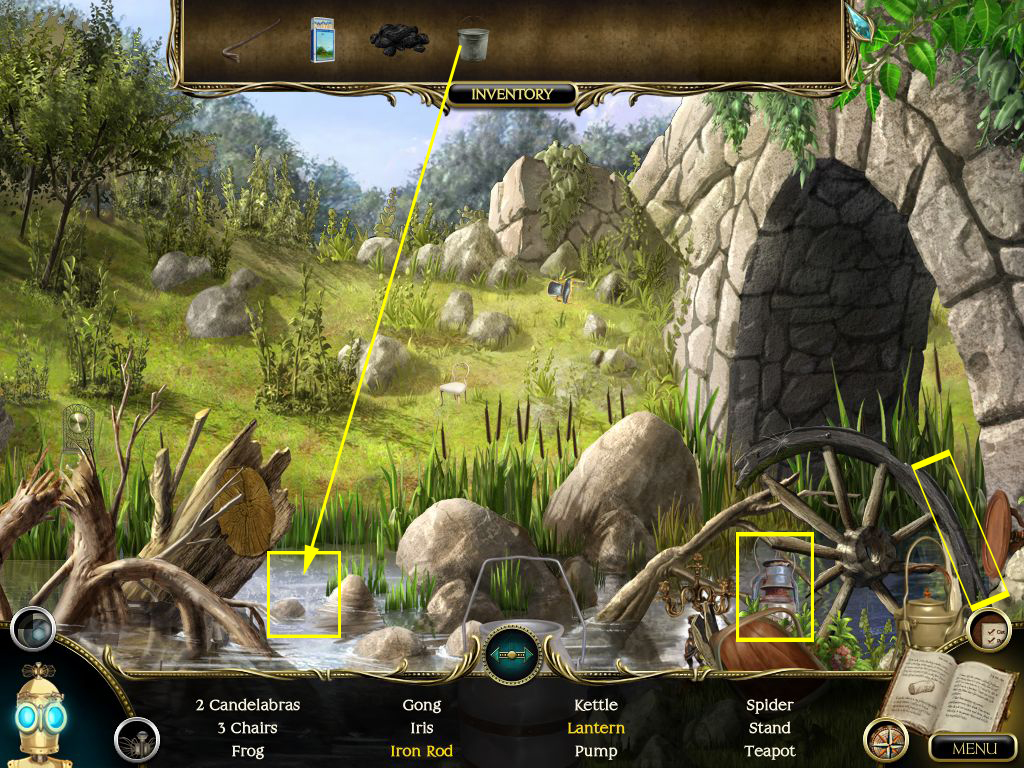
Village Stream
This is a scrolling scene (from left to right)
Find all objects from your list. The metal rod and the lantern will go into your inventory.
Get the bucket out of your inventory and click it on the water to fill up.
The bucket goes back into your inventory automatically.
Screenshot
Go back to the abandoned mines.
Abandoned Mines/Tunnel
Go back to the locomotive. Place the metal rod from your inventory on the middle where a lever is obviously missing.
You will need to find the correct lever positions to remove all barriers.
The right position are:
Left lever -middle
Center lever - bottom
Right lever - top
Click to get a close up view of the locomotive.
Get the bucket with water out of your inventory and pour the water in the water tank left.
Place the coal into the furnace, pour the oil of the lamp onto the coals and light them with the matches.
Close the furnace door and click the breaks on the right and off we go.
Screenshot
Chapter 1: London, England - 4 days ago
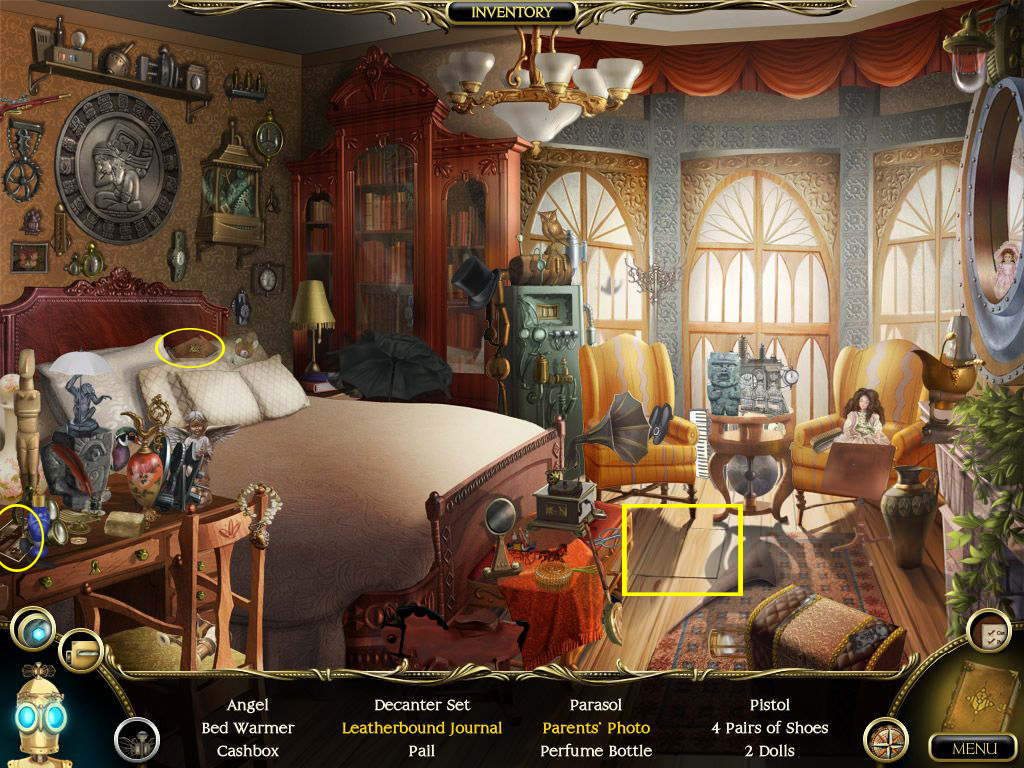
Bedroom
Find the objects from your list.
The diary and the picture will go into your inventory.
Click the upper left carpet edge to find out that you will nee a tool to pry up the boards underneath.
Screenshot
Use the map to enter the attic.
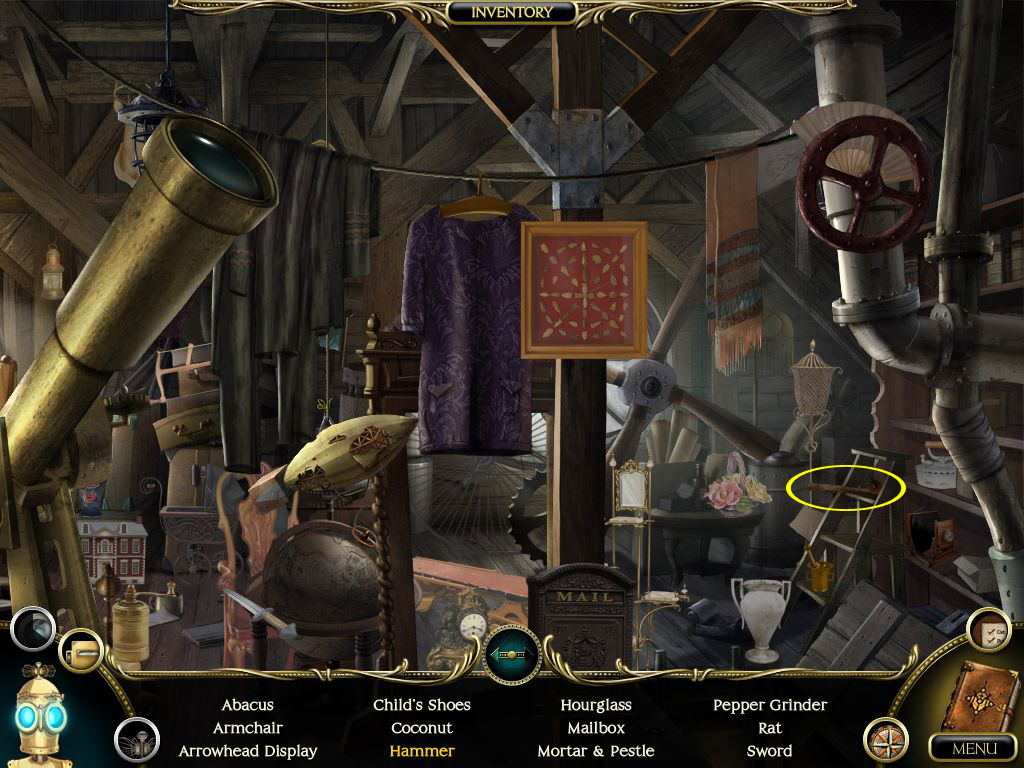
Attic
Scene is scrollable from left to right.
Find all objects from your list to obtain the hammer for your inventory.
Return to the bedroom.
Screenshot
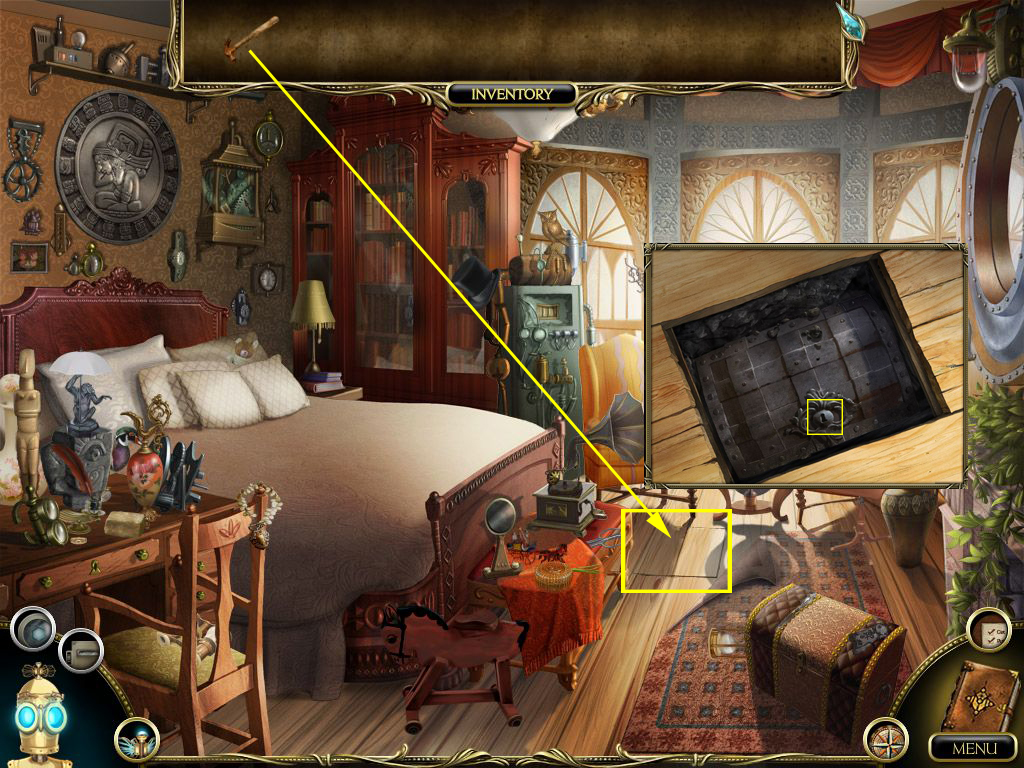
Bedroom
Use the hammer and click two times to remove the floor boards.
Click the box inside the compartment you find to get a close up view.
Click the lock to learn that you will need a key.
Screenshot
Next stop is the cemetery.
Kensal Green Cemetery/Attic
Scrollable scene from left to right.
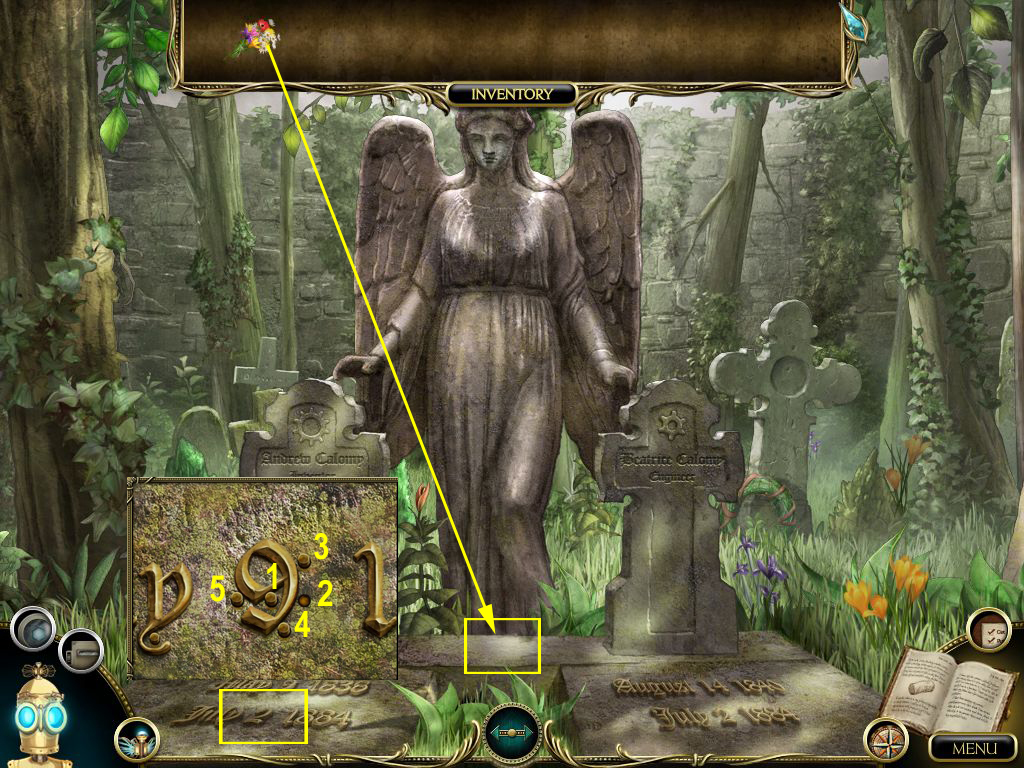
Find 5 flowers of three kinds. The flowers will go into your inventory as a bouquet.
Move the scene so that you are able to see both graves.
Place the bouquet in front of the stone angel.
Click the left tomb slab to get a close up view.
Now click the 9 from "May, 9"
Another close up - the nine has to be turned into a 6.
You will need to press the pins in the right order.
Start with the center pin - all others will now stay down when you press them.
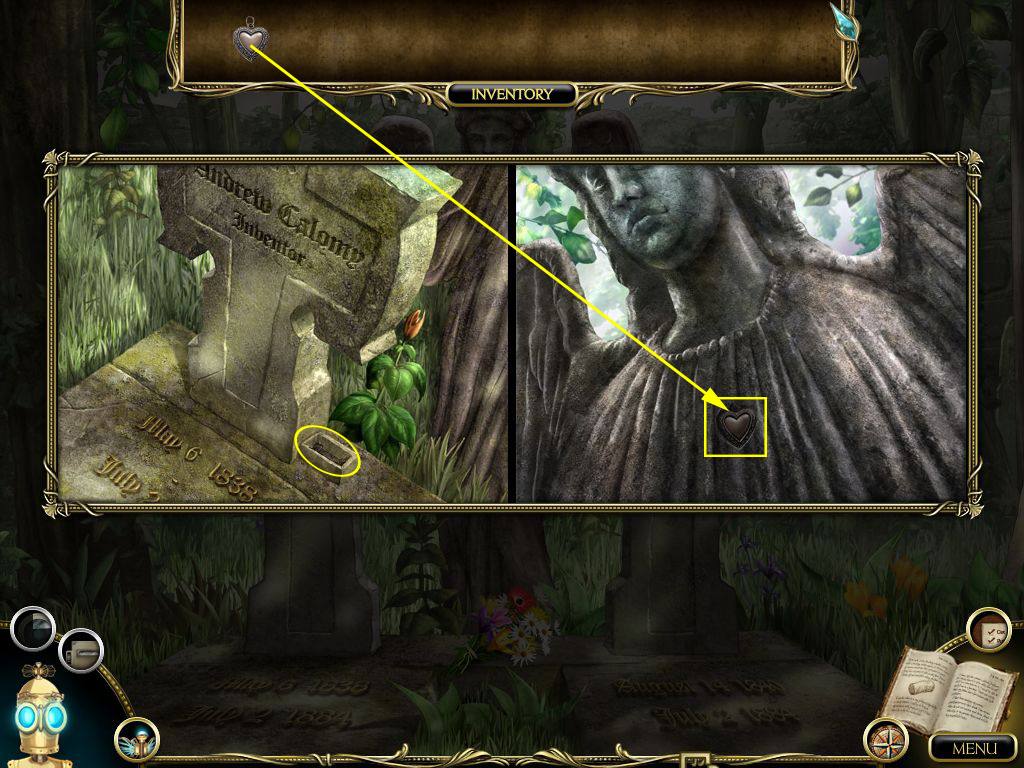
A heart-shaped socket will appear on the angel's chest.
Exit the close up view.
Screenshot
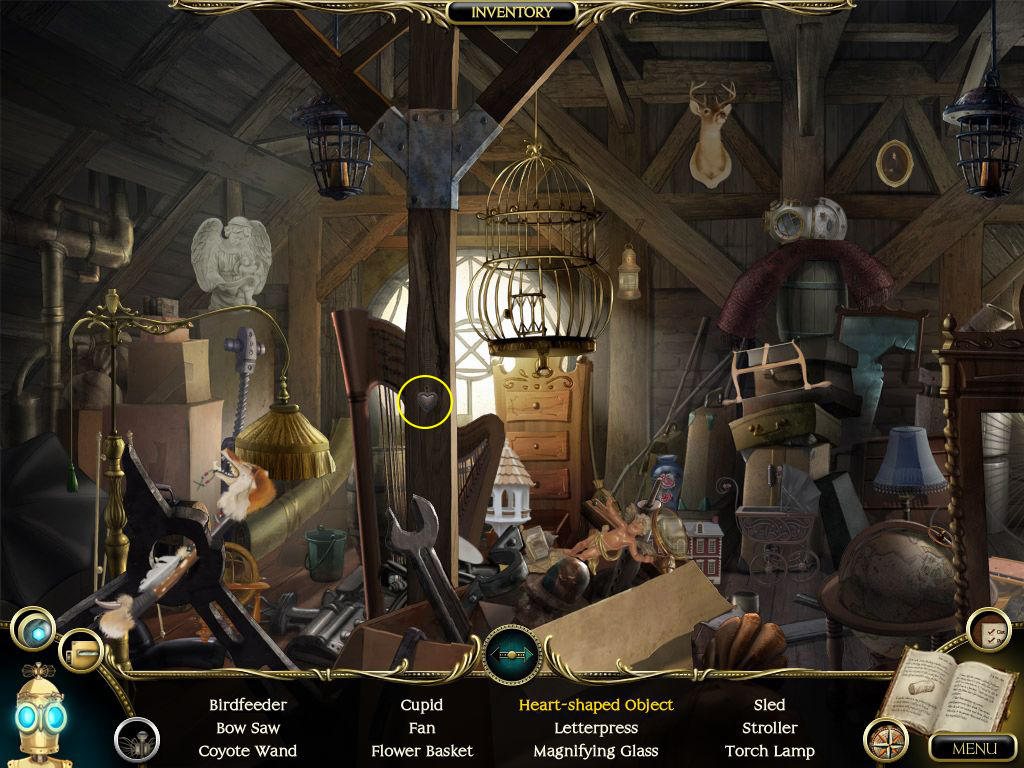
Use the map to return to the attic.
Find all objects from your list to obtain the heart.
Screenshot
Go back to the cemetery.
Click the tomb slap and place the heart into the slot of on the angel's chest.
The grave stone on the left moves - pick up the key.
Screenshot
Use the map and go to the bedroom
Bedroom
Click the box on the floor to get the close up view and open it with the key.
Take the letters and the cylinder.
Exit the close up view and use the map to go to the Professor's office.
Find all objects. Click the broken vase.
Assemble the postcard.
You can rotate tiles by double-clicking or by using your mouse wheel.
The card will go into your inventory.
Click the safe to get a closer view, then click the lock.
Screenshot
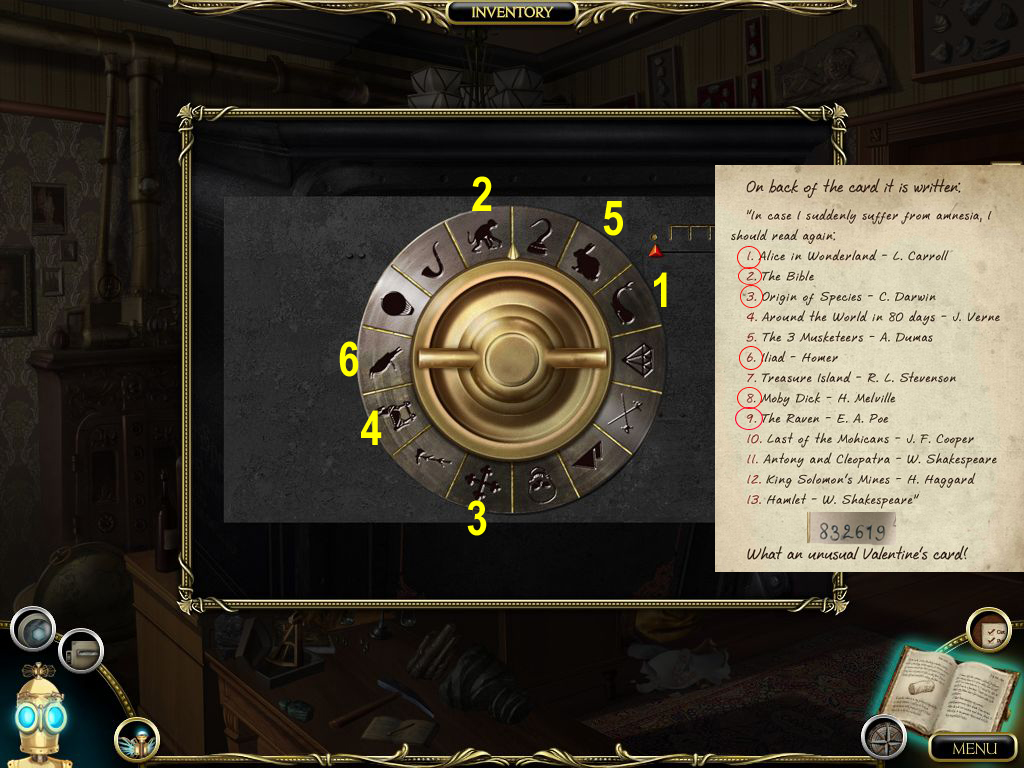
Open your book to see what is standing on the back of the postcard.
There is a number code at the bottom and you will find also numbers standing left of the books on the list above.
The lock on the other hand only shows symbols.
You will have to find out which symbol belongs to which book.
Book 8, Moby Dick = Whale
Book 3, Origin of Species = Monkey
Book 2, The Bible = Cross
Book 6, Iliad = Horse
Book 1, Alice in Wonderland = Rabbit
Book 9, The Raven = Raven
Take the three cylinders and the papers.
Screenshot
Chapter 2: Ballyscath, Ireland - Two days later
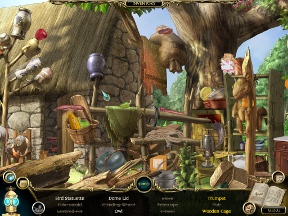
Village Square/Farmhouse
Click the sleeping guy, then exit to the map and choose the Farmhouse.
This is a scrollable scene - from left to right.
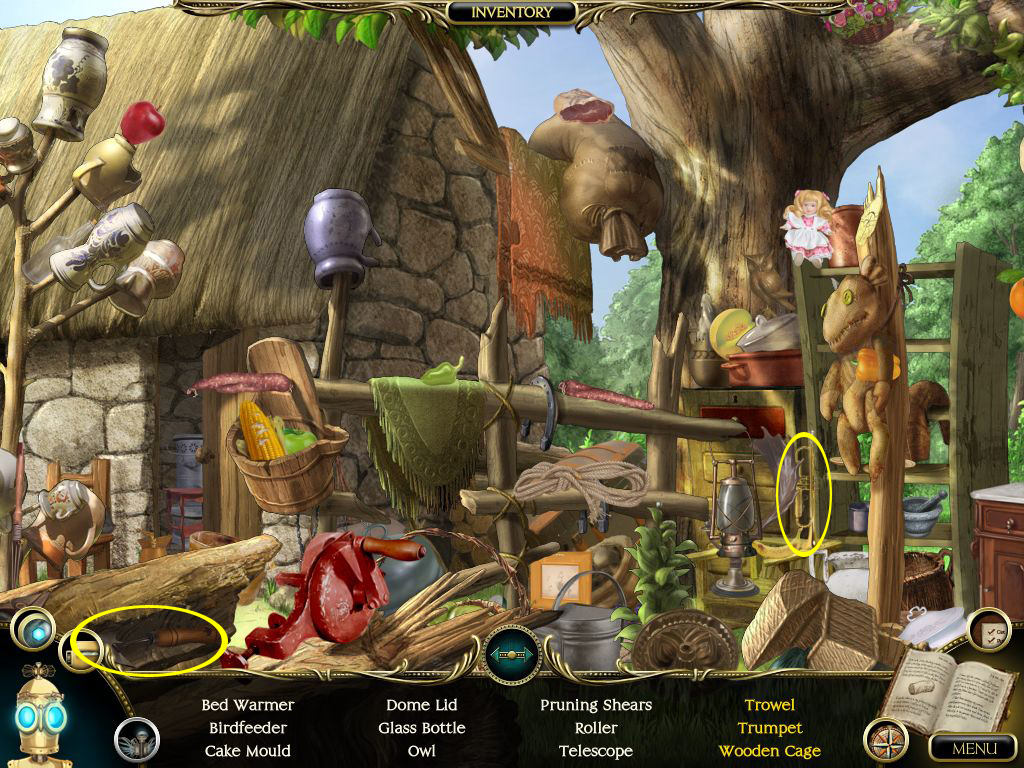
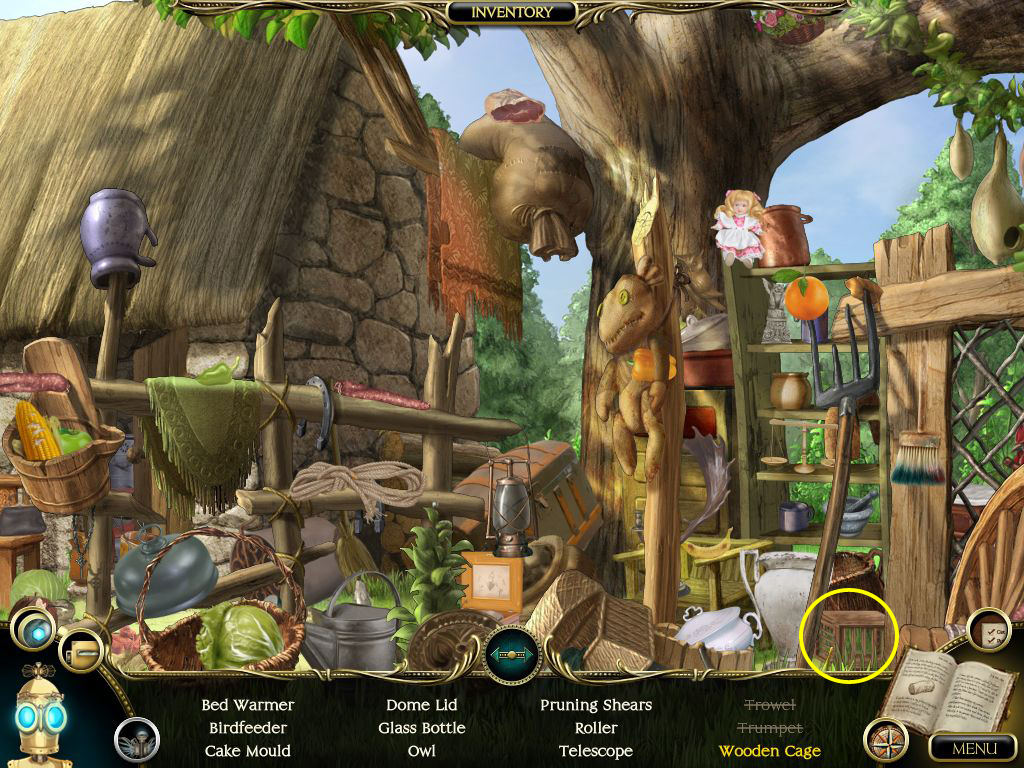
Find all objects of your list to get the shovel, a trumpet and a wooden cage for your inventory.
Screenshot
Screenshot
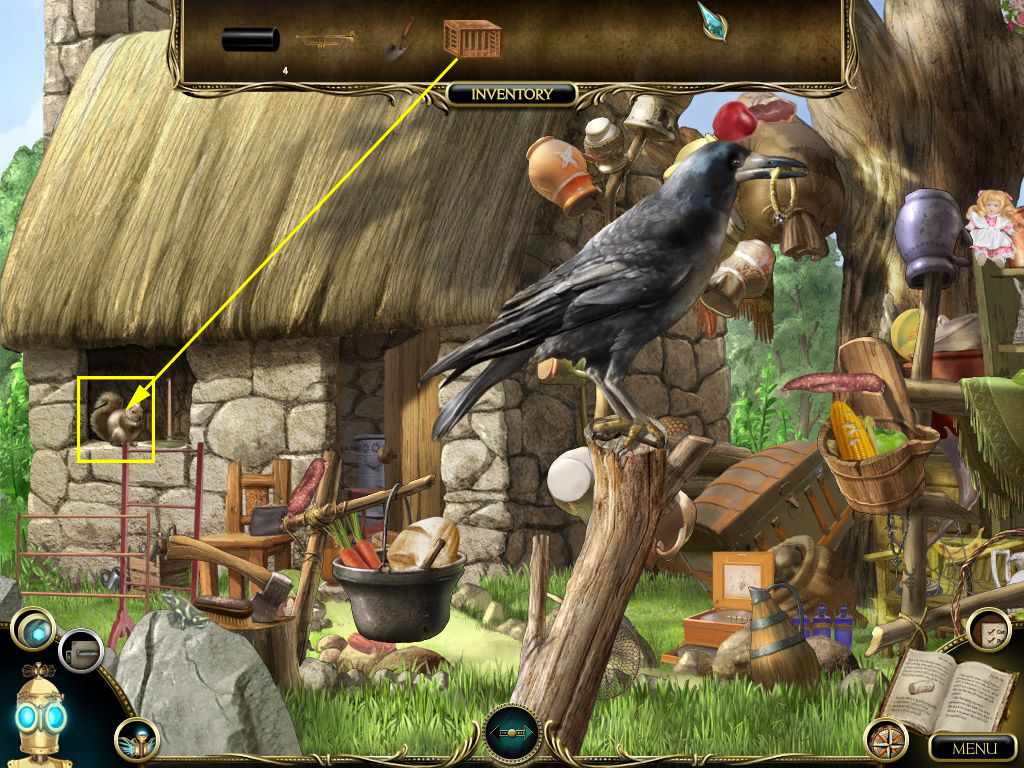
Use the wooden cage to catch the squirrel at the window on the left.
The cage will be set on the ground, but it seems you need something to lure the squirrel into it.
Use the map to reach the Village Stream
Screenshot
Village Stream
Scrolling scene (left to right)
Find all listed objects - the 9 nuts will go in your inventory.
Use the shovel from your inventory to dig in the dirt on the low right side.
Click a few times to obtain a bone for your inventory.
Screenshot
Screenshot
Return to the Village Square
Village Square
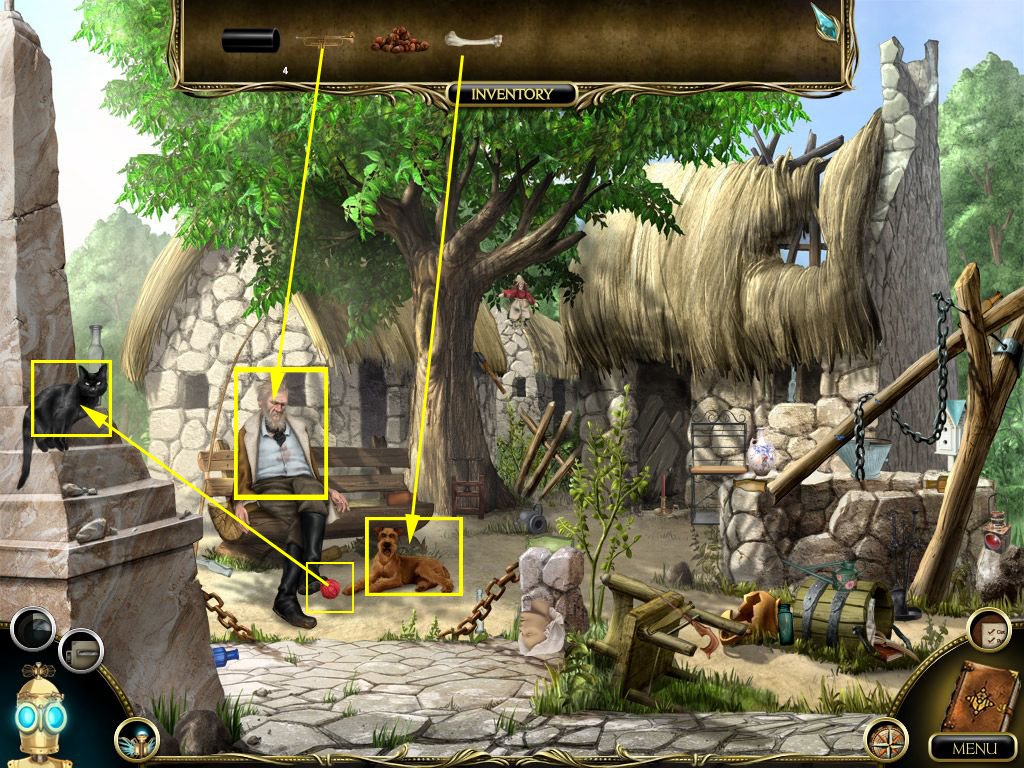
Use the trumpet to wake up Patrick.
Click the bone onto the dog next to Patrick.
Pick up the ball of yarn from the ground right next to Patrick's feet and give it to the cat on the left side.
Once the cat left you can pick up the stick.
One thread will go into your inventory.
Screenshot
Use the map to return to the Farmhouse.
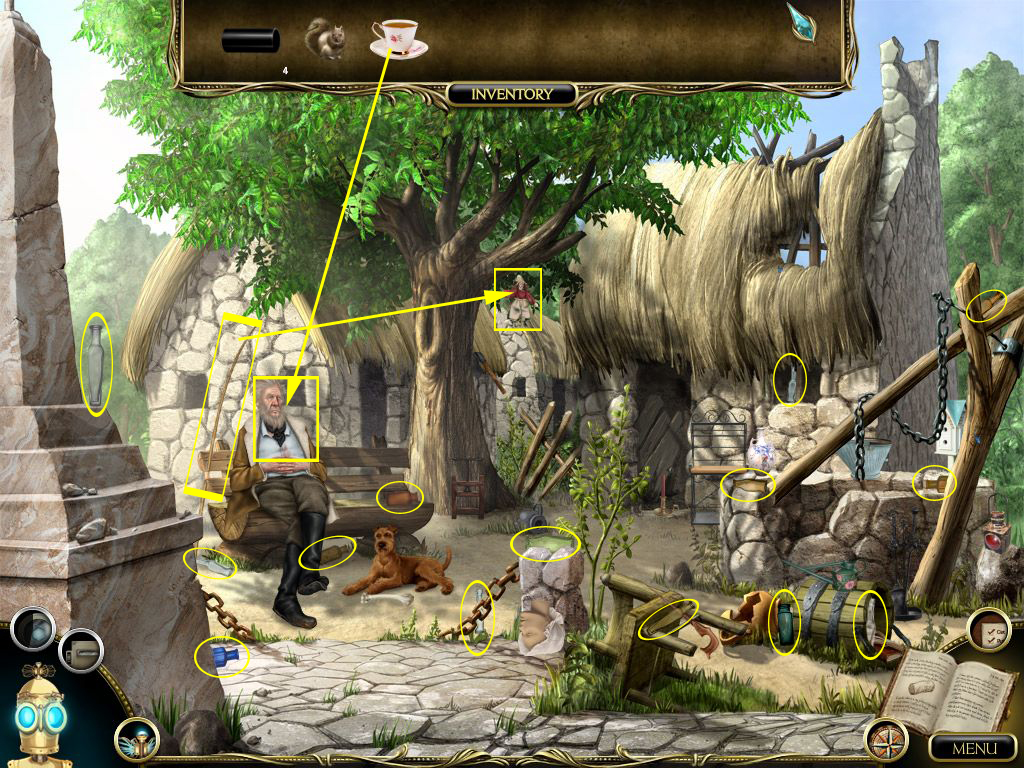
Farmhouse
Use the stick from the inventory with the cage door.
Click the thread at the stick.
Place the nuts in the cage and wait until the squirrel is inside.
Click the thread to close the door.
The squirrel goes into your inventory.
Now find all objects of your list to obtain a cup of tea from Martha.
Screenshot
Head back to the Village Square.
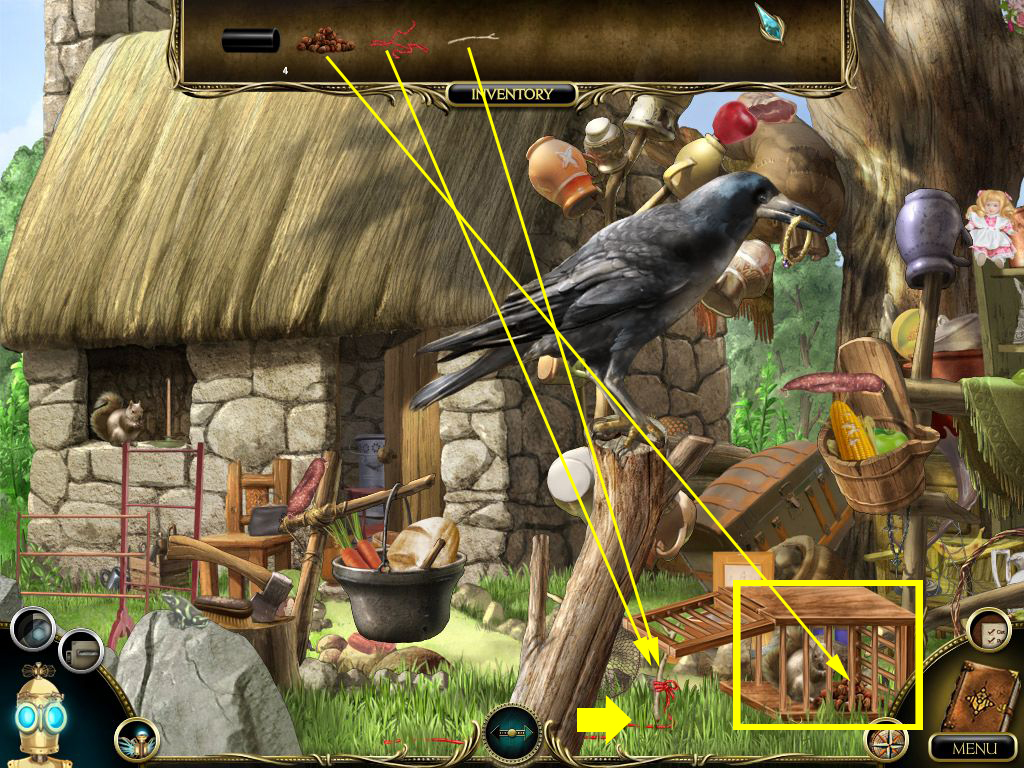
Village Square
Give Patrick the cup of tea.
Try to get the fishing rod next to him to trigger a hidden object scene.
Find all listed items and the fishing rod will go into your inventory.
Use it to get the little scarecrow on the roof in the far middle.
It will fall on the ground, so pick it up to get it into your inventory.
Screenshot
Go back to the Farmhouse.
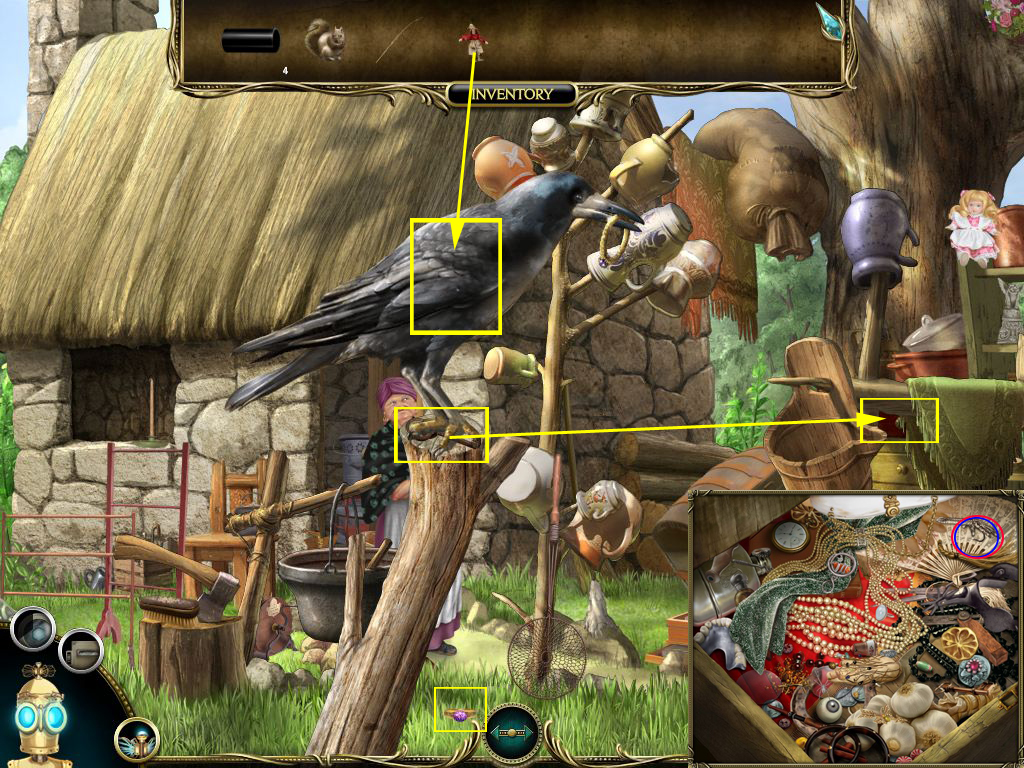
Farmhouse/Village Square
Click the raven and scare him away with the scarecrow.
Once the raven left you can pick up the key.
The raven lost a ring - grab it.
Use the key on the locked drawer on the right side.
Click it again to get a close up view and find all listed items.
The fishing hook will go into your inventory.
Screenshot
Head back to the Village Square and hand over the ring to Patrick to obtain Martha's amulet.
Go to the Village Stream.
Village Stream/Farmhouse
Combine inside the inventory the hook and the fishing rod (drag one on the other).
Use the fishing rod now to get the cylinder out of the water.
It will go into your inventory.
Screenshot
Return to the Farmhouse and give Martha the amulet.
Chapter 3: The Submarine - Present time
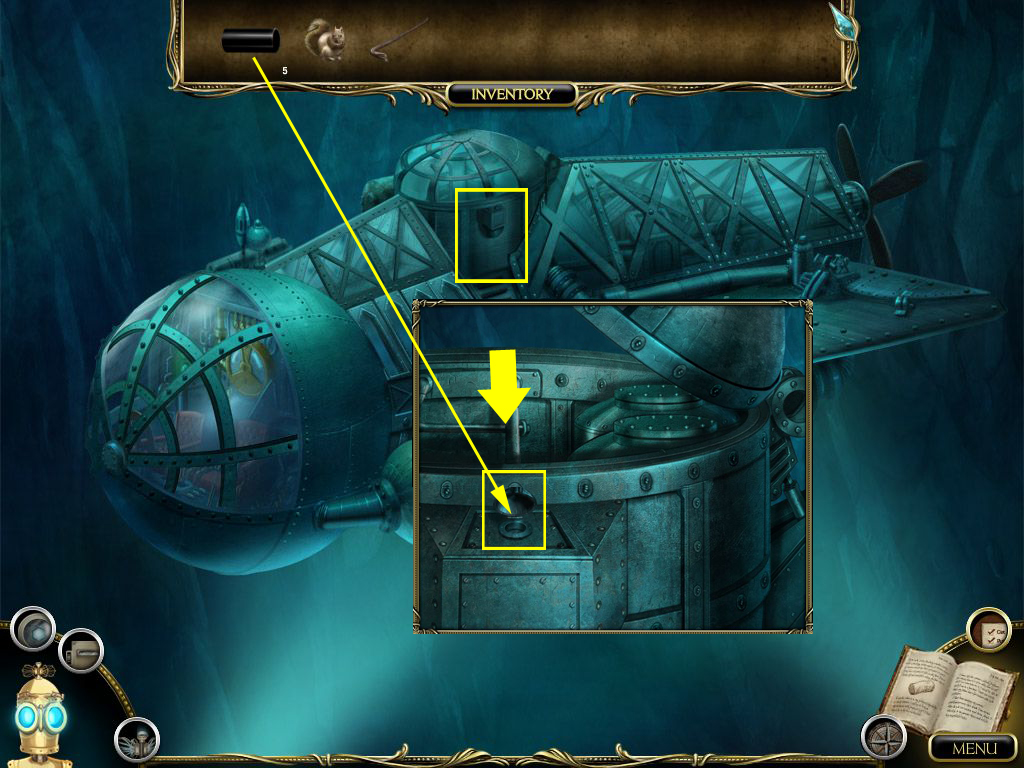
Submarine Exterior
Click the submarine entrance to get a close up view.
Click the hatch to open it an insert the cylinder from your inventory.
The hatch opens. Enter the hatch.
Screenshot
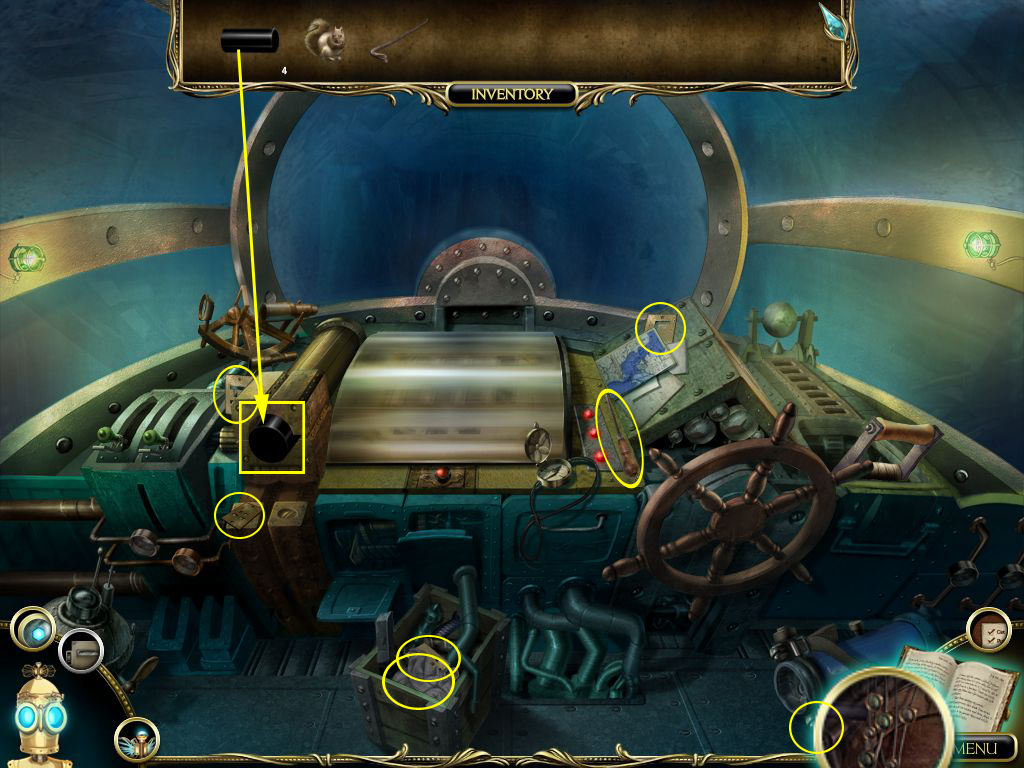
Navigation Room
Place a cylinder from your inventory into the round opening on the left.
Now you have light.
Pick up the 5 metallic cards, the screwdriver and the rag for you inventory.
Screenshot
Use the map icon and go the Engine Room.
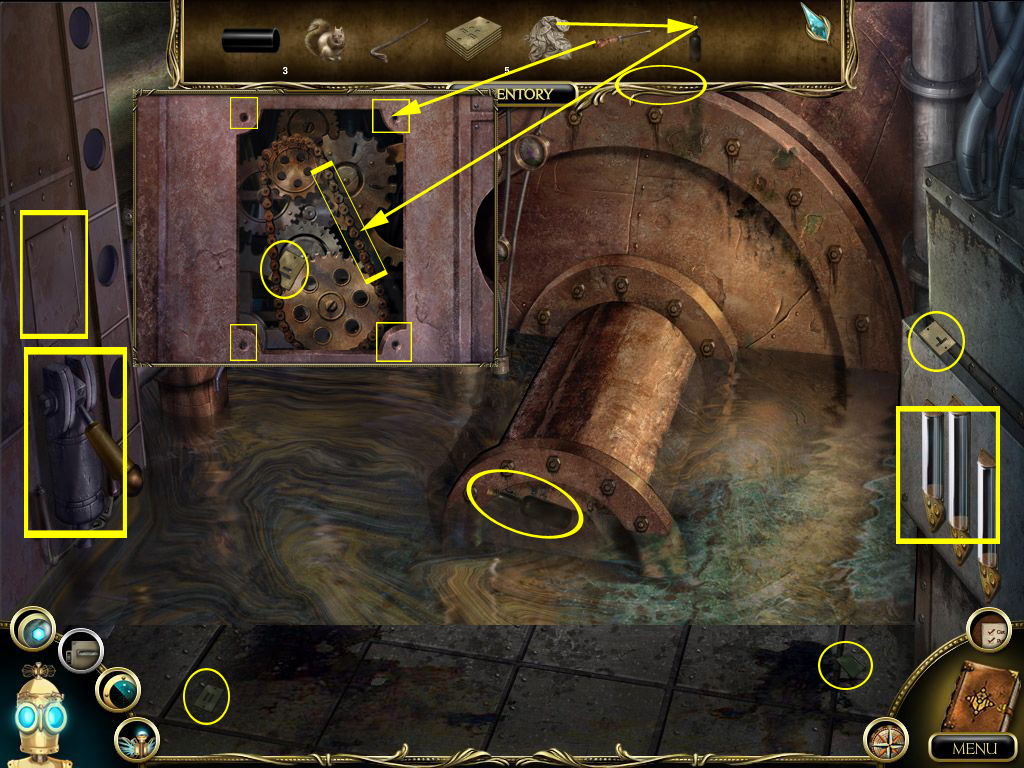
Engine Room
Take the bottle of sour wine and the two metallic cards.
Click the lever on the left side - it does not work.
Zoom into the wall panel above the lever and use the screwdriver to remove all four screws.
Panel and screws will go into your inventory as well as the metallic card inside the mechanism.
Inside your inventory combine the rag and the bottle of sour wine to obtain a wet rag.
Clean the chain by clicking on it a few times with the rag.
Take the panel from your inventory and replace it on the wall.
Exit the zoom scene.
Pull the large lever below the panel. When the water is drained, you can collect collect the other two metal cards.
Screenshot
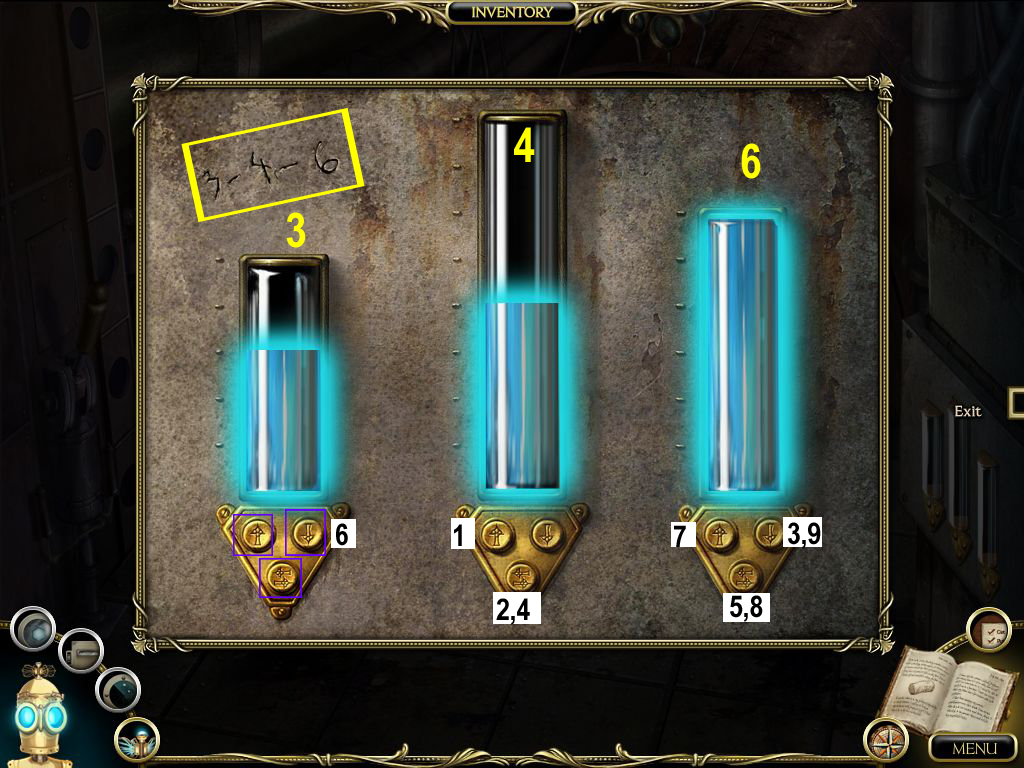
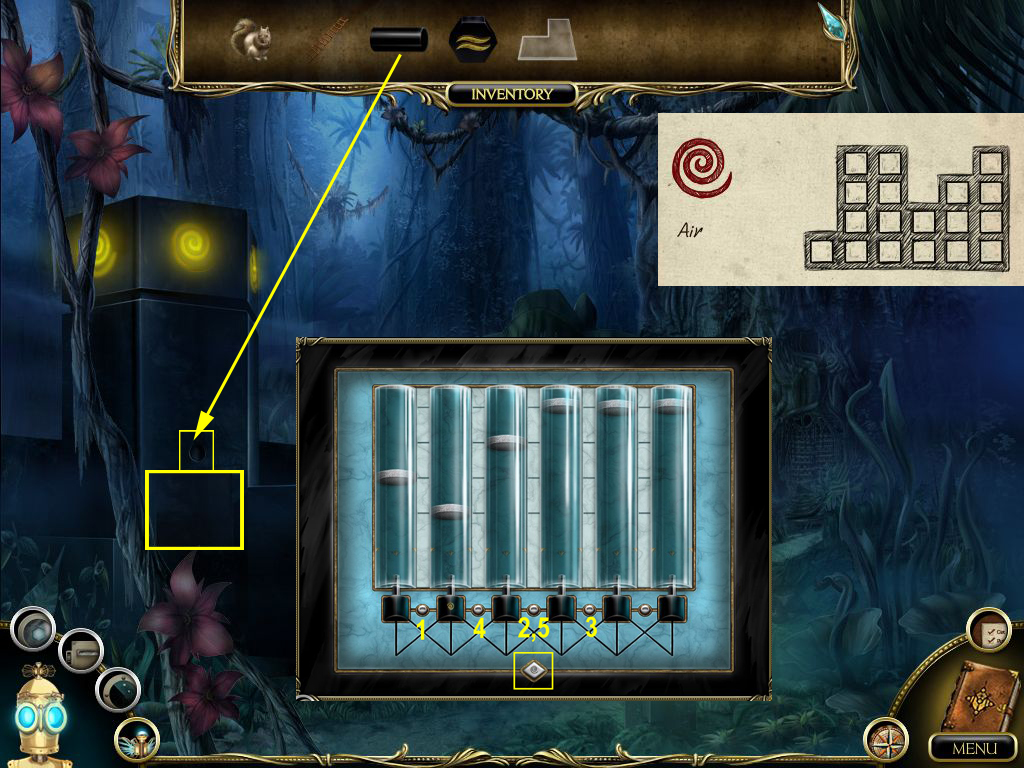
Click the pressure gauge on the right side to get a close up view.
You see the numbers 3-4-6 on the top left.
These are the amounts the gauges have to show.
Below each gauge you have three arrows.
The arrow on the left is used to fill, the arrow on the right to drain the tubes.
The double arrow transfers liquid to the gauge on its right.
The rightmost gauge will transfer its contents equally between the other two.
Fill the middle gauge.
Transfer the liquid from the middle gauge to the right (there will be some leftover).
Drain the right gauge.
Transfer the left over liquid from the middle gauge into the right one.
Drain the left gauge.
Fill the right gauge.
Transfer the liquid of the right gauge to the other two.
Drain the left gauge.
Fill the right gauge.
Transfer the liquid of the right gauge to the other two.
Fill the right gauge.
Screenshot
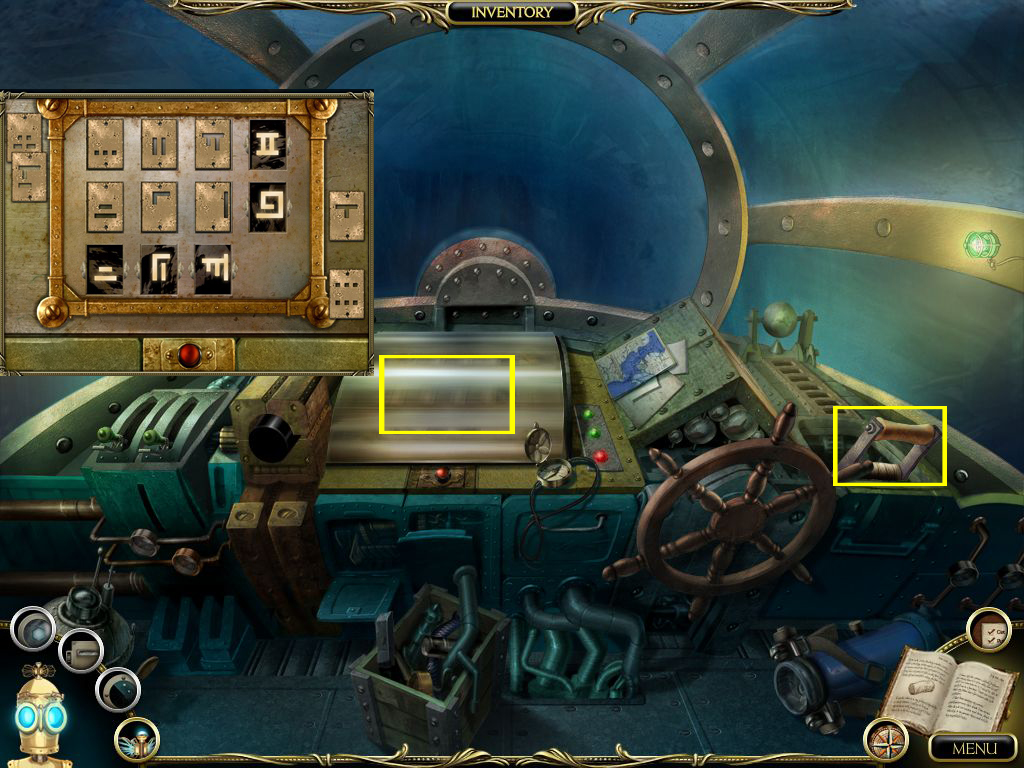
Return to the Navigation Room.
Navigation Room
Click the glass panel in the middle to get a close up view.
The metal cards from your inventory are already placed at the side.
Open your book. The coordinates for the Hidden World are on page 13 of the journal.
Set the coordinates for the Hidden World by choosing the 6 correct metallic cards and placing them in their proper positions.
As you place the cards on the slots, the markings of each row and column will be combined on the 5 black areas.
These should look like the symbols on the 5 coordinates.
The symbols on the black areas should go in this order: From top to bottom, and then from left to right.
Pull the throttle to start the submarine.
Screenshot
Chapter 4: The Cavern - Four days later
Cave
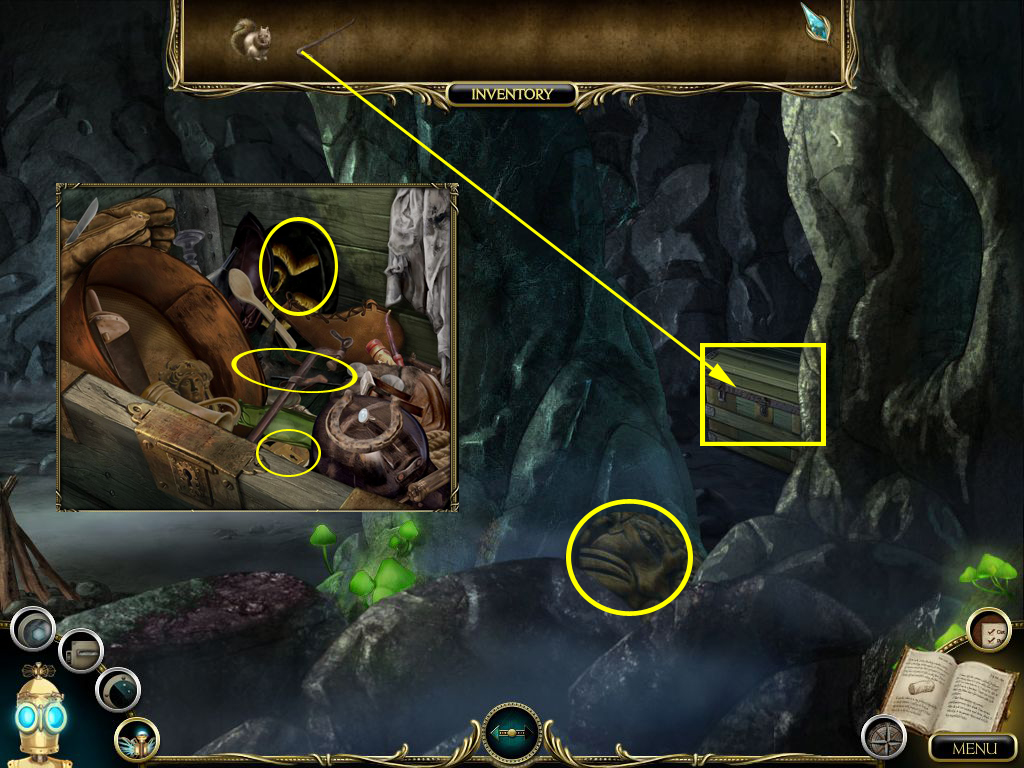
Scrollable scene - from left to right.
Get the crowbar from your inventory to open the chest on the right side.
Click to get a close up view - this will trigger a hidden-object scene.
Find all listed items to obtain the brush and the pick axe.
Also pick up the disk from inside the chest.
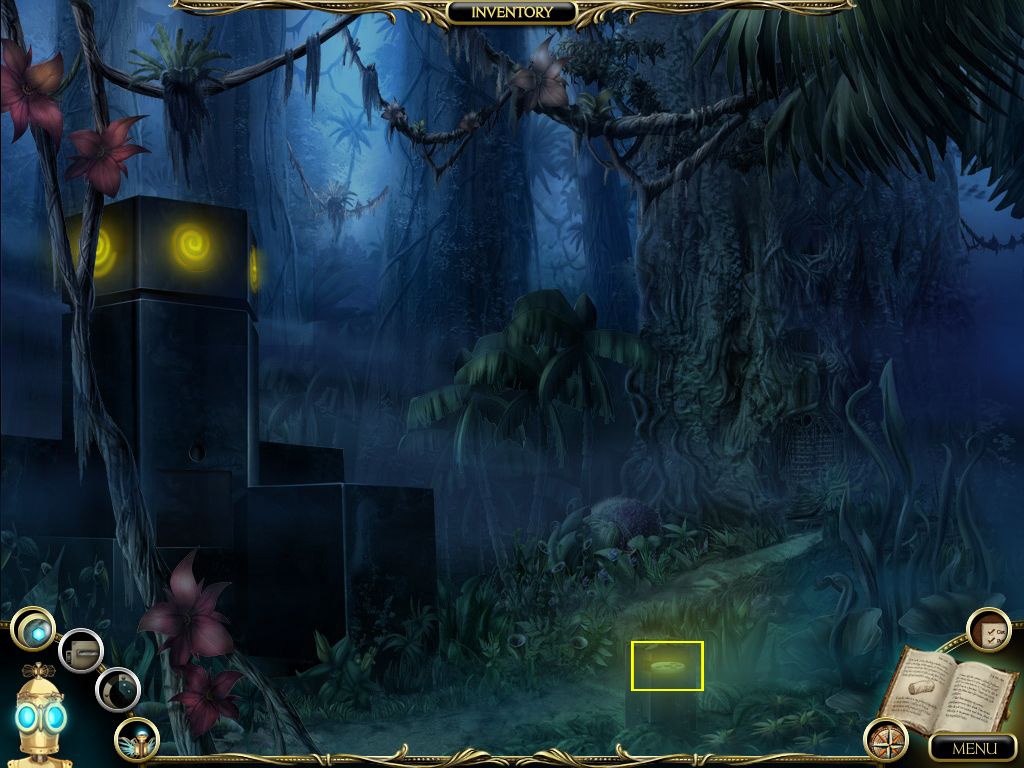
Pick up the disk on the lower middle of this scene view.
Screenshot
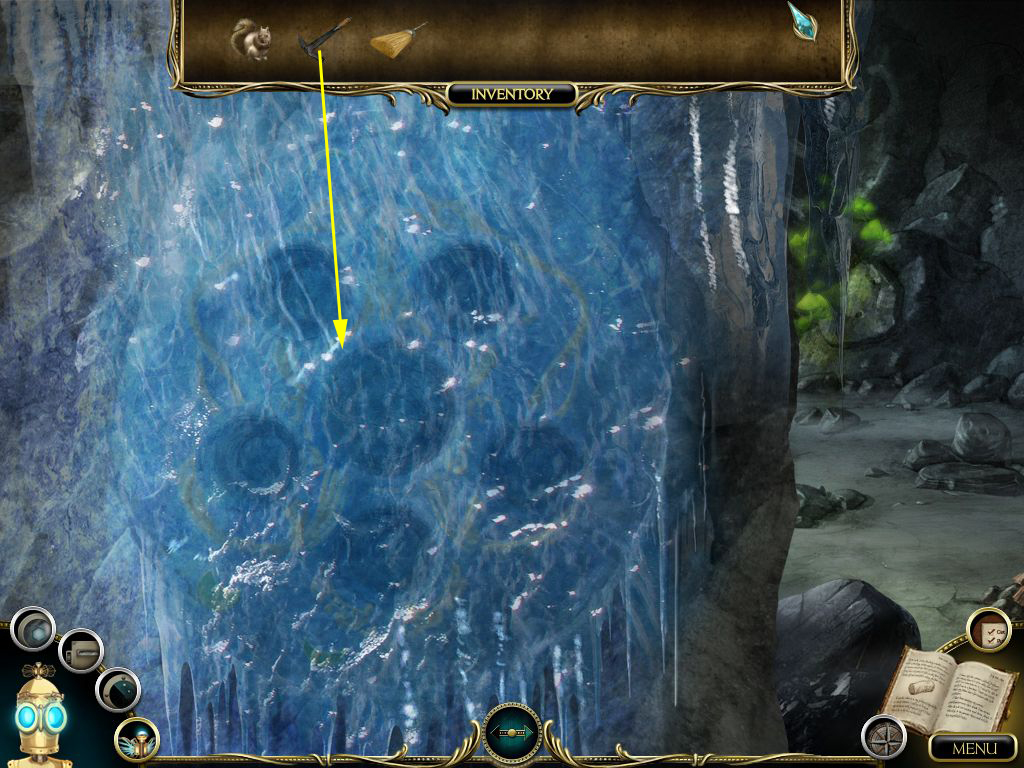
Exit the close up and go completely to the left.
Use the pick axe at the icy wall (click 6 times in total).
Screenshot
Go a little bit to the right and collect the 3 shards.
Click the mosaic on the ground and use the brush to clean it.
Find 9 crescent moons.
Screenshot
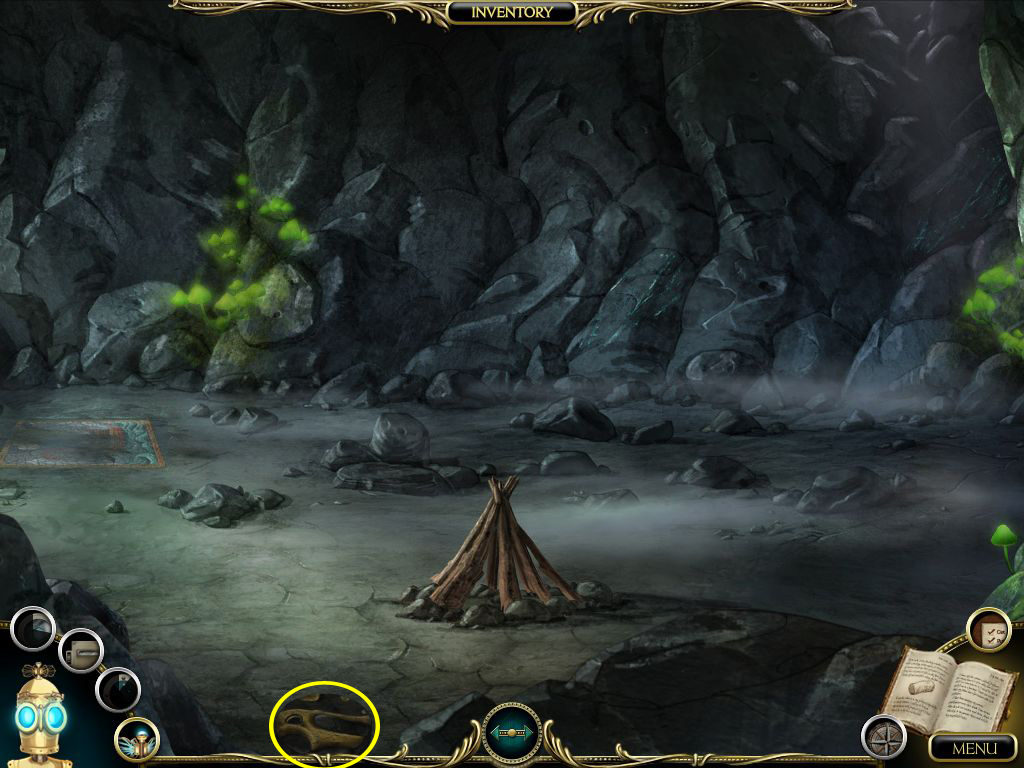
Exit the close up and pick up the 3 disks in that scene.
Screenshot
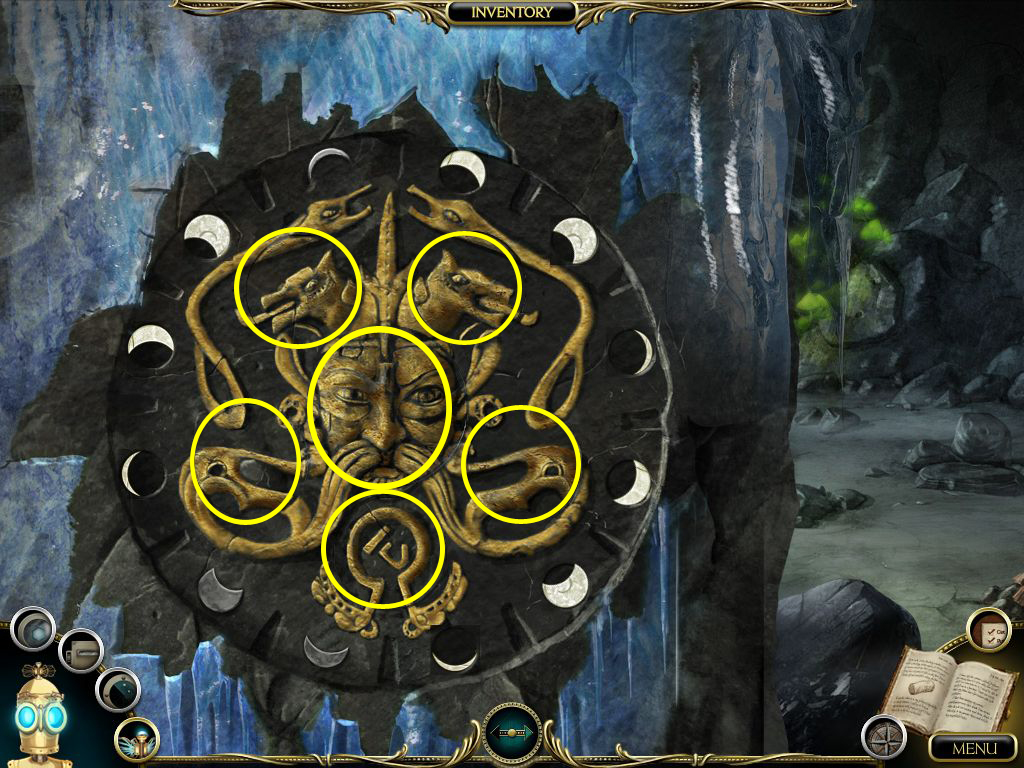
Go back to the left.
Place the collected crescents at the outside of the stone disk.
Three are already placed to give you a hint - they have to show the moon phase.
Now place the collected disks.
Each can only be placed into one slot.
To move them click the middle of the disk, then rotate them to fit in exactly.
Screenshot
Click the elevator to enter the Hidden World.
Chapter 5: The Hidden World
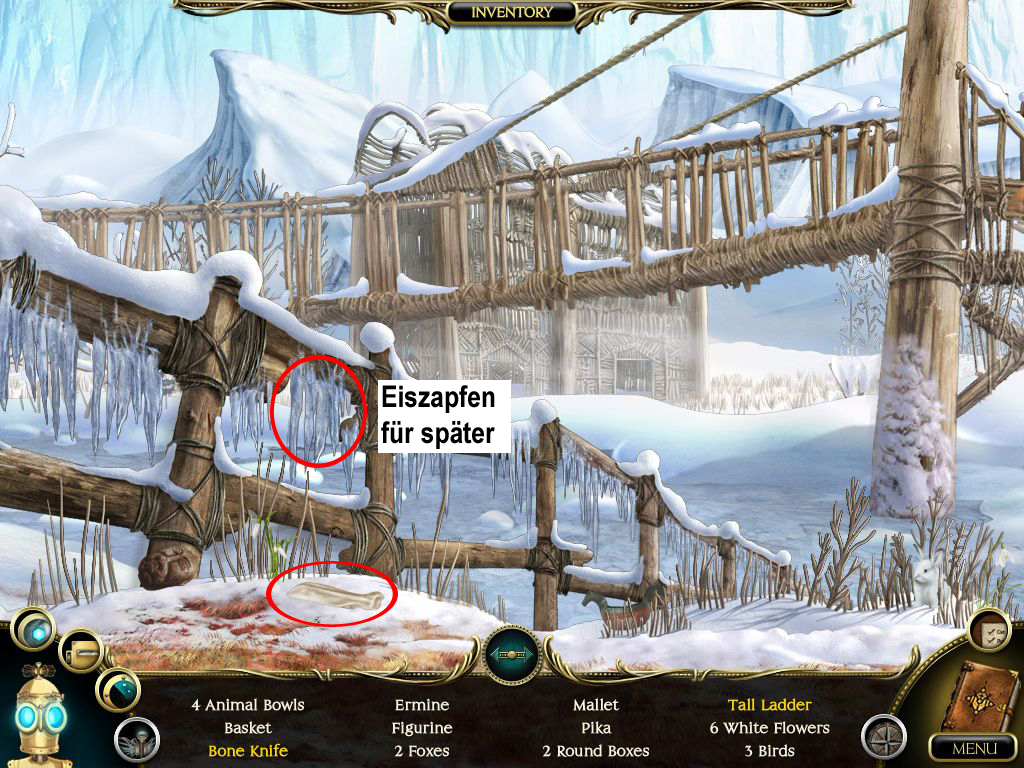
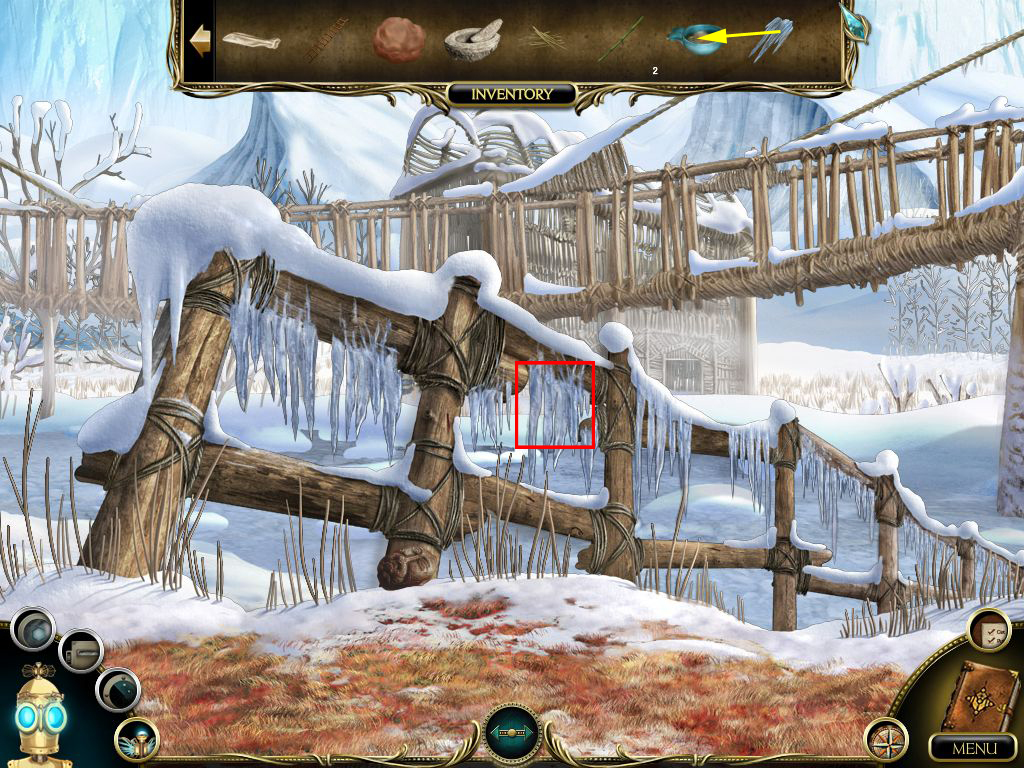
Tundra
Scrollable scene from left to right.
Find all listed objects. The knife and the ladder will go into your inventory.
Notice the icicles at the fence for later.
Screenshot
Screenshot
Use the map icon to enter the Woodland.
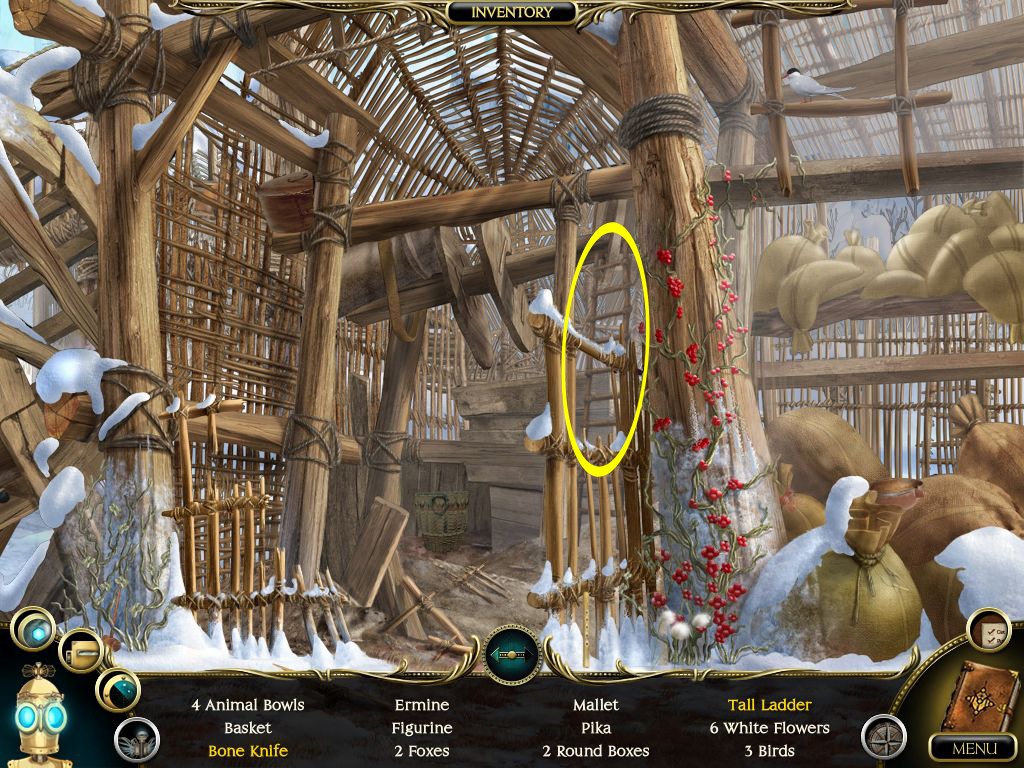
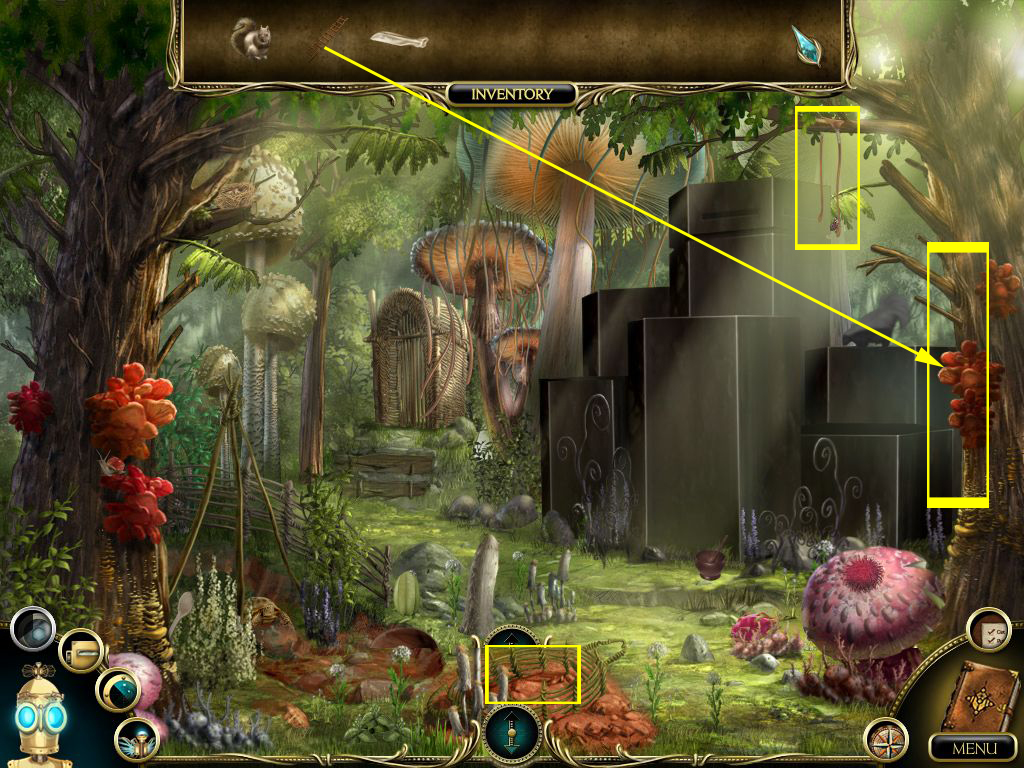
Woodland
Zoom scene to move back and forth.
Find all listed items to obtain the pair of tweezers for your inventory.
Place the ladder at the tree on the right side and take the slingshot.
Take the ladder back into your inventory.
Pick up some clay from the ground.
Screenshot
Go back to the front area and take some pebbles from the hanging basket on the top left.
Screenshot
Use the map icon and go to the Desert.
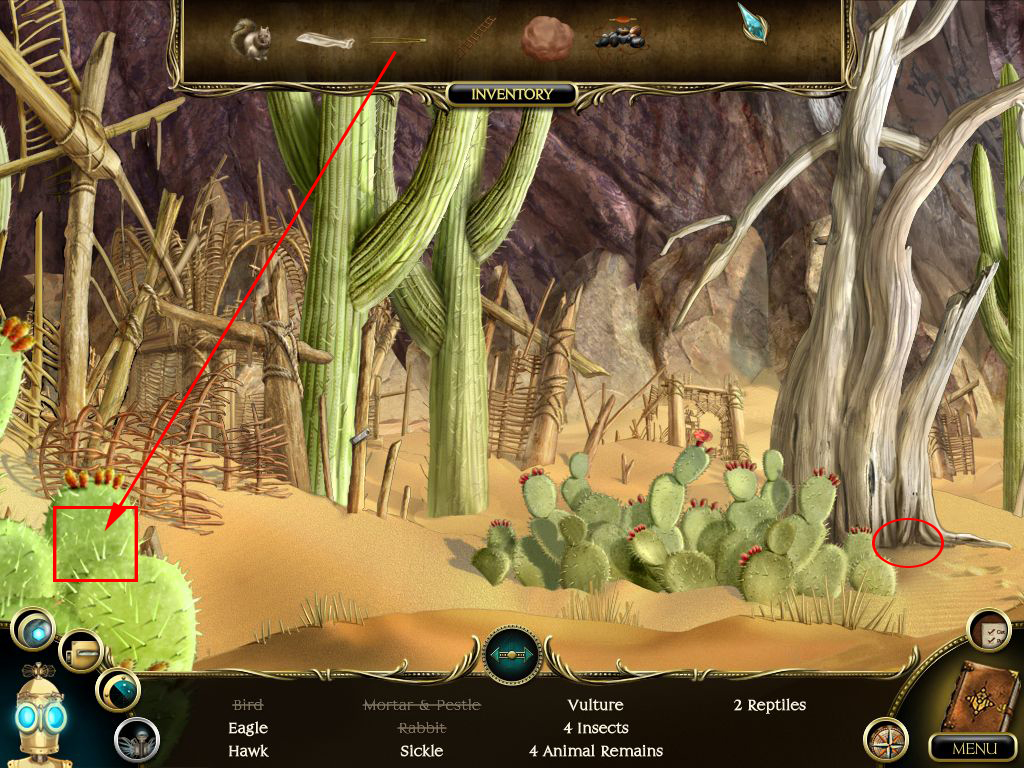
Desert
Scrollable scene from left to right.
Find the listed items to obtain a mortar and pestle.
Click the huge cactus to get a close up view and use the tweezers from your inventory to get some thorns.
Screenshot
Go to the Rainforest.
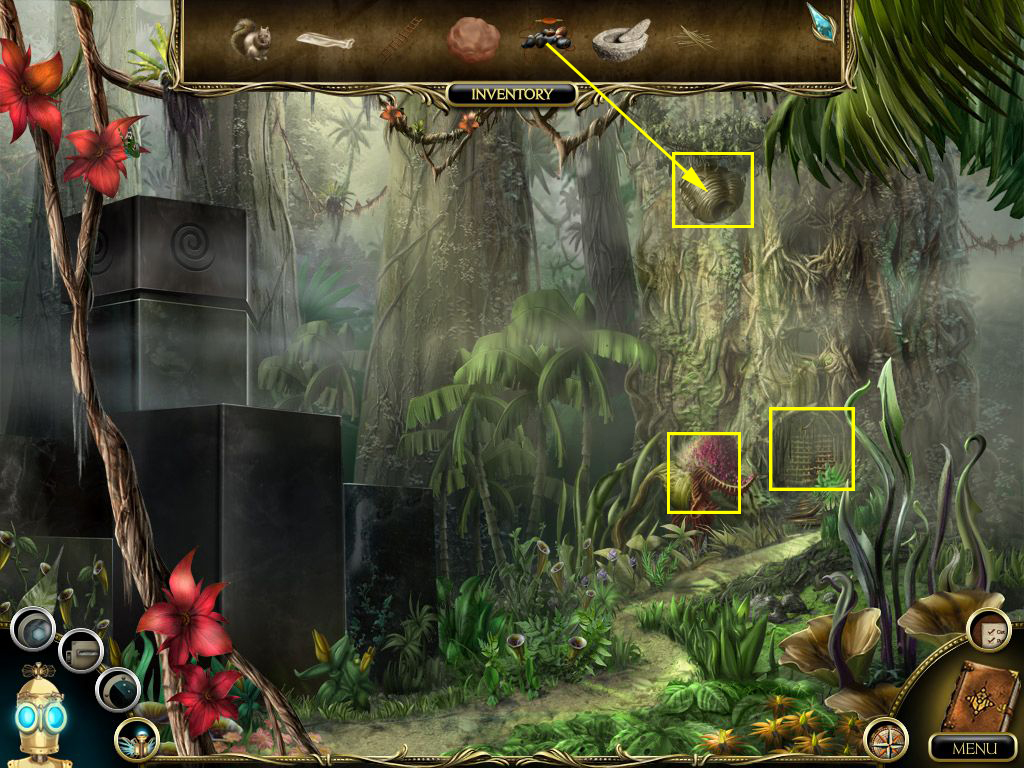
Rainforest
Click the door in the background - a carnivorous plant snaps at you.
Use the slingshot from your inventory and click on the beehive above the plant 2x.
It falls down and the carnivorous plant is satisfied.
Screenshot
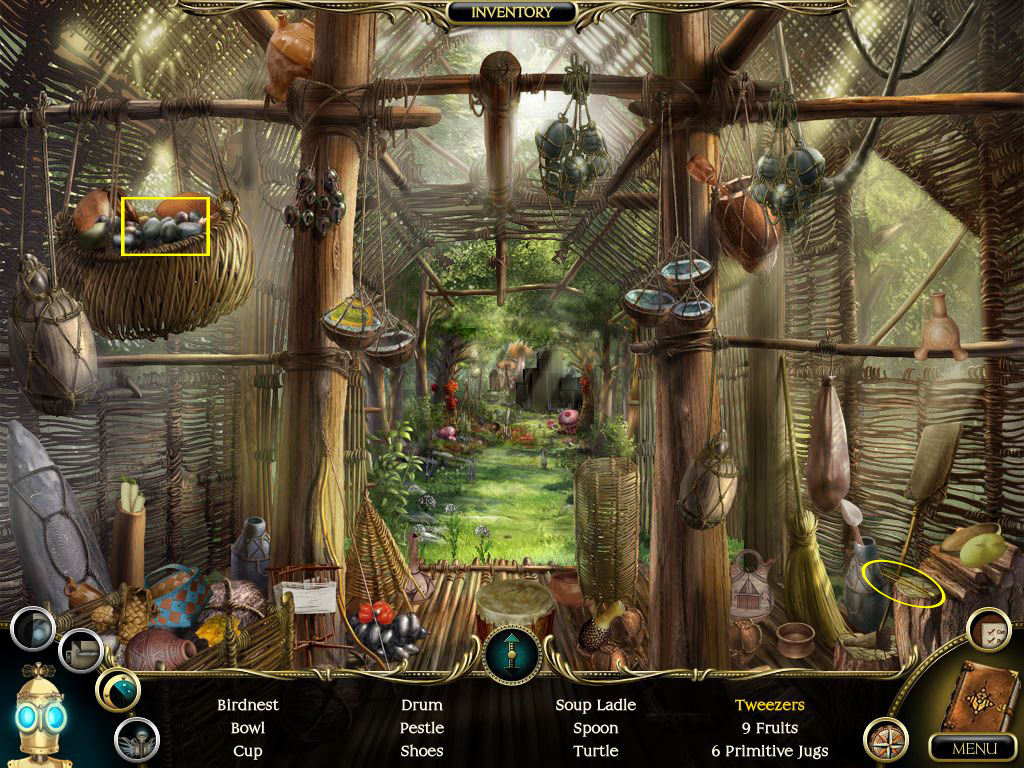
Click the temple door again to trigger a hidden object scene.
The scene is vertical scrollable from top to bottom.
2 bamboo sticks and a cup will go into your inventory.
Go to the top and cut off a part of the musky flower on the top right.
Screenshot
Head back to the Tundra.
Tundra/Desert
Click the icicles you saw before.
Combine them inside the inventory with the cup.
Screenshot
Use the map icon and go the Desert.
The ice melts and all you have left is water in the cup.
Go back to the tundra.
Now combine inside the inventory the knife with the bamboo sticks to cut them.
Combine the musky flower with the mortar and pestle.
Combine the mortar with the cup.
Combine the thorns with the clay to get an arrow.
Combine the arrow with the cup.
Screenshot
Chapter 6: The Fall of Darkness
Tundra/Desert/Rainforest/Woodland
You will need to go to all four locations to find a disk.
You can select the four locations on the map in any order.
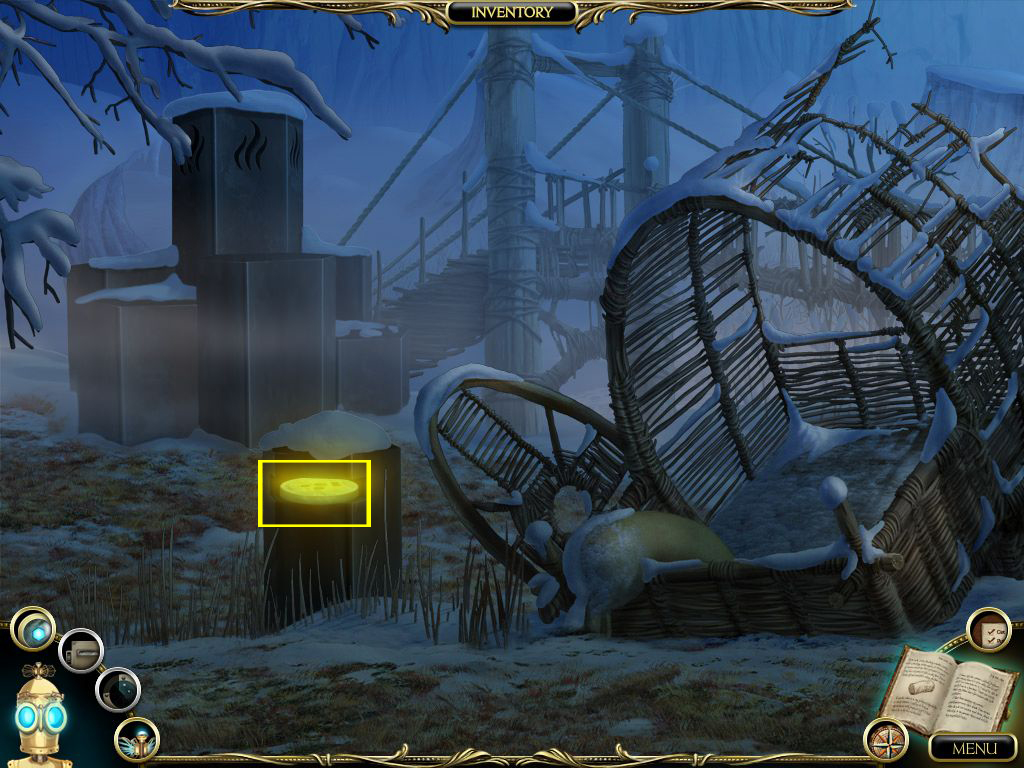
Pick up the disk from the Obsidian pedestal in each location.
Screenshot Tundra
Screenshot Rainforest
Screenshot Woodland
Screenshot Desert
Use the map icon to got to the Overlook Plateau.
Overlook Plateau
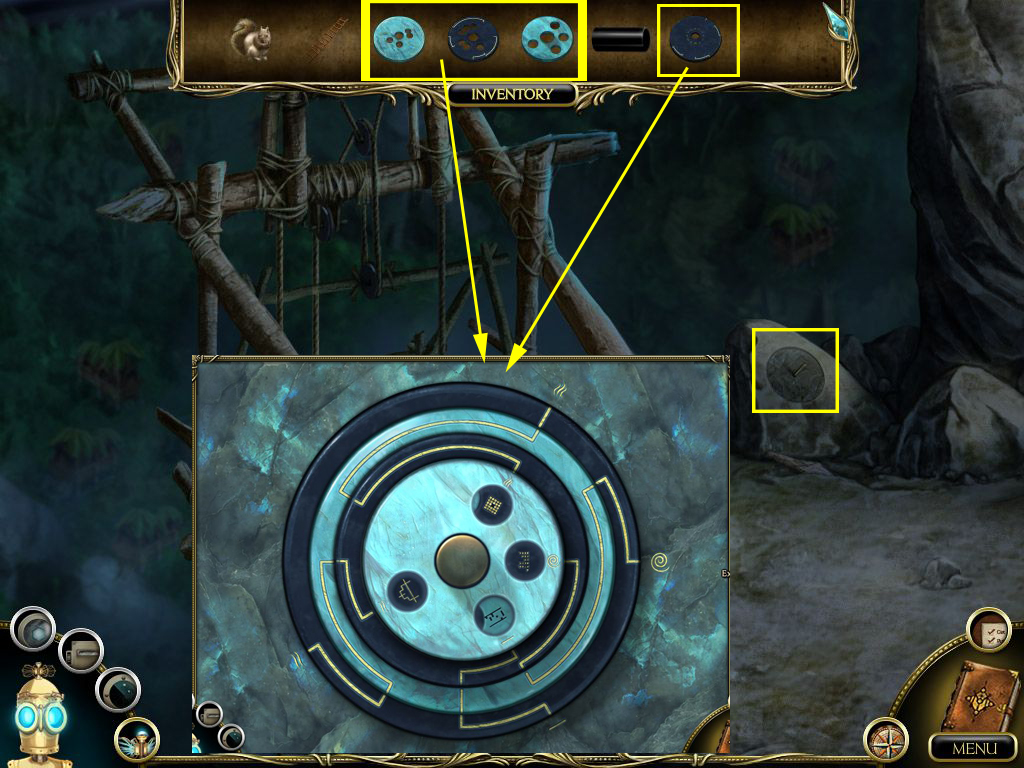
Click the spindle on the rock on the right side to get a close up view.
Use the four disks from your inventory and place them on the golden middle point.
Clicking on the right side of a disk rotates it clockwise; clicking on the left rotates it counter-clockwise.
Rotate the disks so that the lines connect matching symbols from the stone to the innermost disk.
Start with the outer disk, connect the symbols and work your way to the innermost disk
Screenshot
Diagrams for the 4 element puzzles are added to your journal.
Go to the Desert.
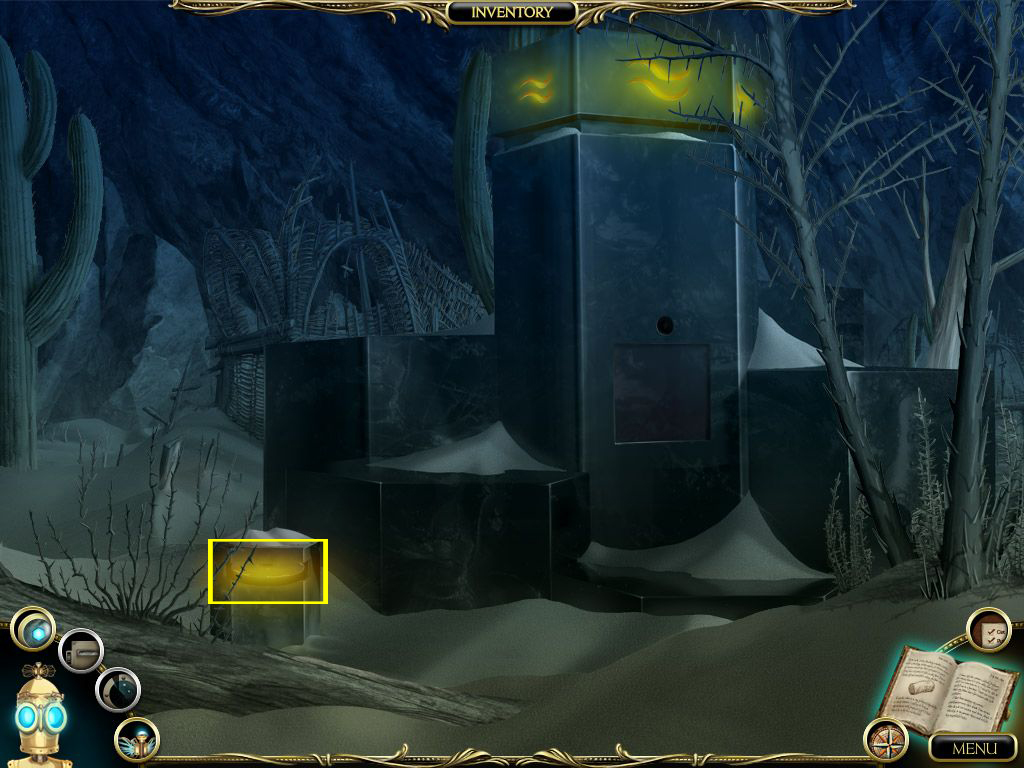
Desert
The symbol on the top shows the element of water.
Click the panel to get a close up view and place the cylinder from your inventory in the opening.
The cylinder will go back into your inventory after using it.
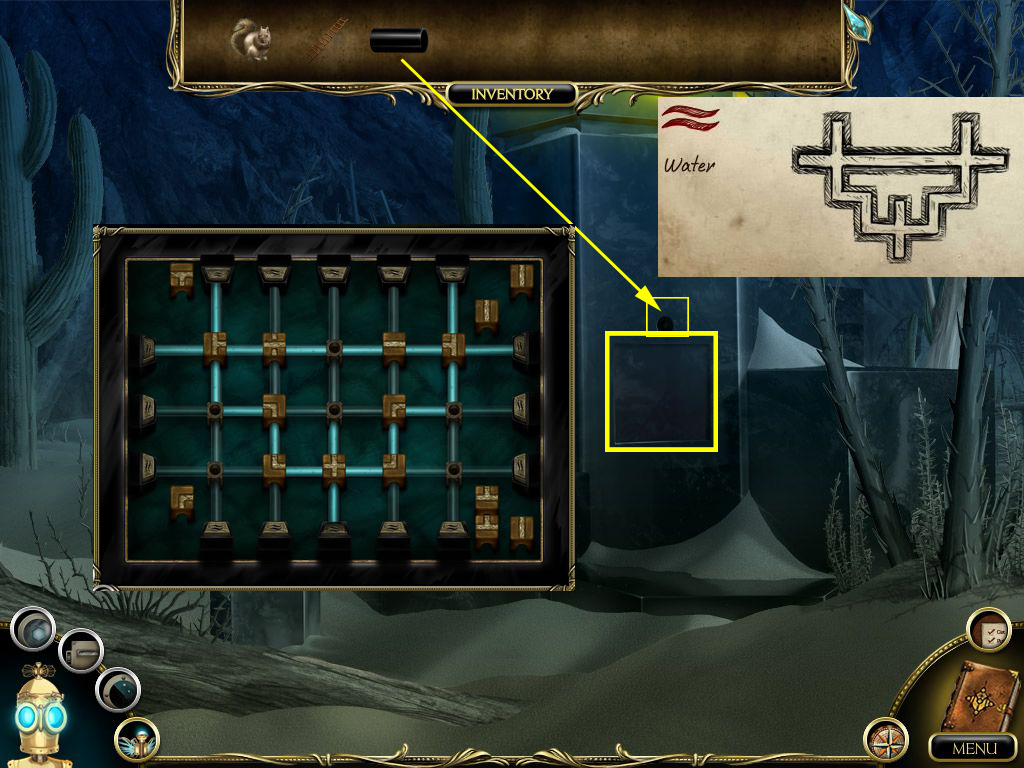
Click on the contraption to solve the puzzle.
The journal will give you the needed hint, what the solution has to look like.
The buttons on the edges of the puzzle start and stop the flow of water.
The valve junctions control the direction of the water.
You do not have to use all valve junctions.
Screenshot
Take the glass tile and water artifact that appear.
Go to the Rainforest.
Rainforest
Click the panel and place the cylinder.
The needed element here is the air.
Click on the white diamond button to blow air into the pipes, lifting the discs upwards.
Refer to Air puzzle diagram in the journal to see the how high a disc should be in each pipe.
The round button in between two pipes swaps their air strength levels.
Seen from left to right, click 1, 3, 4, 2, 3.
Screenshot
Take the metallic sphere and air artifact that appear.
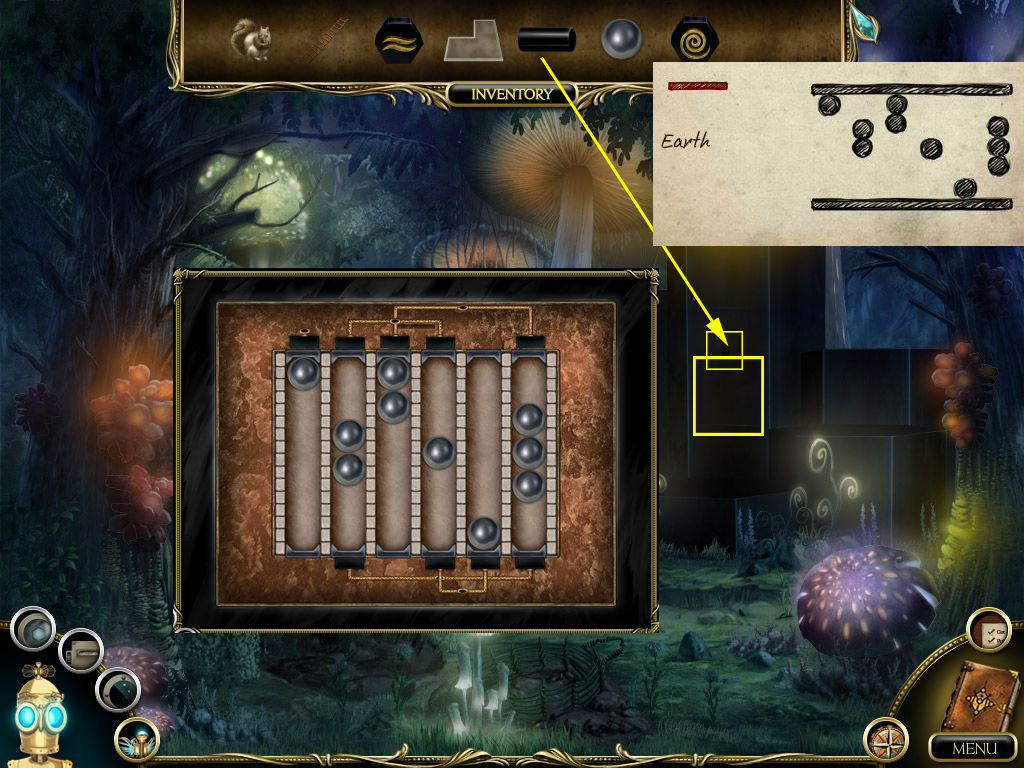
Go to the Woodland.
Woodland
Click the panel and place the cylinder.
The needed element here is earth.
Take the metallic sphere from your inventory and place it on the puzzle.
Move the balls between columns until you have the correct number of balls in each.
Then, use the bars with magnets to raise or lower the balls according to the diagram.
To make balls hover, place magnets on both ends of its column.
Screenshot
Take the earth artifacts that appear.
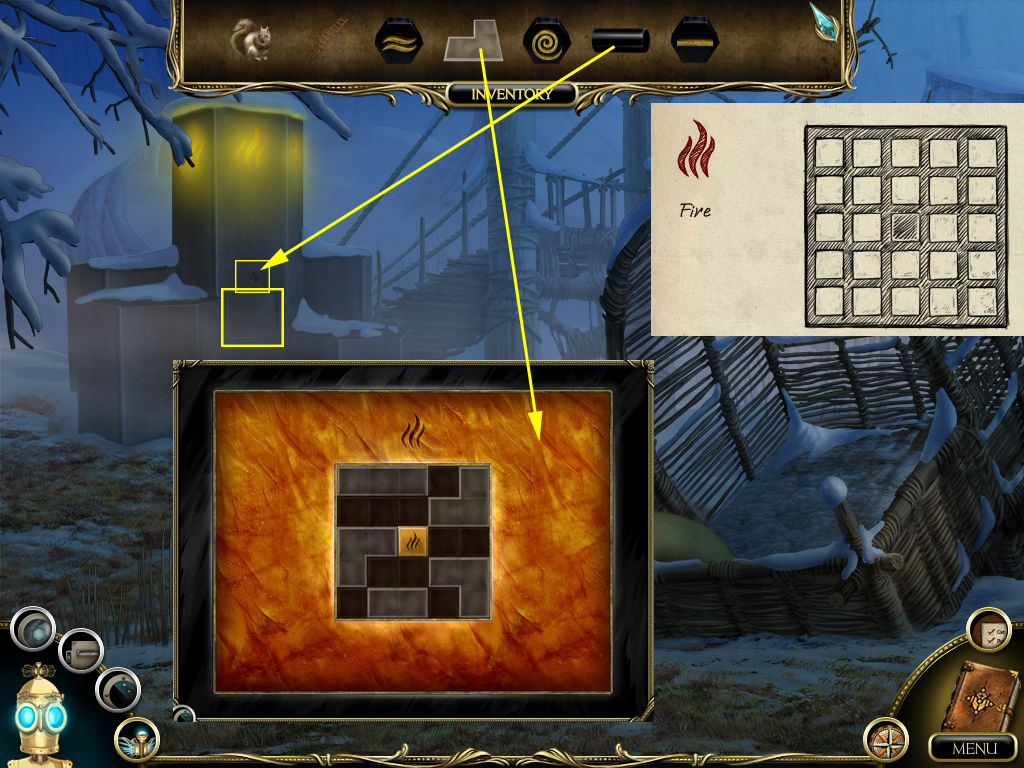
Go to the Tundra
Tundra
Click the panel and place the cylinder.
The needed element here is fire.
Take the glass piece from your inventory and place it on the puzzle.
Arrange the 5 glass tiles on the grid so that all the squares are lit up.
A glass tile lights up the squares it is placed on, as well as the surrounding squares by half.
A square that is half-lit twice becomes fully lit.
Screenshot
Take the fire artifact that appears.
Use the map to go to the Machine Entrance
Machine Entrance
Get the ladder out of your inventory and place it in front of the entrance.
Click the entrance to get a close up view.
Use the cylinder with the opening.
Place the four collected artifacts in the now open niche.
Page 14 of your journal will give you the hints about the required order.
From left to right: Earth, Air, Fire, Water.
The niche closes but the door opens.
Enter.
Screenshot
After the cut scene click the structure and enjoy
THE END
Screenshot
Thanks to Kayleigh for the walkthrough!
Posted by: Mike |
November 6, 2010 6:41 PM
|
November 6, 2010 6:41 PM