
![]() Your correspondent predicted correctly. Your curiosity would get the better of you. You would arrive at The Room, sparse but for an unusual safe, seeking answers. In order to protect it from lesser minds, a box, something they said could never be built, is secreted inside the safe.
Your correspondent predicted correctly. Your curiosity would get the better of you. You would arrive at The Room, sparse but for an unusual safe, seeking answers. In order to protect it from lesser minds, a box, something they said could never be built, is secreted inside the safe.  Your first task is unlocking the mysteries of the safe. Once you do, like your epistolarian host, you're irrevocably imbibed by an eagerness to know more, fingers drawn to a tiny panel to unlatch, an oddly-placed contraption to wind up, or an arcane design in gold. Thusly, you are subsumed by The Room, a splendidly surreal, 3D puzzle adventure from Fireproof Games.
The Room consists of four chapters. You begin in view of a small side table, upon which is an envelope. To angle yourself within reach of it, tap and swipe the screen. A couple more slight gestures let you slide a letter out of the envelope and turn it over to read. "I have every faith in you solving its mysteries," you're told of this unique box. "You always were the smart one," and "The stakes are higher than you could possibly imagine," proffer further enticement to carry on through dexterous puzzles and clever riddles, seeking yet another key to another latch or one more clue to just one more coded lock. Stopping at this point appears to be much more difficult than the current quandary that befuddles you.
SEE ALSO ON JAYISGAMES: The Room Two
 This is because The Room's touch controls make immersion as natural as scratching an itch. A briefly worded tutorial initiates you in all the controls and soon they are intuitive. For the most part, you'll make use of your tablet's multitouch functions, tapping your way around all sides of the beautifully appointed constructions which make up the safe, the box, and all the devices, knobs, drawers and secret messages therein. The distance between you and the game's completion is paced out by a need to explore every interactive area—some conveniently obvious and others much more well-hidden—correctly deciphering a puzzle then activating the next sequence of requirements.
While your lateral thinking and deduction skills will be put on trial, puzzles are usually solved through manipulation, either through a deft swipe or, occasionally, tilting your mobile device, so most the challenge is mitigated by how observant you are in your explorations. There is an amazing amount of interesting cachés and designs to examine and they're multiplied by a special eyepiece received early on. Gameplay is similar to the Dismantlement series of games, even if the look and scope is much broader. Rather than escape, you are pulled further inside.
In those occasions your progress deeper into the box is stymied, tapping the "?" icon will provide a hint. Hints are scaffolded so that the first usually states what you already know, then, after a few minutes, the next should prove more helpful. Often in that time, your diligence in exploring will uncover the solution before more hints are needed. Progress is punctuated by more correspondence from your host. Each letter continues a narration about the device's incredible powers and explains its origins. As you read, you partake and empathize with his inability to let go. Chapters end by opening the next stage, taking you deeper toward the center and more revelations.
 Analysis: There is very little to displease in Fireproof Game's remarkable creation. My biggest complaint is its being too short. "Too short" being operative for "I want to never stop playing with this gorgeous, gadget populated box!" and thus we can only impatiently wait for an update or another installment of the game. Yet, as far as value goes, this was perhaps the most fulfilling app I've purchased to date, affirming every good reason to possess an iPad. The exceedingly astute player might complete his or her adventure in under ninety minutes but most of us will spend over two hours in downright awe, especially those who enjoy lingering over lovely visual effects and whose latent compulsiveness to observe every detail is ignited by the intricate artistry.
The Room is remarkably well-constructed and designed, to the point that immersion overrides any sense of your surroundings beyond the box's apparatuses. That leads to the next small blemish on this beautifully imaginative game—an incomplete 360° navigation. Well, it's not a flaw, really, except the wealth of imagination crafted into layers of contraptions and architecture transmute to the player's increased desire to play and assay. Which precipitates frustration when we're only allowed certain views of the box's details or only certain hotspots are active. From distant angles, you can fully circumnavigate the box; once you zoom in, though, you cannot move freely around the box. It's a complaint that wouldn't and shouldn't exist, that only arises because of the superior way Fireproof has made this room appear so real and this box feel as if we're actually moving our hands and eyes along every side.
Here is a box, blooming at your curiosity and to your delight, furnished with copious amounts of magnetic fascination and little else. You'll learn "the truth of your predicament" soon, but it's never enough to regret the experience. Myst-like in its ability to evoke a mesmerized state of engagement, The Room is eye candy for the mind.
NOTE: This game was played and reviewed on the iPad 2. Game was available in the North American market at the time of publication, but may not be available in other territories. Please see individual app market pages for purchasing info.


Walkthrough Guide
(Please allow page to fully load for spoiler tags to be functional.)
The Room Walkthrough
Chapter 1
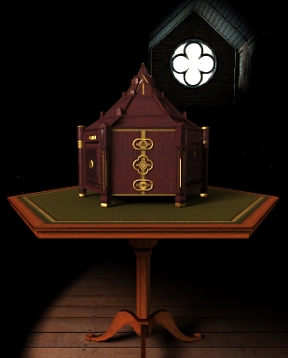
Start by looking at the top of the safe.
Double tap the envelope to inspect it.
Tap and drag the letter out of the envelope.
Read the note, then take the SMALL BRASS KEY from the wax seal.
The camera will automatically shift to inspect the jewlery box.
Swipe the lid of the box so that the circle attached to the lid fits over the keyhole in the middle of the box.
Drag the SMALL BRASS KEY into the lock, then rotate the key clockwise to open it.
Lift the lid to open the box.
Take the EYEPIECE from the opened compartment at the top of the box; note that the EYEPIECE has become a button on the right side of the screen, rather than going into your inventory.
You can tap the EYEPIECE at any time to wear it, then tap it again to remove it.
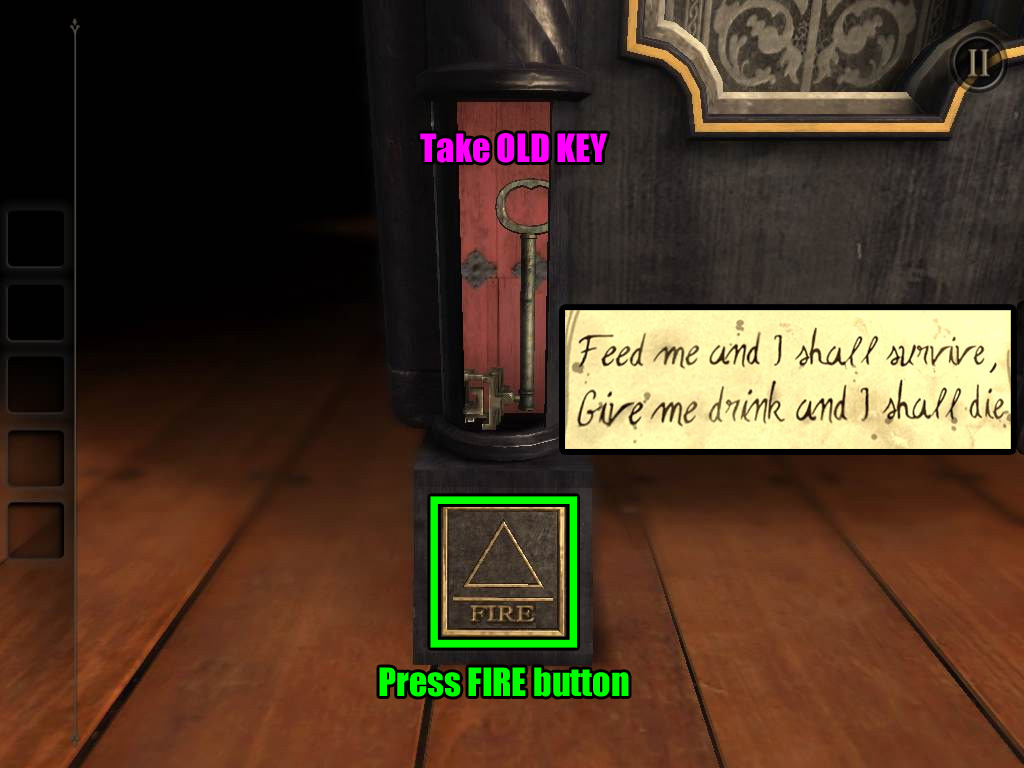
Double tap the note to find a riddle: "Feed me and I shall survive, Give me a drink and I shall die."
Zoom out to the full view of the safe, then take a look at the legs of the safe.
Each leg has a different alchemical symbol, but only one of them is the one you're looking for!
Remember the riddle and apply it to each element.
The solution is Fire. You can feed a fire to make it grow and pour water on it to put it out.
Zoom in on the base of the safe with the fire symbol, then press the button to open a compartment above it.
Screenshot.
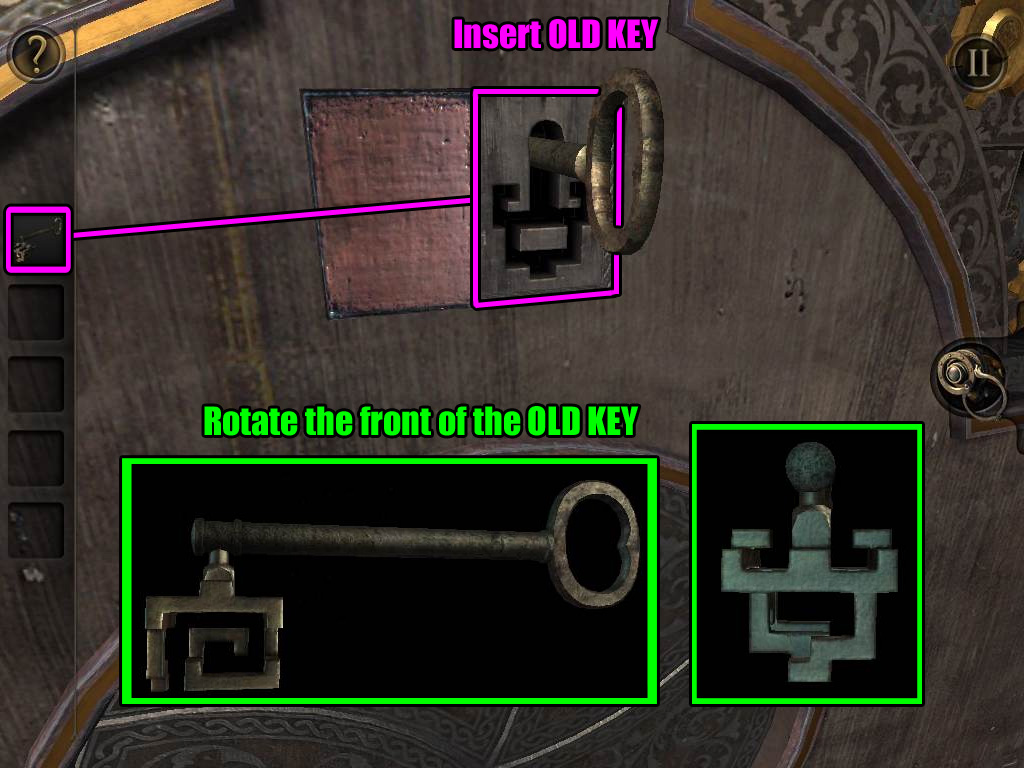
Take the OLD KEY from the compartment.
Tap the OLD KEY in your inventory to take a closer look.
Rotate the end of the key to turn it into a different shape.
You can also tap and drag around the key to view it from a different perspective.
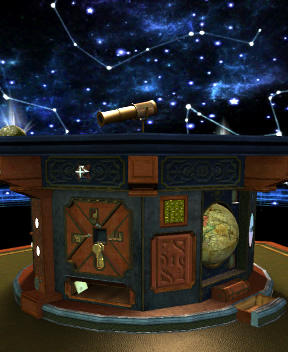
Zoom out to the full view of the safe again, then turn to the side with the ornate disc and ring of golden cogs.
Double tap the small rectangular panel above the disc to zoom in.
Tap and drag the panel to the left to reveal a keyhole.
Insert the OLD KEY into the lock - it will only fit if the front of the lock is correctly rotated - then turn the key in the lock.
Screenshot.
When the lock is opened, note that the ornate disc has been replaced with a gold disc; we can't do anything with it just yet, so remember it for later.
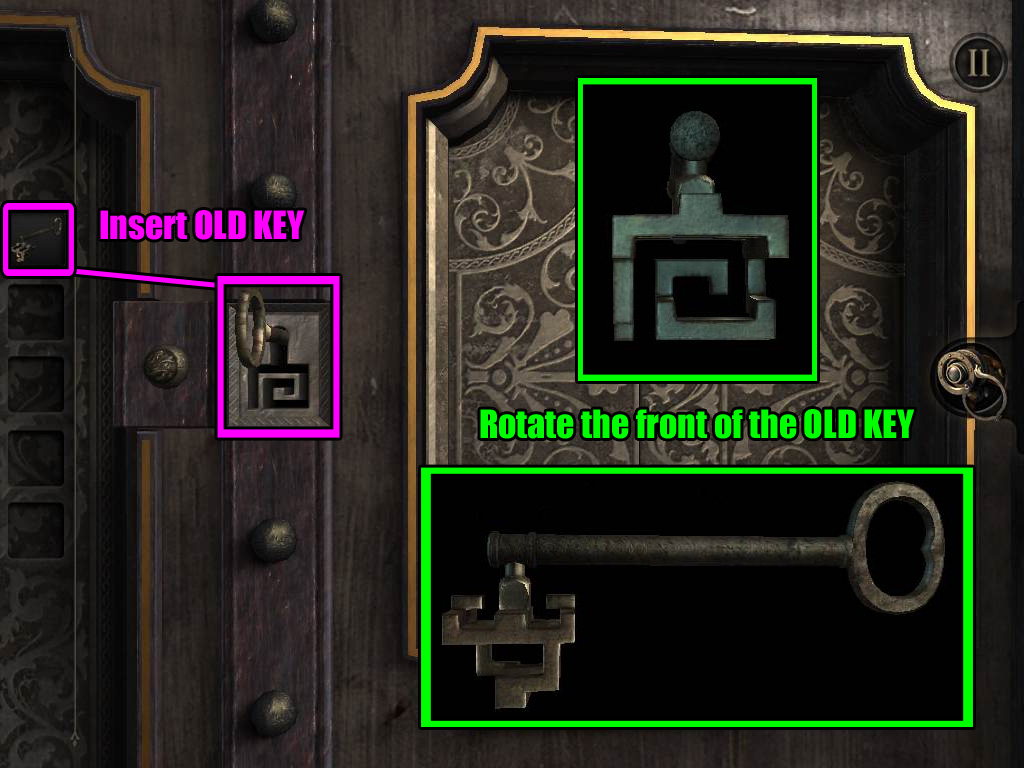
For now, turn to the left side of the safe with the fire and earth buttons at the base.
It may seem bare at first glance, but take a closer look near the top of the bolted strip.
It's another panel! Slide this one to the left to reveal another keyhole.
This keyhole also has a unique shape, so you'll need to rotate the front of the OLD KEY to fit it again.
Once you've aligned the front of the OLD KEY correctly, insert it into the lock and turn the key to open it.
Screenshot.
Take the METAL PLATE from the revealed compartment in the center of the ornate frame to the right of the keyhole.
Zoom out and turn left again to view the side with the maker's plaque.
Double tap the plaque with the word "TALISMAN" to zoom in.
Tap and drag the METAL PLATE onto the bolt on the right side of the plaque, then rotate the METAL PLATE to remove the bolt.
Take the LENS from the revealed compartment.
The LENS will be automatically combined with the EYEPIECE to complete it.
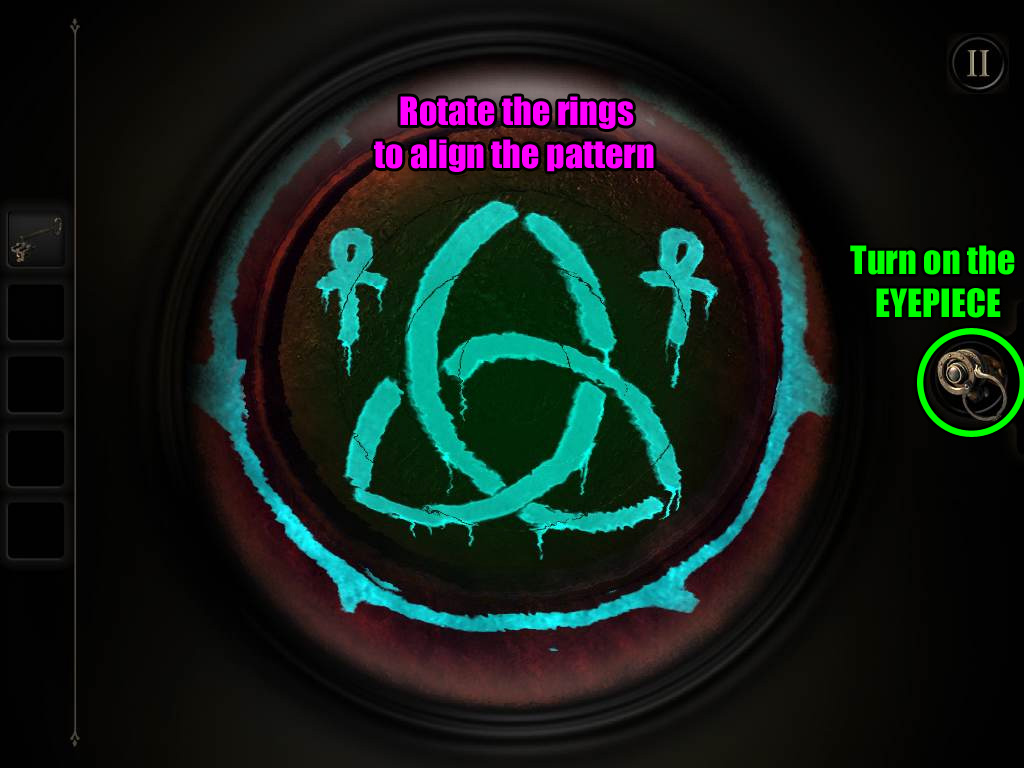
Turn to the side of the safe with the gold disc, then double tap the disc to zoom in.
You can see the rings that make up the gold disc can rotate, but you don't know the correct pattern.
Perhaps getting a new perspective will help you see things more clearly.
Turn on the EYEPIECE to see the hidden glowing markings on the disc.
Tap and drag the rings to move them clockwise or counter-clockwise.
Note that the center of the disc does not move, so use that point to find the correct orientation of the pattern and solve from the inside out.
Rotate the rings to align them in the correct positions and complete the picture.
Screenshot.
Tap the disc to open the door to the safe.
Chapter 2
Seal 1 - The Eye
You start facing the three seals keeping the box locked.
Put on the EYEPIECE and zoom out, then turn left around the box until you see the edge marked with glowing fingerprints.
Double tap the fingerprint smudges for a closer look at the panel and take off the EYEPIECE.
Tap the panel to reveal a hidden compartment containing a BOOK.
Take a look inside the empty compartment and note the symbols carved into the upper right side.
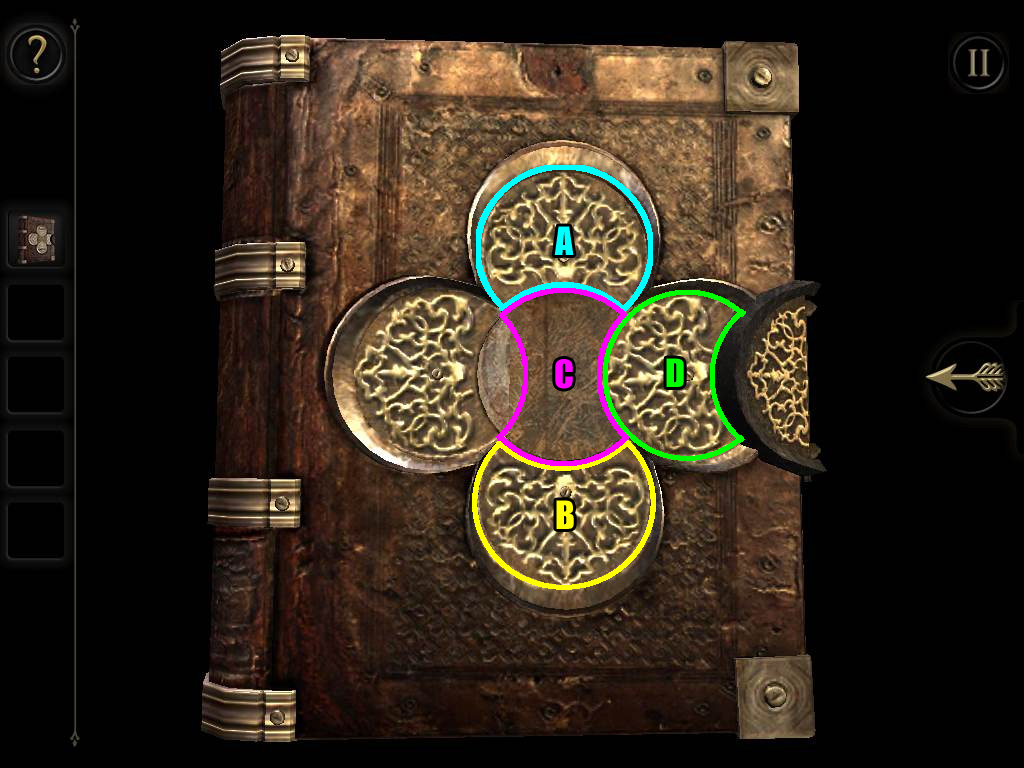
Inspect the BOOK in your inventory.
The cover is locked, but it only takes a few simple moves to open.
Rotate the top disc (A) and the bottom disc (B) so that their cut-out section is in the center of the book to make room for the middle piece.
Turn the middle piece (C) to align it vertically with the top and bottom discs.
Rotate the right piece (D) so its cut-out section is on the right to make room around the lock.
Screenshot.
Read the journal entry in the book and take the WIND-UP KEY inside.
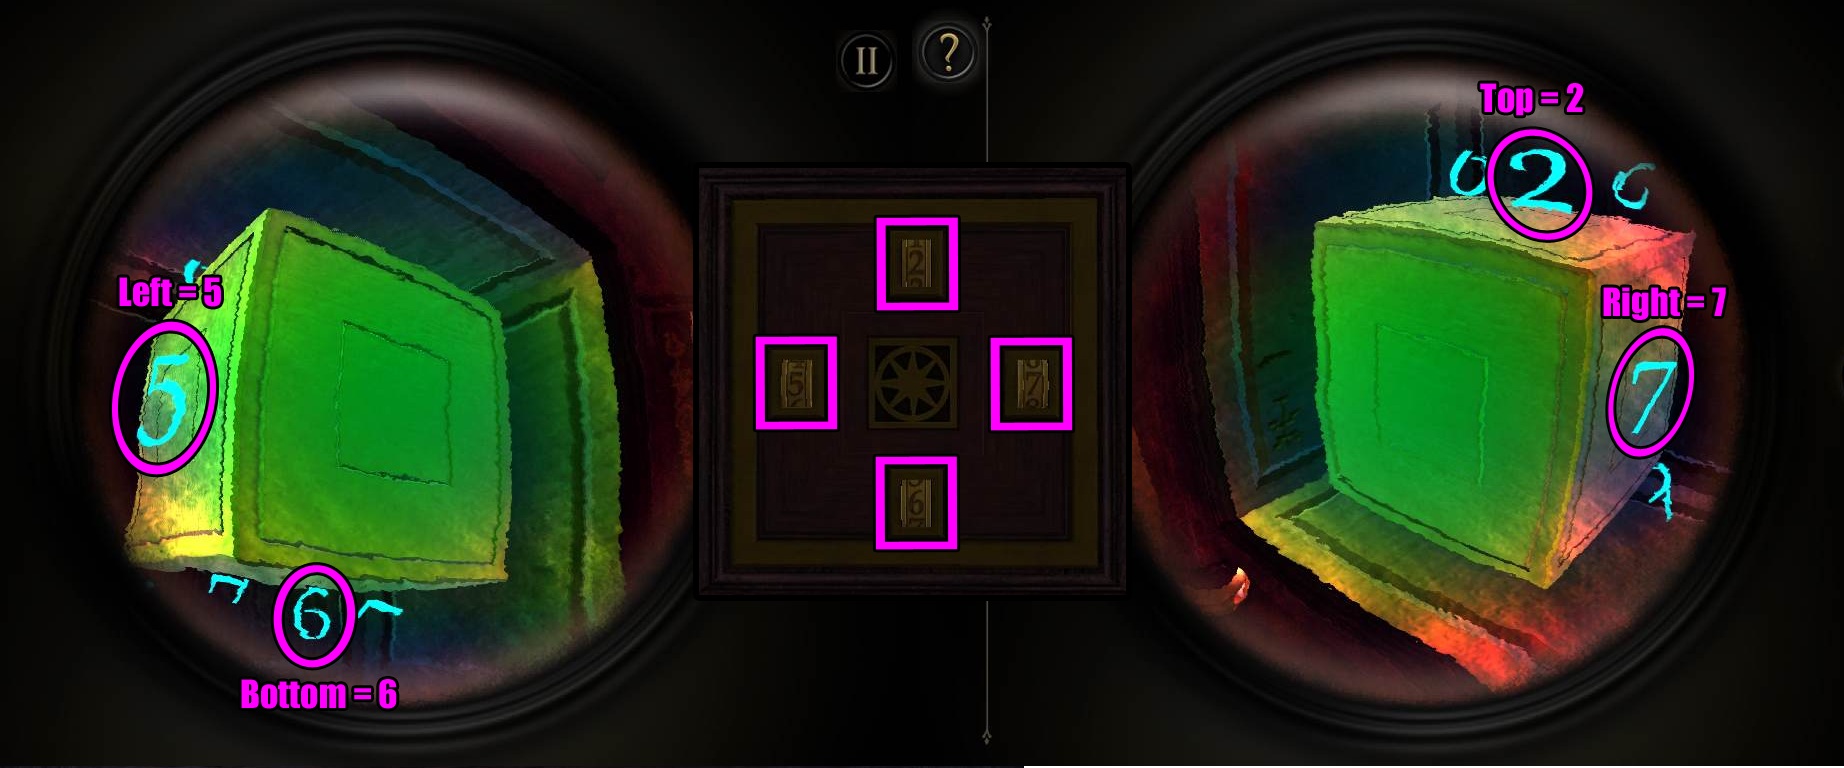
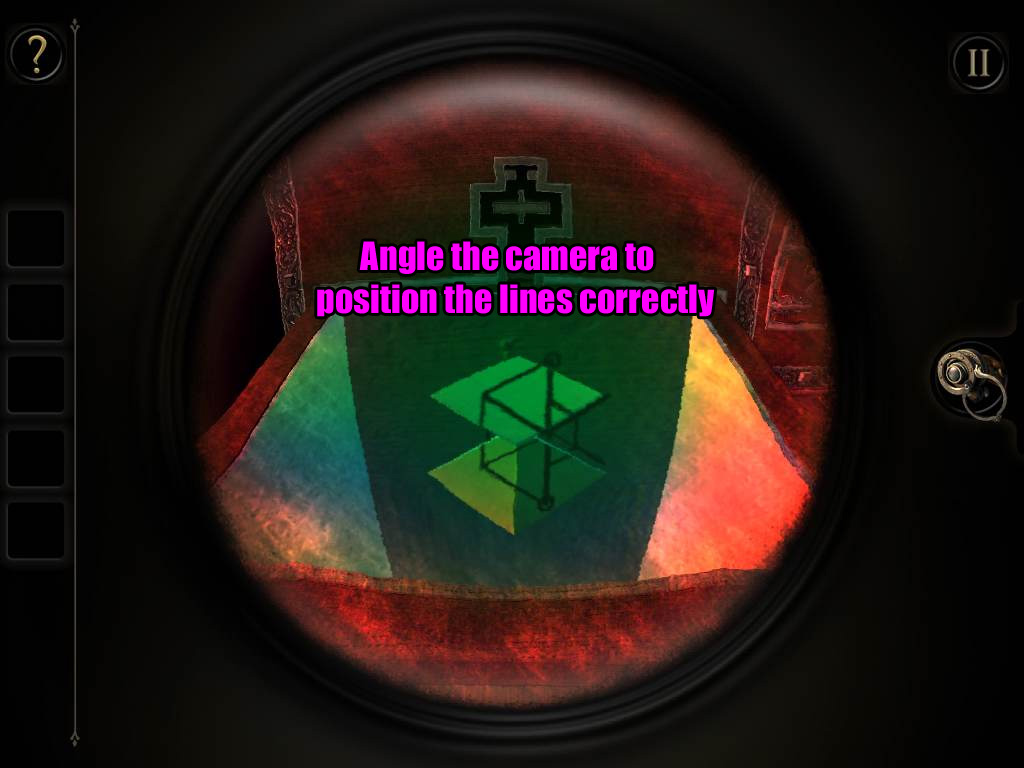
Zoom out to the full view of the box; put on the EYEPIECE, then turn to the left until you see the glowing shapes around a floating cube.
Double tap the cube to zoom in.
The shapes may look strange at first, but they will become much more familiar if you view them in the right perspective.
If you angle the camera correctly, you will see a unique number at each side of the cube.
View the left side of the cube to find the number 5.
View the right side of the cube to find the number 7.
View the top of the cube and turn it to the right to combine the shapes into the number 2.
View the bottom of the cube and turn it to the left to combine the shapes into the number 6.
While you're looking at the cube with the EYEPIECE on, inspect the left wall of the box containing the cube and note that there are more symbols carved inside.
Take off the EYEPIECE to view the lock on the box.
You've found all the numbers and their positions, so turn the dials to set each number.
Set the top dial to 2, the right dial to 7, the bottom dial to 6, and the left dial to 5.
Screenshot.
When the lock is opened, flip the switch in the center to release the large mechanism on the side of the box.
Zoom out and turn left to face the mechanism.
Inspect the rounded golden leg at the base of the box.
Swipe the middle of the leg in a clockwise motion to rotate it.
Take the revealed COTTON PIECE from the small cache.
Zoom out and face the mechanism again, then double tap to zoom in on the area above the golden plate at the lower right section of the mechanism.
Note that the golden, round object with the hole in the center "smells like burning".
Place the COTTON PIECE into the burner.
Swipe upwards or downwards on the slider to the left of the burner to create a spark and light the cotton.
Drag the small lever on the right side of the burner all the way up to raise the burner.
Zoom out and rotate the camera to view the left side of the mechanism.
Double tap the small door near the bottom of the left side.
Drag the latch off the knob on the small door to open it.
Insert the WIND-UP KEY into the winding mechanism to the left of the gears.
Drag the key in a clockwise motion to turn on the mechanism.
The camera will automatically shift to the front of the mechanism. From there, turn left to the side of the box with a row of letters at the top and a small, round plate with a keyhole symbol in the center.
If you look at the edge of that side of the box, you'll see a striped band at the top that looks very similar to the leg of the box where you found the cotton.
Double tap that gold band to zoom in, then swipe over it from left to right to raise the lid at the top.
Take the MINIATURE TELESCOPE from the cache under the lid.
Inspect the MINIATURE TELESCOPE in your inventory.
Rotate the disc at the front of the telescope so the arrows at the top and bottom of the lens are aligned.
Screenshot.
The length of the telescope will extend when the disc is aligned correctly.
Zoom out and return to the side of the box with the large mechanism.
Double tap the stand beside the spinning wheel to zoom in.
Place the extended MINIATURE TELESCOPE on the stand.
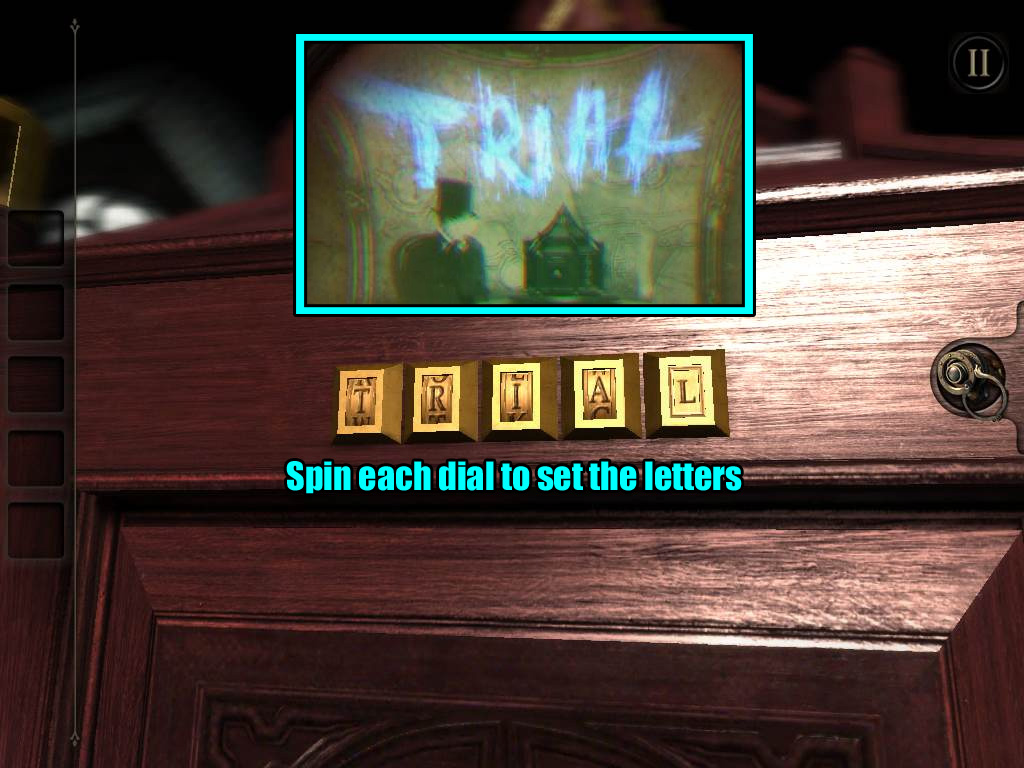
Rotate the camera to view the lens of the telscope.
Turn on the EYEPIECE and tap the lens to look at the projected image.
Watch the short clip and note the glowing word "TRIAL" written over the wall.
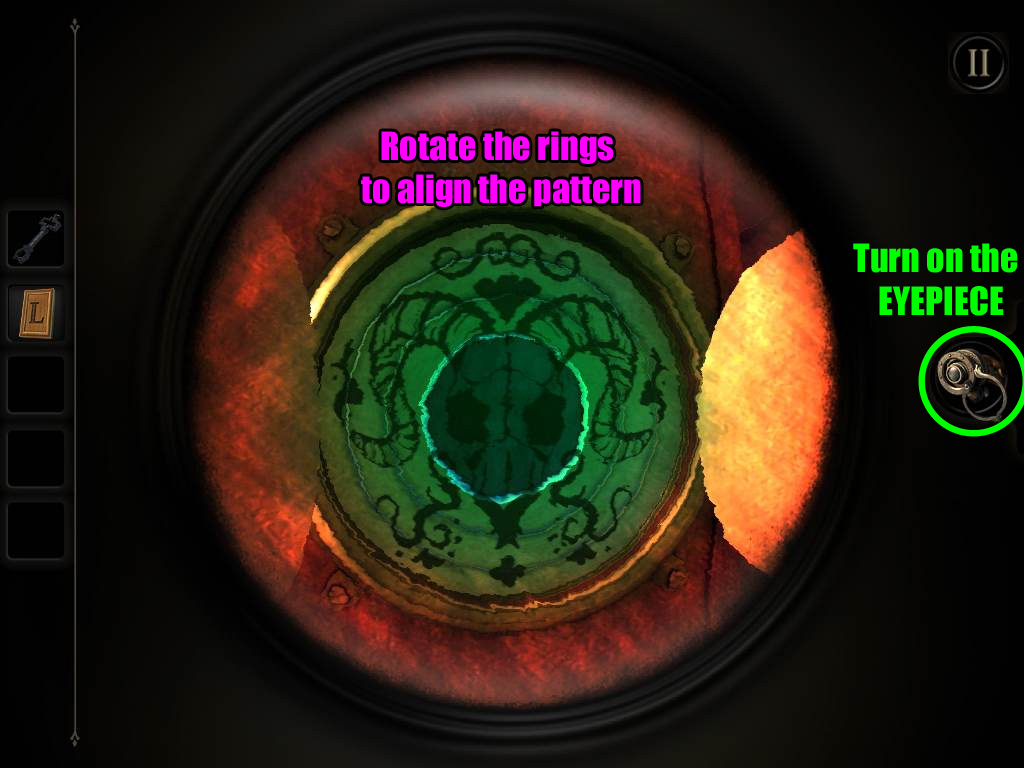
After you tap the screen to end the clip, the camera will automatically shift to the gold disc that is left of the telescope.
The disc will open, revealing a set of patterned rings.
If you try to rotate the rings normally, nothing happens.
Put on your EYEPIECE again to see the hidden pattern over the rings.
Tap and drag each ring to rotate it.
The center piece does not move, so use it to find the orientation of the pattern and solve from the inside out.
Align the rings correctly to complete the picture.
Screenshot.
After the puzzle is solved, a small door to the left of the disc will open, revealing the BRASS PLATE with the letter L inside.
Zoom out to the full view of the box and turn left to return to the side of the box with the row of letters at the top.
Double tap the letters to zoom in.
Add the BRASS PLATE to the empty space on the right to add the letter L to the lock.
Turn each dial up or down to spell out the password.
Remember the word you saw through the lens of the projector mechanism?
Rotate the dials to enter the word "TRIAL".
Screenshot.
This will open the first seal (the eye symbol) on the box.
Seal 2 - The Keyhole
After the lock is opened, a large safe will extend from the side of the box.
Double tap the lid at the top of the safe to zoom in.
Read the folded paper at the back section, and note the shape of the drawing.
Next, inspect the covered front section.
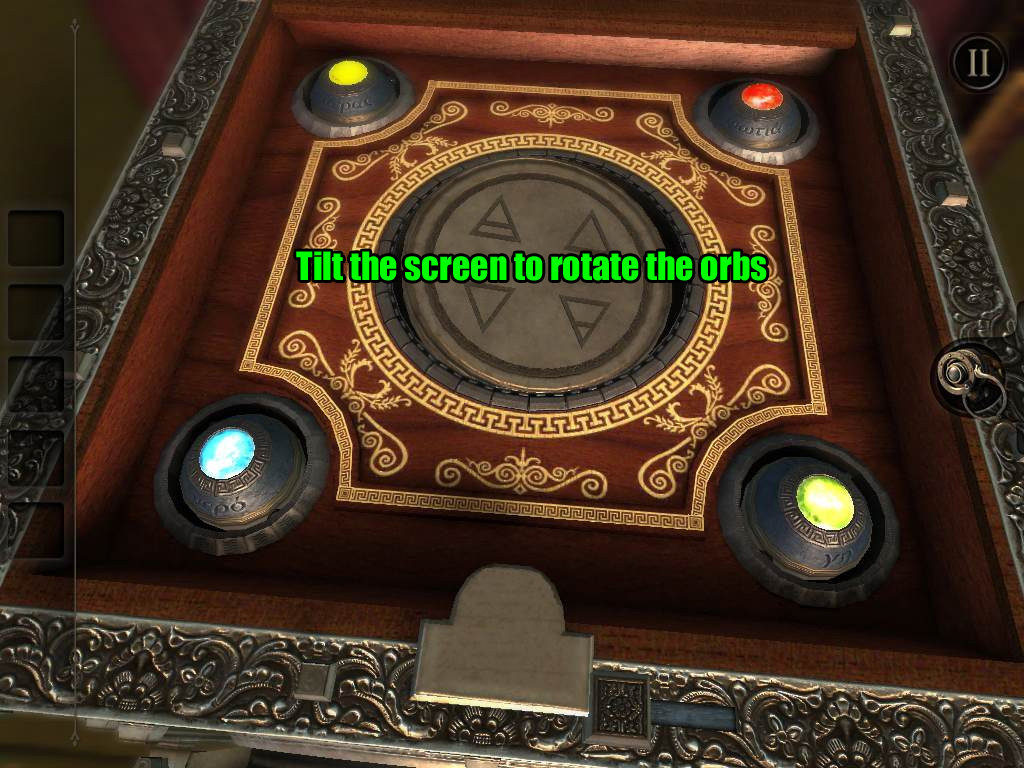
Move the slider beside the lock from the right to the left to open the lid.
Note the four orbs at the corners of the board - they seem to move a little, but how can you really get them rolling?
Tilt your device up, down, left, and right to move the orbs around.
When an orb is fully facing upwards, it will lock in place and the gem in the center will glow.
Screenshot.
The camera will automatically shift to a plate that extends from the right side of the safe.
Take a look at the shape on the note at the center of the plate.
Put on the EYEPIECE while viewing the plate to look through the plate and into the box below.
You will see two floating three-dimensional shapes and some writing on the left wall inside the box.
Angle the camera so that the patterns on the shapes are aligned to match the hexagonal symbol on the note you found on top of the plate.
Screenshot.
After the puzzle is solved, a board with a lock at the right side of the safe will be uncovered.
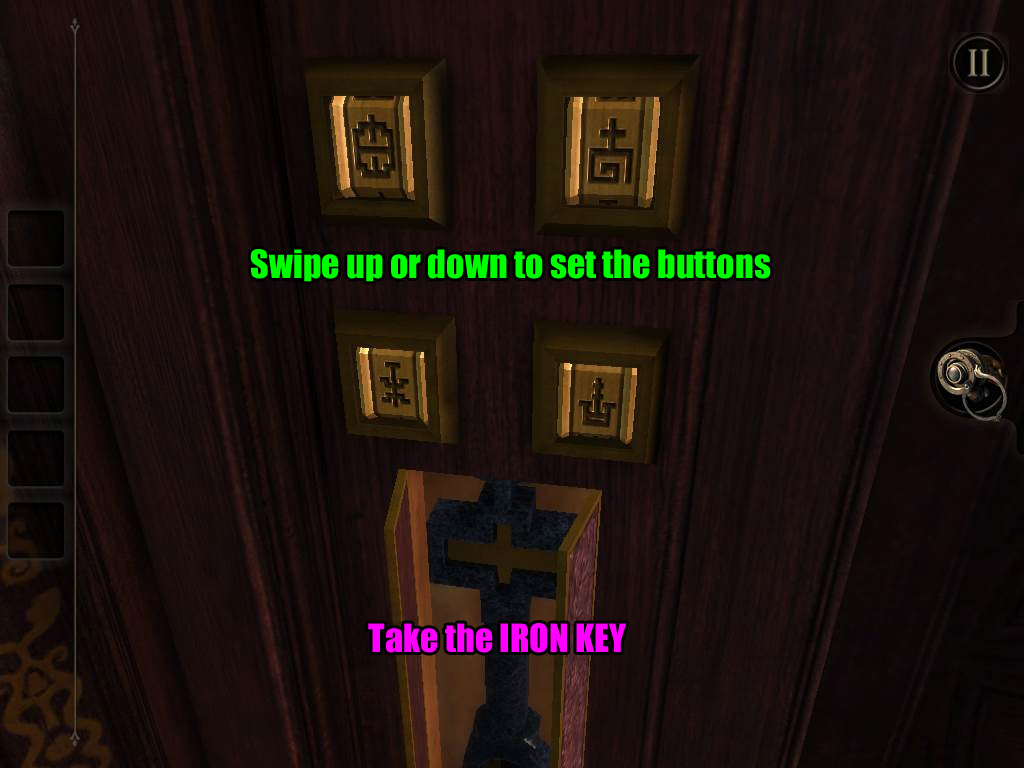
We've found the lock, but we're still missing a key. Zoom out and turn left to the side of the box that has four square buttons with a symbol carved on each button.
Do those symbols look familiar?
Each symbol is hidden at a different location around the box - you've seen at least two already.
You can identify which symbol belongs where by noting how the lines are positioned around it.
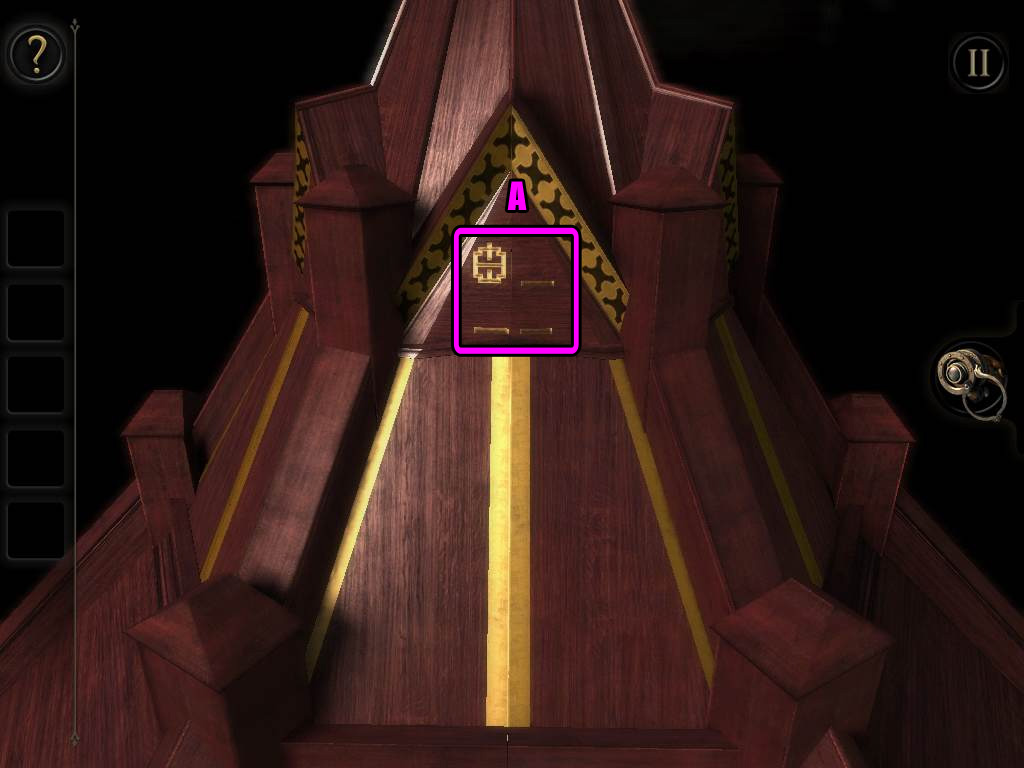
For example, if the symbol is shown at the upper right corner there are blank lines on the upper right, lower left, and lower right corners, then you know that symbol belongs to the upper left button.
The symbol belonging to the upper left button (A) is found in the middle of the triangular shape near the top tier of the box.
Screenshot.
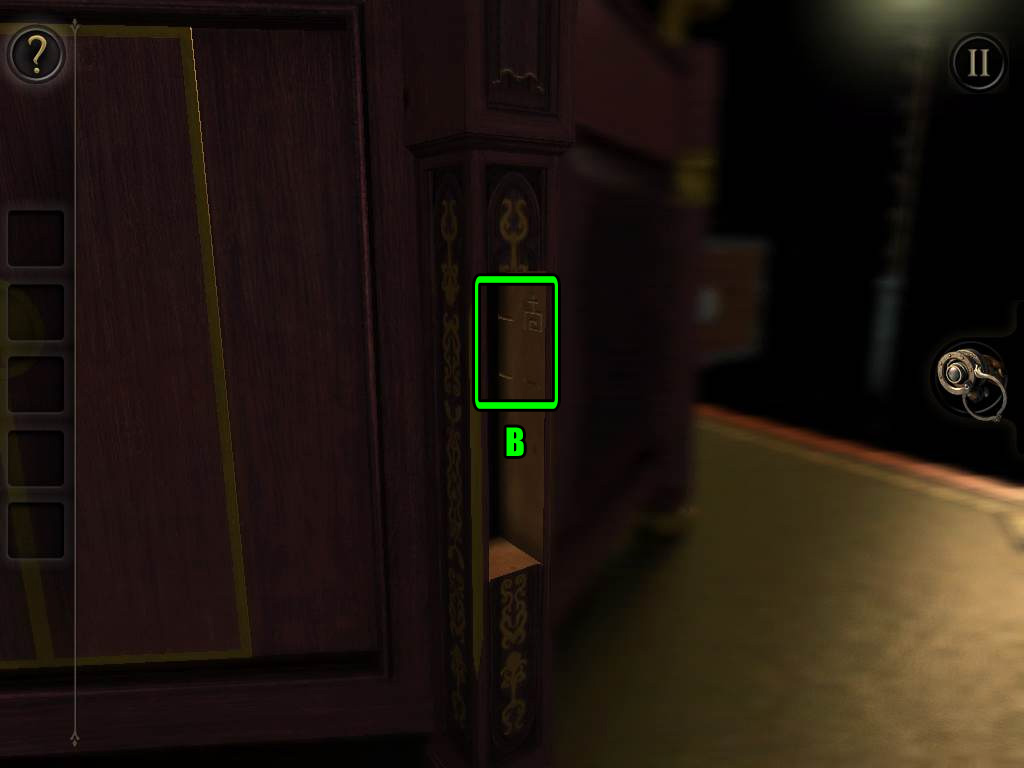
The symbol belonging to the upper right button (B) is found in the compartment at the edge of the box where you found the BOOK.
Screenshot.
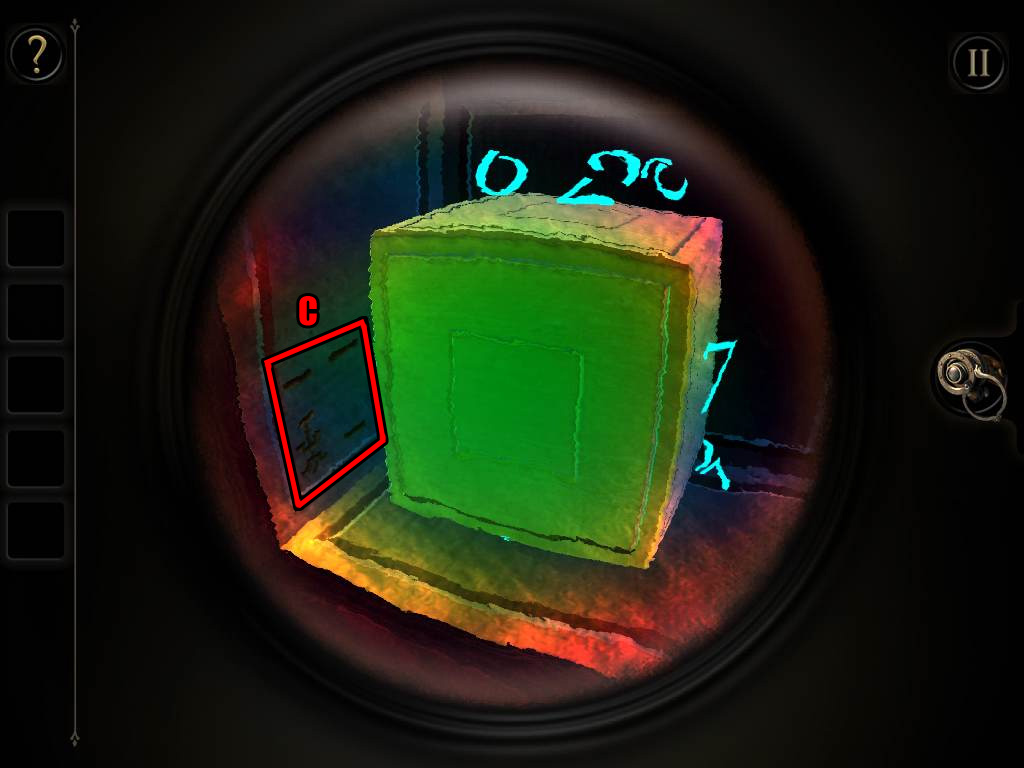
The symbol belonging to the lower left button (C) is found beside the cube with the glowing numbers around it. You will have to put on the EYEPIECE to see it.
Screenshot.
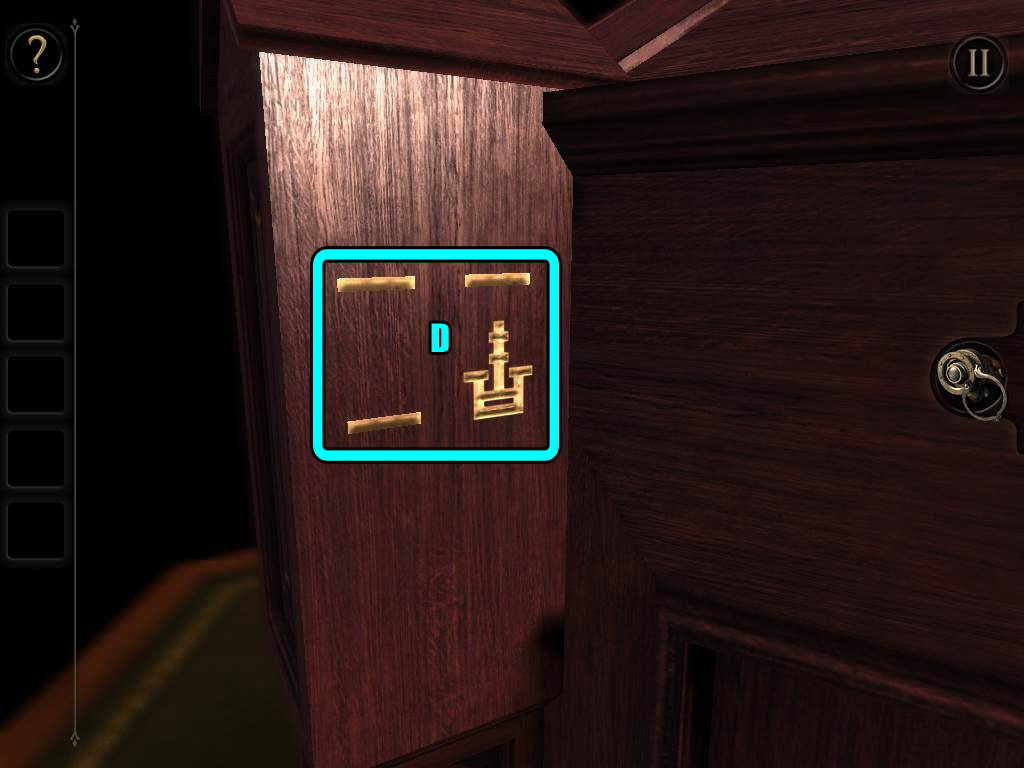
The symbol belonging to the lower right button (D) is found on the edge of the box just to the upper left of the area with the four symbol buttons.
Screenshot.
Drag the buttons up or down to set them to the correct symbols.
Screenshot.
Take the revealed IRON KEY from the compartment under the buttons.
Zoom out and return to the large board sticking out of the right side of the safe.
Insert the IRON KEY into the lock in the middle of the board, then turn the key to open it.
When the board retracts, look at the small drawer with the ornate handle just to the right.
Pull on the handle to open the drawer, then take the CABINET KEY inside.
Zoom out and rotate the camera to view the front of the safe.
Double tap the lock at the upper right corner for a closer look.
Put the CABINET KEY into the keyhole, then turn the key to open the lock.
After the round door opens, take the BRASS STAR inside of the safe.
Note that the safe will close again and the keyhole expands into a more ornate shape.
For now, zoom out again and turn to the side of the box that has the plate with a cog symbol.
Look at the very top tier of the box on that side to find an indentation of a star; double tap that area to zoom in.
Place the BRASS STAR into the indentation to open the panels all around the top tier of the box.
Tap the folded paper under the star to read it.
Turn the camera around to the other side of the tier to find a BRASS RING.
Zoom out completely and turn to the left side of the safe.
Double tap the round plate to zoom in.
Place the BRASS RING around the plate.
Drag the ring clockwise or counter-clockwise around the ring to move it.
Rotate the ring counter-clockwise to the first switch on the left; note how when the arrow passes by the switch, it raises up.
When the arrow on the ring passes by one of the switches in the correct order, the switch will be lifted.
The switches will be reset if the arrow passes by the wrong switch out of order.
Start at the switch under 1 dot on the left, then go right to the switch under 2 dots, then use trial-and-error to find the order for the rest of the switches.
Refer to the screenshot below and hit the switches in the following order to solve the puzzle.
Move counter-clockwise to hit the first switch.
Move clockwise to hit the second switch.
Move clockwise to hit the third switch.
Move counter-clockwise to hit the fourth switch.
Move clockwise to hit the fifth switch.
Move clockwise to hit the sixth switch.
Screenshot.
The round plate will extend into a tube from the left side of the safe when the puzzle is solved.
Tap and hold onto both switches, then drag them both upwards simultaneously.
Take the LARGE KEY from the tube.
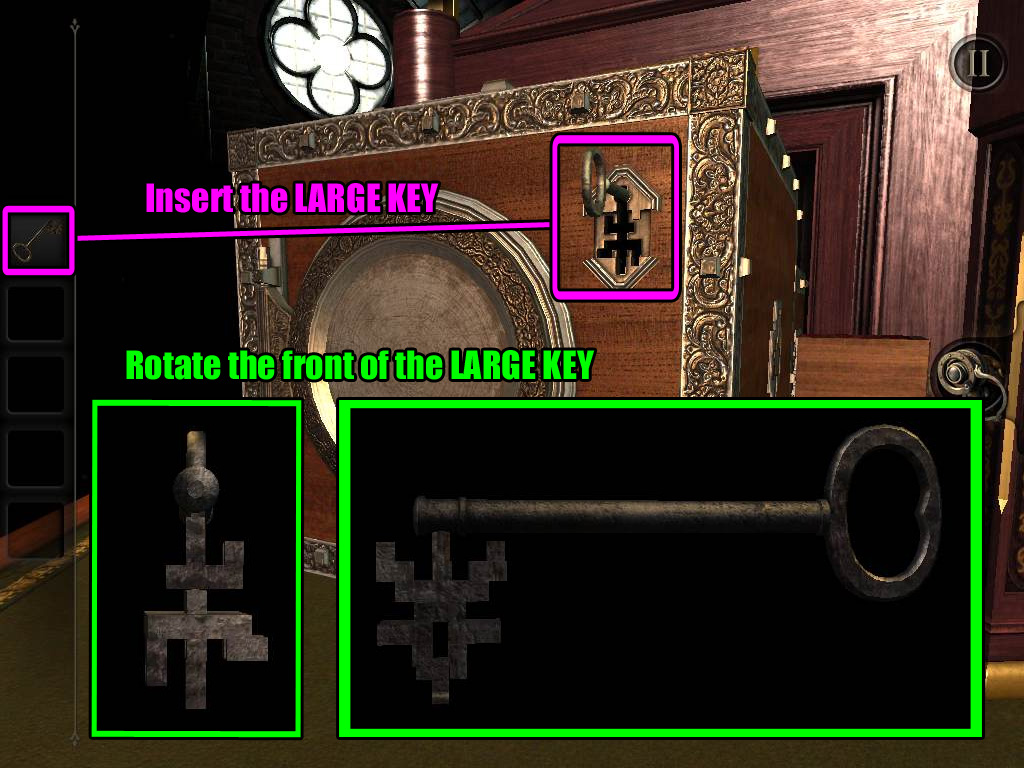
Zoom out and turn the camera back to the front of the safe, then double tap the keyhole at the upper right corner for a close-up view.
Inspect the LARGE KEY in your inventory, then turn the front of the key to fit the keyhole.
Screenshot.
Put the LARGE KEY in the keyhole, then turn it to open the lock.
Take the STAR EMBLEM PLATE from the opened safe.
Zoom out to the complete view of the box, then turn left to return to the side of the box with the cog symbol plate.
Tap the round space at the center of the doors under the cog plate to zoom in.
Insert the STAR EMBLEM PLATE into the round space.
This will open the second seal (the keyhole symbol) on the box.
Seal 3 - The Cog
After the second seal is opened, the star emblem plate will momentarily retract, then a large case will extend from the side of the box.
Inspect the left side of the case with the geared mechnism.
Drag the horizontal slider at the lower left area of the case from the right to the left to shift the gear above the crank to the left side.
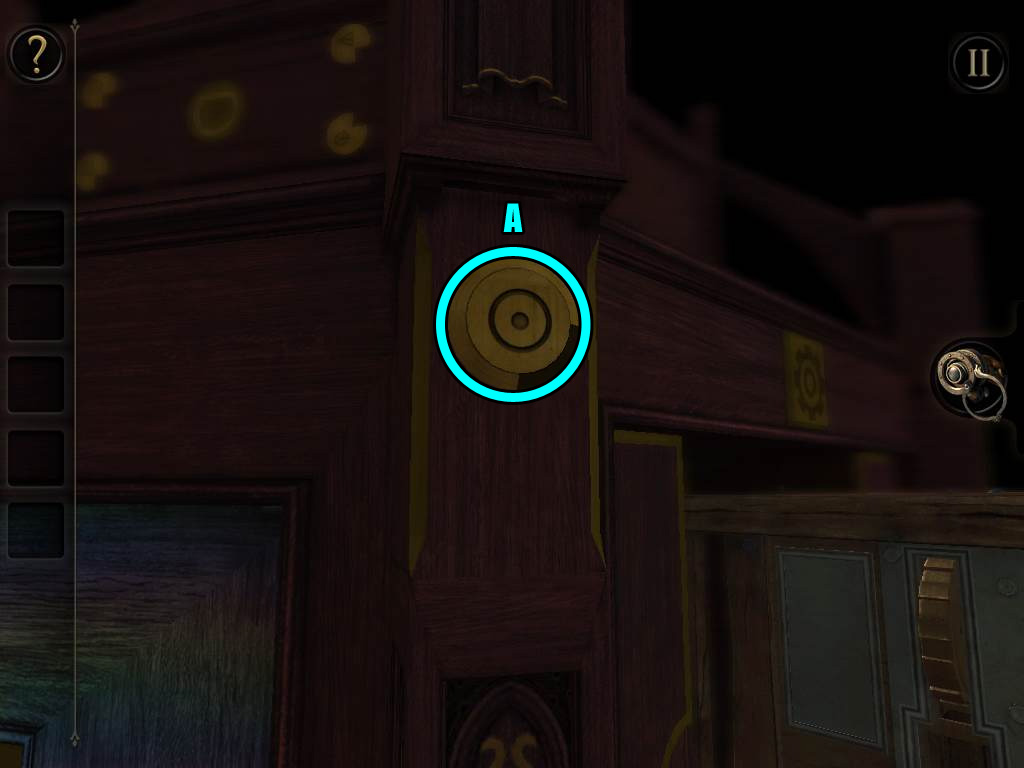
Turn the crank to rotate the gears, which wil move the vertical slider above the gears to the top.
The camera will automatically shift to a new puzzle on a panel at the middle tier of the box.
Around the handle in the center you can see four semi-circles that each have a unique symbol.
The first symbol
The first symbol, the circle with a dot in the center (A), is visible on the edge of the box just to the lower right of the puzzle.
If you rotate that symbol, you can see that its corresponding semi-circle at the puzzle will also rotate with it.
Turn the piece so that the cut-out section is at the lower right.
Screenshot.
The second symbol
The second symbol, the triangle split down the middle (B), can be found on a metal plate at the right side of the large case sticking out of the box.
Drag and hold the metal plate upwards to lift it, then rotate the revealed symbol so that the triangle is pointing upright and the cut-out area is at the lower left.
Screenshot.
The third symbol
The third symbol, of two squares (C), can be found in front of the knight figurine holding a mace.
Rotate the symbol so the cut-out section is at the upper right.
Screenshot.
The fourth symbol
The fourth symbol, a pentagon containing a star pattern (D), is beside the geared mechanism on the left side of the large case.
Rotate the symbol so the cut-out section is at the upper left.
Screenshot.
Return to the panel with the puzzle and drag the handle - if the semi-circles are positioned correctly, the drawer will open.
Screenshot.
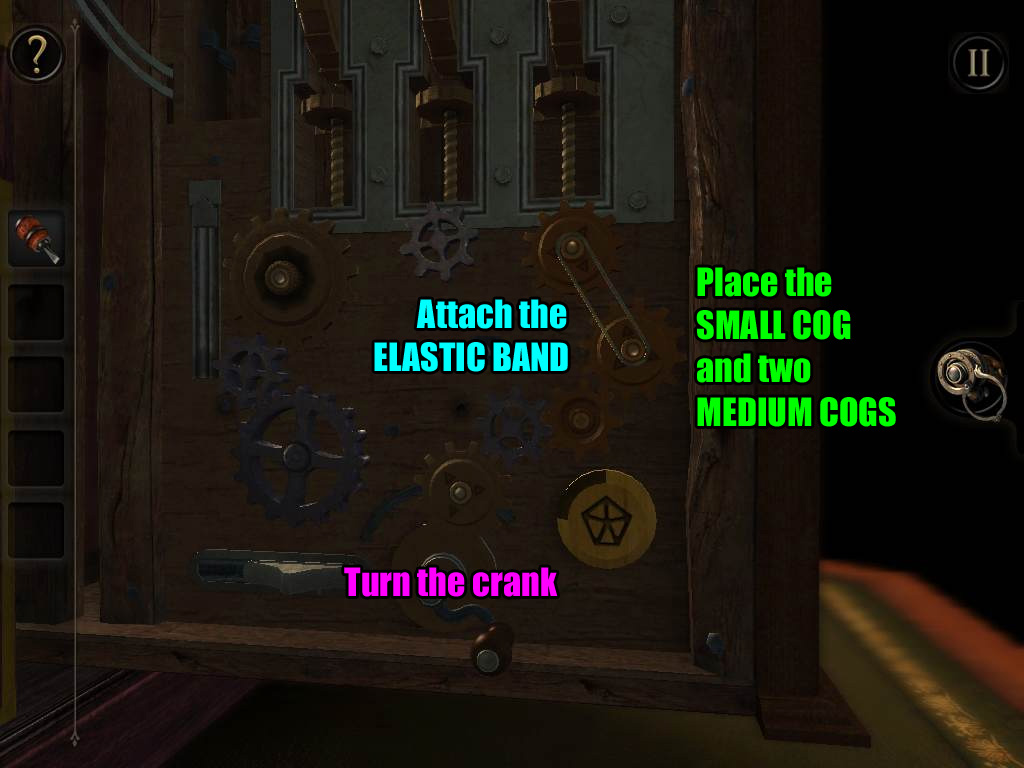
Take the ELASTIC BAND and the LARGE COG from the opened drawer.
Zoom out to the full view of the box and return to the cog mechanism on the left side of the large case.
Place the LARGE COG on the peg directly underneath the left spinning cog at the top of the mechanism.
Turn the crank counter-clockwise to rotate the gears and raise the left spinning cog.
Take the SCREWDRIVER from the uncovered compartment at the upper left corner.
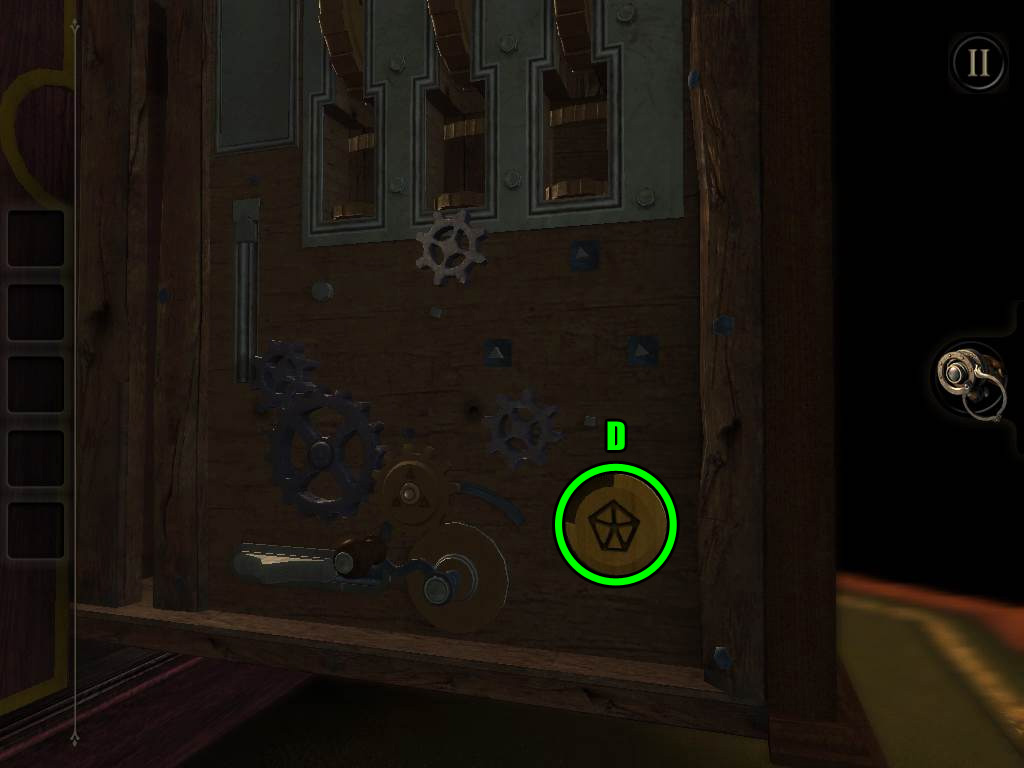
Zoom out again and turn to the right side of the case; double tap the metal plate at the lower left corner of that side for a closer look.
Put the SCREWDRIVER in each screw, then turn it counter-clockwise to remove the screw.
Take all the screws at the corners of the plate to remove it.
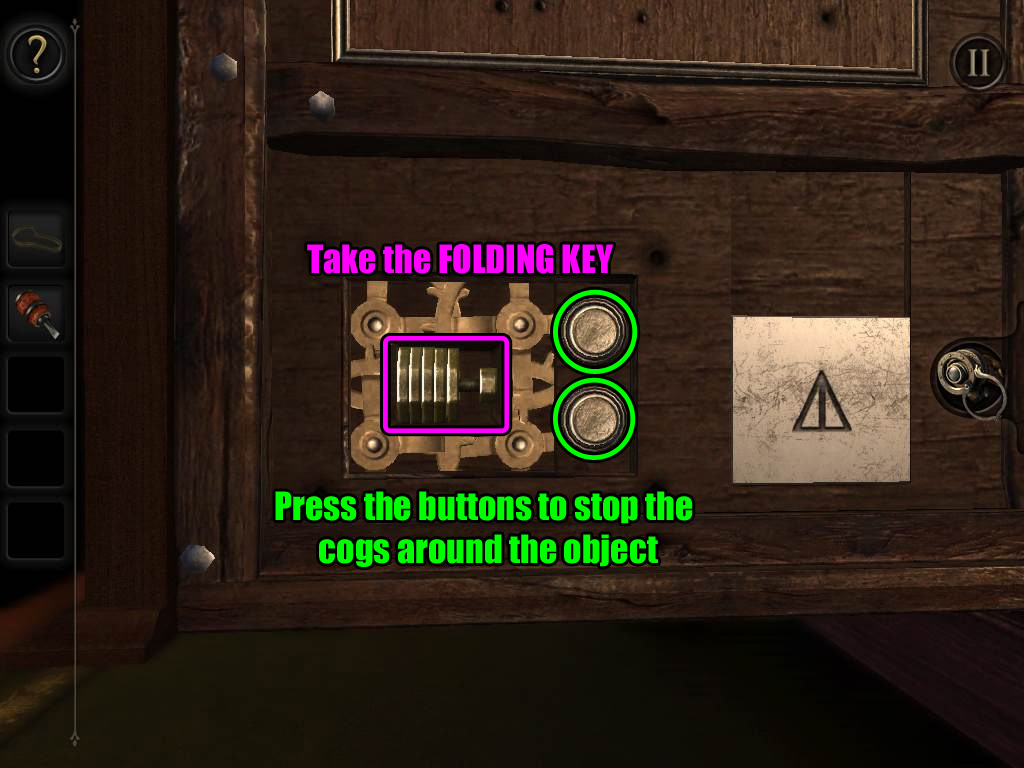
Four spinning cogs block the cache, but you can get past them by stopping the cogs at the right time.
Press and hold the top button to pause the upper right cog and lower left cog.
Press and hold the bottom button to pause the upper left cog and lower right cog.
Stop the cogs while their cut-out sides are positioned in a rectangular shape around the object in the cache.
Screenshot.
Take the FOLDING KEY between the cogs.
Zoom out to the full view of the box, then turn to the side of the box with the symbol buttons and the gold knight figurine.
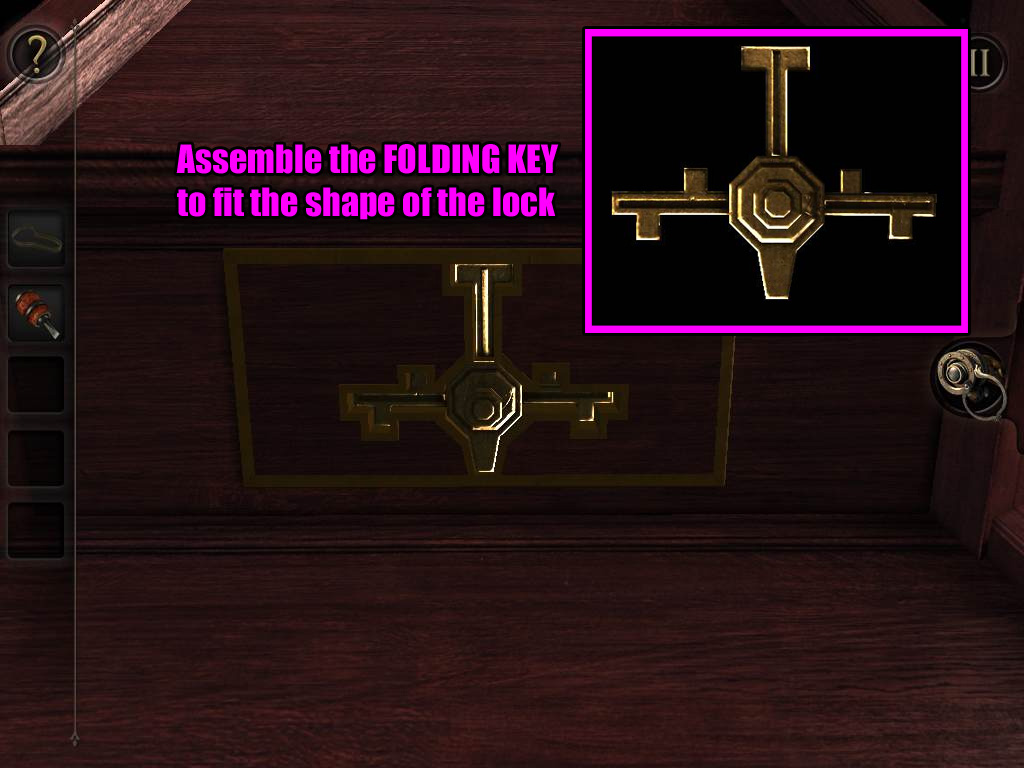
Double tap the drawer with the "oddly shaped indentation" in the middle tier of the box to take a closer look.
Inspect the FOLDING KEY in your inventory.
Extend the pieces of the folding key so that its shape will match the indentation on the drawer.
Tap and drag each piece to move it around the key.
Screenshot.
Insert the FOLDING KEY into the indentation to open the drawer.
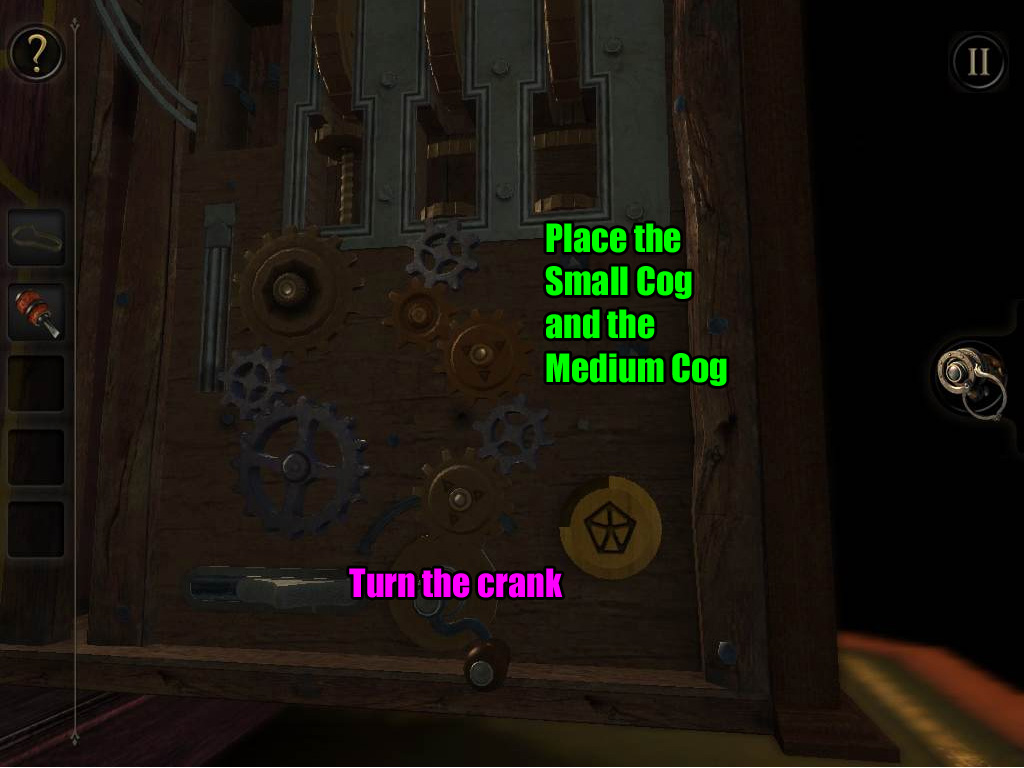
Look at the top of the drawer to find the SMALL COG and the MEDIUM COG (1/2).
Zoom out and return to the geared mechanism at the left side of the large case.
Move the horizontal slider at the lower left area to move the gear above the crank from the left to the right.
Place the SMALL COG on the square peg under the silver cog that is positioned below the middle spinning gear.
Place the MEDIUM COG (1/2) on the triangular peg beside the SMALL COG.
Turn the crank clockwise to spin the cogs and raise the middle rotating gear.
Screenshot.
The camera will automatically shift to the area under the clock at the front of the case.
Take the MEDIUM COG (2/2) over the small globe.
Return to the gear mechanism on the left side of the case.
Remove the SMALL COG and the MEDIUM COG (1/2) from the pegs.
Place the MEDIUM COG (1/2) on the triangular peg under the right spinning gear.
Place the MEDIUM COG (2/2) on the triangular peg to the lower right of the other medium-sized cog.
Place the ELASTIC BAND between the two medium-sized cogs to connect them.
Place the SMALL COG on the square peg between the silver cog at the lower left and the medium-sized cog at the lower right.
Turn the crank clockwise to rotate the gears and raise the spinning gear.
Screenshot.
Again, the camera will automatically shift to the clock at the front of the case.
Press the button above the upper left side of the clock to turn the gears at the upper right side.
Take the revealed STEEL TUBE from the compartment between the button and gears.
Inspect the STEEL TUBE in your inventory.
Drag the cap off the top of the tube to pull out the SMALL KEY.
Drag the OLD PHOTOGRAPH rolled up inside the tube; flip the photo over and note the message "Rev. 6:05" written on the back.
Zoom out and turn the camera to the right side of the case.
Double tap the large square panel on the right side to zoom in.
Put the SMALL KEY in the thin keyhole at the left side of the panel, then turn the key to open the lock.
The unlocked panel will move to uncover a board with sliding plate with a familiar hexagonal pattern.
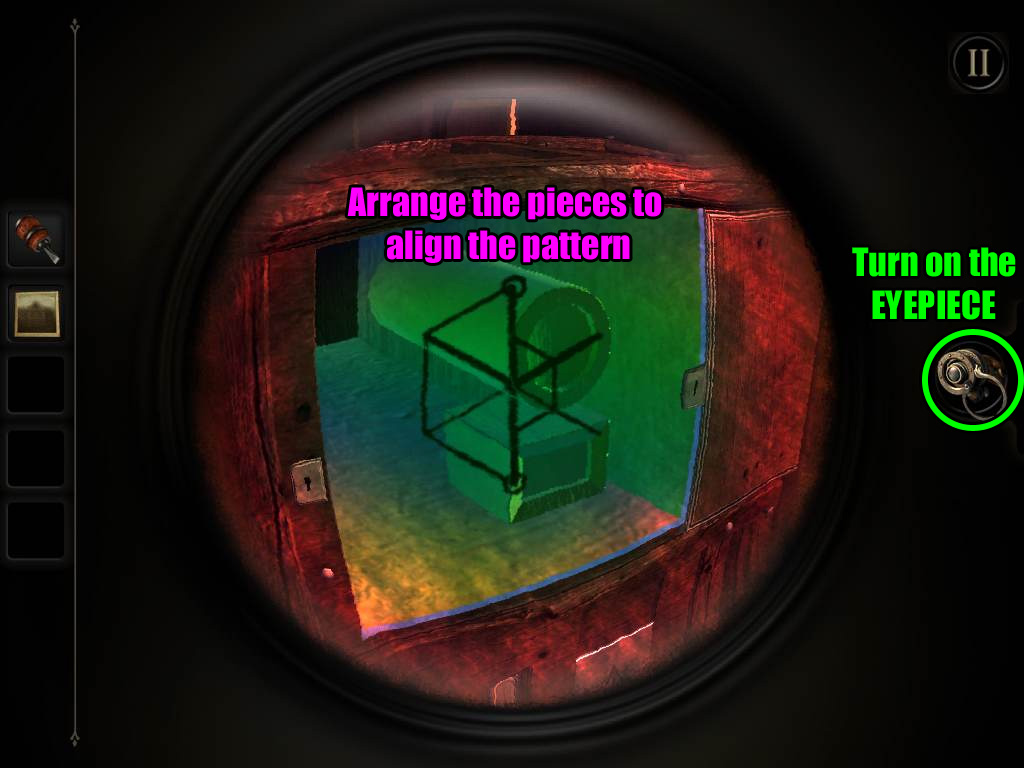
Put on the EYEPIECE to see through the board. You will now see two different three-dimensional shapes behind the board.
Tap and drag the block to move it from left to right.
Rotate the front of the cylinder-shaped object to turn it clockwise or counter-clockwise.
Angle the camera and move the objects to recreate the pattern found on the slider on the board while the eyepiece is off.
Screenshot.
After the puzzle is solved, take the SILVER SHIELD from the center of the board.
Zoom out to the full view of the box, then inspect the gold knight figurine at the top tier.
Place the SILVER SHIELD in front of the gold knight.
Take the GEMSTONE from the figurine's back.
Zoom out again and turn to the front of the large case.
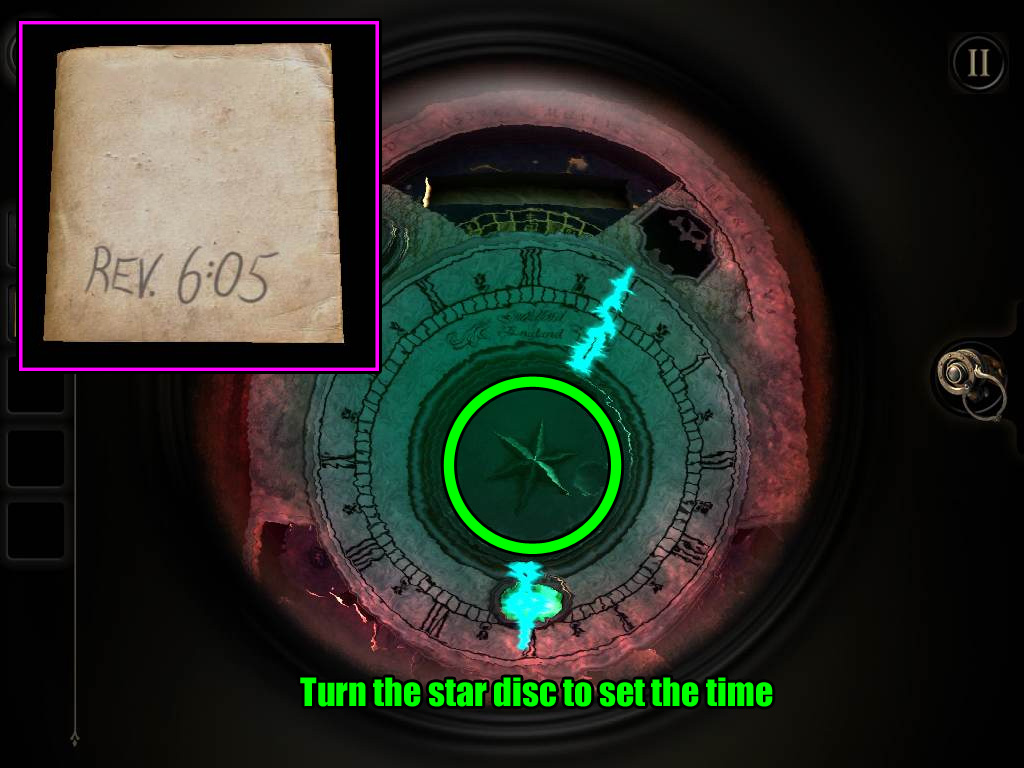
Double tap the clock at the front of the case for a close-up view.
Insert the GEMSTONE into the socket above the number 6 on the face of the clock.
Turn on the EYEPIECE to view the hands of clock.
Rotate the dial with the star symbol at the center of the clock face to turn the hands.
Do you remember what time to set the clock to? You've seen the solution already
Check the back of the OLD PHOTOGRAPH again to find the time 6:05, then set the hands of the clock accordingly.
Screenshot.
When the puzzle is solved, the third and final seal of the box will be unlocked.
Chapter 3
Part 1
You start the chapter facing the globe in the base of the table.
Put on the EYEPIECE and turn left until you see an ornately designed circular plate.
At the edge of the table base to the right of the plate you will see a small maker's plaque with a brightly glowing fingerprint on it - double tap the plaque to zoom in.
Remove the EYEPIECE, then tap and drag the plaque to the left to remove it.
Drag the uncovered switch downwards.
The camera will automatically shift to the compartment opened just to the right of the plaque.
Read the folded paper, then take the PUZZLE BOX.
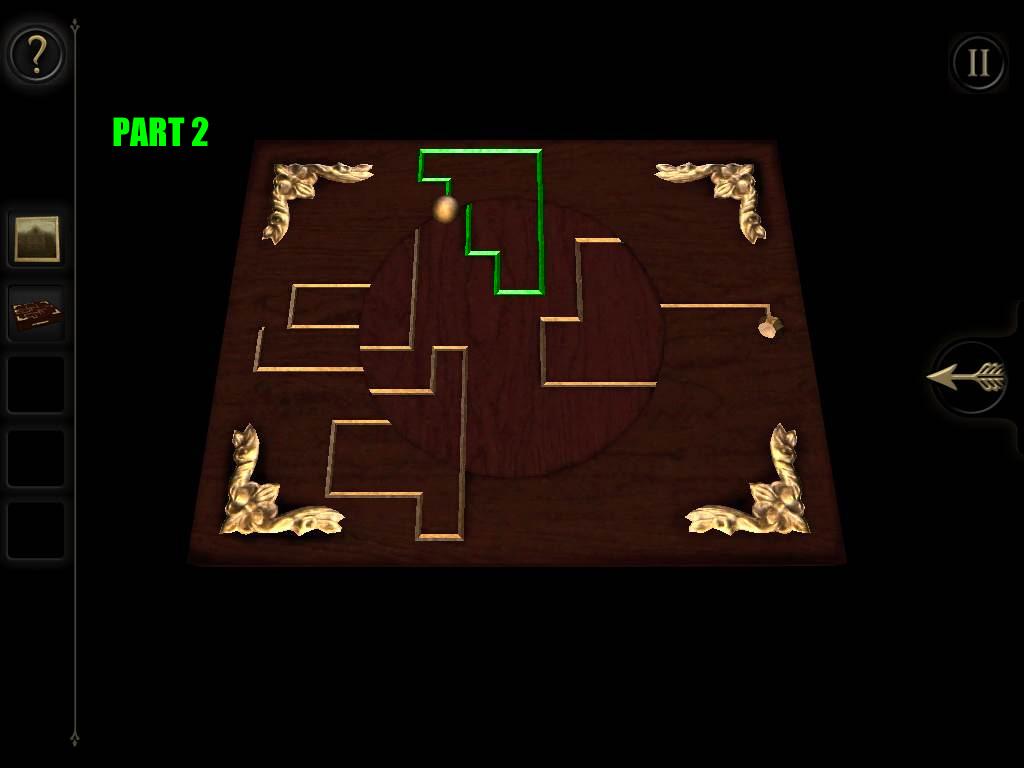
Inspect the PUZZLE BOX in your inventory.
Move the gold ball along the track from the left side to the hole at the right side.
Tap and drag to move the ball along the track.
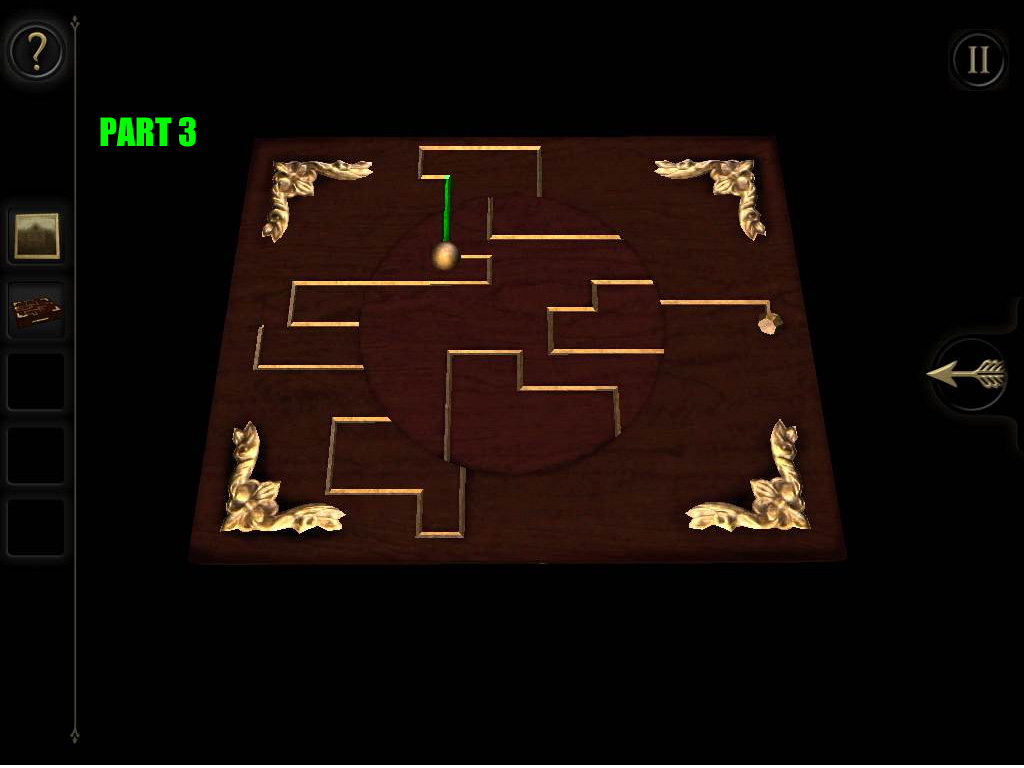
Turn the center of the board to rotate the pieces of the track inside the circle.
Refer to the screenshots below for the following solution.
First, drag the ball all the way towards the right to the end of the connected track inside the circle.
Part 1.
Rotate the center of the board clockwise to move the ball to the top.
Drag the ball to the end of the top track.
Part 2.
Rotate the center clockwise again to move a new piece of the center track to the top.
Drag the ball just slightly down so that it is on the center track.
Part 3.
Turn the center counter-clockwise again to connect the center track with the bottom of the board.
Drag the ball down to the end of the bottom track.
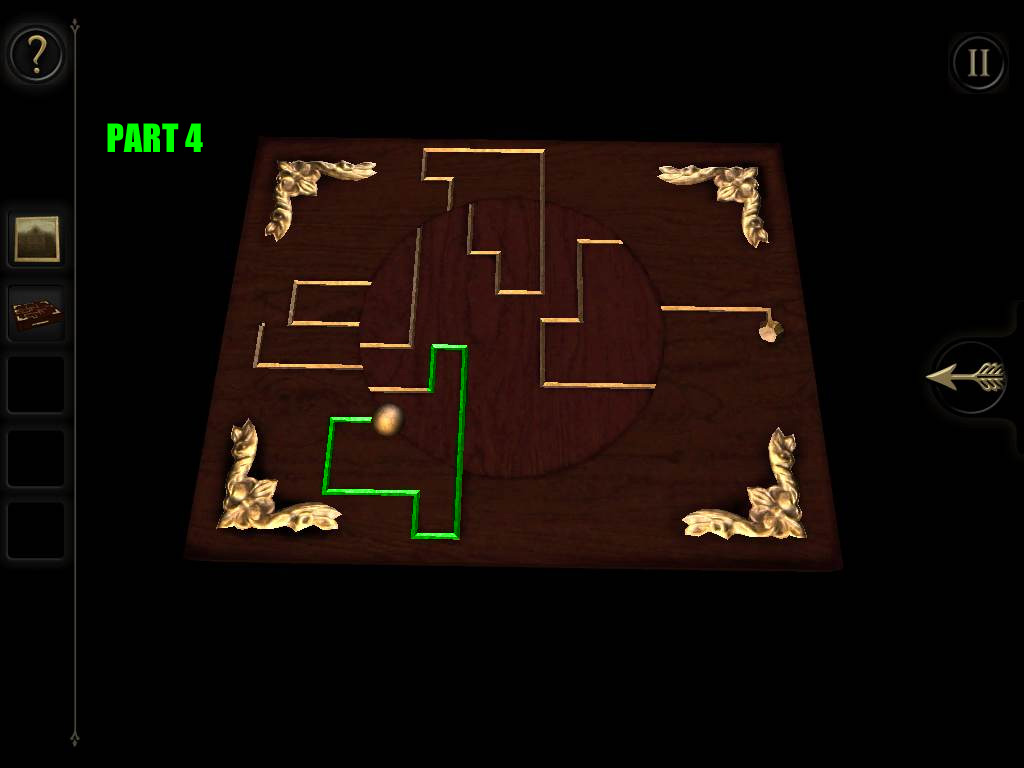
Part 4.
Rotate the center counter-clockwise to connect a new piece of the center track with the bottom section.
Drag the ball to the end of the connected center piece.
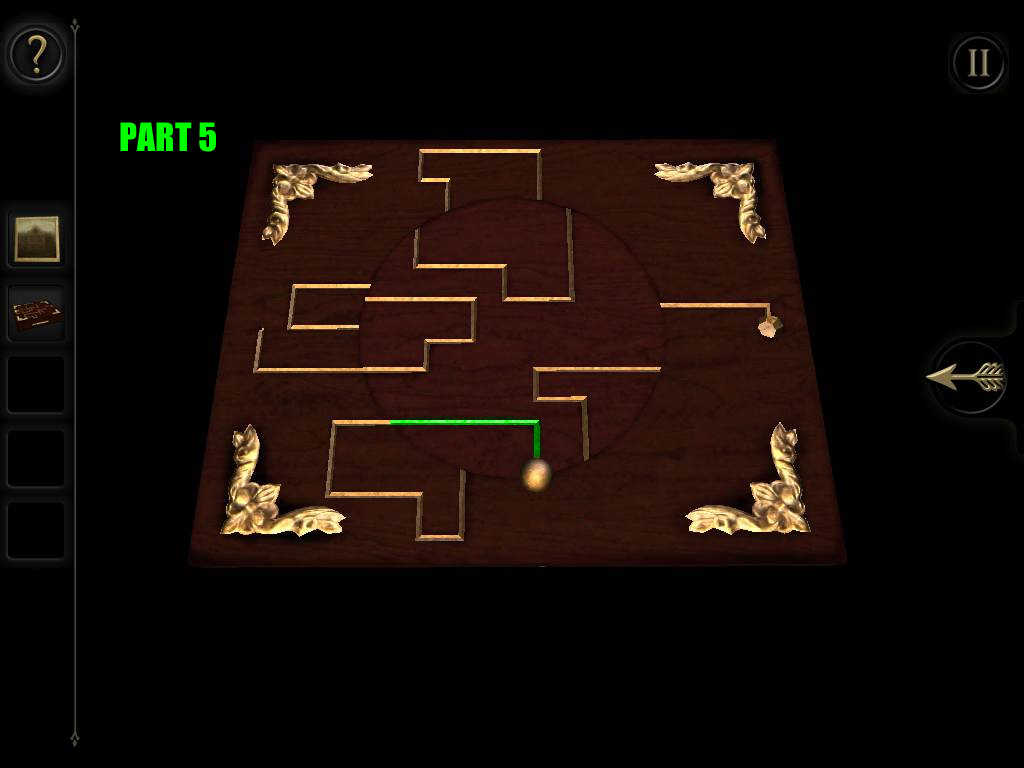
Part 5.
Rotate the center counter-clockwise to connect it to the right side of the board, then drag the ball all the way right to the hole.
Part 6.
After the puzzle is solved, take the KEY from the drawer that extends from the puzzle box.
Zoom out to the full view of the table base and turn right until you see an ornate lock and a large, gold dial.
Double tap the lock to zoom in.
Insert the KEY into the lock, then turn the key to pull the bar out of the gold dial.
Tap and drag the dial to move it clockwise or counter-clockwise.
As the arrow on the dial passes by the switches, it will raise or lower them.
If the switch is hit in the correct order it will go up, but if an incorrect switch is passed, then all the switches will reset and go down.
First, turn the dial counter-clockwise to raise 5 switches and stop.
Next, turn the dial clockwise past the 5 raised switches, then continue to move right to lift another 4 switches and stop.
Third, turn the dial counter-clockwise again all the way to the end of the switches on the left side of the dial.
Lastly, turn the dial clockwise all the way to the right end of the switches.
Screenshot.
After the dial is lowered, take the SQUARE PEG from the revealed compartment.
Place the OLD PHOTOGRAPH on the stand in front of the lens.
Turn on the EYEPIECE, then look through the lens to view the short video clip.
Note the word "SIGIL" at the end of the cut-scene.
Remove the EYEPIECE and zoom out to the full view of the table.
Part 2
Turn left to face the plain wooden circle on the side between the gold disc puzzle you just solved and the large globe.
Double tap the wood circle for a closer look.
Drag the small switch at the lower-right side of the circle all the way down.
Put on the EYEPIECE again to see a hidden ornate disc over the wood circle.
Note how there is a rectangular space towards the top of the disc.
Drag the disc to rotate it and position the space at the left side of the circle.
Drag the left tile from the center of the circle into the space in the disc.
Rotate the disc to move the tile to the space at the lower right section of the circle.
Drag the tile down out of the disc and into the empty space.
Rotate the disc to position the space in the disc on the right side of the circle.
Drag the right tile from the center into the space in the disc to clear the area at the center of the circle.
Place the SQUARE PEG in the square indentation.
The camera will automatically shift to the small box with letter dials underneath the globe.
Drag the dials up or down to set the letters and spell the password.
Enter in the word "SIGIL" that you found from viewing the old photograph.
Screenshot.
Read the folded note and take the BLUE CRYSTAL inside the opened drawer.
Zoom all the way out to the full view of the base of the table.
Turn to face the edge of the table with a T-shaped slot at the top and an "irregularly shaped hole" at the bottom.
Double tap the hole for a closer look.
Place the BLUE CRYSTAL into the indentation to create a light that shines into the lens above the crystal.
Swipe from right to left over the lens to rotate it and focus the beam of light.
Take the WEIGHTED FLYWHEEL from the revealed compartment that lowers above the top of the beam of light.
Zoom out and turn left to side of the table with the large, ornately designed square.
Inspect the small mechanism below the lower left corner of the square.
Place the WEIGHTED FLYWHEEL on the heptagonal peg beside the matching flywheel.
Hold a finger on each of the two switches below the lip holding the flywheels, then drag both switches from left to right simultaneously.
Pull the lowered handle to open the drawer above the wheels.
Take the REFLECTOR (1/2) inside the opened drawer.
Tap the small square-shaped indentation inside the drawer to reveal a hidden compartment containing a HEXAGONAL MAP PIECE.
Return to the side of the table with the glowing light beam.
Double tap the slot at the top of the light beam for a close-up view.
Insert the REFLECTOR (1/2) in the right side of the slot.
The camera will automatically shift to the button panel just underneath the surface of the table.
You can press either button to set off a ticking timer, but can you find what's changed before the time runs out?
All along the table just underneath the surface are small wooden beams with a square panel at the end.
Press the right button, zoom out, and move to the next beam at the right. You will see a find a new button panel where before there was only another square end.
Zoom in and quickly push the next button to extend the timer, indicated by the arrow moving across the meter.
Zoom out again and continue to look around the table for a new button panel that is located above the large, ornately decorated square.
Quickly press the third button, zoom out, and continue to turn around the table to the beam at the upper left side of the ornate circle.
Above the side with the globe you will find that the square panel has opened to reveal a secret compartment.
Look inside the compartment and take the STAR MAP PIECE.
Return to the original button panel; you'll see the right button has darkened.
This time, press the left button to start a new timer.
Turn to the opposite side of the table and look for the second button panel in the beam between the Q-shaped wooden board and the gold disc.
Quickly press the second button and turn right to find the new button panel on the side of the table with the focused white light.
Press the third button, then zoom out and turn to the beam above the large globe.
Look inside the revealed compartment and take the BRASS FOLDING KEY inside.
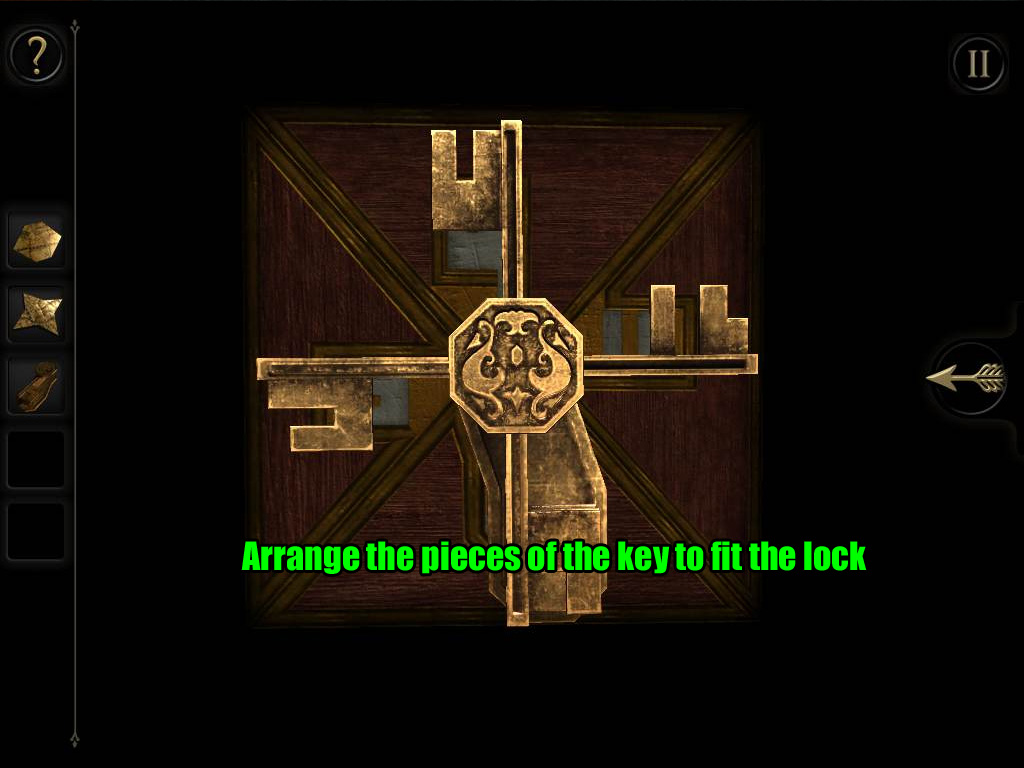
Turn to the side of the table with "a cross-keys emblem cut into the wood".
Double tab to zoom in on the emblem.
Note the shape of the emblem, then inspect the BRASS FOLDING KEY in your inventory.
Extend the sides of the key to fit the emblem.
Tap and drag each key piece to move it away from the handle.
Inspect the shape of each key and see how it relates to the shape of one of the indentations of the emblem.
Find the three keys that fit the left, top, and right sides, then move the other keys down in front of the handle.
Screenshot.
Insert the BRASS FOLDING KEY into the emblem to open it.
Take the revealed REFLECTOR (2/2) in the compartment at the center of the emblem.
Part 3
Zoom out and turn to the side of the box with the focused beam of light.
Double tap the reflector at the top of the light for a closer look.
Add the second REFLECTOR to the mirror to direct the light to the left.
The camera will automatically shift left to the large ornate square, which will lift to reveal an area covered in reflective mirrors. But where is the light?
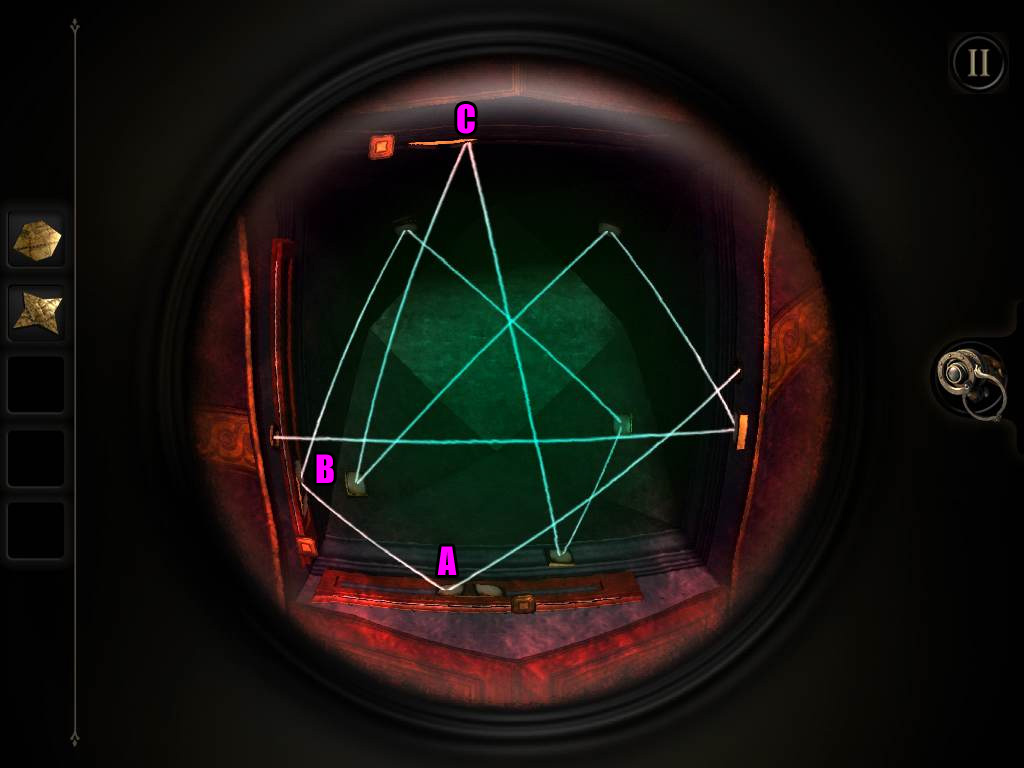
Put on the EYEPIECE to see the glowing beam of light in a diagonal line across the lower right area of the box.
Move the slider at the bottom of the box (A) so that the left mirror on the slider reflects the light to the left side of the box.
Move the slider at the left side of the box (B) so that the top mirror on the slider reflects the light to the top of the box.
Move the slider at the top of the box (C) so that the right mirror on the slider reflects the light into the hole at the left side of the box.
Screenshot.
When the puzzle is solved, the orbs on the surface of the table will light and project constellations around the room.
The camera will automatically shift to the small compartment under the surface of the table just below the glowing gold orb.
Take the ARROW MAP PIECE from the compartment.
Zoom out and turn to the side of the table with the large globe, then double tap the globe to zoom in.
Swipe left or right over the globe to spin it.
Turn the globe and look for a hole that is shaped like a star.
Put the STAR MAP PIECE into the hole to flip the small door at the lower right side of the globe.
Turn the globe and look for a hole that is shaped like an arrow.
Place the ARROW MAP PIECE into the hole to flip another small door at the lower left side of the globe.
Turn the globe once more and look for a hole that is shaped like a hexagon.
Put the HEXAGONAL MAP PIECE into the hole to flip the small door at the upper right side of the globe, revealing a WINDING HANDLE in front of it.
Zoom out and turn to the side of the table with the ornately designed circle and double tap it to zoom in.
Insert the WINDING HANDLE into the small, square hole beside the circle.
Rotate the handle clockwise to remove the round plate and reveal a plain board.
Put on the EYEPIECE to see the three-dimensional space behind the board.
Swipe left or right across the floating disc to rotate the glowing shapes above it.
Align the shapes and the angle of the camera to recreate the hexagonal symbol that you've found in previous chapters.
Use the stationary pattern to find the orientation of the rest of the symbol.
Screenshot.
After the puzzle is solved, take the INTRICATE WOODEN BOX from the center of the circle.
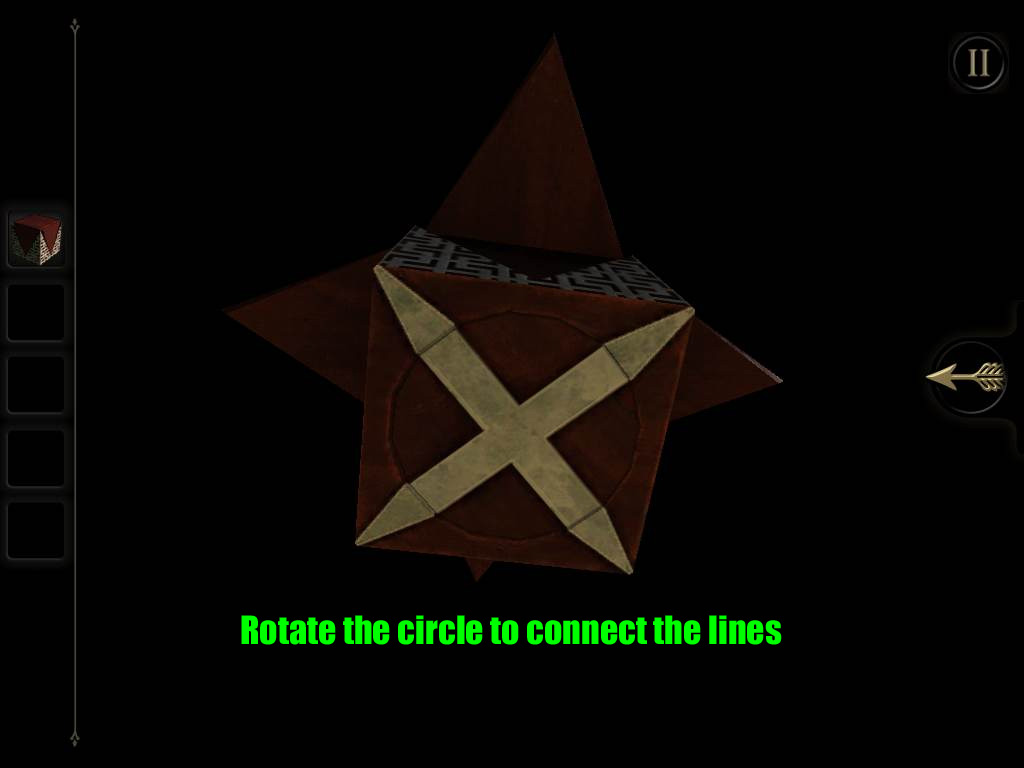
Inspect the INTRICATE WOODEN BOX in your inventory.
Turn the box to look at the underside.
Rotate the circle at the bottom of the box to connect the lines of the cross with the lines at the corners of the box to unfold the top of the box.
Screenshot.
Zoom out to the full view of the box and turn to the side with the cross-keys emblem cut into the wood.
Inspect the star-shaped indentation above the emblem.
Place the unfolded INTRICATE WOODEN BOX into the indentation.
The camera will automatically shift to the telescope raised out of the top of the table.
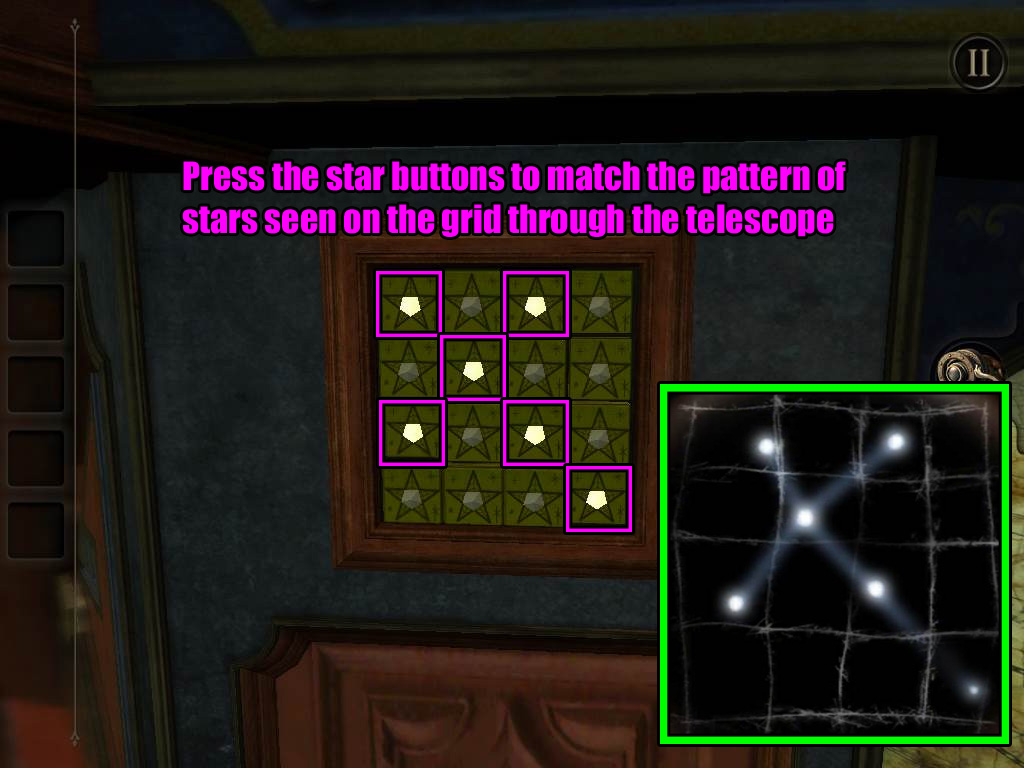
Double tap the lens of the telescope to look through it.
Note the cross-shaped pattern of the glowing points on the grid.
Zoom out and turn to the side of the table with rows of star-shaped buttons.
Press the buttons to light the stars in the correct order.
Enter the same pattern of lights seen on the grid through the telescope.
Screenshot.
The camera will shift to the opened cache below the star buttons.
Take the SQUARE MAP PIECE, then read the folded note inside the cache.
Zoom out and return to the globe.
Turn the globe and find the hole that is shaped like a square.
Place the SQUARE MAP PIECE into the hole to turn the last small door at the upper left side.
The camera will shift to the handle that extends from under the table at the beam above the globe.
Drag the handle downwards to open the top of the table.
Chapter 4
You start the chapter facing the middle of the large star chart on the surface of the table.
Turn slightly to the right to find the small grille near the edge of the table.
Double tap the grille for a close-up view.
Move the upper slider to the right and the lower slider to the left.
Tilt the whole device to get the sliders to move from side to side.
When a slider reaches the middle of the grille, it will glow and lock in place.
Screenshot.
Read the note and take the BRASS WINDING HANDLE from the revealed cache above the grille.
Zoom out and turn left to return to the starting point where you will see three semi-circles aligned vertically.
Double tap the small grey rectangle under the bottom semi-circle for a closer look.
Tap the rectangle to reveal a small socket.
Insert the BRASS WINDING HANDLE into the socket.
Turn the handle clockwise to rotate the hourglass-shaped piece inside the middle circle. This will raise a large wooden frame on the opposite end of the table.
The camera will automatically shift to the constellation control panel.
Press the button on the left side of the panel to turn the gears and change to a new constellation.
Zoom out and turn left to look behind the large wooden frame.
Double tap the boards inside the frame for a closer look.
Put on the EYEPIECE to see the three-dimensional space through the boards.
Turn the floating disc with a sword sticking out of it to rotate the glowing shapes above it.
Arrange the shapes and angle the camera to make the same hexagonal pattern you've found in previous chapters.
Screenshot.
After the puzzle is solved, remove the EYEPIECE and take the DAGGER that appears at the back of the wooden frame.
Zoom out and go to the star design at the middle of the table.
Double tap the small slit in the very center of the star for a close-up view.
Insert the DAGGER into the slit to raise a model of the planets to the center of the table.
Zoom out and turn to look behind the wooden frame again.
Tap the frame to zoom in and put on the EYEPIECE.
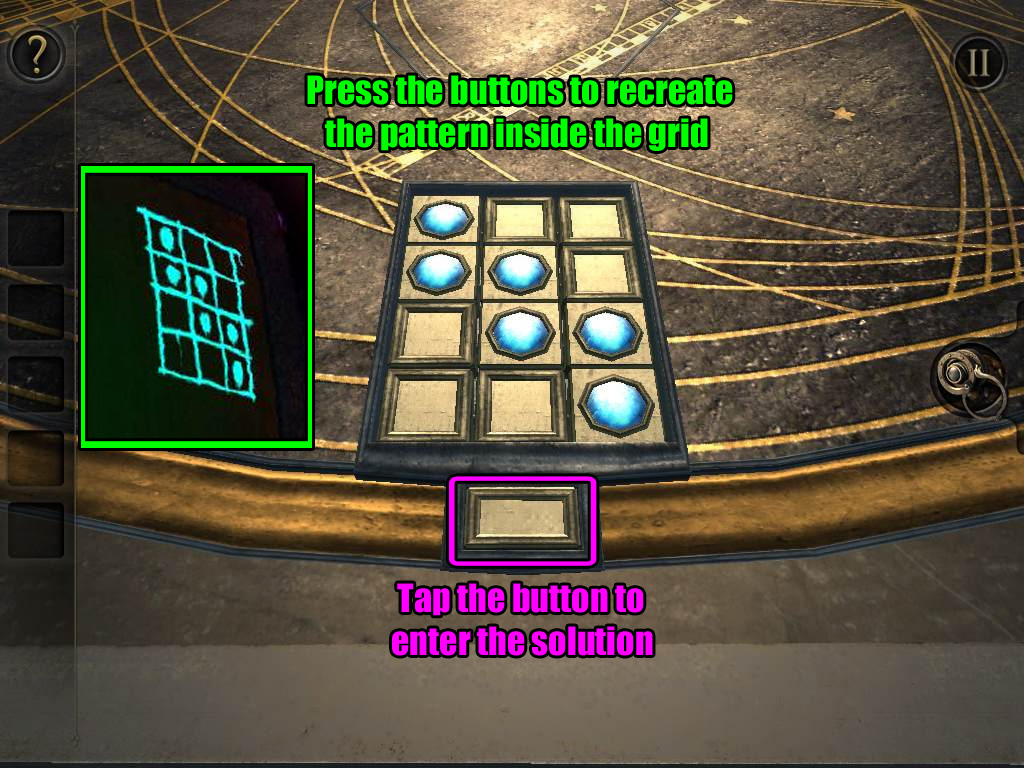
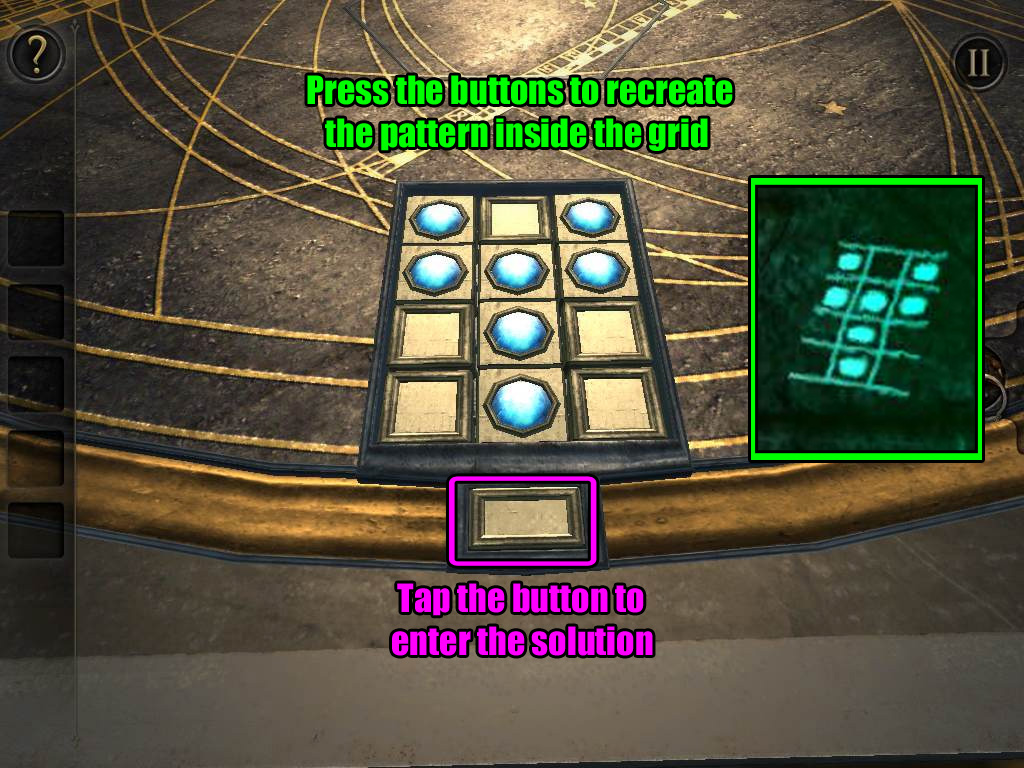
Note the pattern inside the grid at the upper right corner of the boards inside the frame.
Take off the EYEPIECE, then zoom out and turn left to the 3x3 panel of buttons at the edge of the table.
Press the buttons to raise the blue circles in the same pattern you saw on the grid at the back of the wooden frame.
Tap the large button at the bottom to enter your solution.
Screenshot.
The camera will automatically shift to the constellation control panel.
Press the button again to shift to a new constellation.
Zoom out and return to the back of the wooden frame.
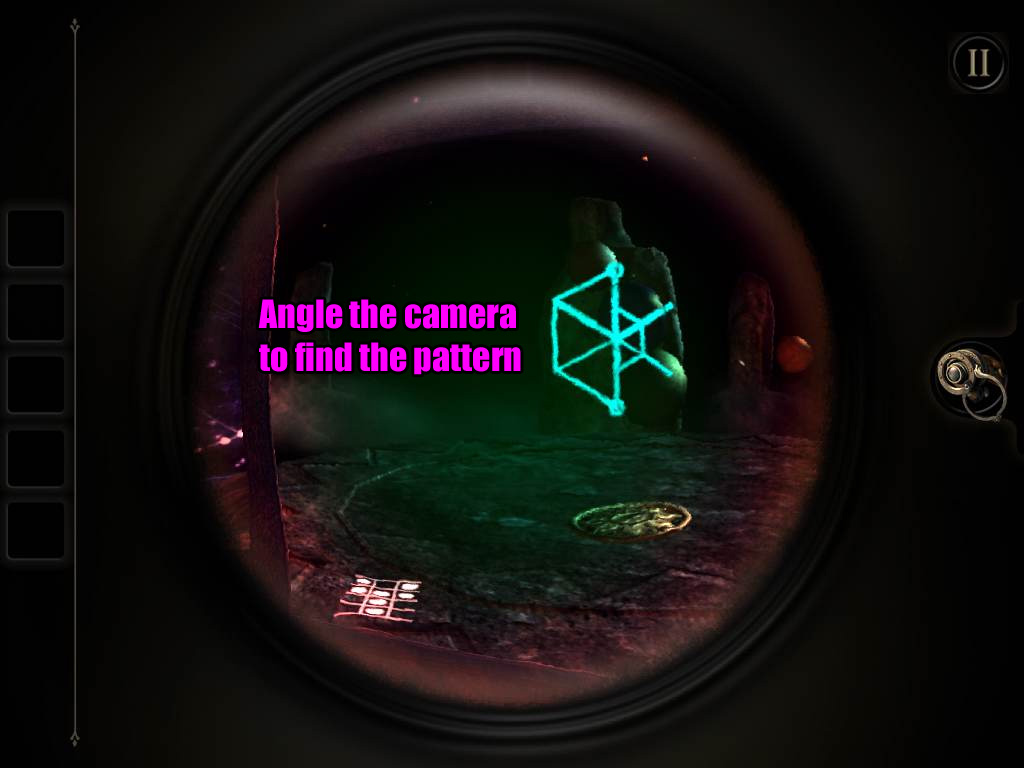
Put on the EYEPIECE and double tap the boards to look through the frame.
Angle the camera to look at the lower left corner and note the Y-shaped pattern in the grid you find there.
Remove the EYEPIECE and zoom out, then go back to the button panel to the left of the frame.
Just like last time, press the buttons to raise the blue circles in the same pattern you saw on the grid while looking through the back of the wooden frame.
Tap the large button at the bottom to enter your solution.
Screenshot.
After the puzzle is solved, the planets will stop moving around the table. The camera will automatically shift to the boards at the back of the wooden frame.
Turn on the EYEPIECE again to see through the boards.
Angle the camera to align the pattern on the planets and make the usual hexagonal shape.
Screenshot.
After the puzzle is solved, take off the EYEPIECE and take the GOLD AMULET from the boards.
Zoom out and turn to the side of the table with the circular indentation.
Place the GOLD AMULET in the indentation, which will cause the model of the planets to be removed from the table.
Zoom out and return to the wooden frame.
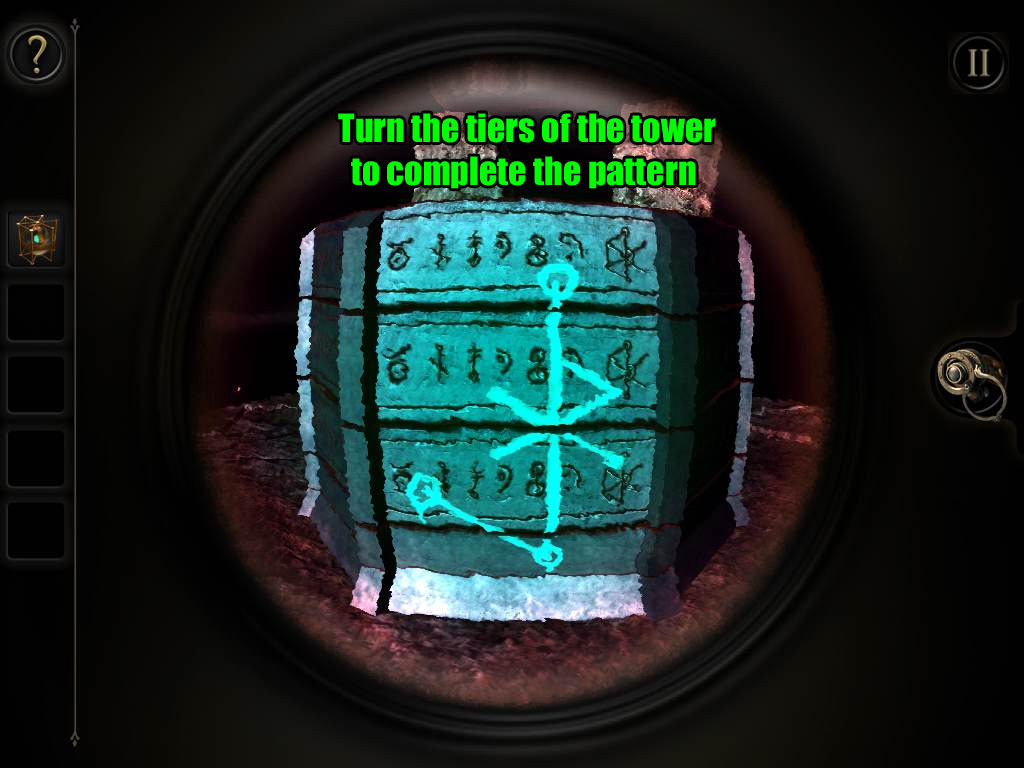
If you look through the frame, you'll see a tower-like object with square indentations on one of the tiers.
Note the position of the indentations, then zoom back out and return to the amulet in the indentation.
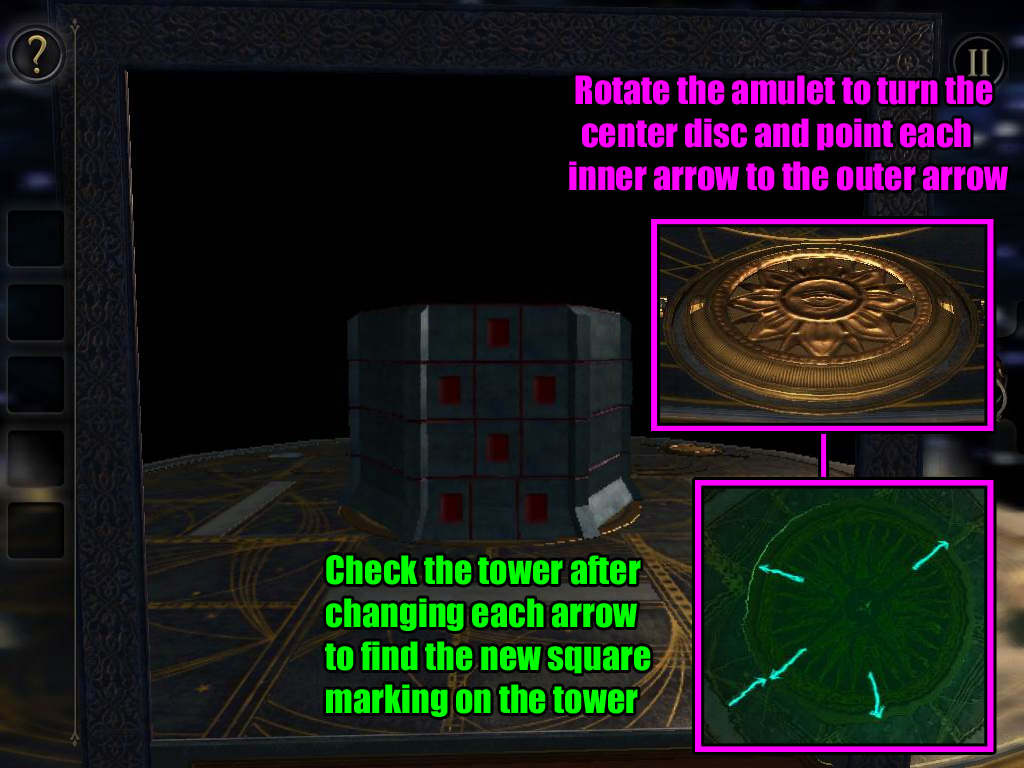
Put on the EYEPIECE and look towards the center of the table.
From there you'll see that there is one arrow on the surface of the table pointing inward and four more arrows around the star on the round piece at the center of the table that are pointing outward.
When you rotate the amulet, you will also rotate the round section on the table.
Turn the amulet so that the arrow on the table is pointing to a different arrow on the round section.
Zoom out and return to the back of the wooden frame.
If you look through it this time, you'll see that there is a new square (or squares) indentation on a different tier of the tower.
Note the position of the indentation, then continue to turn the amulet to a different arrow and check the tower again until you've found the squares on all four tiers of the tower.
I've combined the tiers for the sake of convenience in the screenshot below:
Screenshot.
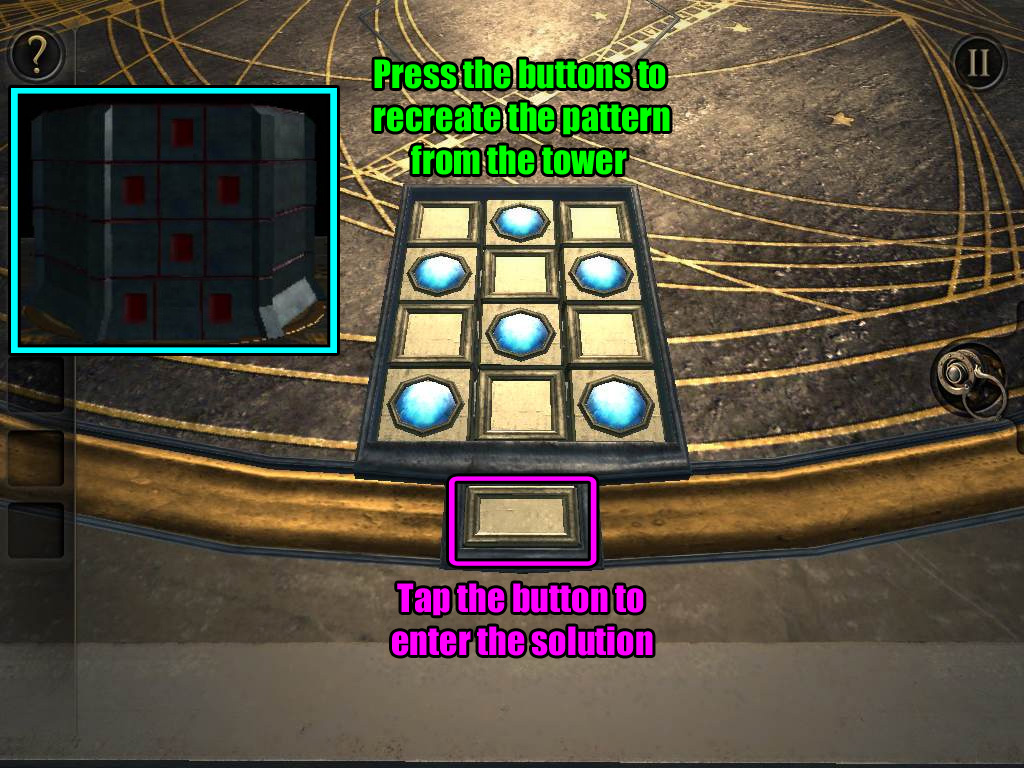
Zoom out and go left to the 3x3 button panel again.
Press the buttons on the panel to match the pattern of the square indentations on the tower.
Screenshot.
After the puzzle is solved, take the ENERGY SOURCE that appears above the button panel.
The camera will automatically shift to the constellation control panel.
Once again, press the button to shift to a new constellation.
Zoom out and return to the back of the wooden frame.
Double tap the frame for a closer look.
Put on the EYEPIECE to look through the frame.
Double tap the tower that appears to zoom in.
Rotate the tiers of the tower to arrange the pattern of the hexagonal shape.
Turn the camera to the side of the tower that has a glowing pattern at the immovable section at the botom of the tower.
Use that point to find the orientation for the rest of the shape.
Screenshot.
Place the ENERGY SOURCE on the outline of the hexagonal shape on top of the pedestal.
Posted by: Trinn |
September 24, 2012 6:50 PM
|
September 24, 2012 6:50 PM
The Room: Epilogue walkthrough
Part 1
Double-tap the folded note on the table to take a closer look.
Tap the note once to open it and read the message.
Note the symbols at the upper right corner of the paper.
If you turn your device, you'll be able to identify the symbols - they're piano keys!
Three of the keys are marked with a small "x," the keys are B, D, and F.
Close the note and zoom out. Put on the EYEPIECE to see through the magic lens, then turn the camera to view the opposite side of the table.
With the eyepiece on, you should be able to see a bright blue smudge on the surface of the table. Double tap it to zoom in.
The smudge is a bright handprint, the palm of which covers a disc which you can tap and drag to rotate.
Turn the disc to align it with the rest of the handprint on the table.
Screenshot.
Once the disc is correctly aligned, it will pop out of the table.
Take off your eyepiece and slightly rotate the camera towards the right side of the elevated disc.
Drag the slider on the side of disc all the way to the right, which will open a compartment on the opposite side of the disc.
Take the TRIANGLE GEAR from the compartment.
Zoom out and turn the camera towards the right until you reach the pen and notepad on top the table.
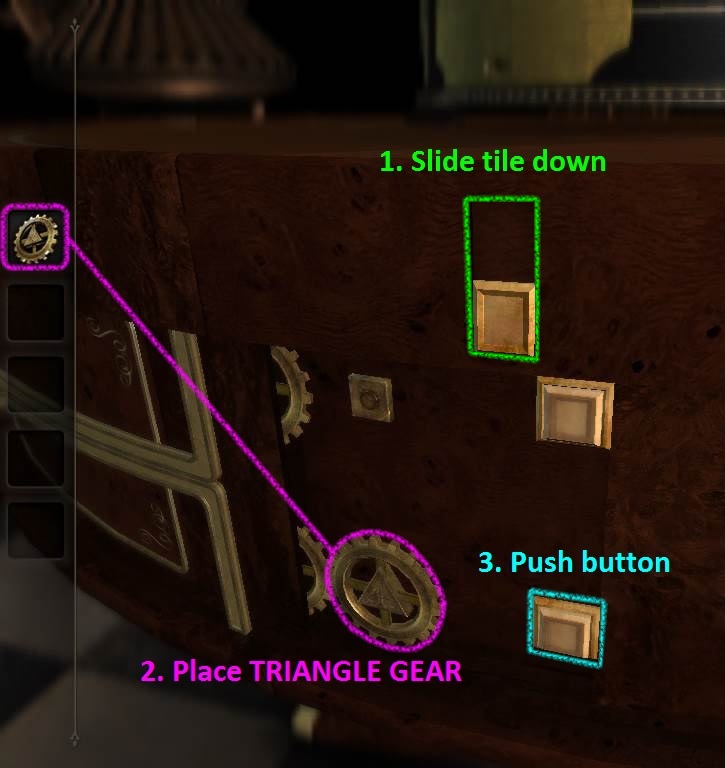
To the left of that, at the edge of the table, you should see a small square tile. Double tap the tile to inspect it.
It's a hidden switch! Drag the tile to reveal a mechanism directly below it.
Place the TRIANGLE GEAR on top of the triangular peg. Push the button to the right of the gear to operate the lower half of the mechanism.
Screenshot.
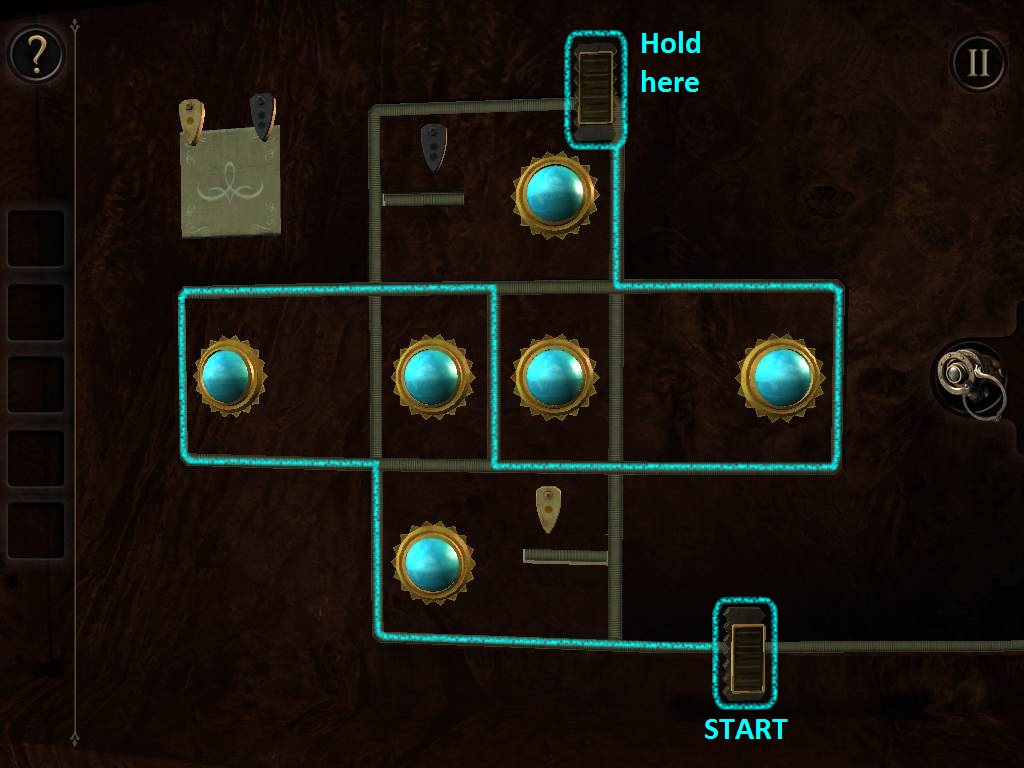
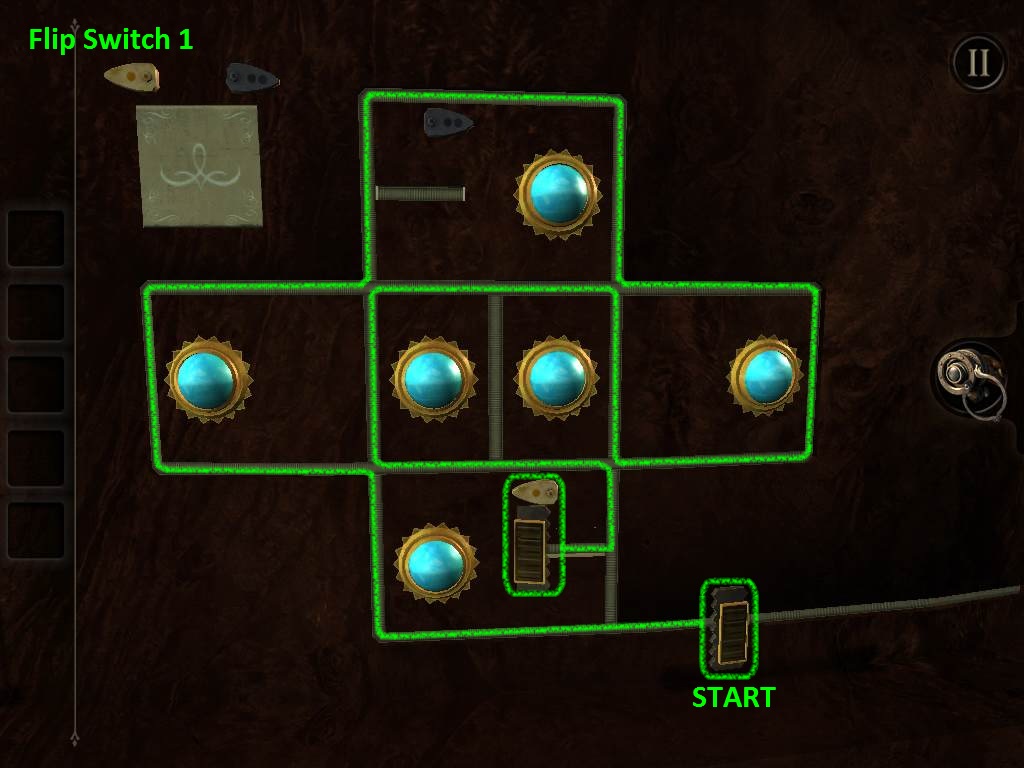
The camera will automatically transition to the left, arriving at cross-shaped track with six sun-shaped orbs.
Hold and drag the slider along the track. Each time you pass by one of the orbs, the slider will turn it on (changing the color to blue).
Passing by an orb that is on will turn it back off again.
Move the slider around the track so that all six orbs are in the on position.
Keep it held in place or else the slider will revert back to its original position and reset the puzzle.
Screenshot.
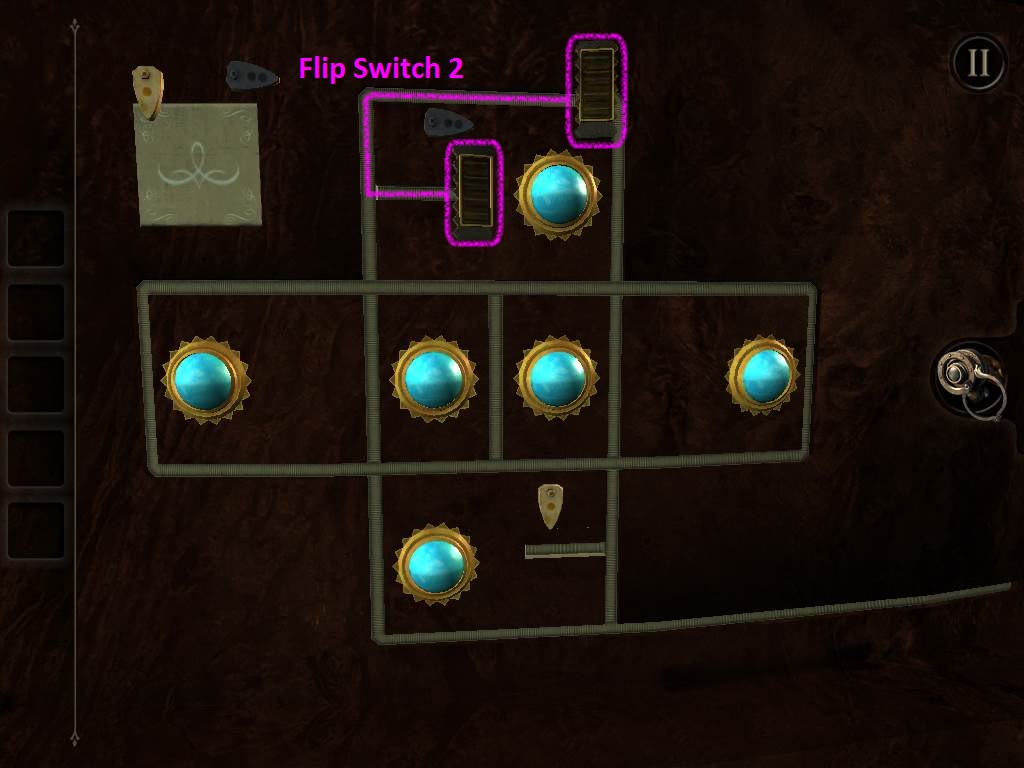
When all the sun orbs have been changed to blue, two new small paths will appear on the track.
Each path leads to a small switch, a bronze switch with 1 dot, and a grey switch with 2 dots.
Now the goal is flip both of the switches with the slider while keeping all of the orbs blue.
Once one switch is flipped, it will revert to its original position at the start of the puzzle and turn off all the orbs.
You do not need to hit the switches in numeric order. In fact, the Switch 2 is easier to get to first:
Switch 2 Screenshot.
Switch 1 Screenshot.
After you've completed the puzzle, a panel will pop open beneath the two switches at the upper left corner, revealing a third, large switch.
Flip this new switch down. The camera will automatically transition to a canister which has appeared on top of the table.
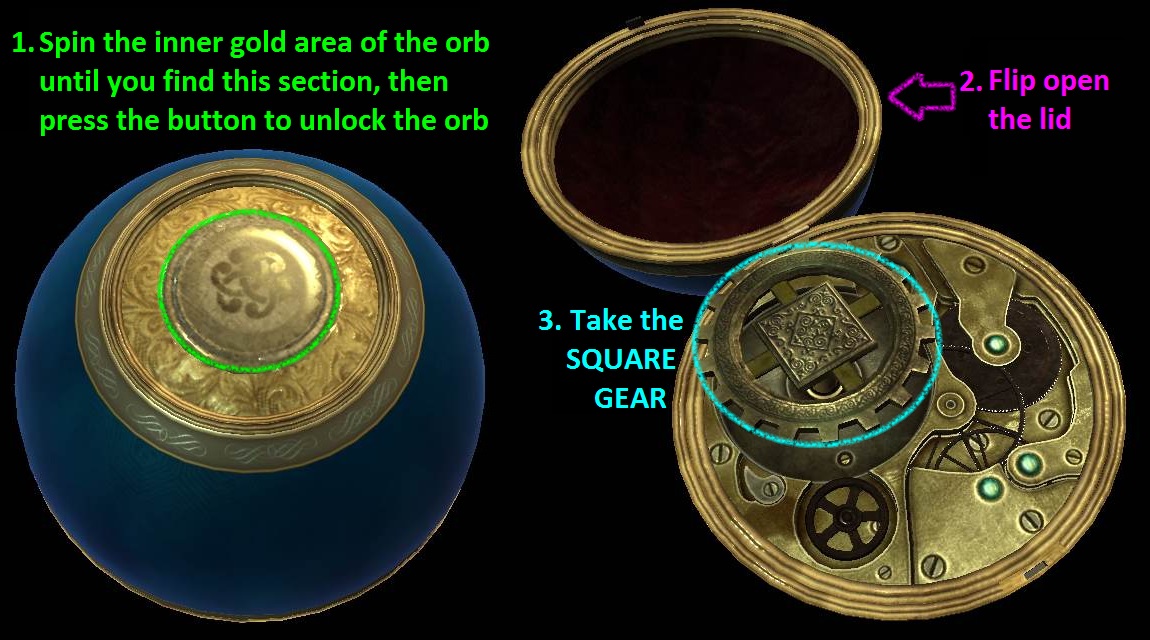
Take the METAL ORB from the opened canister, then tap the item in your inventory to examine it.
Turn the camera to view the top of the orb, where you'll see an exposed section of the orb that is gold and scale-patterned.
Rotate this gold inner section of the orb until you find the part that is patterned with filigree and has a round button in the center.
Press the button to unlock the orb, then drag the top of the orb up and back to split the orb open.
Take the SQUARE GEAR from the mechanism at the center of the orb.
Screenshot.
Return to the view of the gear mechanism on the side of the table, where you placed the TRIANGLE gear before.
This time, set the SQUARE GEAR on the square-shaped peg at the top.
Press the button to the right of the gear to unlock a drawer, which the camera will automatically move to.
Drag out the drawer by its handle, then take the STAR KEY inside.
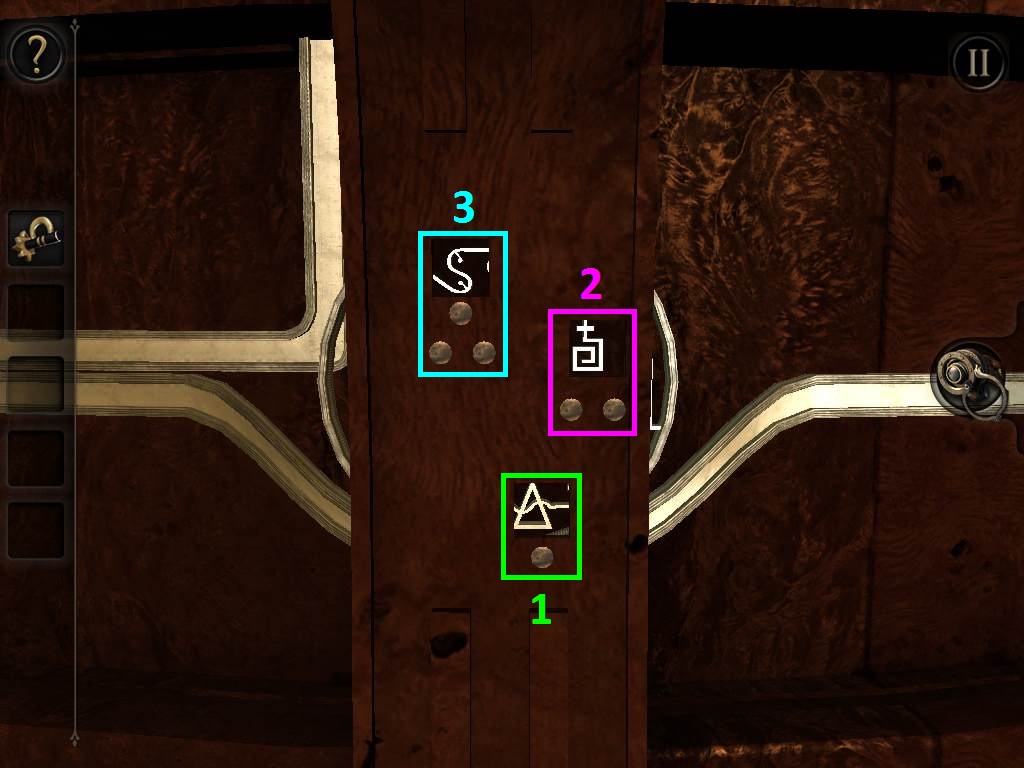
Zoom out and turn the camera to the right of the square and triangle gears at the edge of the table. You should see two shiny metal paths travelling across a section the table.
Double tap the three small, glowing symbols at the center of the lower middle path to zoom in.
Note the three symbols and the number of dots that appear below them.
The top symbol has 3 dots, the middle symbol has 2 dots, and the bottom symbol has 1 dot.
creenshot.
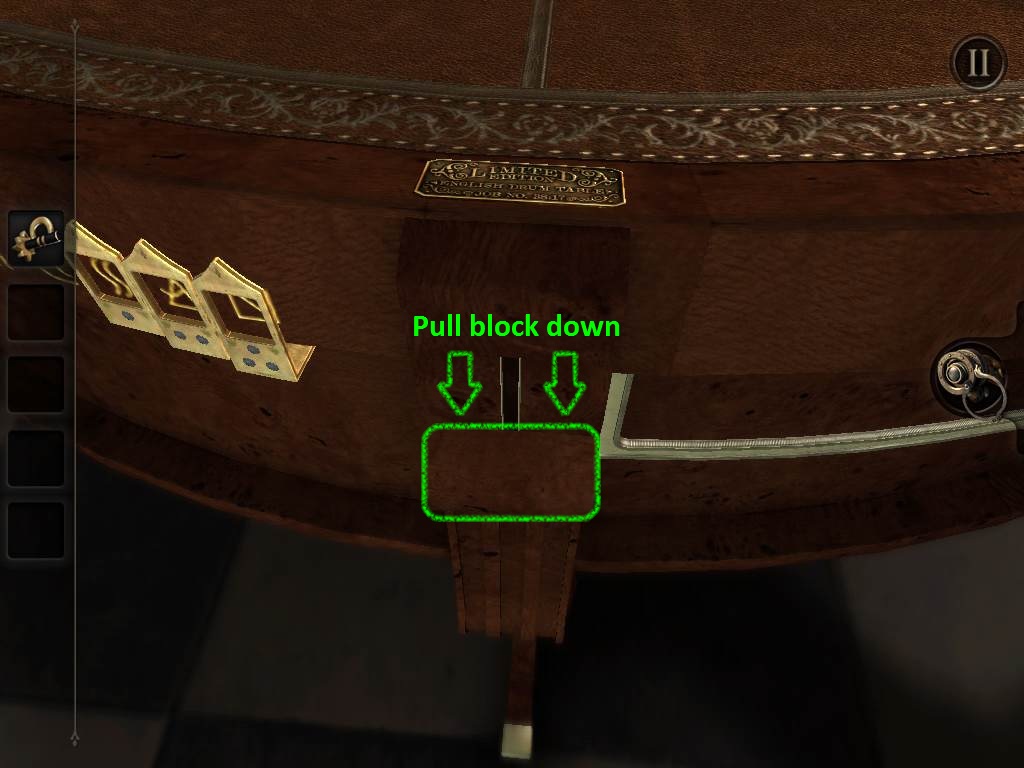
Now turn the camera to the left, still following the edge of the table until you reach the end of the metal path to the left of the orb path puzzle you solved earlier.
Tilt the camera slightly upwards and you should see a small plaque on the table that reads "Limited Edition English Drum Table". Double tap it to zoom in.
Directly below the plaque is an odd metal block at the top of a short track.
Drag the metal block down to activate a hidden switch. This switch will add three small golden plates to the series of symbols on the left.
Screenshot.
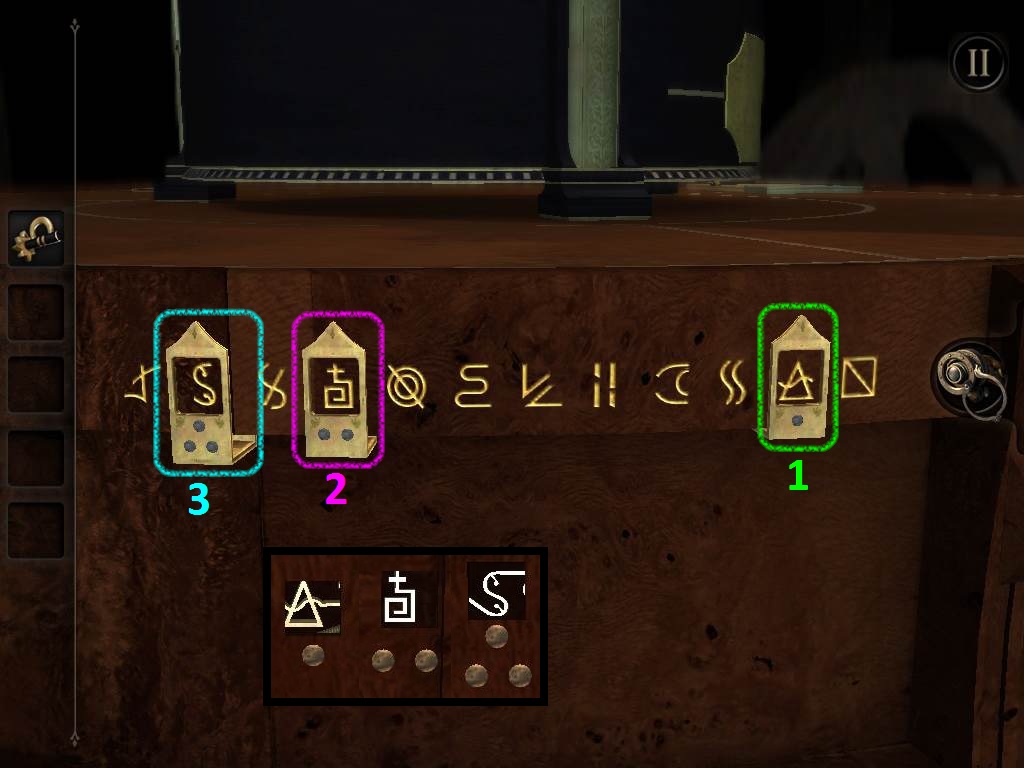
Zoom out and adjust the camera slightly to the left, then double tap the twelve golden symbols carved into the upper edge of the table to start another puzzle.
Position each of the three small golden plates on top of the correct puzzle.
Pay attention to the number of dots at the bottom of each plate.
If you need to, go back to the three symbols on the other side of the table you viewed a few moments ago to see which three symbols belong inside each plate.
Screenshot.
After the puzzle is solved, the camera will move to a small compartment which pops out near the bottom of the table and to the left of the puzzle you just completed.
Take the COIN from this revealed compartment.
Part 2
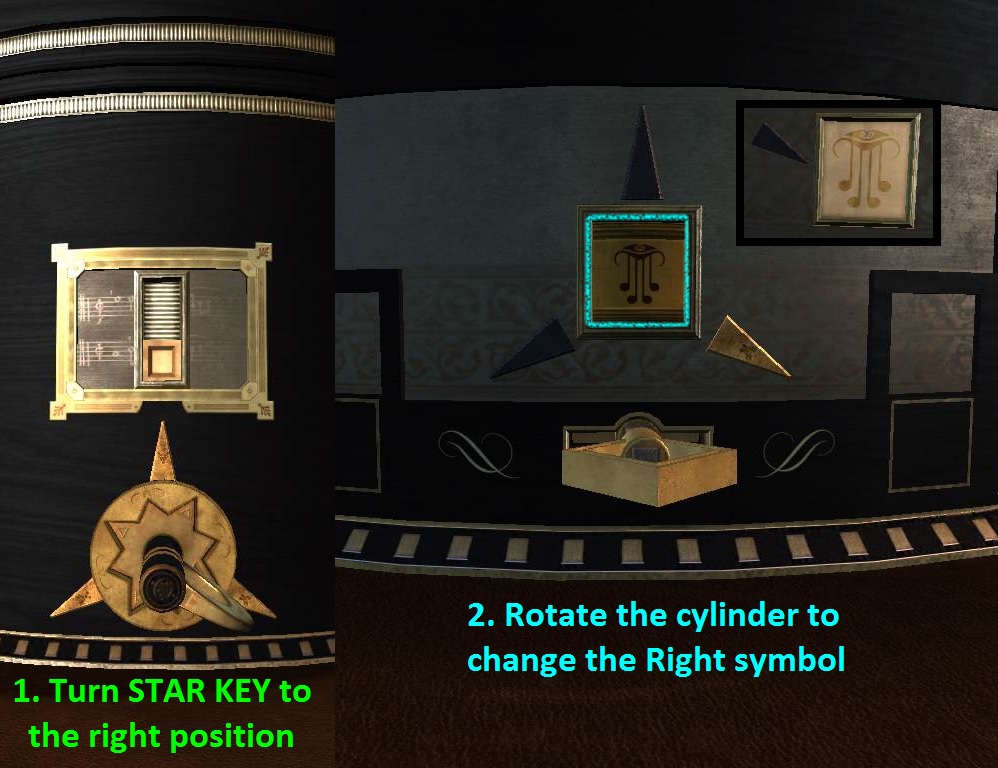
Zoom out and turn the camera to the left. Look on the black box for a star-shaped socket below a metal plate. Once you find it, double tap it to inspect it.
Insert the STAR KEY into the star-shaped socket to activate the music box mechanism.
Note how the key has three possible positions, indicated by the three arrows around it: one is at the left, one is at the right, and one is at the top.
Each time the key is turned to one of these positions, it turns the metal cylinder seen in the small window above the key.
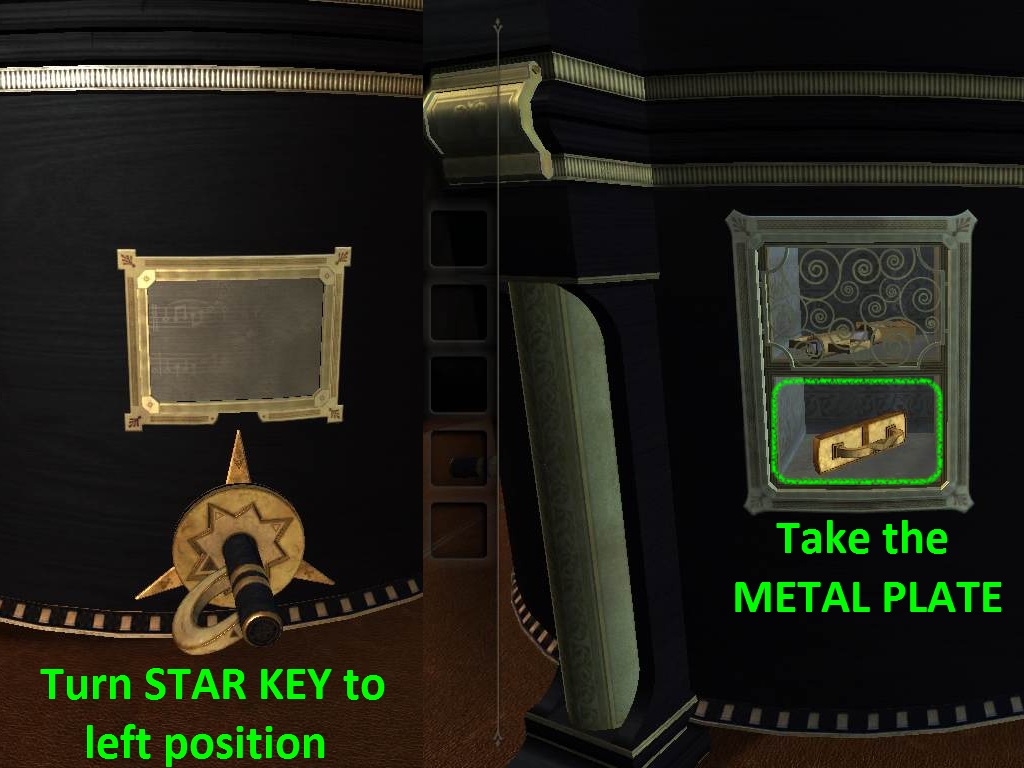
First turn the key to the left position.
Zoom out and move the camera just past the column-shaped divider to the right. You should now see a small rectangular-shaped window that contains two items.
Double tap the window to zoom in and take the METAL PLATE from the bottom half. The item in the top half is covered by a screen, which we can now move with the star key.
Screenshot.
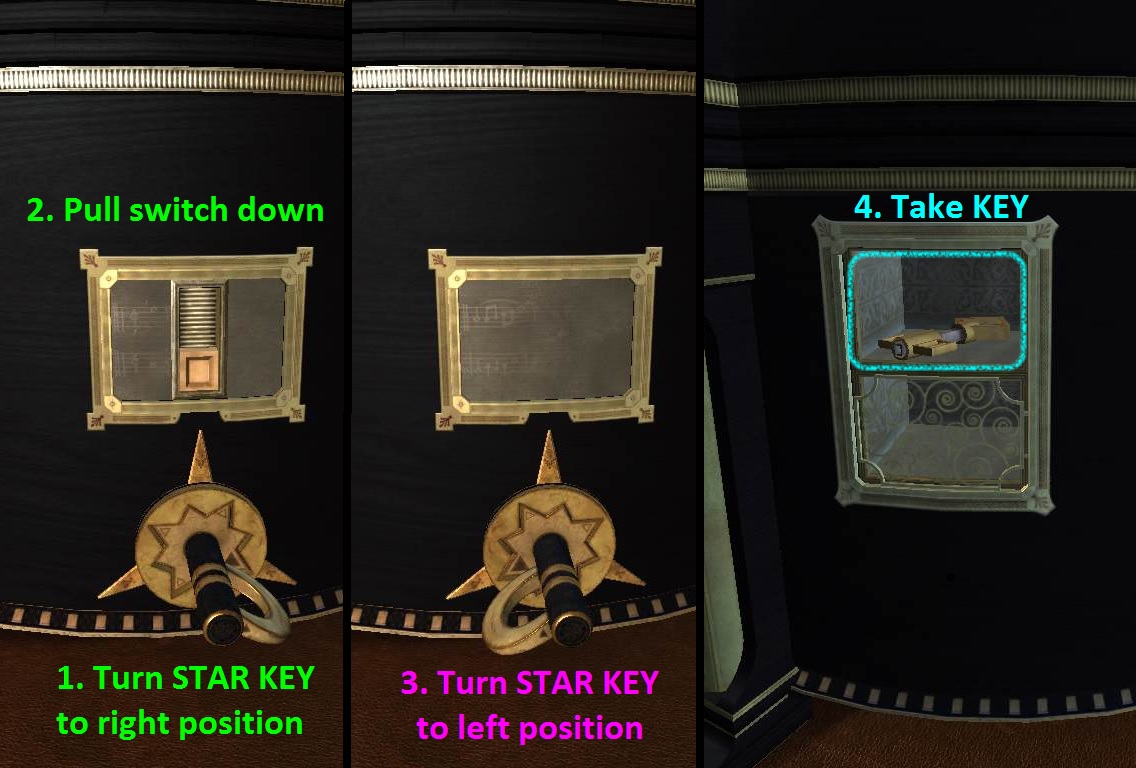
Return to the star key and turn it to the right position.
Pull down the switch that appears on the cylinder above the key. This moves the screen down to its lower position.
Now turn the star key to its left position again.
Zoom out and go back to the window where you took the first item.
Now that you've moved the screen down, you can take the KEY from the top half of the window.
Screenshot.
Turn the camera towards the right. Examine the large and ornate golden plate at the side of the black box.
Insert the KEY into the keyhole at the bottom of the plate, then turn the key to the right to open the lock.
The golden plate will split in half and open to reveal a patterned silver plate and another puzzle.
At the center you'll see three arrows identical to the ones around the star key. Note how the left arrow is gold, since we left the star key in the left position.
There's also a small cylinder in the middle of the arrows which you can turn to cycle through different symbols, but you don't know the order just yet.
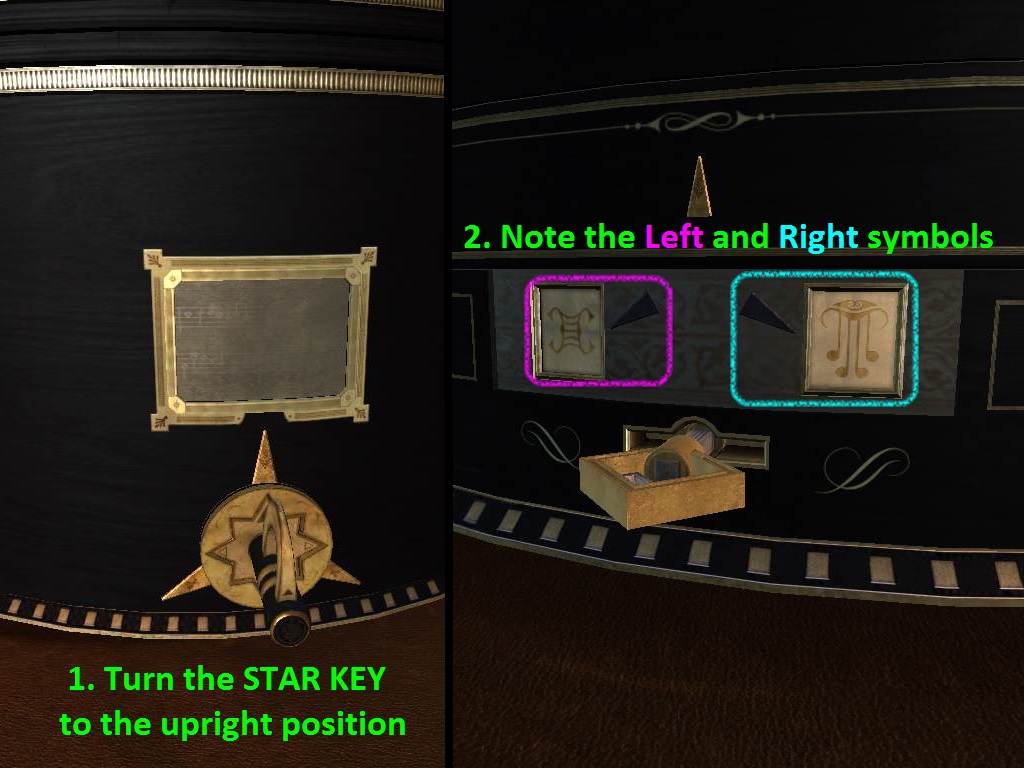
Zoom out and return to the view of the star key.
Turn the key to the upward position.
Return to the view of the puzzle between the split golden plates.
Note the symbols beside the two side arrows:
Screenshot.
Zoom out and go back to the star key.
Turn the star key to the left arrow position.
Move the camera back to the puzzle between the golden plates.
Tap and drag the cylinder to rotate it. Set the symbol to match the one you saw by the Left side arrow.
Screenshot.
Back up and move the camera right to return to the star key.
Now turn the star key to the right arrow position.
Zoom out and turn the camera left to view the puzzle again.
Rotate the cylinder to set the symbol and match it with the one you saw by the Right side arrow.
Screenshot.
Now that the Left and Right symbols are both correctly set, the two small black squares at the left and right side of the silver plate will move down, uncovering the lower left and lower right corners of the plate.
Zoom out and go back to the star key one last time.
Turn the key to the upward arrow position.
Move the camera left to view the completed puzzle between the golden plates again.
Beside the two symbols you'll now see two square buttons.
Press and hold these buttons down at the same time to reveal a combination lock on the black box and pop out a drawer between the gold plates.
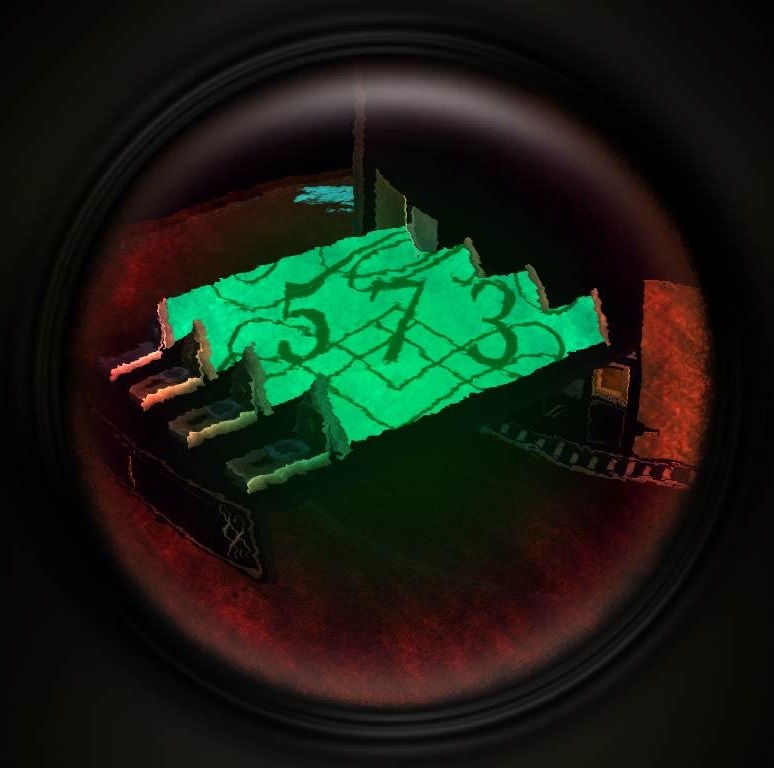
Examine the triangular bars on top of the drawer.
Put on the EYEPIECE to look through the lens.
Adjust the view of the camera towards the markings that appear on the right side of the bars.
Look closely and you'll see that the thick lines are actually parts of split numbers.
At the bottom of the three bars on the right are switches which you can pull to rotate each bar.
The one exception is the far left bar, which does not have a switch.
Use this stationary bar as your reference for the correct positions of the other three bars.
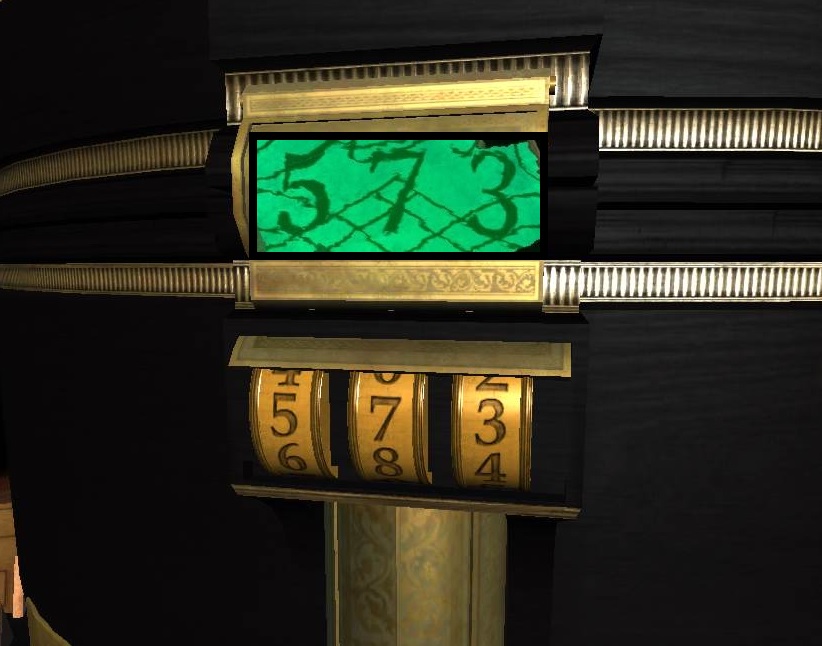
Once all four bars are aligned, a three digit combination will become visible:
Screenshot.
Rotate the camera slightly to the right, then examine the combination lock between the lid of the black box and the column-shaped divider (the one that appeared after you pushed the two square buttons).
Enter the combination you found on the triangular bars:
Screenshot.
This will extend a large square plate out of the black box.
You can't interact with the plate just yet, so you'll have to come back later.
Turn the camera to the side of the box with the star key. Adjust the camera down to the edge of the table where you should see a hexagonal shape with two holes, "suggesting something's missing".
Zoom in and insert the METAL PLATE with the handle into the holes, then turn the handle to the right to reveal a keyboard at the side of the table.
Remember the note you viewed at the very start of this chapter? It has the clue you need to interact with this keyboard.
Play the keys that are marked on the picture at the upper right corner of the note: B, D, and F.
You'll notice the wooden panel above the keyboard shakes when the correct keys are pressed. Tap and hold all three down simultaneously to open the panel completely.
A small slot with a circular hole will also pop out from the middle of the keyboard. Insert the COIN into this slot to start the next puzzle.
Screenshot.
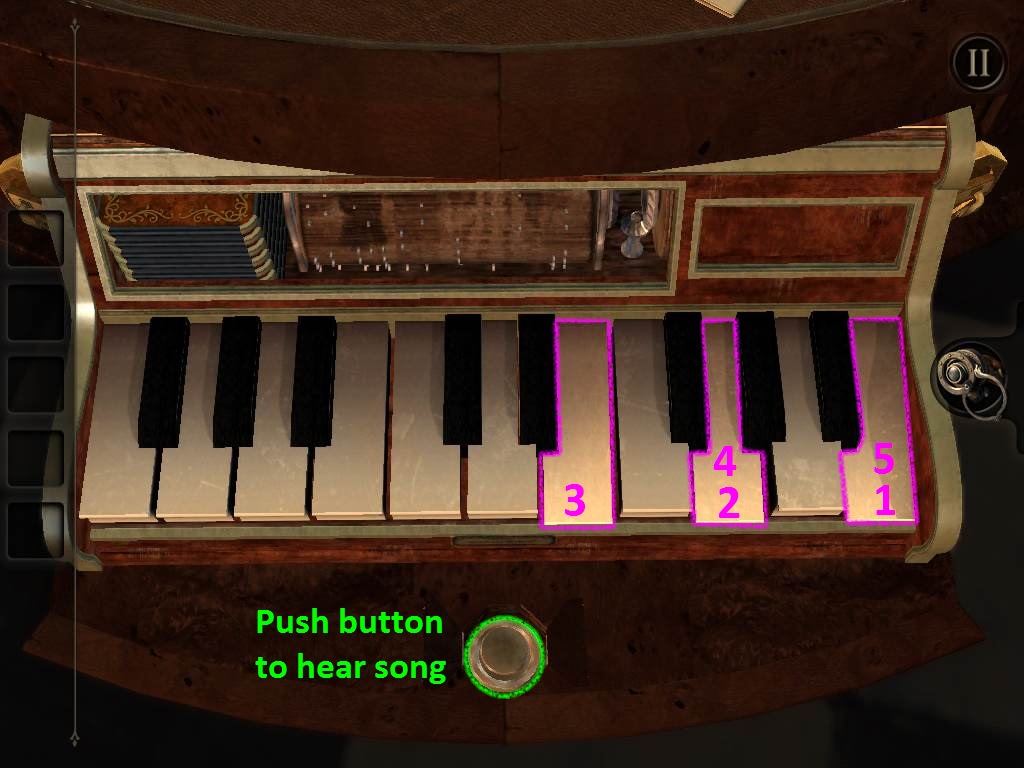
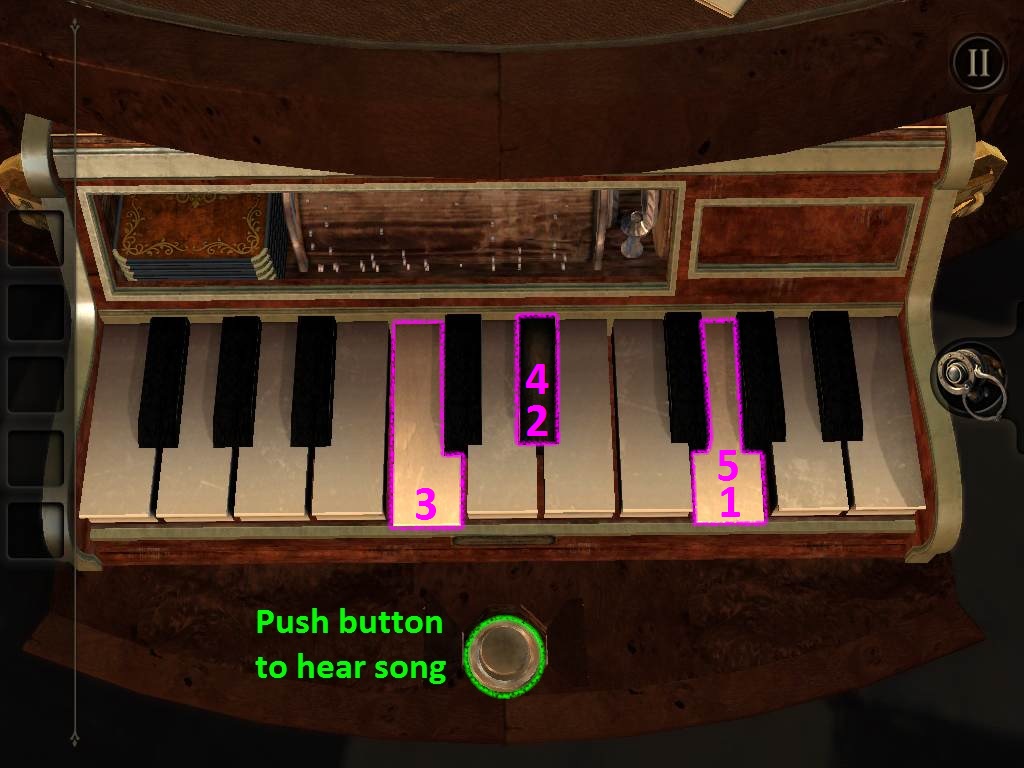
Push the button below the middle of the keyboard to hear a five note tune played on the keys.
Memorize the notes and then tap the keys in the same order to repeat the song you heard.
You must correctly play three songs to complete the puzzle. If you miss a note in any of the songs, the whole puzzle will reset.
The first song is:
B, G, E, G, B.
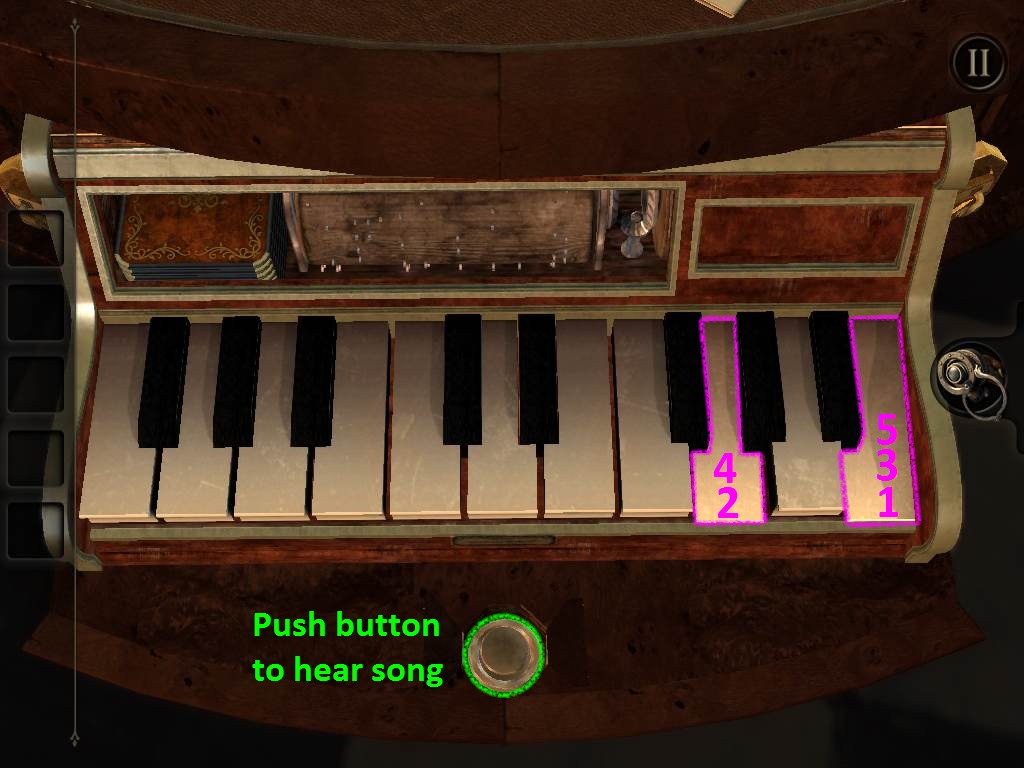
The second song is:
G, D#, C, D#, G.
The third song is:
B, G, B, G, B.
Refer to the screenshots below and press the keys in the following order:
Solution Song 1.
Solution Song 2.
Solution Song 3.
Once you've completed the puzzle, the camera will automatically shift to a small compartment above the right side of the keyboard.
Take the two HANDLES from this compartment, then zoom out to put away the keyboard.
Part 3
Tap the left side of the square plate sticking out of the black box to take a closer look.
Insert the two HANDLES into the sockets at the top and bottom of the plate.
Put on the EYEPIECE to look through the plate.
You'll see a cube partitioned into four square sections. Turning the handles rotates the face of the cube.
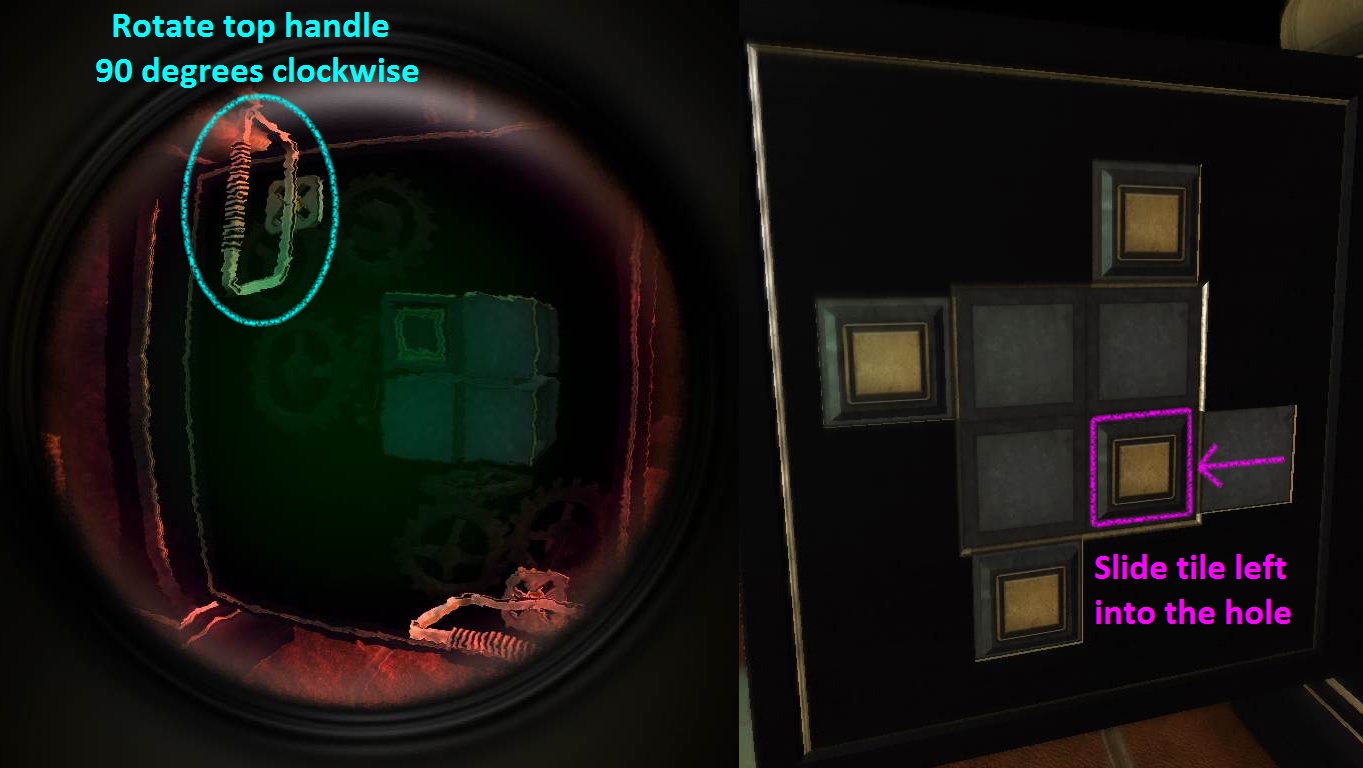
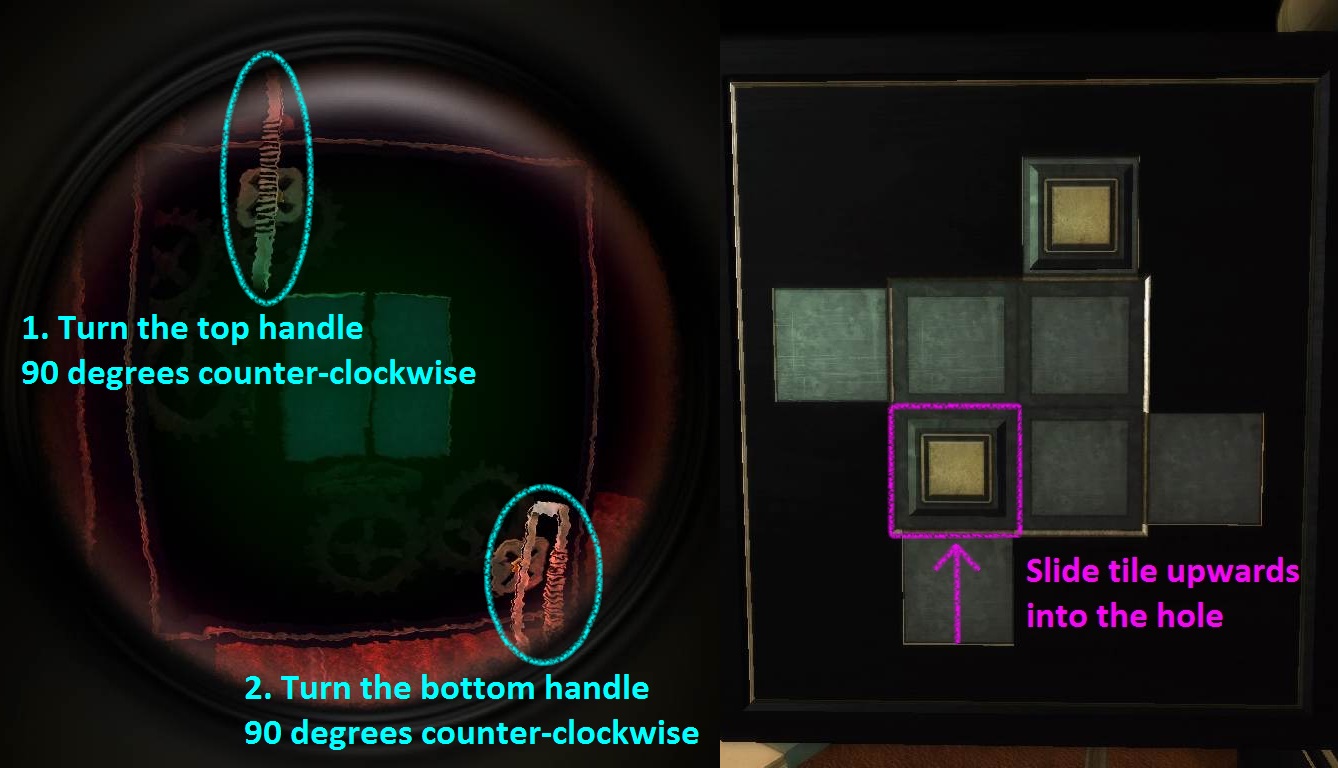
Rotate the top handle 90 degrees clockwise so that it is vertical.
You should now see an indentation in the upper left section of the cube.
Turn the camera around to the board on right side of the square plate. You can take off your eyepiece while facing this side if you prefer the increased visibility.
Slide the square tile at the lower right side of the board into the hole beside it.
Part 1 Screenshot.
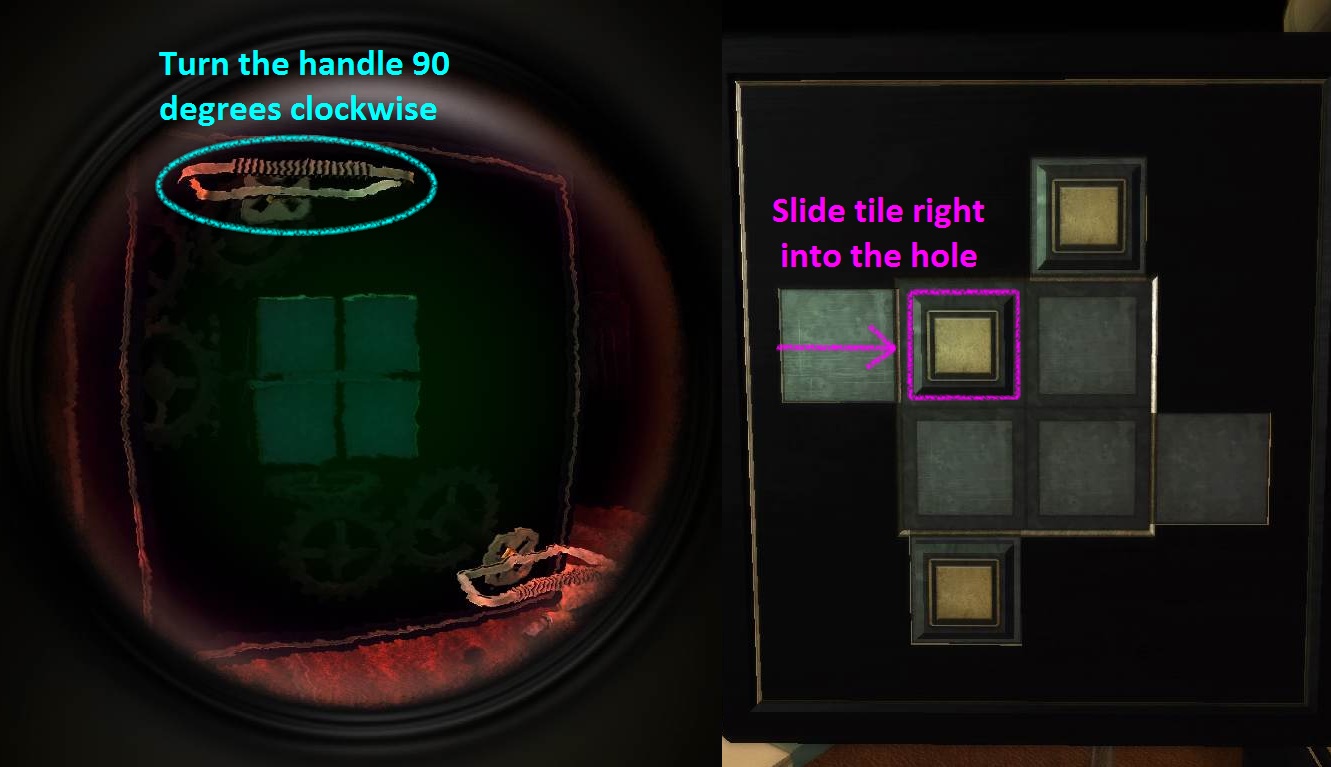
Again, rotate the top handle 90 degrees clockwise so that it is horizontal.
With the eyepiece on you should now see a blank cube when looking through the plate.
Turn the camera back to the right side of the plate.
Slide the square tile at the upper left area of the board into the hole at its right.
Part 2 Screenshot.
Move back to the view of the left side of the plate.
First rotate the top handle and then rotate the bottom handle 90 degrees counter-clockwise so that both handles are vertical.
Again you should see a blank cube while viewing the left side of the plate with the eyepiece on.
Turn the camera to the board on the opposite side of the plate.
Slide the tile at the lower left section of the board up into the hole above it.
Part 3 Screenshot.
Return to the view at the left side of the plate.
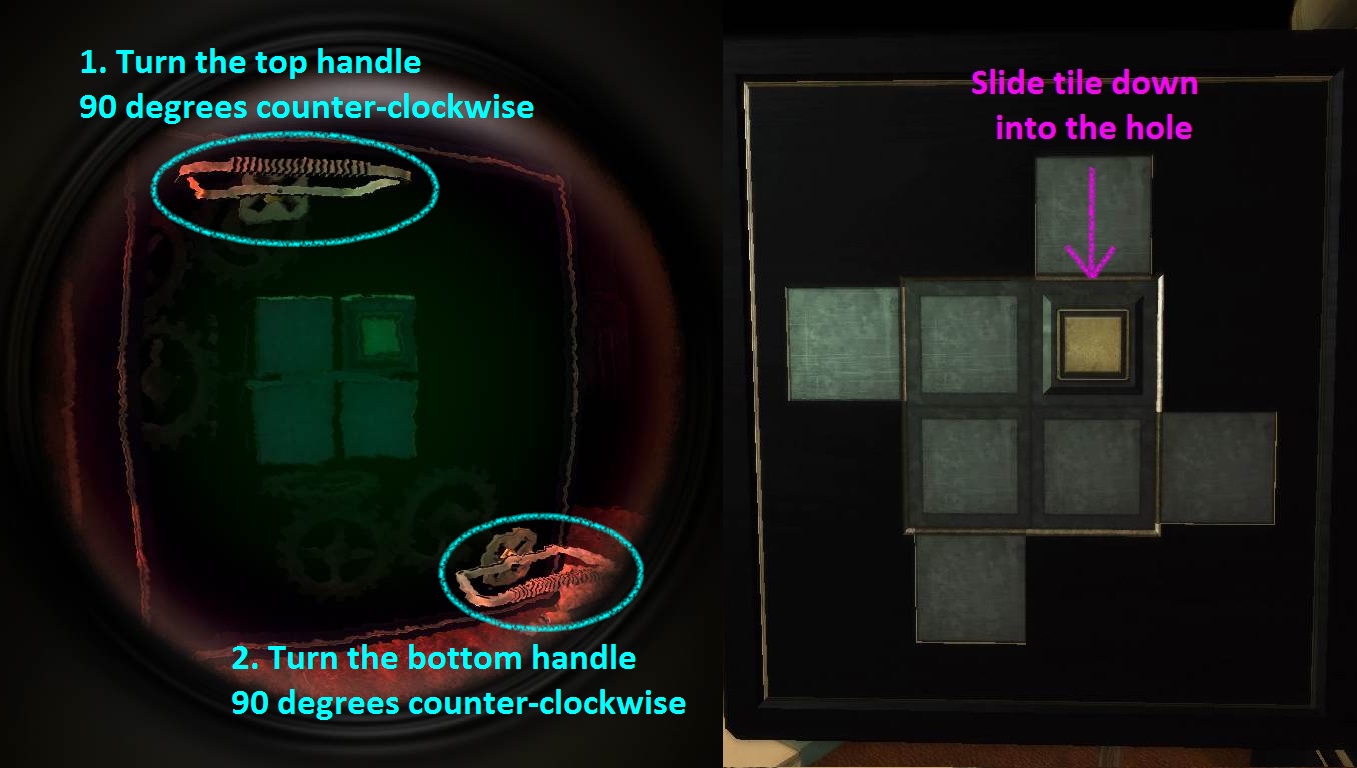
Once again, turn both the top handle first and bottom handle second 90 degrees counter-clockwise. This time both handles should be horizontal.
While looking through the plate with the eyepiece on you should now see a cube with a gold square at the upper right section of the cube.
Turn the camera to the right to view the board on the other side of the plate.
Slide the final piece at the upper right area of the board down into the hole to complete the puzzle.
Part 4 Screenshot.
Take the RED GEM TILE that appears at the center of the board after the puzzle is complete.
This will cause the square plate used for the cube puzzle to retract back into the box.
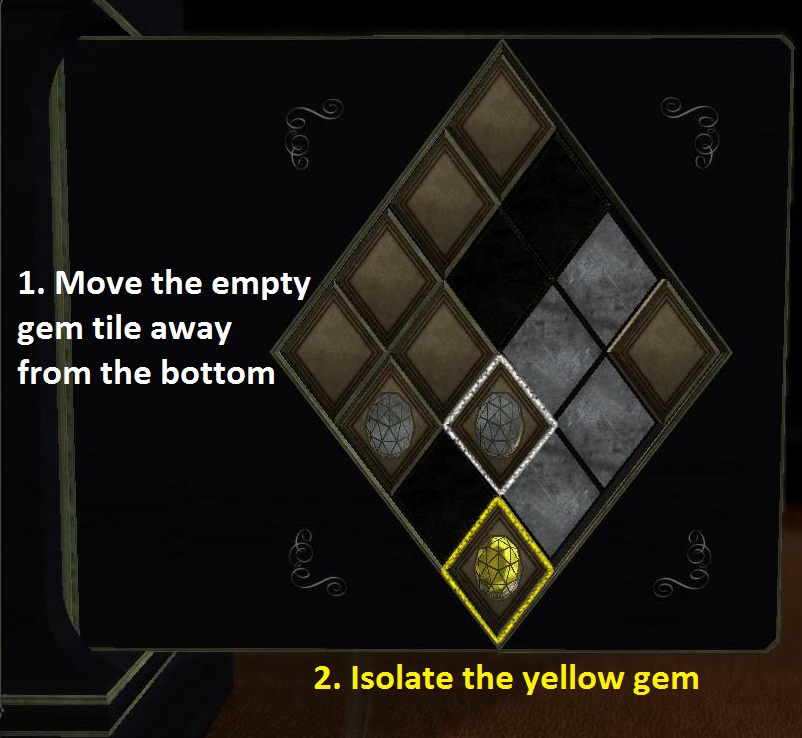
In its place, two square plates will pop out of the sides of the box. One plate has a large glass lens and the other has a board covered in rhombus-shape tiles and gems.
Double tap the board with the tiles and gems to, you guessed it, begin another puzzle!
Arrange the tiles so that you can move the gems into the window at the bottom of the board.
Tap and drag the tiles to move them up, left, down, or right into an adjacent empty space.
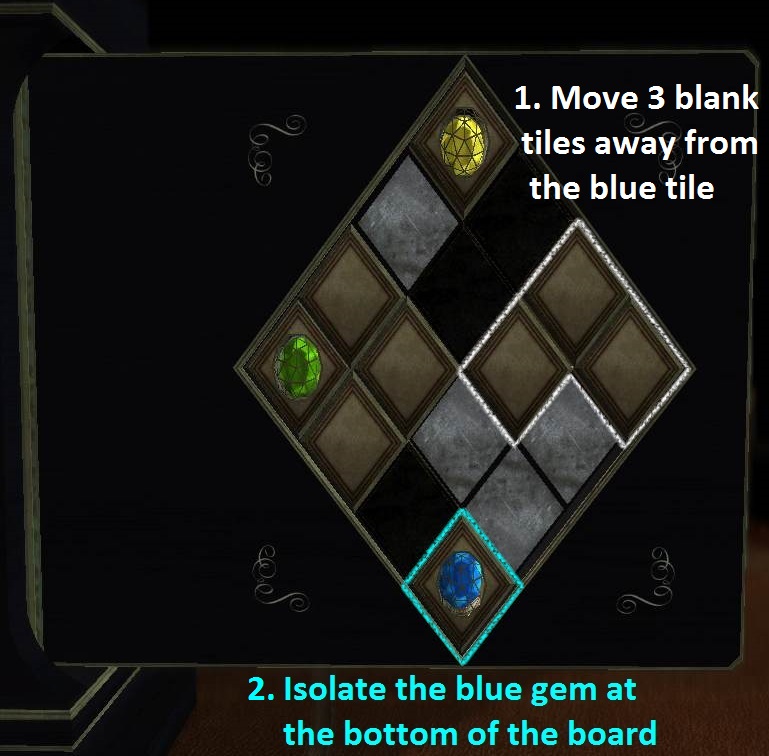
The first step is to move away all of the blank tiles blocking the blue gem and then position it inside the window.
Turn the camera to the right side of the plate and take the BLUE GEM from the other side of the window.
Part 1 Screenshot.
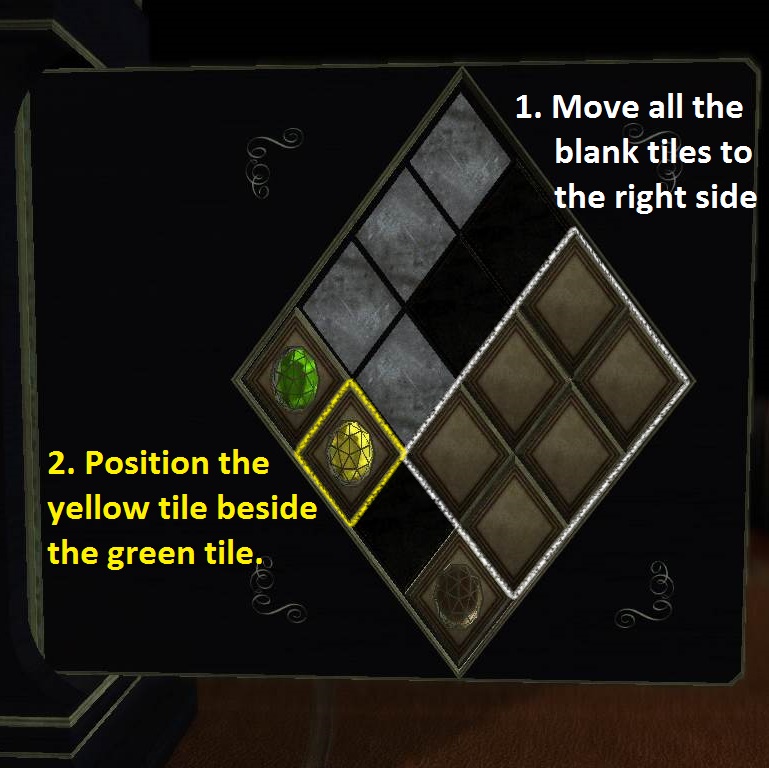
Next, move all of the blank tiles from the left side of the board to the right side.
Position the yellow gem tile beside the green gem tile.
Part 2 Screenshot.
Now move three of the tiles to the upper left side of the board.
Drag the yellow and then the green gem to the now empty spaces at the top of the right side of the board.
Part 3 Screenshot.
Move two more blank tiles and the empty tile that used to hold the blue gem to the left side of the board.
Position the green gem tile into the window at the bottom, then turn the camera to the other side of the board and take the exposed GREEN GEM.
Part 4 Screenshot.
Lastly, drag the empty green gem tile out of the window at the bottom of the board and replace it with the yellow gem tile.
Turn the camera to the right side of the plate and take the final YELLOW GEM from the open window.
Part 5 Screenshot.
Zoom out and turn the camera left to the disc on the table between the two plates. Double tap it to zoom in.
Insert the RED GEM TILE into the empty space at the upper left section of the disc.
Place the BLUE, GREEN, and YELLOW GEM into the sockets at the other three sections of the disc.
Zoom out and adjust the camera to the left side of the plate with the large glass lens.
Put on the EYEPIECE to see the glowing shapes created by the four gems.
The shapes need to be connected into a pattern identical to the looping symbol at the upper left side of the glass lens (which is also seen at the center of the disc).
The angle of each shape is determined by its gem's position in the disc.
Since the red gem can't be moved from its place on the disc, use it to orient the angle of the other remaining shapes.
Now that you know what to do, go back to the disc and place each gem in its proper position:
Place the GREEN GEM in the upper right socket.
Place the BLUE GEM in the lower right socket.
Place the YELLOW GEM in the lower left socket.
Go back to the glass lens and put on the EYEPIECE to view the completed shape.
Solution.
Once this puzzle is complete, the lid of the black box will unlock.
Part 4
Tap and drag the lid to lift it back and open it.
Orient your camera at the blue gem and the small plaque near the edge on the top surface of the box.
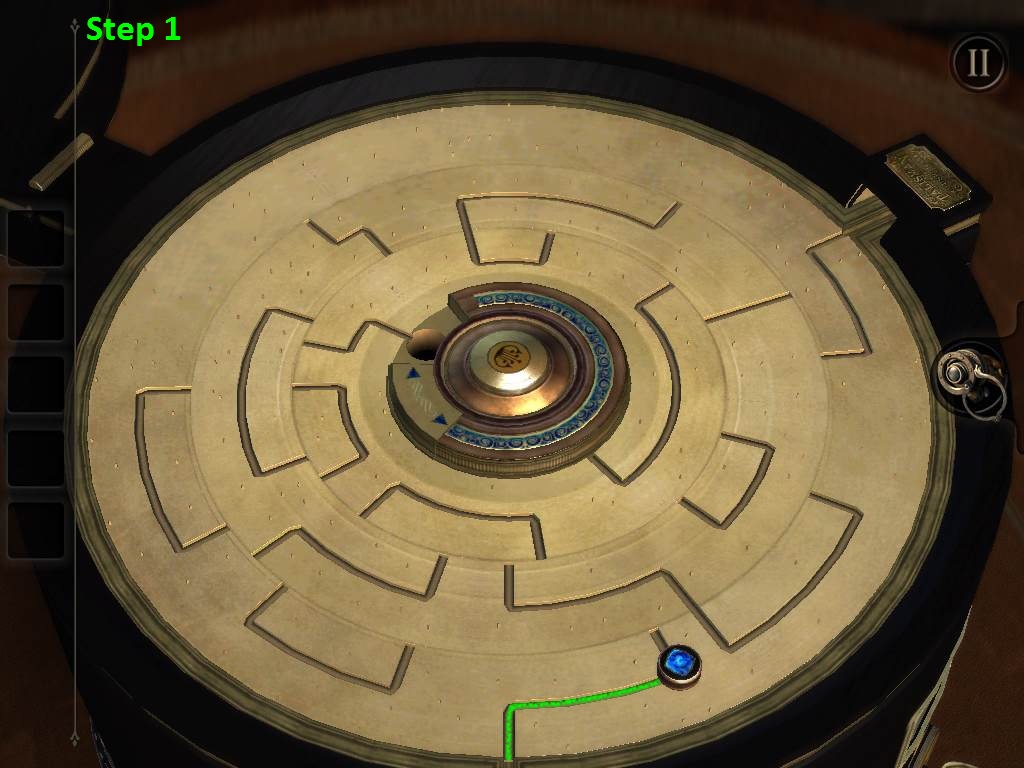
The objective of this puzzle is to move the blue gem along the track and to the hole at the center of the maze.
Drag the gem to move it along the path.
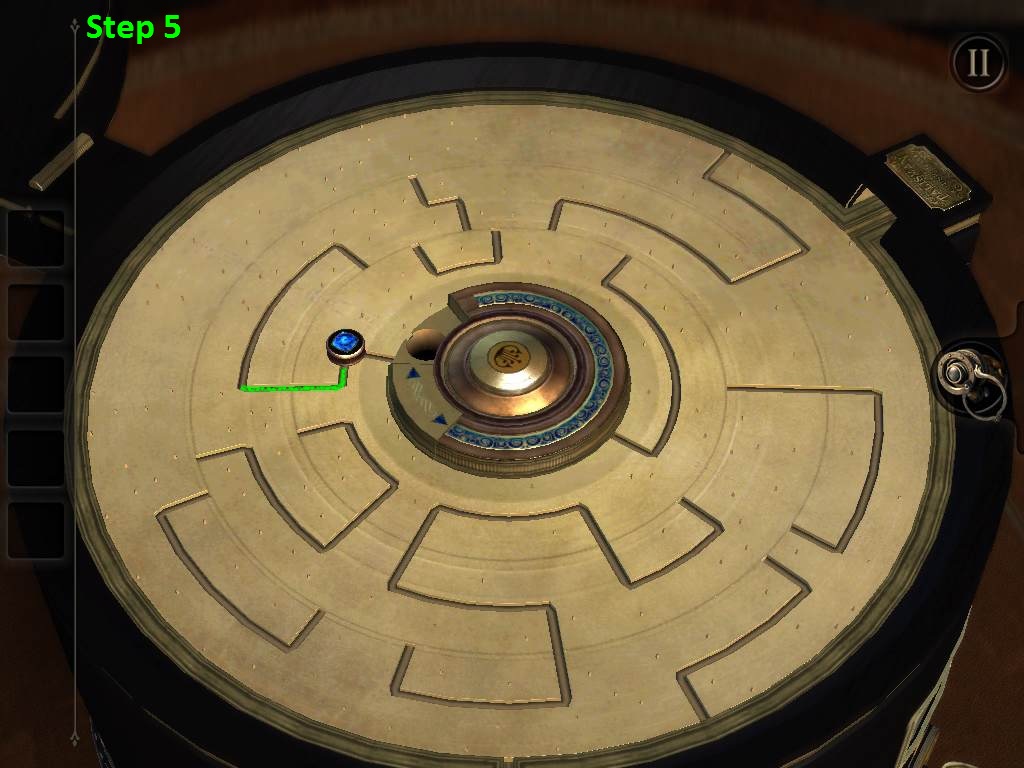
Press the button at the center of the puzzle to turn the outer ring, middle ring, and inner ring of the maze, which will move their paths to one of three possible positions.
To clarify, the outer ring is the one at the edge of the box, the inner ring is the one closest to the center button, and the middle ring is the one between them.
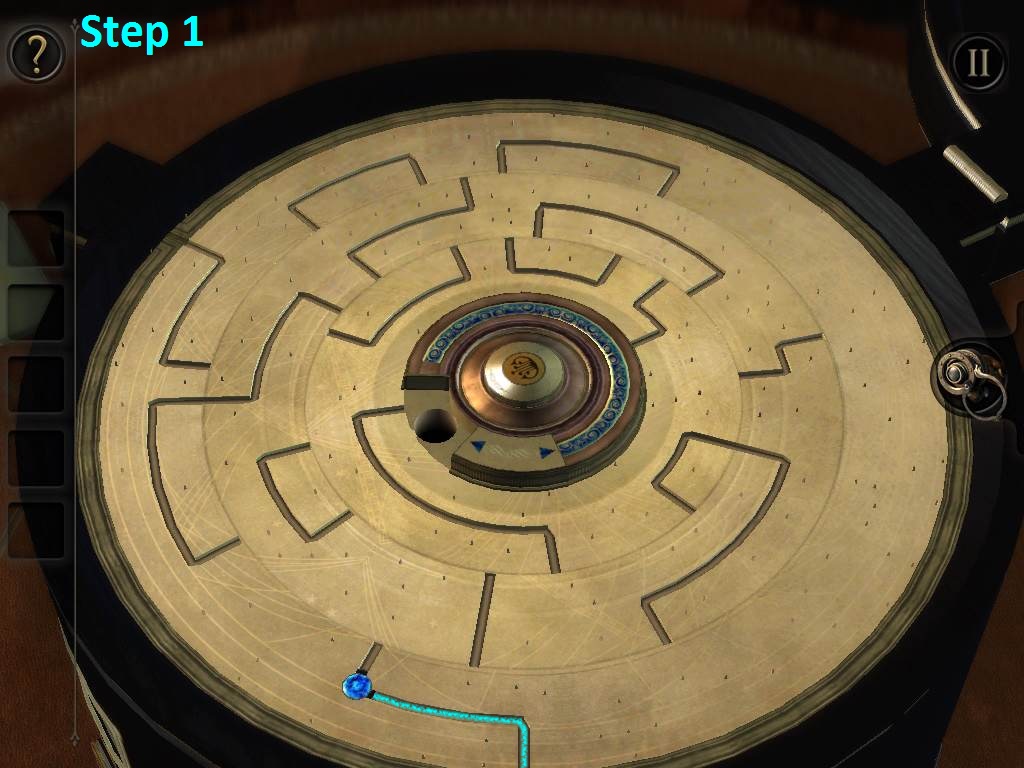
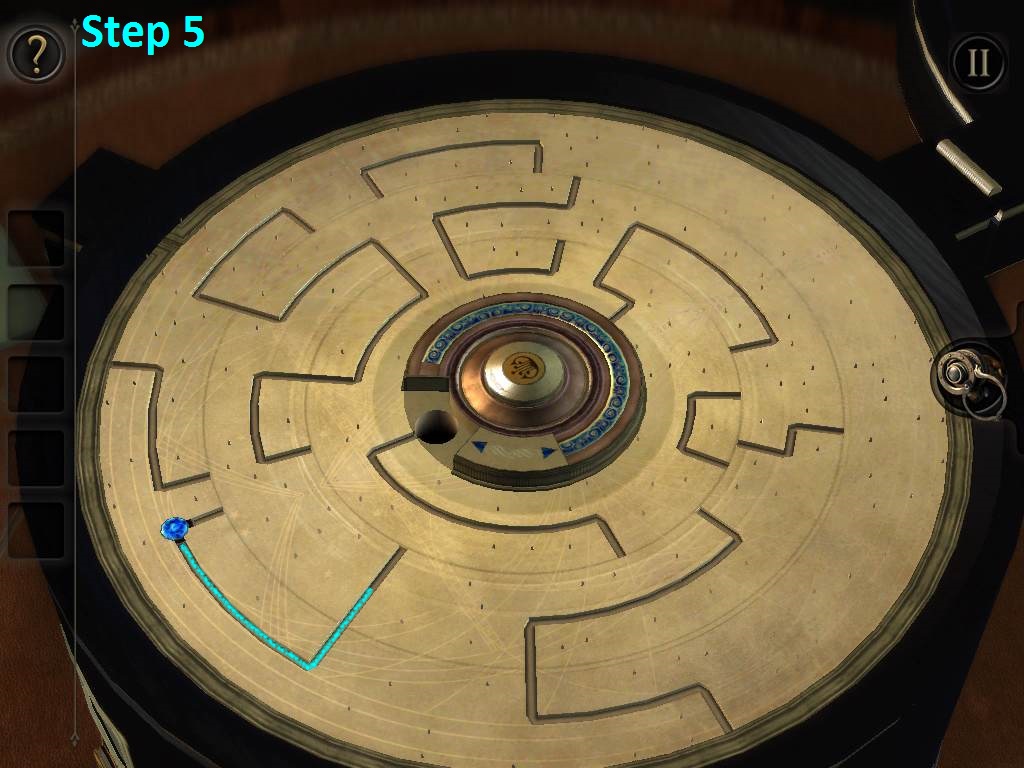
Refer to the following steps to solve the first part of the puzzle:
Start by moving the blue gem onto the path in the outer ring.
Screenshot Step 1
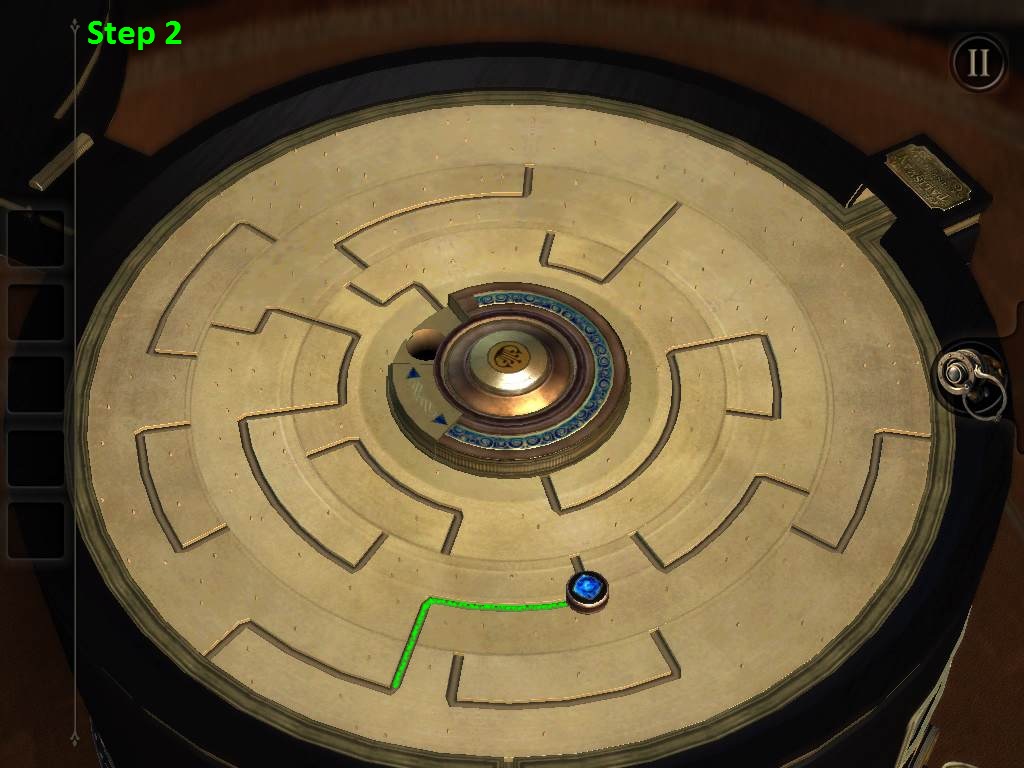
Push the center button twice.
Drag the blue gem onto the connected path at the middle ring.
Screenshot Step 2
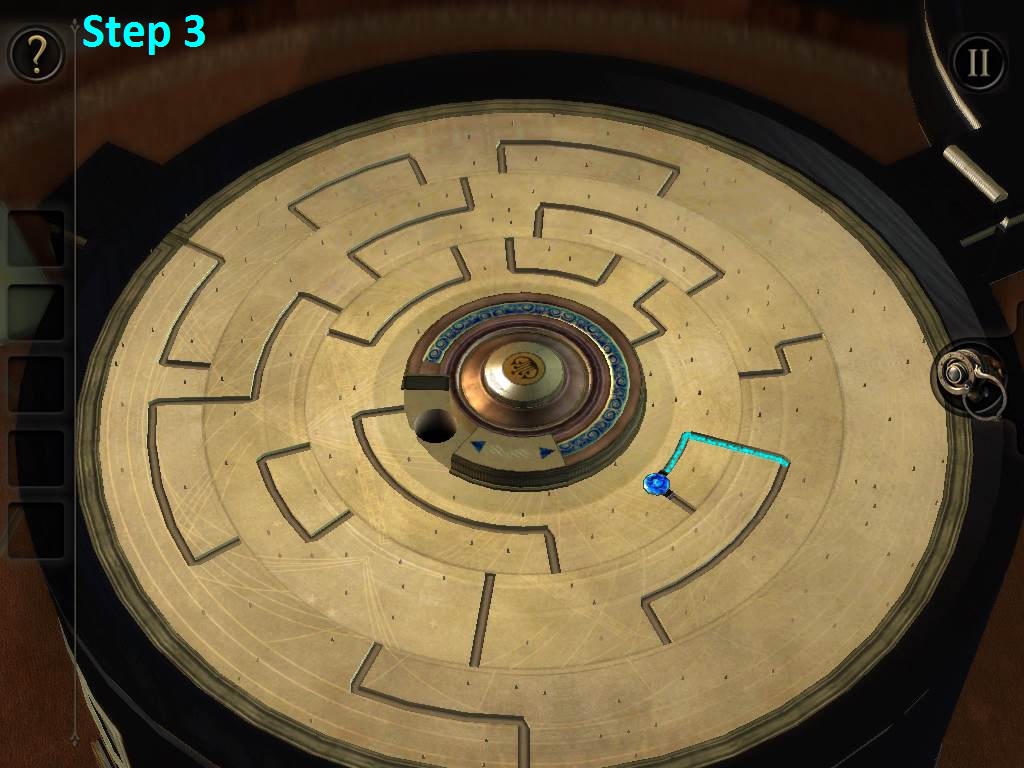
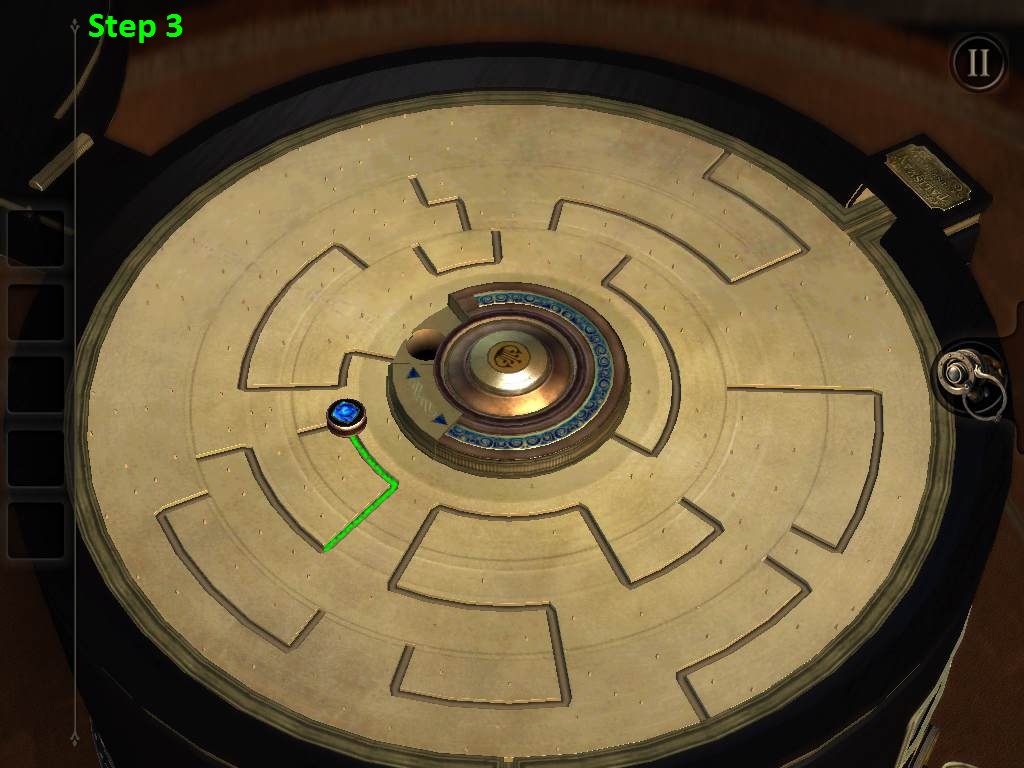
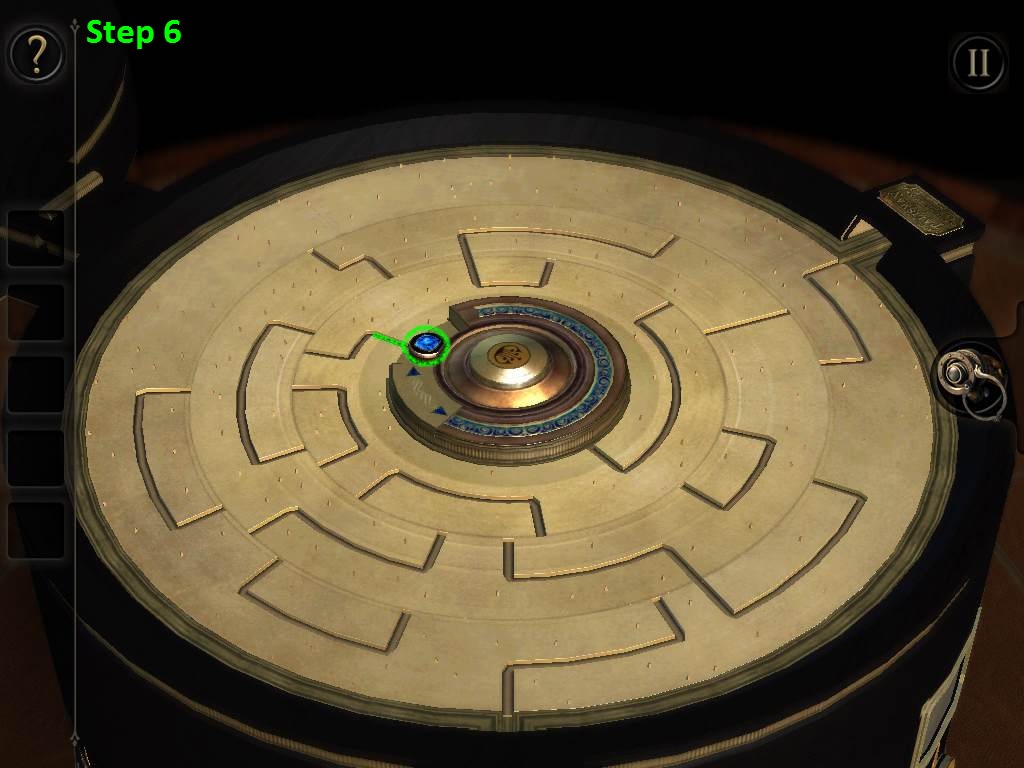
Push the center button once.
Move the blue gem onto the connected path at the inner ring.
Screenshot Step 3
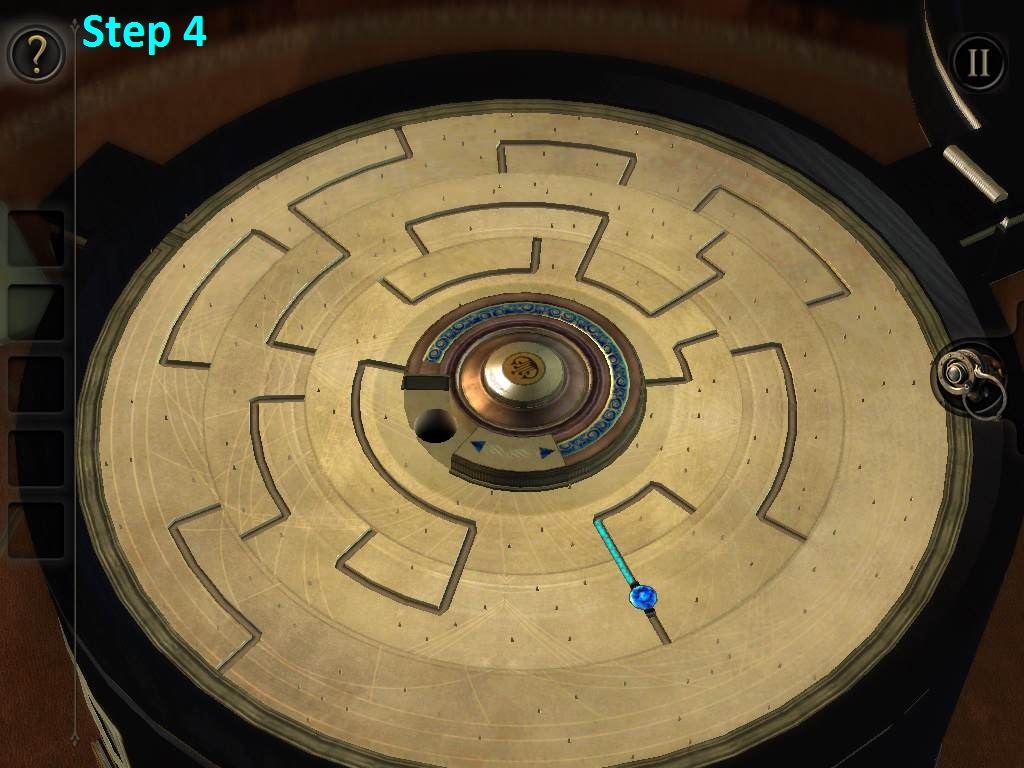
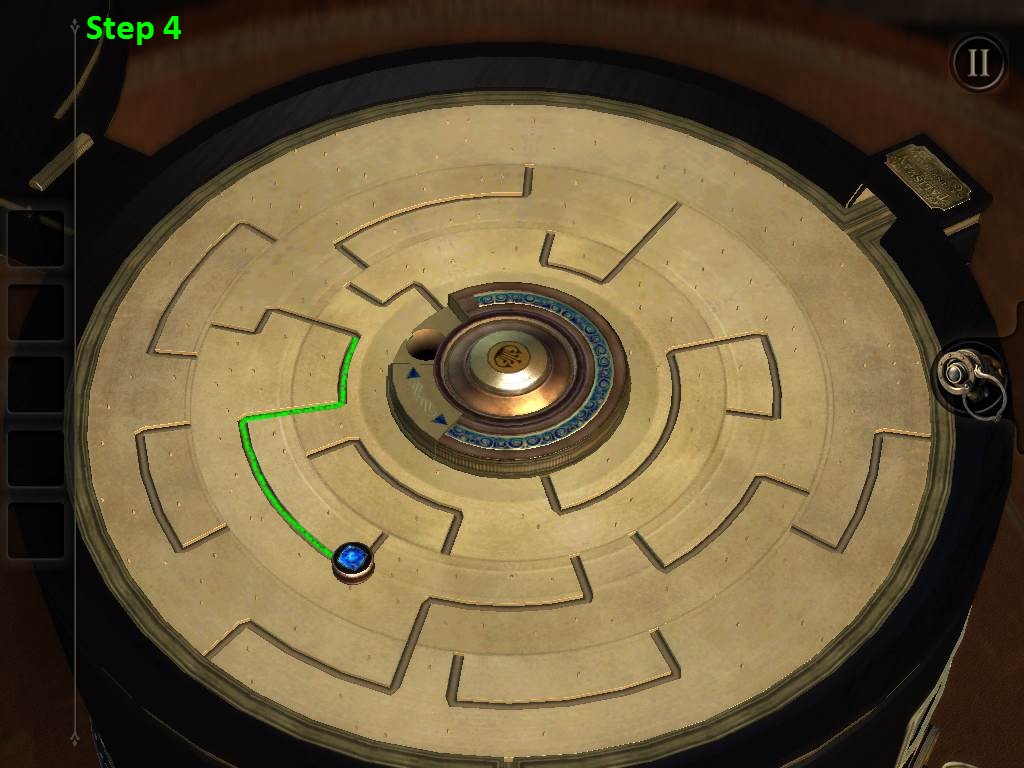
Push the center button once.
Drag the blue gem onto the connected path at the middle ring.
Screenshot Step 4
Push the center button once.
Pull the blue gem onto the connected path at the outer ring.
Screenshot Step 5
Push the center button once.
Drag the blue gem onto the connected path at the middle ring.
Screenshot Step 6
Push the center button twice.
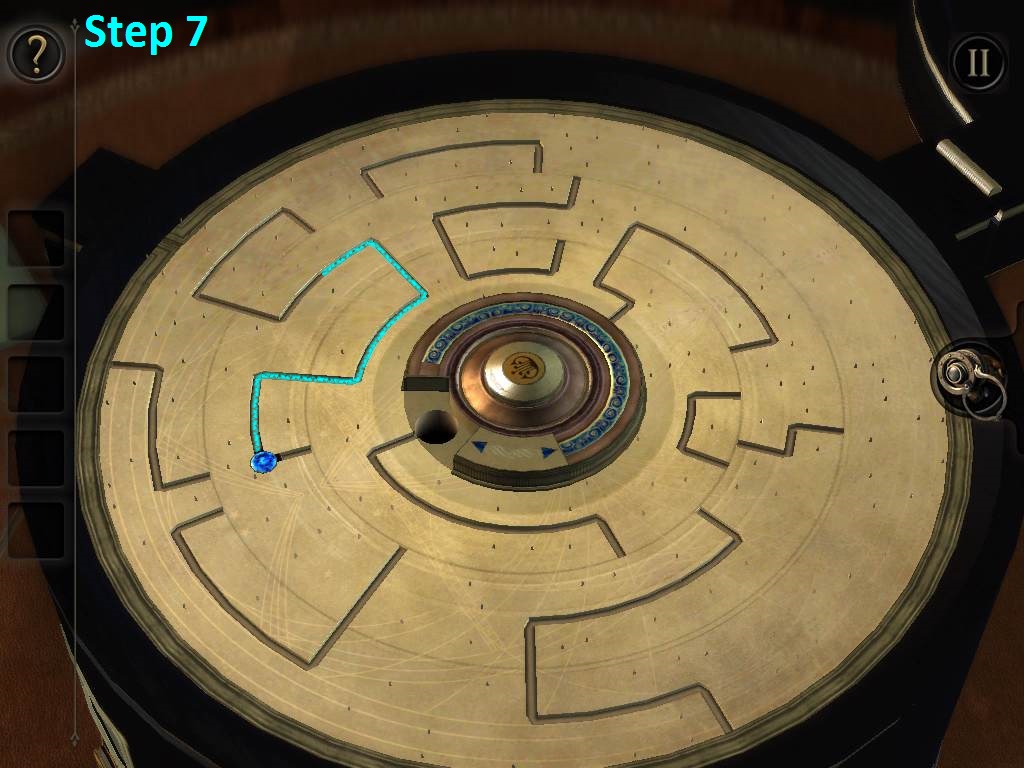
Move the blue gem onto the connected path, which is also at the the middle ring.
Screenshot Step 7
Push the center button twice.
Move the blue gem onto the connected path at the inner ring.
Screenshot Step 8
Push the center button once.
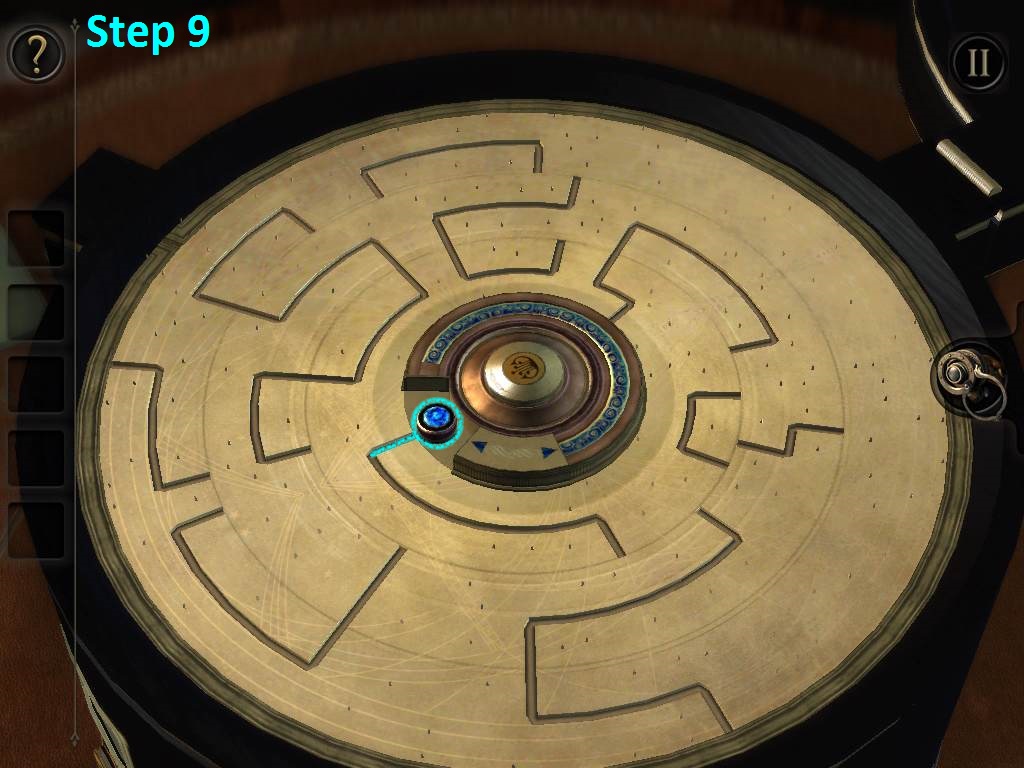
Drop the blue gem into the hole at the end of the path to complete the first maze.
Screenshot Step 9
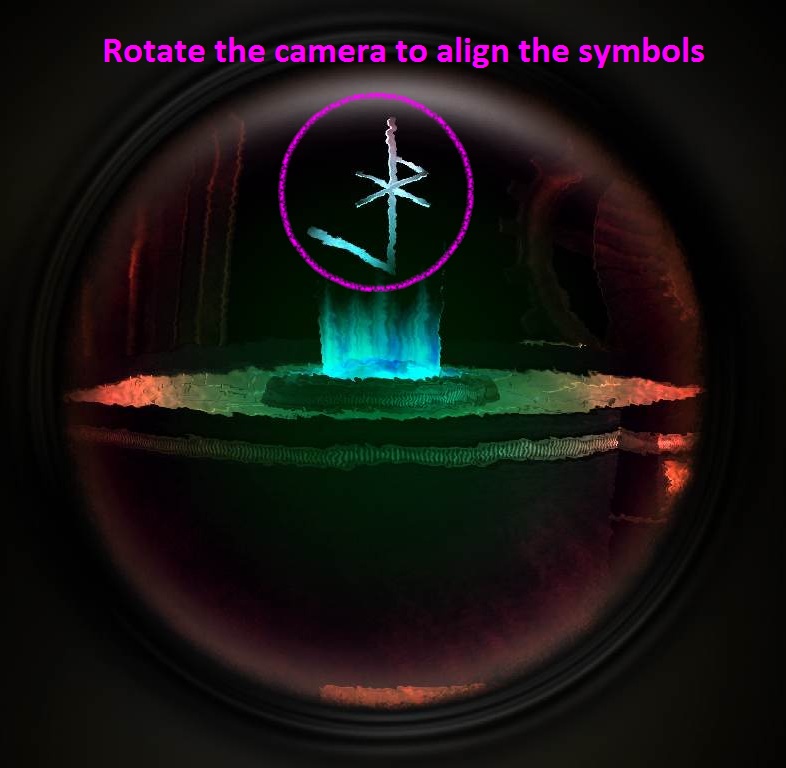
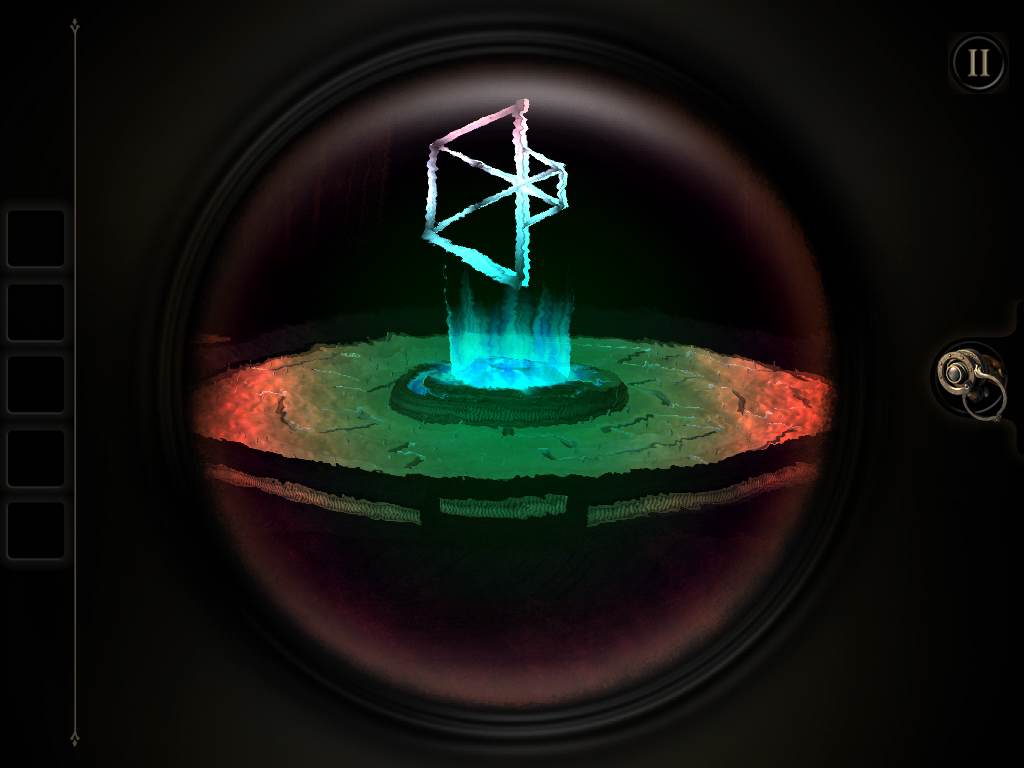
Put on the EYEPIECE to see the glowing shapes above the blue crystal at the center of the maze.
Angle the camera to align the shapes floating above the crystal with the matching pattern of light that is in the space slightly above the table.
Solution.
After you've aligned the two shapes, another blue gem will appear on the other side of the table.
Refer to the following steps to solve the next part of the puzzle:
Start by pushing the center button once, and then moving the blue gem onto the path in the outer ring.
Screenshot Step 1
Push the center button once.
Drag the blue gem onto the connected path at the middle ring.
Screenshot Step 2
Push the center button once.
Move the blue gem onto the connected path at the inner ring.
Screenshot Step 3
Push the center button twice.
Drag the blue gem onto the right connected path at the middle ring.
Screenshot Step 4
Push the center button once.
Move the blue gem onto the connected path at the inner ring.
Screenshot Step 5
Push the center button once.
Drop the blue gem into the hole at the end of the path to complete the second maze.
Screenshot Step 6
Once the second maze is complete the crystal at the center will start to glow again.
Put on the EYEPIECE to view the hidden shapes above the crystal and begin the final part of the puzzle.
Just like before, you need to align the parts in the center of the maze with the matching pattern floating in the space above the table.
This time, however, you can also rotate the disc around the crystal to turn some of the pieces of the puzzle.
First try turning the disc to determine which pieces are stationary and which can be moved.
Next, tilt the camera to align the stationary pieces with the matching pattern.
Lastly, turn the disc again until the movable pieces connect to the stationary ones and also line up with the pattern.
Solution
Thanks to Trinn for the walkthrough!
Posted by: Mike |
August 31, 2013 12:40 PM
|
August 31, 2013 12:40 PM