
The Cave (DoubleFine)
Platform: iOS, Mac, Windows
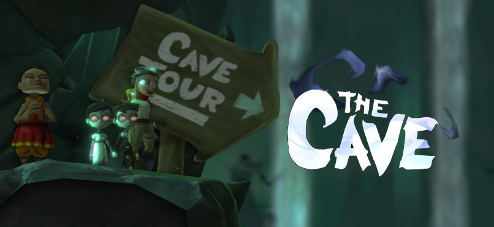
![]() The Cave is both the title of DoubleFine's latest action adventure, and the name of your gracious host and narrator. Not a nickname, mind... it's very literal. The Cave is a sentient wonder of nature, and within lies treasure, adventure, and peril. Seven strangers have assembled to plumb its depths and uncover its secrets. But whether they survive is up to you as you create your own team of spelunkers to work together, solve puzzles, and maybe even get to the bottom of the Cave entirely... and themselves. What? Too dramatic? Well along the way, you'll also have to rescue a mining cart full of vittles, tantalize a death-breathing beast with an enormous hot dog, track down ill-gotten treasures to sell in a gift shop, and bodily hurl yourself off more cliffs than you can shake a stick at.
The Cave is both the title of DoubleFine's latest action adventure, and the name of your gracious host and narrator. Not a nickname, mind... it's very literal. The Cave is a sentient wonder of nature, and within lies treasure, adventure, and peril. Seven strangers have assembled to plumb its depths and uncover its secrets. But whether they survive is up to you as you create your own team of spelunkers to work together, solve puzzles, and maybe even get to the bottom of the Cave entirely... and themselves. What? Too dramatic? Well along the way, you'll also have to rescue a mining cart full of vittles, tantalize a death-breathing beast with an enormous hot dog, track down ill-gotten treasures to sell in a gift shop, and bodily hurl yourself off more cliffs than you can shake a stick at.
 The game controls with a combination of keyboard and mouse that can be configured to your liking under the options ranging from simple [WASD] to almost entirely mouse-driven. At the start of the game, you'll be presented with all seven potential characters to assemble your spelunking squad, so spend some time experimenting with each one, or just pick the three you like the best and take them each into the Cave to begin your adventure. Think carefully, since once you go past a certain point you won't be able to change your party, and everyone has their own unique ability to help out. The Twins, for instance, can leave a ghostly double of themselves behind to hold switches and such, while the Adventurer can use her grappling hook to snag onto certain bits of scenery and swing past obstacles. Once inside, your party will have to work together to proceed, using each other's special talent or simply muscle mass to manipulate the environment together and solve puzzles. Though any combination of characters will allow you to complete the game, who you pick will have an impact on what you get to see and where you get to go.
So what's in the Cave? Well... a lot. But don't worry. Whether you drown, get crushed, get devoured, are impaled, electrocuted, or otherwise dead, there's no dying in the Cave, and you'll be teleported back to a safer spot close to where you kicked the bucket. Since most of the puzzles in the game will require a lot of experimentation, this is a good thing. Sometimes you'll need to use a bit of simple platforming skill. Sometimes you'll have to trigger different mechanisms all at the same time. Sometimes you'll need to set a trap for a giant killer crystal beast. There's a lot more inside the Cave than rocks and cobwebs. As you play, keep an eye out for glowing drawings representing your party members... when you click on them while the appropriate character is active, you'll get a bit of insight into their history. Of course, for the whole story, you'll have to go deeper...
 Analysis: The Cave is one of those games that's more than just a pretty face, but is still quite pretty indeed. The visuals are, of course, cartoonish, but it's hard to care when the areas you'll explore are so beautiful. Lighting plays a big role in it, with the rich colours and imaginative design makes this a game you'll love to explore every nook and cranny in. Perhaps even more impressive is the fluid, expressive animation, from the way characters gesture and move their faces naturally as they talk, to the way the Twins quickly help each other work in tandem to do everything from climbing to swimming. It might be one of the best animated computer games around... it's certainly one of the most personality-packed, brought to life with superb voice acting, and in a primarily puzzle-driven adventure, that's extremely important.
The controls are... decent. Ish. With no real way to entirely disable one set of controls in favour of the others, you can find yourself accidentally activating abilities or swapping heroes. Combined with how awkward the platforming can sometimes feel, especially given how slowly your characters climb, this means traveling to and from places is sometimes more frustrating and tedious than it should be. It helps, then, that the actual gameplay itself is really, really fun. While I wish that more of the puzzles you came across used your party's unique abilities in more interesting ways, the bizarre nature of the obstacles you have to overcome is offset by how tightly designed each area is. Though each Cave area is fun, however, the game really shines once you begin to explore each of the locations dedicated to your party members. There, the game executes some great storytelling, allows you to interact with more memorable characters, and offers up some truly beautiful level and environmental design that provides a welcome break from the rest of the Cave.
Ultimately, how much you're going to enjoy the Cave comes down to how much you like clever environmental puzzles and DoubleFine's signature brand of humour, and both are in remarkably fine form here. It's an exercise in marrying absurd jokes with some surprisingly well-handled storytelling, and once you finish you'll want to go back through again with an entirely new party to see what areas you missed. It really is a fantastic example of puzzle-based adventuring, and has more style and charm in a single level than most games have in their entire package. The Cave is one of those games that's an easy recommendation for players who like to think, laugh, and be constantly surprised, and will keep you busy and mesmerized for a long time.
![]() Windows:
Windows:
Order the full version (Steam)
![]() Mac OS X:
Mac OS X:
Order the full version (Steam)


Walkthrough Guide
(Please allow page to fully load for spoiler tags to be functional.)
The Cave Walkthrough
General Info, Chapters 1-2, Knight, Hillbilly, Adventurer, and Twins Zones
General Information
Controls
Use the [WASD] or [arrow] keys to move. You can also use your mouse to click a location to make your selected character walk there.
Hold down the shift key while running to make your character walk slowly.
Press spacebar or the right mouse button to jump. It can also be used to make a small leap upwards while climbing a ladder.
Press E or click an object to interact with it. You can also press it to use an item your character is holding on a nearby object.
Press Q or push the middle mouse button to activate your character's special ability. Refer to the Selecting a Character section for a description of each player's unique ability.
Press 1, 2, and 3 to cycle between the characters in your group or scroll with the middle mouse button. You can also click the character's portrait by the number buttons at the lower left corner of the screen.
Press C to release an item your character is currently holding or to pick up a nearby item. You can also use it to drop down while hanging from a ledge, rope, or ladder and to close the Menu or Options windows.
Selecting a Character
First things first: at the start of the game you will have an option to select 3 of the available 7 characters to play as on your adventure.
Each character has a set of unique abilities and one special map region that is only accessible when that character is on your team.
The Knight - This character has the ability to shield himself, making him invincible to all incoming damage; can also be used to safely fall from great heights. Allows access to the special zone the Tower.
The Hillbilly - This character has the ability to hold his breath and swim underwater indefinitely. Allows access to the special zone the Carnival.
The Time Traveler - This character has the ability to phase through certain barriers, letting her shortcut through many locked gates. Additionally, the Time Travelers boots allow her to hover over the surface of water when moving at full speed. Allows access to the special zone the Museum.
The Adventurer - This character has the ability to grapple, allowing her to swing safely over danger or hoist herself above obstacles. Allows access to the special zone the Pyramid.
The Twins - These characters have the ability to separate their ghosts from their corporeal form, leaving their spirits behind as placeholders. Allows access to the special zone the Estate.
The Scientist - This character has the ability to hack machines, unblocking certain passages and sometimes revealing new ones. Allows access to the special zone the Laboratory.
The Monk - This character has the ability to perform telekinesis, moving objects with the power of his mind. Allows access to the special zone the Temple.
Click one of your selected characters to control him or her and begin the tutorial stage.
Achievements
What You Always Wanted - "Reached the bottom of The Cave."
Awarded when you reach the end of the game for the first time on any character.
Who Wants to Live Forever - "Got everyone out of The Cave without dying once."
Fairly self-explanatory, you must complete the entire game without letting any member of your party die.
Shoplifing - "Saw a postcard stolen from the Gift Shop."
Located in Chapter 1: The Cave Souvenirs at the Exiting the Gift Shop section. Exit through the right door of The Cave Souvenirs shop while one of your characters is holding the Postcard.
Remorse - "Remembered it's wrong to steal."
Hold on to the Postcard for the entire game and return with it to the Gift Shop at the end. Place it back into the Postcard Display.
Well Done - "Sacrificed oneself for ultimate flavor."
Located in Chapter 1: The Cave Souvenirs at the Capturing the Monster section. Place the Hot Dog from the vending machine on to the Pit of Spikes. Do not ring the bell. Instead, walk up to the monster to make her breathe fire at your character, which will kill your character and roast the Hot Dog.
Royal Buffet - "Where did the King go anyway?"
Located in the Knight's Tower at the Returning for Your Prize section. After you deliver the Amulet to the King, return to the Princess's tower to find the dragon coming back for seconds.
Weight of the Beast - "The scale reveals a baleful figure."
Located in the Hillbilly's Carnival. Build a team consisting of the Hillbilly, Knight, and Time Traveler characters. Have each of them hold one of the following items: The Wrench, the Sledgehammer, and the Barbell. Stand all three players on the Guess Your Weight Machine scale, then press the button to have the Barker guess your weight. The added total of the characters and their held items will equal 666 pounds.
Fire in the Hole - "3 die by the Miner's hand."
Located in Chapter 2: The Mine at the Finding the Miner & Delivering Cart #1 section. When you encounter the Miner, stand all three characters in your group together while the Miner throws Dynamite at you. You will receive the achivement if the explosion from the Dynamite kills all three players at once.
Walk Like an Adventurer - "Pantomimed an ancient hieroglyph."
Located in the Adventurer's Pyramid at the Exploring the Pyramid section. Find the room inside the pyramid with a painting on the wall depicting three men who "walk like an Egyptian". Move all three characters in your group into the room.
Such Bad Children - "Watched Mummy and Daddy's furniture get broken all to bits"
Located in the Twins' Estate at the Reaching the Cellar section. Use the Dumbwaiter to ride up to the Parents' Bedroom on the second floor. Jump on the bed three times to break it.
Smells Like Team Spirit - "Made all three characters smell like a dinosaur at once."
Located in the Time Traveler's Museum at the Exploring the Museum section. Walk all three characters in front of the dinosaur exhibit at the bottom of the museum. Push the exhibit button to spray the three players with dinosaur scent.
To Soothe a Savage Beast - "Recorded and played back the elevator music from the Zoo food court."
Located in the Abandoned Zoo at the Making the Tape Recording section. After you power the Tape Recorder with the charged Battery, run to the building with the loudspeaker playing cheesy music in the food court. Drop the Tape Recorder in front of the speaker to record the music. Pick the Tape Recorder back up when it's done recording, then place it down again to play back the music.
Hazardous Work Environment - "Slipped, where wet."
Located at the Scientist's Laboratory at the Attaining the Second Key section. Go down to the Level 3 to find the Wet Floor Sign. Pick up the sign and place it on the edge of the platform just to the left. Now walk past the sign to make your character slip and fall over the side of the ledge.
Embrace Impermanence - "Broke bridges."
This achievement is composed of two parts, you must break both of the red bridges at the Monk's Temple.
The first bridge is located at The First Trial section. Retrieve the Feather from the zen master at the top of the temple. Walk down to the bridge beside the old sign at the start of the level. Stand all three members of your group on the bridge, then make one person jump to collapse it.
The second bridge is located at The Fourth Trial section. With the Feather still in hand, stand the three characters on to the floating carpets. When you reach the passage in the right wall, quickly move all your characters off the carpets and into the passage. Stand them all on the red bridge and jump to collapse it.
Creamed Corn - "Food-based destruction."
This achievement is composed of two parts, you must destroy two Cans of Corn.
The first Can of Corn is located in the Mine at the Finding the Miner & Delivering Cart #1 section. When you first approach the Miner, he will throw several objects at you, including the Can of Corn and live Dynamite. Stand next to the Can of Corn on the ground to make him aim the Dynamite at your feet, then run away. When the Dynamite explodes, it will destroy the can and complete the first half of the achievement.
The second Can of Corn is located on the Island at the Detonating the Gun Powder Kegs section. Go to the right shore of the island and move the blue crate to uncover the Can of Corn. Go underground to the Pirate Gate, and on the way there, place the Can of Corn on top of the grate in the floor that's positioned under the loose boulders in the ceiling. When you detonate the barrels to take out the ceiling, the explosion will also destroy the second Can of Corn.
Don't Fill Up on Fortune Cookies - "Peered into everyone's fate."
Located at the Hillbilly's Carnival. Use the Zaetan fortune telling machien to predict the fortunes of all 7 characters. Because the Hillbilly must be in your group to access this area, you can only bring 2 unique characters at a time, so it will take a minimum of 3 playthroughs to get all 7 fortunes.
A Midsummer Knight's Thieve - "Helped the Knight obtain Excalibur."
Complete the Knight's Tower. Refer to the Character Zone in the walkthrough for the step-by-step instructions through that area.
Funnier Than a Burning Carnival - "Enabled the Hillbilly to burn down the Carnival."
Complete the Hillbilly's Carnival. Refer to the Character Zone in the walkthrough for the step-by-step instructions through that area.
It Belongs in a Museum - "Came ever-so=close to recovering the Sarcophagus."
Complete the Adventurer's Pyramid. Refer to the Character Zone in the walkthrough for the step-by-step instructions through that area.
God Bless Us, Every One - "Stood by and watched as the Twins murdered their parents."
Complete the Twins' Estate. Refer to the Character Zone in the walkthrough for the step-by-step instructions through that area.
Prevenge - "Served as an accessory to the Time Traveler's murder of her enemy's ancestor."
Complete the Time Traveler's Museum. Refer to the Character Zone in the walkthrough for the step-by-step instructions through that area.
Learn to Stop Worrying - "Shared in the blame for the Scientist's act of mass murder."
Complete the Scientist's Laboratory. Refer to the Character Zone in the walkthrough for the step-by-step instructions through that area.
Grand Theft Karma - "Played some dubious role in the Monk's murder of his Master."
Complete the Monk's Temple. Refer to the Character Zone in the walkthrough for the step-by-step instructions through that area.
Win-win-win-win-win-win-win - "Everyone reached the bottom."
Complete the game on all 7 characters. Requires at least 3 playthroughs to reach the end with each character.
Redemption - "Saw the good in everyone."
Earn the good ending for all 7 characters by giving their most desired object back to the Gift Shop Clerk at the end of the game.
Corruption - "Saw the darkness in all our hearts."
Earn the bad ending for all 7 characters by keeping the most desired object fromt he Gift Shop Clerk and climbing up the ladder with it in hand.
The Whole Story - "Collect of forgotten dreams."
Find all of the cave paintings and both the good and bad endings to the stories for all 7 characters.
Tutorial Stage - The Campfire
After you've gotten the brush up on every character, select one of the players you'd like to take on your adventure.
Take a look at the "Selecting a Character" topic in the General Information section of this walkthrough if you want to learn a little more about the characters before making your selection.
Move to the right until you reach a small shack.
Take the Crowbar that's mounted on the wall inside the shack, then move all the way left until you find a Shoddy Barricade.
Interact with the Shoddy Barricade three times while you are holding the Crowbar to remove the planks of wood.
Don't lose that Crowbar just yet! It will prove useful later on.
Pass through the opened path to register the first character in your team. You may now select the next two characters and walk them past the unblocked barricade to complete your party.
Continue left through the graveyard, then drop down the ledges and walk right to find a movable crate.
Click the crate once to grab hold of it (or press and hold the "E" key), then walk to the left to pull the crate towards the wall.
Jump up on top of the crate, then jump to the ledge at the top of the wall.
Alternately, if you are playing as the Adventurer, you can simply use your Grapple ability to the grab the hook in the wall and swing on to the ledge.
Move all three players in your group up to the ledge, then walk each of them onto the rickety wooden platform.
Chapter 1 - The Cave Souvenirs
Exiting the Gift Shop
Swim out of the pool and walk right to find The Cave Souvenirs gift shop.
If you abandoned the Crowbar during the earlier stage, it will reappear at the side of this pool. Take it! You're gonna need it.
Speak with the Gift Shop Clerk to hear his sob story for a bit, then try to walk away towards the left.
Pick up the giant Novelty-Sized Key the clerk throws to the ground.
Return to the "Employees Only" door on the left side of the pool.
Use the Novelty-Sized Key to open the giant lock on the gate.
If the Time Traveler is in your group, you can use her Phase ability to pass through this gate.
Fixing One Well, Breaking Another
Drop down the ledges and slide down the rope, then climb down the ladder to reach the Broken Old Well.
Walk left to the lever and use one character to hold it and keep the gate slightly open.
If the Twins are in your group, have them hold on to this lever.
If the Time Traveler is in your group, you can use her Phase ability to pass through this gate.
Be careful not to stand too far to the left while phasing to avoid landing on top of the spikes.
Switch to a different character. Drop down the ledges to the vending machines below.
Pull and hold the lever underneath the lowest wooden platform to full open the gate.
Select the third character in your group and walk them past the opened gate, then jump over the pit of spikes to reach the third lever.
If the Twins are holding the right lever by the gate, you can use their Ghost ability and quickly move left, over the pit, and to the third lever while their spirit forms briefly hold the gate open.
If you are playing as the Adventurer, you can use the Grapple ability to swing safely over the spikes to the other side of the pit.
Once the third lever is pulled, the other two characters can leave their levers and pass through the opened gate.
Move left and hop up the platforms.
You'll find your first Cave Painting at the top of the fourth ledge up.
Jump across the gap and move up to the Old Well.
Use the Crowbar to pry the Rusty Crank off the side of the well.
Pick up the Rusty Crank and walk all the way back to the Broken Old Well.
Attach the Rusty Crank to the Broken Old Well, then use the crank to pull up the Bucket.
Doing so will destroy the well, allowing you to hop over the rubble and access another Cave Painting.
Pick up the Bucket after it lands on the ground beside the ladder.
Capturing the Monster
Return to the Old Well, then continue up and left to find the Fuse Box.
Place the Bucket on top of the Fuse Box to catch the dripping water.
Your character will now be able to safely remove and keep the Fuse.
Go back down to the vending machines near the broken well.
Place the Fuse inside the Fuse Box to power the two vending machines.
Click both of the machines to dispense the Hot Dog and the Can O' Grog.
Use one character to pick up the Hot Dog and another to retrieve the Fuse from the Fuse Box by the right machine.
Climb back up to return to the dripping Fuse Box and place the Fuse back inside to power the claw mechanism.
Jump up the ledges and over the small pit of spikes and move left. Instead of going up the platforms to the old well, continue left until you reach a bell and a giant Pit of Spikes.
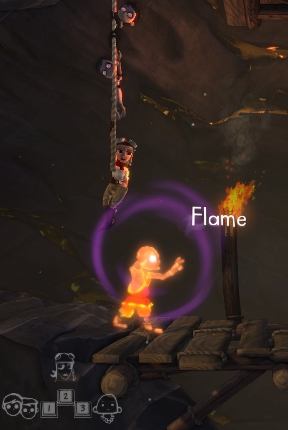
Throw the Hot Dog onto the pike at the center of the pit.
OPTIONAL: While the Hot Dog is on the impaled on the stick, jump over the pit and run towards the crystal cave monster.
The monster will breathe fire at you, killing your character but also roasting the hot dog on the stick and earning you the "Well Done" achievement.
Ring the giant Bell to lure the monster to the pit.
While the monster is distracted, switch to the character by the dripping Fuse Box.
Pull the "Levers and Such" beside the claw mechanism to activate the machine and capture the monster.
Collecting the Three Missing Trinkets
Jump over the giant pit of spikes and move left to find another Cave Painting.
Continue left and jump over the ledge into the pool of water below.
Hop up the ledges on the right, then climb down the series of ladders to the explosives area.
Take a stick of Dynamite from the Box of Dynamite beside the stack of crates.
Climb back up to the top of the ladders.
Light the Dynamite on the Flame from the torch to the left of the top ladder.
Quickly run to the pile of boulders forming a wall to the right and drop the Dynamite, then run away before it detonates.
Move right and hop up the ledge to find the first of the missing trinkets (randomly selected between a Crystal Skull, Cursed Guitar, or Thespianship Award).
Grab the first trinket and switch to a different character in your group.
Walk to the right and drop down, then swim through the U-shaped tunnel of water to resurface at the second missing trinket.
Take the second trinket, then swim back out. Instead of returning to where you came from, jump up the platforms and move right to find a Door Control Console.
If you are playing as the Scientist, you can Hack the console.
Alternately, the Time Traveler can Phase through the gate.
The Twins can use the Ghost ability while standing on the floor button to hold it down, then run to the second button on the other side of the gate.
Otherwise, stand one character on the large floor button to open the gate.
Switch to the third character in your party and walk through the opened gate, then go right and up the ladder to find the third and final missing trinket.
Take the trinket, climb back down the ladder and walk to the right to the Elevator Call Button.
Push the button to move the elevator down to the bottom level.
Don't get on that elevator just yet. Instead, walk to the left and stand on the floor button at the right side of the gate to hold it open for the other two members of your group.
Walk each of the other two members onto the elevator, then switch back to the third character.
Return to the elevator and press the Elevator Call Button, then move on top of the platform to return to the vending machines.
Entering The Cave
Climb your way back up to return to the Gift Shop Clerk at The Cave Souvenirs store.
Give all three trinkets to the Clerk, then speak with him to open the door on the right.
OPTIONAL: Interact with the Postcard Display to drop the Postcard onto the ground.
Pick up the Postcard and walk out of the right door while carrying it to earn the "Shoplifting" achievement.
OPTIONAL X2: Hold on to that Postcard for the entire game! If you can keep hold of it until the very end and return it to the Postcard Display, you will receive the "Remorse" achievement.
Walk to the right and jump over the ledge into the pool of water below.
Continue left, then either hold on to the rope suspending the block or stand on the block itself to weigh it down, raising the other barrier to the left.
Select a different character and jump to the platform on the left to find another Cave Painting.
Switch back to the first character holding on to the lowered barrier and move him or her off to lift the wall back up.
Return to the second character and move them down and to the right to find a movable block.
Pull the block to the left so that it is positioned under the platform before the first character, allowing them to safely drop down onto the block without dying.
If the Knight is in your group, you can use the Invincible ability to drop safely down from any of the ledges.
Walk all three members of your group down and to the right to stand them on top of the floor button.
Follow the sign to the right to access the next area.
Character Zone - Knight's Tower
To access this area, you must have the Knight character in your party.
Beginning Your Royal Quest
Select the Knight in your group, then walk left until you see a downward arrow Cave Tour sign above a pit of fire.
Drop down and quickly use your Invincible ability to safely pass through the flames.
Walk left to speak to the king, who demands that you receive his daughter's amulet before he'll alow you to pull the sword from the stone. After your conversation, move to the right to unlock the gate.
Pass the opened gate and climb up the series of ropes and platforms to reach the top of the princess's tower.
Speak with the princess. She'll ask for the dragon's treasure in exchange for her amulet.
After your conversation, drop down and move right to unlock the next gate.
Using the Elevator
Move right towards the princess sign, then head up the rope and up the long ladder to enter the tower.
As you climb the ladder, you'll see another knight holding a crossbow and guarding the room with the Dragon Gate Key. Stay away from that guy, he's a little trigger happy.
If the Time Traveler is in your group, you can simply Phase through the gate to retrieve the Dragon Gate Key.
Or, if you have the Monk character, use his Telekinesis ability to pull the Dragon Gate Key to him.
Ascend the stairs to reach the elevator. Stand inside the cage with the Knight, then switch to another member of your group.
Move the second character to the lever above the elevator. Pull and hold the lever to move the lift to the 2nd floor (wait for the "ding" sound before releasing the lever).
Switch back to the Knight and move him to the left to find a Cave Painting, then return inside the lift.
Use the second character at the elevator controls to pull the lever again to move the lift to the 3rd floor.
Quickly switch to the Knight again and activate his Invincible ability. As the guard attempts unsuccessfully to shoot the Knight, switch to the third member of your group.
Walk to the guard busy shooting at the Knight, then go up the ladder behind him and fetch the Dragon Gate Key.
Stealing from a Dragon
Move down the series of ladders and ropes and head to the right until you reach the Close & Lock Gate.
Unlock the Dragon Gate with the Dragon Gate Key.
If the Monk character is in your team, you can use the Telekinesis ability to pull the Dragon Treasure straight to him.
Switch back to the second character at the elevator controls.
Pull the lever to lower the Knight on the lift to the fourth floor, then switch to control the Knight character.
Drop down and walk to the left to the second dragon sign and follow it downward. Continue right into the dragon's den.
Approach the dragon as close possible, then quickly activate your Invincible ability.
While the dragon attacks the Knight, switch to the third character in your group who should be standing at the unlocked Dragon Gate.
Run to the left and steal the Dragon Treasure, then flee back to safety. You must move quickly before the dragon's fire pushes the Knight out of range.
Once the Knight has been pushed out of range of the dragon's flames, switch back to his character.
Grab the food dish full of armor and push it to the left and over the ledge.
Climb down and push the food dish to the right until it reaches the rock wall.
Hop on top of the dish and jump up to climb the wall and find another Cave Painting.
Walk right and climb up the ladder to meet with the third character standing by the gate.
Make that character drop the Dragon Treasure so the Knight can pick it up.
Returning for Your Prize
Climb back up into the tower. You'll see that the dragon has killed all the guards, allowing you to proceed safely through the area.
When you reach the top, insert the Dragon Treasure into the Coin Machine to unlock the Princess's door.
Enter the room and pick up the Bloody Amulet on the floor.
Go all the way back to the king with the Bloody Amulet in hand.
After he lowers the drawbridge for you, you can attempt to draw Excalibur from the stone. Unfortunately, you won't be successful without a little extra help.
Return to the inside of the tower and climb up until you reach the room with the Crate of Dynamite.
Grab a stick of Dynamite from the crate, then go down and left. When you find the skull sign, follow it to the left.
Walk to the end of the crypt to find another Cave Painting.
If you stand on top of the tomb containing two skeletons, you'll see a cluster of loose looking boulders leading to the Excalibur's stone in the chamber above.
Light the Dynamite on one of the flames at either side of the tomb. Quickly run back under the boulders in the ceiling and drop the Dynamite on top of the roof of the tomb.
Run away before the Dynamite detonates, or use your Invincible ability to protect yourself from the blast. After the explosion removes most of the stones, return to the King's chamber.
Interact with Excalibur to pull it out of the stone.
OPTIONAL: After the king leaves to see the Princess, you can follow him to her bedroom to receive the "Royal Buffet" achievement.
Follow the sign to the left to access the next area.
Character Zone - Hillbilly's Carnival
To access this area, you must have the Hillbilly character in your party.
Finding True Love & The First Ticket
Select the Hillbilly in your group. Activate the Hold Breath ability to swim through the water tunnels.
When you reach the surface, walk to the Crate of Dynamite on the right.
Take a stick of Dynamite from the crate.
Light the Dynamite on the Flame, then drop the Dynamite next to the pile of boulders to the right of the crate.
Run away from the dynamite before it explodes and takes down the rock wall, allowing the rest of your group to enter.
Move left and climb all the way down to the Amazing Two-legged Lady. Continue left until you reach the poster image of a small child.
Take the Carnival Ticket from the child and walk to the right to the pink bear prize dispenser.
Insert the Carnival Ticket into the Ticket Taker. According to the counter at the top of the booth, you still need 4 more tickets to win the prize.
Getting Ticket #2
Walk all the way to the left until you reach the Dunking Booth.
Stand on top of the trap doors on the platform with the Hillbilly.
Switch to a different character in your party and run them to the Dunking Booth.
Have them push the target to drop the Hillbilly into the water.
Switch back to the Hillbilly.
Swim to the left and climb up the ladder to find another Cave Painting.
Drop down and take your second Carnival Ticket on top of the Dunking Booth platform.
Return to the prize booth and insert your Carnival Ticket into the Ticket Taker. 3 more to go!
Getting Ticket #3
Move to the left until you arrive at a rope hanging from the ceiling between the Test Your Strength Machine and the crying child.
Climb up the rope and ledges and turn left when you see the Guess Your Weight Machine. Don't go down towards the Wheel of Misfortune just yet. Instead, climb over the trunks and go all the way up the passage to the Generator Truck.
Pick up the Wrench on the floor beside the truck. Keep the Hillbilly at the Generator Truck and switch to play a different character in your group.
Go to the Guess Your Weight Machine, continue to the right past Magnifico the magician's tent, climb up and past Xavetar the fortune teller, then walk to the left to finally reach the Man of Ordinary Strength.
Pick up the Barbell on the floor by the ordinarily strong man.
Return to the magician's tent.
After Magnifico performs the disappearing cupcake trick, place the Barbell onto the Magician's Table.
Magnifico will turn the Barbell invisible for thirty seconds. Click the top of the Magician's Table to pick it up - although you can't actually see the object, your character will appear to be holding something in their hand.
Quickly run to the Guess Your Weight Machine while the Barbell is still invisible and push the red button to activate the machine.
The barker will incorrectly guess your weight, allowing you to pick up your third Carnival Ticket from the dispenser.
OPTIONAL (If you have the Knight, the Hillbilly, and the Time Traveler in your group): Have each character carry the Sledgehammer, the Wrench, and the Barbell. Stand them on the scale of the Guess Your Weight Machine and push the button. Their combined weight with the items will total 666 pounds, earning you the "Weight of the Beast" achievement.
Return to the prize machine and insert the Carnival Ticket into the Ticket Taker. Only 2 more tickets left!
Getting Ticket #4
Climb back up to the Man of Ordinary Strength, then walk to the left to find the ferris wheel. Hop onto one of the moving cars to catch a lift.
Ride the car to the upper left ledge and jump off to find a Cave Painting.
Jump back into a car and ride it to the upper right ledge. Hop off again and stand beside the Fuse Box; don't touch the box while it's powered unless you want to be electrocuted.
Switch back to the Hillbilly character, who should be waiting by the Generator Truck.
Use the Wrench to turn off the Generator Truck, temporarily shutting down power to the park.
Switch back to the character standing at the Fuse Box.
Now you can safely remove the Fuse and drop down the cars to the bottom of the ferris wheel.
Walk all the way left to the group of Carnies, then climb up the power pole to the second Fuse Box.
Switch back to the Hillybilly and use the Wrench on the Generator Truck to shut off the power again.
Return to the character standing at the Fuse Box and insert the Fuse.
This will power the Exotic Clothed Dancers booth and distract the Carnies, allowing you to pick up the Sledgehammer on the left.
Walk back down to the Test your Strength Machine.
Use the Sledgehammer on the machine to beat the game, then take the Carnival Ticket from the dispenser.
Return to the prize booth and insert the Carnival Ticket into the Ticket Taker. One more ticket and the pink bear is all yours.
Getting Ticket #5
Go back to the second Fuse Box above the group of Carnies.
Switch to the Hillbilly character to use the Wrench on the Generator Truck and shut down the power again.
Switch back to the character at the Fuse Box and remove the Fuse.
Walk all the way to the right past the Man of Ordinary Strength, then drop down to arrive at Xavetar the fortune teller.
Insert the Fuse into the Fusebox beside Xavetar to activate the machine.
Click Xavetar to receive a fortune. Note the color of the crystal ball and Xavetar's eyes.
OPTIONAL: If you take each of the 7 characters to Xavetar to receive their fortunes, you will receive the "Don't Fill Up On Fortune Cookies" achievement.
Walk left past the Guess Your Weight Machine, then hop over the gap and drop down to reach the Wheel of Misfortune.
Interact with the Color Picker and point the arrow to the side that matches the color Xavetar predicted.
Pull the lever to spin the wheel. If you selected the correct color, take your Carnival Ticket from the dispenser.
Return to the prize booth and insert the Carnival Ticket into the Ticket Taker.
Getting Revenge
The Hillbilly will run to pick up the Pink Bear, leaving the Wrench behind (keep it there for later!).
Walk to the right with the bear in hand to the Amazing Two-Legged Lady... and her new beau.
Walk left to find there's a new prize at the booth, a Lighter, that only costs one ticket.
Continue left to the little kid who has a new Carnival Ticket in his hand. Too bad for him, you're going to steal this Carnival Ticket too.
Return to the prize booth and insert the Carnival Ticket into the Ticket Taker.
Don't pick up the Lighter just yet. Instead, grab the Wrench that you left on the ground earlier.
Go all the way left to return to the Dunking Booth and stand on top of the trap doors.
Switch to a different character and move them to the Dunking Booth as well. Push the target to drop the Hillbilly into the water.
Activate the Hold Breath ability and swim down the lower right passage.
Use the Wrench on the Pipe Valve Nut next to the surface of the water to shut off the firehose.
Walk over the stack of crates to the right to find another Cave Painting.
Switch to a different character in your group. Walk them to the prize booth and pick up the Lighter off the ground.
Move all the way to the right, then use the Lighter on the Hay Bales blocking the exit.
Continue right through the exit and drop down to the two levers below to access the next area.
Chapter 2 - The Mine
Finding the Miner & Delivering Cart #1
Select two characters to pull each of the levers until a boulder drops from the ceiling into the spike pit.
Jump on to the boulder to cross the spikes, then continue down the ladder.
At the bottom you'll see a rock wall to the right and a torch to the left. Looks like you'll be using some Dynamite soon.
Continue left and down until you come across a second rock wall next to a burning torch, another prime Dynamite location. Remember that for later and continue down.
Walk past the Water Puddle, then jump across the rope to the right to find the third area with a torch and rock wall. Your pyrotechnic cup runneth over. Head down the rope and subsequent ladder to reach the mine car tracks.
Move left to talk to the angry Miner. He'll demand three mine cars and throw several objects down at you, including a Bucket, a Shovel, a Can of Corn, and some live Dynamite.
Pick up the Bucket and the Shovel while avoiding the explosions.
If you have the Knight in your team, it is helpful to have him retrieve the items and use his Invincible ability to protect himself.
Or if the Monk character is available, use his Telekinesis ability to grab the objects from a safe distance.
OPTIONAL: Move all three characters within the blast radius of the exploding Dynamite. If all three die to the Dynamite at the same time, you'll receive the "Fire in the Hole" achievement.
OPTIONAL x2: Place the Can of Corn where it can get hit by the Miner's Dynamite. When it explodes, it will become a Destroyed Can of Corn. This fulfills the first half of the "Creamed Corn" achievement.
With whichever character that's holding the Bucket, climb back up the ladder and rope.
Use the Bucket on the Water Puddle to collect the Bucket of Water.
Head down to the miner again and stand at the point where he's throwing the Dynamite to catch a stick inside the Bucket of Water.
Move to safety, then drop the bucket of water to hold on to the Dynamite.
Walk all the way back to the first rock wall and torch you saw near the start of the level.
Use the Dynamite on the flame to the left of the ladder, then quickly drop the lit stick of Dynamite next to the rock wall to the right of the ladder.
After it detonates, continue right through the cleared passage.
Jump across the gap to the right ledge to find a Cave Painting.
Climb down the ladder to the mine car, then switch to a different character in the party.
Use this character to pick up the Shovel, then walk them to the mine car on the track to join the first player.
Have the person with the Shovel sit inside the mine car and the other character stand outside the car to push it down the tracks (don't pull the car, it can run over and kill the character!)
Quickly switch to the character inside the moving mine car.
When the car passes through the first tunnel, use the Shovel to hit the yellow Track Switch.
This will bring the car straight to the Miner. If you don't make it the first time, the car will come back around to the first track where you can push it and try again.
Delivering Cart #2
After the first mine car is delivered, switch to a character not holding the Shovel.
Use them to pick up the Bucket of Water and catch another stick of Dynamite from the angry Miner.
Climb up to the Water Puddle, then continue up the left ladder to return to the second rock wall.
Light the stick of Dynamite on the Flame, then drop the burning Dynamite in front of the rocks and run a safe distance away.
Move left and jump from the right ledge to the middle platform and then from the middle platform to the left ledge to find another Cave Painting.
Climb down the ladder to the mine car filled with meat on the bottom track. From here, you'll have to do a few steps to get the car from the right side of the bottom track to the left side of the upper track.
First, push the car as far to the left down the small section of track that it will go.
Go up the ladder and stand on the right elevator to weigh it down.
Pull the mine car on to the lowered elevator.
Climb up both ladders to reach the top platform, then stand on the raised left elevator to weigh it down. Now your character and the mine car should both be on separate elevators that are balanced by weight at the middle level.
Switch to a different character and have them run to the right elevator and stand next to the mine car full of meat.
Switch again to the third person in your group. Walk them to the left elevator to stand next to the first player. At this point, both elevators should be at the middle again.
Use the character standing on the right elevator to push the car on to the middle platform between the elevators.
Stand only one character on each elevator to bring them both to the middle again.
Make the third character push the mine car on to the left elevator, then stand them on the right elevator to balance the weight.
Use the person on the left elevator to push the mine car to the left and out the exit, sending it to the angry Miner.
Delivering Cart #3
Return to the Miner with one of your characters.
Pick up the Bucket of Water and catch the third stick of dynamite.
Climb up the ladder and rope, then jump to the right to reach the third rock wall and torch.
Light the Dynamite on the Flame and drop it in front of the rock wall.
Run to safety before it detonates, then continue through the cleared path on the right.
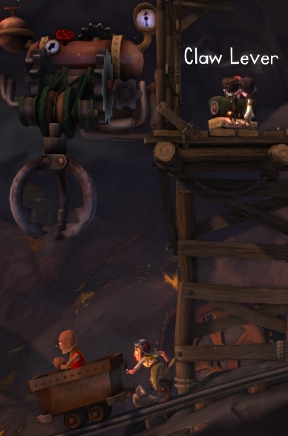
Slide down the rope, walk right past the claw mechanism, and then climb up the ladder to find the Claw Lever and another Cave Painting.
Stand one character beside the Claw Lever, then switch to another player in the group.
Walk to the claw mechanism, then continue right to the mine car at the end of the track.
Push the mine car to the left and hold it under the claw mechanism.
Switch back to the character standing by the Claw Lever and activate it to drop the claw into the gold ore.
If the mine car is positioned correctly, the claw will pick up the ore and dump it into the car.
Switch again to the player holding the mine car and release it to send it down the track to the Miner.
Jump all three of your characters on to the three mine cars to break the tracks and fall down to the next area.
Character Zone - Adventurer's Pyramid
To access this area, you must have the Adventurer character in your party.
Exploring the Pyramid
Select the Adventurer character in your group and walk to the left to open the sliding stone door.
If you have the Hillbilly in your group, you can swim through the water passage to find another Cave Painting.
Use the Grapple ability to swing over the spike pit.
Stand over the floor button found between the Cave Tour sign and the pit to remove the spikes, allowing your other characters to safely cross.
Walk left until you reach the two cat statues at the entrance to the pyramid.
Don't go left yet. Instead, jump up and onto the wall to continue ascending the side of the pyramid.
Enter the secret room to find a Cave Painting.
Go back out, then walk up to the top and over the left side of the pyramid.
Follow the sign to the right, then use the Grapple ability again to swing over the large pit of spikes.
After speaking with the explorer, stand on the floor button to retract the spikes in the pit so the other two characters can cross safely again.
Walk to the right, past the wall painting of a woman with an ankh and three cats, and climb up the first ladder.
OPTIONAL: Stand all three characters in front of the wall painting between the two ladders depicting three men standing to earn the "Walk Like an Adventurer" achievement.
Climb down the ladder between the two paintings. Go down the left ladder, then cross the bridge and follow the sign right until you're stopped by a barrier.
Take the Ankh from the slab on the wall.
Return to the rest of your group at the wall painting of the three men, then climb up the right ladder.
Use Grapple to swing over the next spike pit, then place the Ankh inside the Ankh Recess to move the wall.
The Room of Animals
Go left and stand on the floor button in front of the rabbit picture.
This will remove the block from the area below a matching rabbit picture, allowing your other two characters to enter the room.
If they're still standing in front of the painting of the three men, the way to the next room is down the ladder between the two wall paintings, then to the right to the room with the treasure and golden cat statue.
The rabbit wall will reappear after the second character has dropped through the hole in the floor.
Switch back to the Adventurer and jump on to the ledge at the upper right.
On the wall in front of the next barrier, you will see pictures of two animals: a snake and a lion.
Switch to the two characters inside the rabbit room.
Stand one character on the floor button in front of the picture of the snake.
Stand the other on the button in front of the lion, which will lift the barrier that was blocking the adventurer.
Switch to the Adventurer character again.
Walk her to the right so that she is standing past the barrier.
Look at the next animal picture on the wall: a jackal. Note that the image is much bigger than the previous pictures.
Switch to the other two members of your group in the rabbit room.
Stand both players on top of the floor button in front of the matching jackal picture.
Switch back to the Adventurer character.
Use the Grapple ability to lift yourself up to the ledge.
Look at the wall beside the rows of spikes to find another large animal picture: a crane.
Switch to the two characters in the rabbit room again.
Stand both characters on the floor button in front of the matching picture of the crane.
Switch back to the Adventurer character.
Wait for the spikes to lower, then quickly run across them before they spring back up.
When you've made it safely to the other side, look down to the pit below to find another picture of a snake.
Switch to the two characters inside the rabbit room.
Stand both players on the button in front of the picture of a snake to raise a block that will cover the spikes.
Switch back to the Adventurer character.
Drop down on to the block, then continue left to the next pit.
If you step on the button in front of the image of a person below spikes, you'll activate the ceiling spikes inside the room where the other two group members are located.
Walk left to the next pit and take note of the lion picture on the wall.
Switch to the characters in the other room.
Stand both of the players onto the floor button in front of the lion to remove the spike trap.
Switch back to the Adventurer character.
Walk her left over the edge. If you drop far enough to the left, you can avoid the second ceiling spike button.
Note the wall pictures of the crane and the jackal.
Switch to the two characters in the other room.
Stand one person on the crane button and the other person on the jackal button.
Switch back to the Adventurer character.
Wait for the spikes to retract, then quickly run across them before they spring back up and use the Grapple ability to swing over the pit of floor spikes.
Continue right to the sarcophagus, making sure to jump over the ceiling spikes floor button at the left side of the sarcophagus.
Instead, stand on the right floor button in front of the pictures of the snake and the crane.
Switch to the two characters in the other room.
Move one person on to the button in front of the snake picture and the other on the button in front of the crane.
Stealing the Sarcophagus
Switch back to the Adventurer character. Grab hold of the sarcophagus and push it to the right over the ledge.
When it lands, drop down and push it to the left to place it on the elevator in front of the wall painting of a sarcophagus.
Ride down the elevator with the sarcophagus to the lower level.
Walk to the right, drop down, and stop at the first barrier.
Note the large picture of the jackal next to the wall.
Drop down again to stop at the second barrier.
Beside this wall is a picture of a lion.
Remember both of those images so you know which floor buttons to push in a minute.
Use the Grapple to pull yourself back up, then climb up the ledges to return to the sarcophagus.
Switch to the two characters in the other room.
Stand both players on top of the floor button in front of the jackal to remove the first obstacle.
Switch back to the Adventurer character.
Run down to the jackal picture, then continue left and drop down to find a Cave Painting.
Return to the sarcophagus. Stand on the floor button at its left side to send it moving down the elevator.
Quickly run down to the jackal picture again, move to the left, and stand on the second elevator button.
Hold the button down just long enough for the elevator to clear the second barrier, then run down to the lion picture.
Switch to the two characters in the other room.
Position both of the players on top of the lion button as fast as you can to remove the lion barrier before the sarcophagus gets too low.
Switch back to the Adventurer character.
Run to the left and stand on the third elevator button before the sarcophagus moves too low and resets.
Hold the button down until the sarcophagus finally reaches the bottom, then drop down on top of it.
Push the sarcophagus to the right (you may need to pull it out a bit to get to its left side).
When you encounter the Explorer, keep pushing the sarcophagus to knock him into the spikes.
You can use his body like a bridge (ick) and safely walk and push the sarcophagus over him.
Move the sarcophagus on top of the narrow stone bridge to make it collapse, dropping you down to a sand pit.
Escaping the Pyramid
Walk left to find a floor button that reveals a ladder behind one of the cat statues when held down.
Continue to left to the three floor buttons in front of another set of wall pictures.
Note the paintings on the wall between the group of buttons on the left and the ladder-activating button on the right.
The first painting at the left depicts a snake and a jackal sitting on either side of a feather.
Stand the Adventurer on the floor button in front of the image of the feather.
Switch to the two characters in the other room.
Move one person on top of the snake button and another on the jackal button.
Switch back to the Adventurer character. You'll see a fire has been lit in the brazier in front of the first picture.
Repeat the same process with the next picture.
The middle image has a lion and a crane with an ankh between them.
Move the Adventurer on to the floor button in front of the ankh.
Switch to the two characters in the other room.
Stand one player on the lion button and a second player on the crane button.
Switch back to the Adventurer character. You'll find the second brazier is now also lit.
Examine the last wall painting.
The picture shows a lion and a jackal sitting beside a pharaoh's crown.
Stand the Adventurer on the floor button in front of the picture of the pharaoh's crown.
Switch to the two characters in the other room.
One player should already be standing on the lion button from last time, so simply move the second on to the jackal button to complete the puzzle.
A large stone slab will fall from the floor at the center of the room, allowing the two characters to escape.
Use one of the characters from the button room to push the stone slab over the ledge to the left.
Use the Adventurer to pull the stone slab to the left and position it on top of the floor button beside the sand pit to hold the ladder open.
Climb the ladder and follow the Cave Tour sign to the right to find a blockade and a floor button.
Stand all three characters on top of the floor button to lift the barrier.
Walk right and jump up to the upper left ledge to find a Cave Painting.
Continue right to access the next area.
Character Zone - Twins' Estate
To access this area, you must have the Twins in your party.
Reaching the Attic
Jump up the wooden platform and climb the ledges up to the row of three gate switches.
Have each of the members in your group hold one of the switches to open the gate.
Use the Twins' Ghost ability to make their spirit form hold the lever, then quickly run through the open gate.
Drop down the ledges and on to the balcony to enter the house.
Walk right to find Daddy guarding the exit door.
Take the Umbrella hanging from the hook beside the portrait.
Move left and climb up the flight of stairs, then walk up all the way to the attic door at the top of the building.
Use the Umbrella on the Attic Hatch to open the door.
Climb up the ladder to enter the Attic.
Using the Dumbwaiter
Go left of the ladder to find a Cave Painting.
Go to the right wall at the other side of the attic.
Pull the cardboard box to the left to uncover the Fuse Box. Remove the Fuse from the box.
Climb down the ladder, head down one flight of stairs, then walk left to reach the elevator.
Insert the Fuse into the empty Fuse Box beside the elevator to give it power.
Head down the stairs to the second lowest floor of the mansion. Move left to enter the kitchen.
After speaking with Mummy, take the Hammer from the toolbox beside the elevator.
Return to the attic.
Use the Hammer on the Loose Floorboard to force it back down.
Grab hold of the cardboard box again, then push it to the left and out the hatch.
Push the box all the way down to the kitchen and position it in front of the elevator.
Pull and hold the Dumbwaiter Switch two times to send the cardboard box up to the third floor.
Have the Twins pull the lever to return the elevator to the first floor.
Follow the box and climb up to the twin's bedroom on the third floor.
Push the cardboard box out of the elevator and to the left wall.
Don't go out the window just yet. Instead, walk back to the kitchen again.
Pull the Dumbwaiter Switch, then quickly use your Ghost ability to keep the lever held while the Twins run on to the elevator platform.
Reaching the Cellar
The elevator will take them to their parents' bedroom on the second floor.
OPTIONAL: Jump on the bed in this room three times to break it and receive the "Such Bad Children" achievement.
Pick up the Empty Chamber Pot on the floor.
Open the Parents' Room Door and walk down to the dining room. Climb up the ladder between the dining room and kitchen to enter the bathroom.
Use the Empty Chamber Pot on the sink to fill it with water.
Go upstairs to the Twins' bedroom on the third floor.
Climb on top of the box to reach the ledge outside the open window.
Jump up the two ropes and on to the roof, then go right to find the Chimney.
Use the Chamber Pot on the Chimney to douse the flames in the fireplace.
Climb down the ladder in the Chimney to enter the study.
Pick up the Skeleton Key on the floor, then use it to open the Study Door.
Go down the short stairs on the left, then continue right to the living room entrance.
Use the Skeleton Key to open the Living Room Door, then enter the room.
Click the right Bookcase three times to knock it over, revealing another Cave Painting.
Walk down the stairs all the way to the bottom of the house to reach the cellar entrance.
Use the Skeleton Key to open the Cellar Door.
Poisoning the Soup
Go through the opened door to enter the cellar.
Pick up the bag of Dog Food on the floor.
Return to the kitchen up one flight of stairs, then walk left to the back door.
Put the Dog Food in the Empty Dog Bowl on the floor.
The Guard Dog will leave his post and run to eat the foot through the dog door.
Switch to control a different character in your group.
Drop down a few ledges, then jump over the gap to the right ledge to find a Pile of Bones in an open grave.
Take the Femur from one of the skeletons.
Continue to drop down to the bottom level, then walk right to find a Cave Painting.
Move further right, then drop down into the gap before the stairs. Walk right until you reach the red valve.
Turn the Steam Valve to shut off the steam blowing through the pipe in the basement.
Walk back up to the Guard Dog at the back door and wait there.
Switch back to the Twins.
Go downstairs to the basement and walk all the way to the left wall.
Pick up the box of Rat Poison on the ground.
Return to the kitchen and wait by Mummy at the stove.
Switch to the character standing outside the back door.
Show the Femur to the Guard Dog to make it bark.
Quickly switch back to the Twins.
While Mummy is distracted by the barking dog, put the Rat Poison into the Soup.
When she turns back around, Mummy will tell you that dinner is ready and instruct the Twins to go wash up.
Climb up the ladder to enter the bathroom.
Use the Sink to wash their hands.
Go downstairs to the basement to retrieve the Skeleton Key.
As you pass the dining room, you'll find the bodies of Mummy and Daddy.
Go up the stairs and head right to find the Front Door that was previously being guarded by Daddy.
Use the Skeleton Key to unlock the door and exit the building.
Depending on which characters are in your group, you must either walk to the three levers on the right side of the exit door, or return to the sewers and walk all the way to the left to the three levers beside that exit door.
In either case, have each member of your group pull and hold one of the levers to open the gate, allowing you to move on to the next area.
Posted by: Trinn |
January 27, 2013 11:03 PM
|
January 27, 2013 11:03 PM
The Cave Walkthrough
Chapters 3-5, Time Traveler, Scientist and Monk Zones
Character Zone - Time Traveler's Museum
To access this area, you must have the Time Traveler character in your party.
Powering the Time Machine
Walk right until you reach the stalactite and stalagmite barrier.
Use the Time Traveler's Phase ability to pass through the rocks.
Walk right past the time machine (note that it's missing a fuse in the fusebox below to power it), then climb up the ladder.
Go right to find another Cave Painting.
Move left to reach a second rock formation.
Use the Phase ability to pass through it.
Continue left, then climb on top of the rock to jump up to the wooden platform (if you have trouble reaching, you can pull the rock to the right).
Take the Fuse from the Fuse Box.
Phase back through the wall and climb down the ladder to return to the street. From there, walk right and climb down the second ladder, then go all the way left.
Insert the Fuse into the Empty Fuse Box to power the Time Machine.
Exploring the Museum
Go up the ladder and move left to return to the Time Machine.
Press the button twice to travel to the past.
Climb up the vine ladder, then walk all the way to the left wall.
Grab hold of the rock slab and pull it to the right to position it under the dripping brown water, cutting off the flow from the puddle to the area below.
Walk back to the Time Machine and use it to return to present day.
Because you altered the past, the rock formation that was blocking your teammates has disappeared.
Move the other to players to join the Time Traveler at the Time Machine.
Press the button to travel to the future.
Use the Phase ability to pass through the museum door that appears on the right side of the time machine.
Push the Museum Door Button to open the door for your teammates.
Walk right past the "Greatest Employee of All Time" and the Dynohypernator exhibit, then climb down the ladder.
From there, walk left past the Smurg exhibit, climb down the ladder, and walk all the way to the left wall to find a Cave Painting.
Go right, climb down the ladder, then continue right to reach the dinosaur exhibit.
Press the Dinosaur Exhibit button to spray your character with the dinosaur scent.
OPTIONAL: Move the entire team in front of the exhibit.
Press the Dinosaur Exhibit button to spray all three players with the dinosaur scent, earning you the "Smells Like Team Spirit" achievement.
Return to the Time Machine and use it to travel to the past.
Killing a Dinosaur
Walk all the way right and climb down the vine ladder. Move left and climb down the second ladder, then go all the way right to find another Cave Painting.
Go left, climb down the ladder, and move right.
Where the dinosaur exhibit was in the future, you'll find an actual living dinosaur in the past.
Don't approach it just yet, as the scent from the exhibit will attract the dinosaur.
Switch to a different player in your group.
Go to the Time Machine and use it to join the Time Traveler in the past.
Walk all the way to the ladder that leads to the dinosaur's room, but instead of going down, continue left to find Thog attempting to build a wheel.
Grab hold of the triangular stone slab beside Thog and push it to the right, then stop just before you reach the hole to the right of the vine ladder.
Switch back to controlling the Time Traveler.
Walk up to the dinosaur to attract it with your dinosaur exhibit scent.
Lure the dinosaur as far to the left as possible.
Quickly switch to the character holding the stone block from above.
Push the stone block over the edge to drop it on top of the dinosaur's head.
Getting Rid of the Competition
Walk right and go up the vine ladder, then continue all the way to the right to find a basin with a stone wheel at its center.
Pull the stone wheel to the left to move it away from the water dripping from the ceiling.
Switch back to the Time Traveler.
Go to the Time Machine and use it to travel to the present.
Walk all the way right to return to the basin, where you'll see the skeleton of your teammate holding the stone wheel and a well that has appeared from the deposit of ceiling water.
Click the crank at the side of the well to lift the bucket and hold it in place.
Switch to the third member of your team.
If they aren't still in the future, use the Time Machine to travel to that time period.
Walk to the basin area of the museum to find the Rangfust exhibit and the skeletons of your other two teammates by the broken well.
Pick up the Bucket on the pedestal under the portrait.
Go down to the dinosaur exhibit, which now has a large pool of oil on the floor from the corpse of the dinosaur in the past.
Use the Bucket to collect some oil from the puddle.
Return to the Dynohypernator exhibit.
Pour the contents from the Bucket of Oil into the Engine Oil Intake of the Combustion Engine to power the elevator.
Press the Elevator Button, then quickly stand on top of the elevator platform to be lifted up to the storage area.
Grab the tire wheel and pull it on to the elevator platform.
Push the Elevator Button to go back down with the tire.
Roll the tire into the Time Machine, then use the machine to travel to the past.
Push the tire to the right and over the edge to send it to Thog.
Walk down to the area where Thog was carving the wheels from stone.
Grab one of the stones slabs and push it down the same hole you used to kill the dinosaur to crush Thog.
Escaping the Museum
Go back to the Time Machine and use it to travel to the future.
Return to the Smurg exhibit.
Now that all of Thog's descendents are dead, there's no one around to activate the security laser.
Pick up the "Smurg" (aka the large key) on the pedestal.
Go back to the Time Machine and travel to the present.
Walk a little left to find the Locked Door.
Use the Smurg to open the door.
Move left further to reach the second Locked Door. Open it with the Smurg again.
Climb down the ladder and go left through the sewers until you reach the three Gate Switches.
Have the three members of your group pull and hold each Gate Switch to open the gate.
Walk left and open the third and final Locked Door with the Smurg.
Drop down to access the next area.
Chapter 3 - The Abandoned Zoo
Hunting the Crystal Monster
Drop down the series of ledges to reach the ladders. Climb down and continue down the lower left path to find the gates to the Zoo.
Walk to the left of the gate. Surprise! The crystal monster from the first chapter returns and swallows one of your party members.
Move left until you see the electrific eel pool.
Swim through the pool to find a Cave Painting on the other side.
Swim back out, drop down a few more ledges, then walk right to find the food court. Go past the abandoned builing playing some cheesy music to find the Monster Hunter.
Be careful not to approach her too closely, or she'll shoot you to guard the Hot Dog Machine.
You can also overhear her saying that she won't move until she hears the monster nearby.
Pick up the Batteryless Tape Recorder she throws on to the ground.
Continue to move downwards, climb down the ladder and walk right to find another Cave Painting.
Go left past the crumbling bridge to encounter the Crystal Cave Monster.
Approach the monster's mouth and she'll fling you behind her back, reuniting you with the lost member of your group.
Finding a Working Battery
Climb up the ladder and ascend to the top to find a large crate.
If the Adventurer is in your group, you can skip this part with the following shortcut:
Go up to platform at the middle of the ladder and stand on the left side.
Use the Grapple ability to swing yourself from the hook to the top of the tall stone block.
If you do not have the Adventurer character, follow the steps normally:
Push the crate over the right ledge two times to drop it down to the bottom floor.
Note that when you push the crate over the second ledge, it falls on the Crystal Cave Monster and causes it to roar angrily.
Go down the ladder and pull the crate to the tall stone block all the way to the left.
Climb on top of the crate and jump to the top of the stone block.
Move up the ledge and hold onto the Lever. Keeping it held raises the elevator and opens the doors to the passage below.
Select a different member of your group and walk them all the way to the Lever.
Continue left and jump up to the right ledge to discover a Cave Painting.
Go back down and walk left, then drop into the pit to find the three dead cave explorers.
Click the robot and take the Dead Battery from its chest.
Return to the elevator area and drop down the opened passage.
You'll find a second lever here than opens the gate on the right when held.
If the Scientist character is in your group, you can use her to hack the Door Control Console to the left of the gate.
Alternately, if you have the Time Traveler in your group, she can simply phase through the bars of the gate.
If the Twins are in your group, you can use them to hold the lever, then activate the Ghost ability to keep the lever held for a short time while the Twins run through the opened gate.
Walk to the left wall to find another Cave Painting.
Return to the Lever on the right and hold it open.
Select the third member of your group and walk them all the way to the second Lever by the Door Control Console.
Move through the opened gate and drop down, then walk to the right and climb up the ladder, placing you back at the crumbling bridge.
Go all the way back to the electrific eel pool you passed while heading left from the Zoo entrance.
Jump into the pool and touch one of the electric eels.
The shock from the eel will charge the Dead Battery, making it into a usable Battery.
Making the Tape Recording
Walk back to the Crystal Cave Monster to rejoin your group.
Have whoever is holding the Batteryless Tape Recorder drop it on to the ground.
Interact with it while holding the charged Battery to combine the items, completing the powered Tape Recorder.
Run to the front of the Crystal Cave Monster and drop the Tape Recorder as close to its head as possible. Move your cursor over the Tape Recorder to make sure it says "(Recording)".
OPTIONAL: Run back to the abandoned building playing the cheesy music over the intercom.
Drop the Tape Recorder in front of the building to record the music.
After a few seconds, pick the Tape Recorder back.
Walk to the front of the Crystal Cave Monster and drop the Tape Recorder to play back the recorded music and earn the "To Soothe a Savage Beast" achievement.
Now that you're prepared to record the sound of monster, you need to make it roar.
Switch to whichever character is holding the elevator Lever and release it to lower the elevator, but keep them standing ready by it.
Switch to a different character and use them to push the crate to the right to position it on top of the elevator.
Return to the person waiting by the Lever and have them hold it to raise the elevator again, lifting the crate up to the platform at the middle of the ladder.
Push the crate over the right edge to drop it down on to the monster's back, causing her to roar into the recorder.
Walk back to the front of the Crystal Cave Monster and pick up the Tape Recorder on the ground.
Escape!
Return to the Monster Hunter by the vending machine at the food court.
Drop the Tape Recorder nearby to play the recording of the monster's roar.
After the Monster Hunter runs off to chase the monster, use the vending machine and then pick up the Hot Dog it dispenses on to the floor.
Walk back to the front of the Crystal Cave Monster.
When you get close enough while holding the Hot Dog, she will start follow the trail of the scent.
Be careful not to run too fast and lose her or to let her get too near, or she will eat you and the Hot Dog. If that happens, you can go back to the vending machine to pick up another one.
Lure her right to the crumbling bridge, which will collapse under her weight.
Follow the monster and drop down into the pool of water below to access the next area.
Character Zone - Scientist's Lab
To access this area, you must have the Scientist character in your party.
Starting the Missile Launch
Use the Scientist's Hack ability on the Door Control Console to open the gate.
Walk right until you reach the dead end.
Use the Hack ability on the Grog Machine to reveal the secret elevator that will carry you down into the lab.
Go left to the stairs, then hop up on the ledge to find a Cave Painting.
Move left and cross the pool of water.
Remove the Fuse from the Fuse Box beside the large, metal door.
Swim back across the water and climb up the ladder.
Place the Fuse inside the Empty Fuse Box beside the top of the ladder to power the elevator.
Push the Elevator Call Button, the quickly move on to the elevator platform to be lifted to the control room.
Move right and climb up the ladder to the raised platform.
Use the Hack ability on the Lower Blast Door Console to open the lower blast door.
Note that the gate in the room has stayed locked.
If the Time Traveler is in your group, you can use her Phase ability to move through the gate.
Select a different character to control on the team.
Go out the door on the left, then press the Elevator Call Button and stand on the elevator platform to move back down to the lower level.
The nuclear launch procedure will begin automatically.
Attaining the First Key
Switch back to controlling the Scientist.
Go through the opened gate on the right to reach the laser room.
When you enter the room, don't step past the metal section of the floor just beside the doorway.
The man on the other side of the room will activate the laser.
Wait for it to move as far left as it can go, then immediately run to the left Door Control Console and Hack it right away.
The laser will change directions and disintegrate the other scientist.
Pick up the Launch Key that falls to the ground in front of the Elevator Console.
Run back to the control room and insert the Launch Key into one of the three Keyholes.
Attaining the Second Key
Return to the laser room.
Use the Hack ability on the Elevator Console to activate the Elevator Call Button.
Continue right into the next room.
Inspect the Administrator's Terminal at the center of the room.
Note the numeric codes and their corresponding days of the week written on the sticky notes around the desk.
These numbers are randomized and will change each play-through.
Go back to the laser room and stand on the elevator platform.
Press the Elevator Call button to travel down to Level 1.
Climb down the ladder to move past Level 2 and reach Level 3.
Walk left to the Wet Floor Sign, then jump towards it (to avoid falling as you walk by) and pick it up from the ground.
OPTIONAL: Place the Wet Floor Sign at the edge of the platform.
Walk past the sign to slip over the side, earning you the "Hazardous Work Environment" achievement.
Climb down the ladder to find another Cave Painting.
Go right to enter the cafeteria, noting the food under "Today's Special" written on the chalk board.
Climb back up the first ladder, then move right and climb up the second ladder to return to Level 1.
Follow the left sign up the ladder and into the warhead room (note the caution sign at the top of the ladder as you enter).
Place the Wet Floor Sign on the ground beside the scientist at the left side of the room.
Use the Hack ability on the Warhead Loading Console at the left side of the room.
The other scientist will try to stop you, but will slip when he passes the Wet Floor Sign.
Follow him as he continues to slide out the door and over the ledge. Pick up the second Launch Key he drops to the groud.
Return to the control room and insert the Launch Key into the second Keyhole.
Attaining the Third Key
Ride the elevator back to Level 1, then climb down the ladder to Level 2. Follow the right sign into the break room.
Inspect the Bulletin Board on the wall.
Read the Launch Menu; find the day of the week that matches "Today's Special" seen on the chalk board in the cafeteria.
Combine that information with the numbers you saw on the sticky notes at the Administrator's Terminal earlier to find the correct 4-digit combination.
For example, the menu item next to Tuesday is "Beef Stew". When you go to the cafeteria, the item on the chalk board under "Today's Special" will also be Beef Stew.
At the Administrator's terminal, the code on the Tuesday sticky note is "9801", thus the 4-digit combination for the day is 9801.
Go back to the ladder and climb down to Level 3. Follow the right sign down the stairs and into the code room.
Walk down the flight of stairs to find a Cave Painting.
Hop on to the platform and press the buttons to enter the code found earlier (like 9801 for Tuesday from the example).
Press the Confirm Code Entry button beside the gate on the right to submit your solution and open the gate.
If the Time Traveler is in your group, you can also use her Phase ability to pass through the gate.
Or, if the Monk is in your group, use Telekinesis to pull the Knockout Gas to him through the gate.
Move into the unlocked room to the right and pick up the Knockout Gas from its pedestal.
Go back to the ladder and climb up to Level 2.
Walk right past the break room to enter the locker room and wait there.
Switch to control a different character in your group.
Take the elevator up to the laser room. From there, climb up the ladder and continue right to reach the HVAC controls.
Press the HVAC Control Switch to reverse the flow of air inside the vents.
Switch back to the character waiting in the locker room.
Drop the Knockout Gas to the ground.
The gas will get sucked into the vents and travel to Level 1, where it will knock out the armed guard and drop his key to the ground.
Go back to the ladder and climb up to Level 1.
Walk up the right stairs to find the passed out guard, then take his Launch Key from the floor.
Return to the control room and insert the Launch Key into the third Keyhole.
Launching the Missile
Take the elevator down to Level 1 and then climb down the ladder to go down to Level 3.
Continue left and down the stairs to return to the cafeteria.
Search through Fruit Bowl on top of the right table until you find a bunch of Bananas.
Go back to the passed out guard on Level 1 and continue right to reach the chimp's room.
Feed the Bananas to the Chimp to make him follow you.
Walk to the ladder and climb down to Level 2.
Go down the left stairs into the pod room.
The Chimp will follow you inside and hop into the pod, completing the last step needed to prepare the missile launch.
Return to the control room. Use each character to turn and hold the three Launch Keys inside the Keyholes.
After the launch, exit the room through the left door and step on the elevator.
Press the Elevator Call Button to ride it down to the lower level.
Climb down the ladder, then head left and drop down the waterfall to reach the next area.
Character Zone - Monk's Temple
To access this area, you must have the Monk character in your party.
Finding the Master
Go left and climb up the ledges to the rock wall.
Use the Monk's Telekinesis ability to pull out the Support Beam and collapse the wall.
Continue to climb upwards to reach the temple at the top.
Walk left to the edge of the road.
Use the Telekinesis ability to ring the Wind Chimes above the Master's head.
After speaking with him, use Telekinesis again to retrieve the feather he releases into the air.
The First Trial
Climb all the way back down the mountain.
Stand on the red bridge beside the Old Sign near the entrance.
Switch to the other two members of your group and stand them on the bridge as well.
Switch back to control the Monk, then jump on the bridge to make it collapse with the added weight of the feather.
The Second Trial
Go all the way left and climb up the ladder.
Use Telekinesis to pull the Lotus Blossoms from inside the cave to the Monk.
Your challenge is to reach the left end of the hallway with the Lotus Blossoms without letting them disappear.
Walk slowly (don't run) to keep from dropping the blossoms.
When you see the chimes hanging from the ceiling start to sway, turn your back to the left and stop moving to block the wind. If you continue walking or facing the wind, the blossoms will blow away.
Continue the process of walking, stopping, and turning until you reach the end of the hall.
Use Telekinesis to shut the window, which will stop the wind from flowing through the chamber.
Place the Lotus Blossoms on to the Blossom Pedestal to complete the challenge.
The Third Trial
Go up the ladder to enter the next room.
Read the Old Sign to find your clue to the next challenge.
If you need help solving this puzzle, you can visit the site on the sign (http://monkpuzzle.com/).
Note the monkey statue with golden arms that work like a scale holding 6 Gallons of water in one hand.
To the right, you'll find a Drainage Gate, two Jugs, and a Pool of Water.
The small Jug can contain up to 4 gallons of water and the large Jug can contain up to 7 gallons.
Follow these steps to solve the puzzle:
Pick up the Empty 7 Gallon Jug and fill it at the Pool of Water.
Pour the water from the 7 Gallon Jug into the 4 Gallon Jug.
Because the 4 Gallon Jug is too small, you will have 3 remaining gallons of water inside the 7 Gallon Jug.
Set the 7 Gallon Jug down on the floor and pick up the 4 Gallon Jug.
Empty the 4 Gallons of Water down the Drainage Gate.
Set the 4 Gallon Jug down on the floor and pick up the 7 Gallon Jug.
Pour the three gallons of water inside the 7 Gallon Jug into the 4 Gallon Jug.
Now the 4 Gallon Jug should currently contain 3 gallons of water while the 7 Gallon Jug should be completely empty.
Fill the 7 Gallon Jug at the Pool of Water again.
Pour the water from the 7 Gallon Jug into the 4 Gallon Jug.
Since the 4 Gallon Jug is already holding 3 gallons of water, it will only fill with 1 more gallon, leaving 6 gallons of water remaining inside the 7 Gallon Jug.
Place the 7 Gallon Jug containing 6 gallons of water on to the Scale (the monkey statue's free hand) to complete the challenge.
Step on to the elevator to reach the next room.
The Fourth Trial
Examine the Cave Painting on the wall to the left of the elevator.
Read the Old Sign to the right of the elevator.
Move to the right side of the room and stand on one of the carpets.
Switch to the other two members of the team.
Have one of the characters fetch the Feather from the broken bridge of the first challenge.
Walk them both up to the room where the monk is waiting and stand each of them on one of the carpets as well.
When all the players are in position, the carpets will start to float to the ceiling.
Ignore the Objects of Desire as you rise to the top. If you pick one up, the carpets will disappear at the end and drop the group to their deaths.
Move all three players to the right carpet.
As the carpets lift, look for a gap in the right wall. When you see it, quickly move all three characters off their carpets and on to the ledge.
Climb up the rope and walk on to the bridge to find a Cave Painting.
Stand the whole group on the bridge to break it, dropping everyone down to the Pool of Water at the third challenge.
You will also receive the "Embrace Impermanence" achievement for having broken both bridges.
Return to the carpets and use them to float to the ceiling.
Climb the rope above the middle carpet, then climb up the ladder to enter the next room.
The Final Challenge
Read the Old Sign at the right side of the room.
Interact with the Meditation Statue to begin meditating.
Note the large Support Bolt on the left side of the building that becomes visible as the camera starts to pan out.
Use the Telekinesis ability five times to remove the Support Bolt.
Walk to the right side of the room.
Use Telekinesis again to pull out the Support Beam in the room on the other side of the wall, which will clear the path and drop a stone block into the room below.
Climb down the ladder and jump across the rope.
Push the square stone block to the right wall.
Hop on top of the block to reach the rope, then climb up to find a Cave Painting.
Exit out the right, then climb up the ledges to return to the top of the temple.
Walk left towards edge of the roof to reach the Master.
Use Telekinesis to ring the Wind Chimes. Without the support of the platform, he will fall to his death, granting you his power.
Climb back down the side of the mountain to return to the entrance.
Swim across the pool of water and stand on the button between the Old Sign and the Master's Gate.
Use Telekinesis to open the gate.
Continue right to access the next area.
Chapter 4 - The Island
Exploring the Island
Climb out of the right side of the pool and continue right to find a Cave Painting just past the Master's Gate.
Move right to the shore of the water.
Sit two of the characters of your group inside the boat.
Use the third player to push the boat into the water, then jump inside the boat to cross the shark-infested waters and arrive at the island.
After you speak to the old Hermit, climb up the ladder and walk right to find a Straight Pipe on the ground.
Continue right to the watermill.
Along the way, note the Pirate Flag lever at the top of the rock.
Climb up the ladder on the left side of the structure, then move right to talk to the Hermit again.
Push the blue crate beside the hermit over the side of the platform and into the pit below.
Go up the ladder to find another Cave Painting on the upper platform.
Drop down to the pit and pull the blue crate to the right wall.
Stand on top of the crate to jump up to the ledge, then continue walking to the right.
Note the second Pirate Flag lever beside the sign.
Go down the ladder and walk right to find the second shore.
Repairing the Pipes
Move the blue crate in front of the sign to the left to uncover the Box of Crackers and a Can of Corn.
Keep pushing the blue crate all the way left to the rock wall.
Hop on the crate to reach the ledge.
Insert the Straight Pipe into the vertical Pipe Socket at the middle of the bamboo pipe above the ledge.
Return to the Hermit's house.
Climb the upper right platform above where the Hermit is sitting.
Pick up the Cross Pipe on top of the platform.
Go back down to the ledge where you placed the first pipe into the socket.
Walk left past the deflated balloon, jump on to the wooden platform, climb the rope, and then walk right to reach the second Pipe Socket.
Insert the Cross Pipe into the socket to repair the gap.
Go up the right ladder to find another Cave Painting.
Pick up the L Shaped Pipe on the ground beside the right wall.
Go back to the rope and continue left.
Certain characters can find a Cave Painting above the rock on the left side of the ladder.
Drop down and walk left to discover the third pipe socket.
Place the L Shaped Pipe into its matching socket.
Opening the Pirate Gate
Move right and climb down the ladder.
Walk left to the Cave Tour sign, then turn the Water Valve to fill the pool of water.
Continue left to return to the boat on the shore.
Push the boat to the right and into the pool of water, then jump inside to ride the boat to the other side.
Hop out and pull the boat to the right and into the second pool of water behind the large metal door.
Jump into the boat and then drop over the metal door. From there, head right to the ladder and climb down.
If the Adventurer is in your group, go right to the pool of lava.
Use the Grapple ability to swing on the hook to the island at the middle of the lava, where you'll discover a Cave Painting.
Walk all the way left until you reach a pirate gate blocking three gunpowder kegs.
Beside the gate you'll find the third Pirate Flag lever.
Switch to a different character in your group.
Walk to the first Pirate Flag lever you found on top of the rock, then pull and hold the lever.
Switch to the third member of the group.
Move them to the second Pirate Flag lever you passed beside the Cave Tour sign, then have them hold that lever as well.
Switch back to the first person waiting at the pirate gate.
Use them to pull the third and final Pirate Flag lever to open the gate.
Detonating the Gun Powder Kegs
Push the first gunpowder keg to the left to uncover the Femur on the ground.
OPTIONAL: Pick up the Can of Corn at the right shore of the island.
Walk down to the pirate gate area by the gunpowder kegs.
Place the Can of Corn on the grate under the boulders in the ceiling.
When you complete the following steps to explode the gunpowder kegs, the blast will also destroy the Can of Corn, earning you the second half of the "Creamed Corn" achievement.
Grab the nearest gunpowder keg again and pull it to the right until you reach a pile of four small stones on the ground (between the grate on the left and the ladder on the right).
Leave the barrel there and return to the other kegs.
Pull a second gunpowder keg until it's half way between the first barrel and the grate in the floor.
Note the loose boulders in the ceiling directly above the grate.
Go back to the third and final keg and push it directly on top of the grate under the boulders.
Push the farthest right gunpowder keg further to the right until you reach the pool of lava.
The heat from the lava will light the fuse on the keg.
Quickly push the powder keg to the left, then release it at the top of the slope to roll it down the hill.
The keg will stop rolling at the four stones and then detonate.
If you positioned the kegs correctly, the blast will set off a chain reaction and explode the other nearby barrels, caving in the boulders in the ceiling.
Escaping the Island Without The 4th Wheel
Return to the boat behind the metal wall. After the explosion, the pool of water will have drained from the floor.
If the Adventurer is on your team, you can use the shortcut to quickly get to the boat. Walk to the right side of the metal barricade and use the Grapple ability to swing yourself up the wall and across the pit.
Pull the Lever at the lower left corner of the pit to raise the barricade.
Push the boat right all the way to the platform under the deflated balloon.
Hop up to the ledge to the right, then use the Water Valve to the right of the balloon.
The steam from the water will inflate the balloon and lift it to the surface.
Walk back outside and go to the balloon, which can now be found just to the right of the second Pirate Flag lever.
Push the boat down the hill to the right shore of the island.
The old Hermit will jump right into the boat as soon as it hits the water, so you'll have to find a way to get rid of him.
Pick up the Box of Crackers on the shore.
Find the Hermit's pet parrot sitting on the rocks to the left of the first Pirate Flag lever.
Show the Box of Crackers to the parrot to lure him on to your character's shoulder.
Walk to the top of the Hermit's house to find his dog Spanky.
Select the character in your group that is holding the Femur bone.
Move them to the Hermit's house as well to join the character with the parrot.
Show the Femur to Spanky the dog to make him bark.
The parrot will hear the barking and start to immitate the sound.
Switch back to the character with the parrot.
Drop down over the right ledge of the building (do not go over the left side, because the parrot will abandon you if you swim through the water), then go to the right shore of the island.
When the Hermit hears the barking parrot, he'll jump out of the boat and run back to his house.
Move all three characters of your group into the boat to travel to the next area.
Chapter 5 - Return to The Cave Souvenirs
Finding Another 3 Trinkets
Select one of the characters in your group to approach the Gift Shop Clerk.
If one team member still has the Post Card stolen from the first chapter, now's the time to place it back on the Postcard Display rack to earn the "Remorse" achievement.
Pick up the Novelty-Sized Key he leaves on the floor for you again.
Walk left to the "Employees Only" Door.
Use the Novelty-Sized Key to open the lock.
Head down the ledges and the rope, then walk left. You'll pass a few old obstacles from the beginning of the game that have all been packed away and arrive at the waterfall, which is now (very dangerous) molten lava.
Carefully drop onto the stone island, then drop down again to the wooden platform.
Walk right past the ladder and then jump on to the ledge with the mine car track to find the Miner.
Pick up the Golden Nugget at his feet.
Switch to a different character in your group to search for the second trinket.
Continue right, then drop down the series of wooden platforms.
Swim through the water passage to find the sleeping monster hunter.
Pick up the Monster Trophy on the ground beside the rug.
Switch to the third member of the team to search for the third trinket.
Move right past the wooden ledges and floor buttons.
Climb up the ladder to find the Hermit's small island.
Pick up his dog Spanky.
Returning to the Gift Shop & Making a Difficult Choice
Go down the ladder, then continue right to the elevator.
Push the Elevator Call Button to move the elevator down.
Switch to the other two group members and move them on top of the elevator platform.
Switch back to the character standing at the button.
Push the Elevator Call Button again, then quickly stand on the platform before it lifts to carry all three group members up.
Climb back up to return to the gift shop.
Give the trinket your character is holding in exchange for one of his items.
At this point, you have a choice between receiving the good ending or the bad ending for your character.
If you decide to exit through the door and up the ladder with the Gift Shop Clerk's item in hand, your character will earn the bad ending.
When all 7 characters have played through the game and taken the option for the bad ending, you will receive the "Corruption" achievement.
The other choice is to give the item back to the Gift Shop Clerk. Speak to him a few times to return your character's object.
Continue through the exit door and climb the ladder empty-handed to earn the good ending to your character's story.
If all 7 characters play through the game and take the good ending option, you will receive the "Redemption" achievement.
Posted by: Trinn |
January 28, 2013 2:38 PM
|
January 28, 2013 2:38 PM